You can write code directly in the UI, but to contribute a full integration, you need a full development environment external to Cortex XSIAM. An external development environment enables linting your code, running unit tests with pytest, creating documentation, submitting your changes via git and more. There are three options for your external development environment, a traditional local environment described below, a [GitHub Codespace environment](set-up-a-github-codespace-environment), or a [containerized environment](set-up-a-containerized-development-environment).
Setting up the local development environment involves the following steps:
### Verify prerequisites
**Cortex XSIAM**
* An active Cortex XSIAM tenant.
* Review [Contribution requirements](../../contributing-content/contribution-requirements).
**GitHub**
Go to [GitHub](https://github.com/) and sign in or sign up for an account.
**Docker**
Make sure Docker is installed on your system and is working correctly by running the `hello-world` container:
```programlisting
sb@dddd:~/demisto$ docker run --rm hello-world
Hello from Docker!
This message shows that your installation appears to be working correctly.
[... output omitted for brevity ...]
For more examples and ideas, visit:
https://docs.docker.com/get-started/
sb@dddd:~/demisto$
```
### Note
If you are using Windows with WSL2, you can still use Docker Desktop from WSL. See [here](https://docs.docker.com/desktop/windows/wsl/#enabling-docker-support-in-wsl-2-distros) for details.
### Fork the GitHub repo
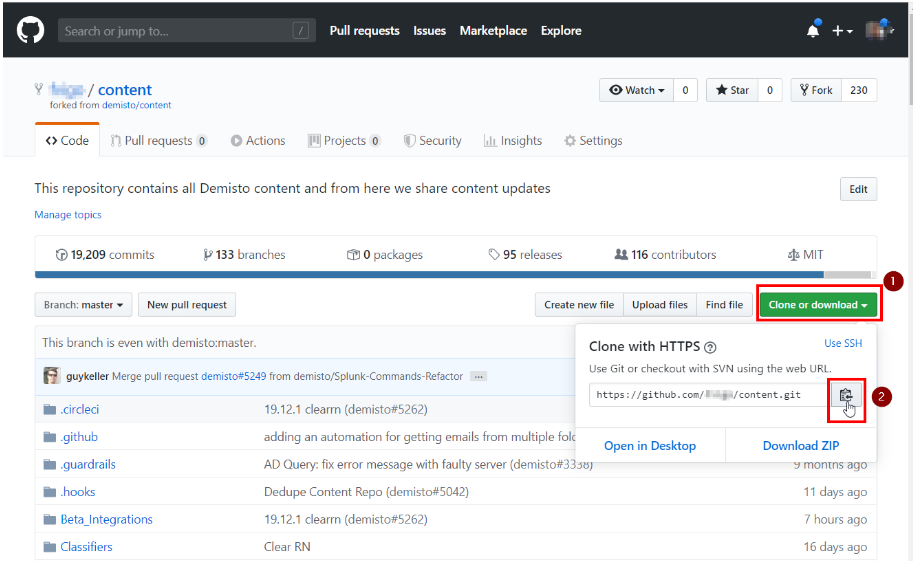
1. Log in to GitHub, navigate to the [Content Repo](https://github.com/demisto/content), and click **Fork**.
2. Once the fork is complete, copy the URL.
This is the fork where you will commit your code and, once ready, create the Pull Request to submit your contribution back to the Cortex XSIAM content repository. Do not work on the master or main branch.
### Clone the GitHub fork locally
In the shell, create a folder (for example, `~/demisto`) and clone your fork of the content repository using `git clone [your_fork_url]`, where `[your_fork_url]` is the URL you copied from GitHub after forking.
```programlisting
sb@dddd:~$ mkdir demisto
sb@dddd:~$ cd demisto
sb@dddd:~/demisto$ git clone https://github.com/[omitted]/content.git
Cloning into 'content'...
remote: Enumerating objects: 108, done.
remote: Counting objects: 100% (108/108), done.
remote: Compressing objects: 100% (90/90), done.
remote: Total 101143 (delta 50), reused 53 (delta 18), pack-reused 101035
Receiving objects: 100% (101143/101143), 110.65 MiB | 11.04 MiB/s, done.
Resolving deltas: 100% (73634/73634), done.
Checking out files: 100% (4522/4522), done.
sb@dddd:~/demisto$
```
### Note
You must clone your fork of the repository, as you will need to be able to write into it. Do not clone `demisto/content`, because you won't be able to push commits.
### Set up environments
**Set up a remote environment**
Follow these steps to set up a fully configured remote environment with [VS Code Dev Containers](https://code.visualstudio.com/docs/remote/containers).
[Verify prerequisites](#UUID-adcab40a-d158-ba42-45f7-47cacfc2ba8e_sidebar-idm4537295782584033705520288836_body)
**VS Code**
1. Download and install [VS Code](https://code.visualstudio.com/download).
2. Install the [Remote Development pack](https://marketplace.visualstudio.com/items?itemName=ms-vscode-remote.vscode-remote-extensionpack).
If you are not familiar with VS Code, follow the [VS Code getting started guide](https://code.visualstudio.com/docs/introvideos/basics).
**Docker**
Follow the instructions [here](https://code.visualstudio.com/docs/remote/containers#_installation) to install Docker to your operating system.
* Windows: Docker Desktop 2.0+ on Windows 10 Pro/Enterprise. Windows 10 Home (2004+) requires Docker Desktop 2.3+ and the WSL 2 back-end.
* macOS: Docker Desktop 2.0+.
* Linux: Docker CE/EE 18.06+ and Docker Compose 1.21+
[Install and enable WSL and Docker](#UUID-adcab40a-d158-ba42-45f7-47cacfc2ba8e_sidebar-idm459948514806083370553794898_body)
For Windows users, we recommend using Windows Subsystem for Linux (WSL) for better performance.
1. [Install WSL](https://code.visualstudio.com/docs/remote/wsl#_installation).
2. [Open WSL in VS Code](https://code.visualstudio.com/docs/remote/wsl#_open-a-remote-folder-or-workspace).
3. [Enable Docker support](https://docs.docker.com/desktop/windows/wsl/#enabling-docker-support-in-wsl-2-distros).
4. Verify `WSL 2` is installed by running:
```programlisting
wsl --list --verbose
```
Verify the installed distribution is running `WSL 2`.
To change versions, use the command:
```programlisting
wsl --set-version <distro name> 2
```
Replace `<distro name>` with the name of the Linux distribution that you want to update. For example, `wsl --set-version Ubuntu 2` sets your Ubuntu distribution to use WSL 2.
[Clone the repository](#UUID-adcab40a-d158-ba42-45f7-47cacfc2ba8e_sidebar-idm4599485048476833705555656998_body)
You can clone the terminal and work directly with VS Code. To work with Github in VS Code, follow the instructions [here](https://code.visualstudio.com/docs/editor/github#_setting-up-a-repository).
**Open the repository in VS Code**
If you already cloned the repository with VS Code, go directly to open the dev container.
1. In VS Code, go to File+Open Folder.
2. Select your GitHub repository.
**Open the Dev Container**
1. Click the green button.
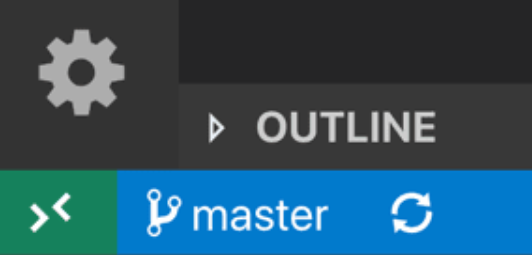
2. Click **Reopen in Container**.
3. It may take a few minutes until the Dev container is ready.
[Troubleshooting](#UUID-adcab40a-d158-ba42-45f7-47cacfc2ba8e_sidebar-idm4599485082288033705613517024_body)
**Docker performance issues**
* For Windows, use WSL2.
* Update Docker.
* Disable **Autosave** in VS Code.
Since Docker is not native for Mac or Windows, there may be performance issues.
**Errors opening the dev container**
* Update Docker.
* Clean up Docker.
```programlisting
docker system prune -a --volumes
```
**Set up a local environment**
[Verify your operating system folder structure](#UUID-adcab40a-d158-ba42-45f7-47cacfc2ba8e_sidebar-idm4537295810073633705618903706_body)
If you are using Windows with WSL and your code resides in a shared folder on the Windows tree (`/mnt/c/code/demisto`), verify the folder is set to be case sensitive.
[Install pyenv and Python](#UUID-adcab40a-d158-ba42-45f7-47cacfc2ba8e_sidebar-idm4537295705024033705628562216_body)
You need Python 3 installed on your system. We recommend using `pyenv`.
1. Verfiy `pyenv` in installed and the `eval "$(pyenv init -)"` expression is placed in your shell configuration (`~/.bashrc` or `~/.zshrc`).
```programlisting
sb@dddd:~/demisto$ eval "$(pyenv init -)"
sb@dddd:~/demisto$ pyenv -v
pyenv 1.2.15
sb@dddd:~/demisto$~/demisto$
```
See more more details about [pyenv installation](https://github.com/pyenv/pyenv#installation). Either Homebrew for MacOS or the automatic installer on Linux/WSL work.
2. If the required version of Python is missing, you need to install it. Because `pyenv` compiles CPython, you may need some libraries. See more [troubleshooting info](https://github.com/pyenv/pyenv/wiki/Common-build-problems).
For example, install Python 3.10.5.
```programlisting
sb@dddd:~/demisto$ pyenv install 3.10.5
Downloading Python-3.10.5.tar.xz...
-> https://www.python.org/ftp/python/3.10.5/Python-3.10.5.tar.xz
Installing Python-3.10.5...
Installed Python-3.10.5 to /home/sb/.pyenv/versions/3.10.5
sb@dddd:~/demisto$ pyenv versions
3.10.5
sb@dddd:~/demisto$
```
[Install Poetry](#UUID-adcab40a-d158-ba42-45f7-47cacfc2ba8e_sidebar-idm4537295548057633705667009286_body)
1. Install [Poetry](https://python-poetry.org/docs/master/#installing-with-the-official-installer).
2. Once you set up your development environment, you can activate Poetry with the `poetry shell` command. Include `(.venv)` in front of the prompt. Note that the shell command is available in a [plugin](https://github.com/python-poetry/poetry-plugin-shell).
```programlisting
sb@dddd:~/demisto/content$ poetry shell
(.venv) sb@dddd:~/demisto/content$
```
<div data-gb-custom-block data-tag="hint" data-style="info" class="hint hint-info"><h3>Note</h3><p>You can leave the Poetry virtual environment using the deactivate command:</p><pre class="language-programlisting"><code class="lang-programlisting">(.venv) sb@dddd:~/demisto/content$ deactivate
sb@dddd:~/demisto/content$
</code></pre></div>
[Install the nvm package manager](#UUID-adcab40a-d158-ba42-45f7-47cacfc2ba8e_sidebar-idm453729577914083370600682798_body)
1. Install the [nvm package manager](https://github.com/nvm-sh/nvm#install--update-script).
2. Run `nvm install node`.
[Install pipx](#UUID-adcab40a-d158-ba42-45f7-47cacfc2ba8e_sidebar-idm4529629328745633706979128221_body)
Pipx is a package that enables you to install and run the Python application globally in an isolated Python environment.
To install Pipx, run the following commands:
```programlisting
pip install --user pipx
pipx ensurepath
```
[Install demisto-sdk](#UUID-adcab40a-d158-ba42-45f7-47cacfc2ba8e_sidebar-idm453201341136163370699405424_body)
[Demisto SDK](https://app.gitbook.com/s/nozw5MT5S8KZD2eF8roV/README) is a tool that assists in the contribution process. It helps you to generate a [content pack](../../contributing-content/content-pack-structure), maintain your files, and validate them before committing to the branch. Install Demisto SDK using the pipx command **`pipx install demisto-sdk --force`**. To verify you have the latest version of the SDK, run: **`demisto-sdk --version`**.
[Run the bootstrap script](#UUID-adcab40a-d158-ba42-45f7-47cacfc2ba8e_sidebar-idm4537295805640033706010642319_body)
Before running the bootstrap script that creates the virtual environment, set up `pyenv` to work correctly in the content folder you just cloned.
Initially, no local python interpreter has been set via `pyenv`.
```programlisting
sb@dddd:~/demisto$ cd content
sb@dddd:~/demisto/content$ pyenv local
pyenv: no local version configured for this directory
```
1. Set `pyenv` to use the latest version Python 3 you previously installed and verify that everything is set correctly.
```programlisting
sb@dddd:~/demisto/content$ pyenv local 3.10.5
sb@dddd:~/demisto/content$ pyenv local
3.10.5
sb@dddd:~/demisto/content$ which python3
/home/sb/.pyenv/shims/python3
sb@dddd:~/demisto/content$ python3 -V
Ptyhon 3.10.5
```
2. Run the bootstrap script.
The bootstrap script sets up a pre-commit hook that validates your modified files before committing. It also sets up a Python virtual environment for development with the package requirements for Python3.
<div data-gb-custom-block data-tag="hint" data-style="info" class="hint hint-info"><h3>Note</h3><p>If you are using WSL and you see errors about "python.exe" getting called, disable it in the App Execution Alias (see <a href="https://superuser.com/questions/1437590/typing-python-on-windows-10-version-1903-command-prompt-opens-microsoft-stor">more details</a>).</p></div>
1. Run the script from the root directory of the source tree: **`.hooks/bootstrap`**.
```programlisting
sb@dddd:~/demisto/content$ .hooks/bootstrap
Installing 'pre-commit' hooks
=======================
Configure poetry to install virtual environment in the project repo (will be available in (.venv)
Check if poetry files are valid
All set!
Installing dependencies...
Detected local env.
Installing dependencies from lock file
No dependencies to install or update
==========================
Done setting up virtualenv with poetry
Activate the venv by running: poetry shell
Deactivate by running: deactivate
=======================
Running: npm install ...
up to date, audited 230 packages in 1s
```
2. After the bootstrap script completes, install an extra [plugin](https://github.com/python-poetry/poetry-plugin-shell) to get poetry shell to work by running **`poetry self add poetry-plugin-shell`**.
3. After the plugin script completes, activate the newly created virtual environment by running **`poetry shell`**.
### Run linters and unit tests
Cortex XSIAM content ships with a HelloWorld integration that provides basic functionality and is useful to understand how to create integrations.
It's located in the `Packs/HelloWorld/Integrations/HelloWorld` folder. `demisto-sdk` runs the linting and unit testing to verify the dev environment is working (including Python and Docker).
1. Verify you are running inside the Poetry virtual environment.
```programlisting
sb@dddd:~/demisto/content$ poetry shell
(.venv) sb@dddd:~/demisto/content$
```
2. Run the `demisto-sdk pre-commit` command on the `Packs/HelloWorld/Integrations/HelloWorld` folder using the `-i` option, or if you want to run against all the committed files in your branch you can use `demisto-sdk pre-commit -g`. It will run both the linters and pytest (unit testing).
<div data-gb-custom-block data-tag="hint" data-style="info" class="hint hint-info"><h3>Note</h3><p>The tests run within a Docker container, so if the tests pass, it means that your development environment is up and running correctly.</p></div>
```programlisting
(venv) sb@dddd:~/demisto/content$ demisto-sdk pre-commit -i Packs/HelloWorld/Integrations/HelloWorld
Running pre-commit using template /Users/sfainberg/dev/demisto/content/.pre-commit-config_template.yaml
Running pre-commit with Python 3.11 on:
Packs/HelloWorld/Integrations/HelloWorld/HelloWorld.py
Packs/HelloWorld/Integrations/HelloWorld/HelloWorld.yml
Packs/HelloWorld/Integrations/HelloWorld/HelloWorld_description.md
Packs/HelloWorld/Integrations/HelloWorld/HelloWorld_image.png
Packs/HelloWorld/Integrations/HelloWorld/HelloWorld_test.py
Packs/HelloWorld/Integrations/HelloWorld/README.md
Packs/HelloWorld/Integrations/HelloWorld/command_examples
Packs/HelloWorld/Integrations/HelloWorld/test_data/get_alert.json
Packs/HelloWorld/Integrations/HelloWorld/test_data/incident_note_list_command.json
Packs/HelloWorld/Integrations/HelloWorld/test_data/ip_reputation.json
DockerHook - Unable to find image docker.io/devtestdemisto/python3:3.11.10.115186-12dd7198e064c21c217cc72c87ddadd5. Creating image based on docker.io/demisto/python3:3.11.10.115186 - Could take 2-3 minutes at first
check json...............................................................Passed
check yaml...............................................................Passed
check python ast.........................................................Passed
check for merge conflicts................................................Passed
debug statements (python)................................................Passed
python tests naming......................................................Passed
check for added large files..............................................Passed
check for case conflicts.................................................Passed
poetry-check.........................................(no files to check)Skipped
pycln....................................................................Passed
ruff-py3.11..............................................................Passed
autopep8.................................................................Passed
mypy-py3.11..............................................................Passed
xsoar-lint...............................................................Passed
pylint-in-docker-demisto/python3:3.11.10.115186..........................Passed
pytest-in-docker-demisto/python3:3.11.10.115186..........................Passed
validate-deleted-files...................................................Passed
validate-content-paths...................................................Passed
validate-conf-json...................................(no files to check)Skipped
validate.................................................................Passed
secrets..................................................................Passed
merge-pytest-reports.....................................................Passed
coverage-pytest-analyze..................................................Passed
```
### Create a branch
The Git flow requires creating a branch with your new code that you will later use to submit a Pull Request.
To create a branch, use the `git checkout -b [branch_name]` command, where the `[branch_name]` corresponds to your integration.
```programlisting
(venv) sb@dddd:~/demisto/content$ git checkout -b my_integration_name
Switched to a new branch 'my_integration_name'
```
### Create your integration directory
Create a directory under `Packs/<Your pack name>`, named after your product where you will put all your content files later, and add it to the staged changes in Git. Use PascalCase in the directory name (for example, MyIntegration). See [Content Pack Structure](../../contributing-content/content-pack-structure) for more information.
You can create a pack and an integration directory using the `demisto-sdk init` command. The following is an example of creating a pack called `MyNewPack`, with an integration called `MyIntegration`, with the metadata file created automatically:
```programlisting
➜ content-docs2 git:(add-pack-and-sdk-docs) ✗ demisto-sdk init --pack
Please input the name of the initialized pack: MyNewPack
Successfully created the pack test in: MyIntegration
Do you want to fill pack's metadata file? Y/N y
Display name of the pack: MyNewPack
Description of the pack: A description for my newly created pack.
Support type of the pack:
[1] demisto
[2] partner
[3] developer
[4] community
Enter option: 2
Server min version: 5.0.0
Author of the pack: Partner name
The url of support, should represent your GitHub account (optional): https://github.com/<PartnerGitAccount>
The email in which you can be contacted in: partner@partner.com
Pack category options:
[1] Analytics & SIEM
[2] Utilities
[3] Messaging
[4] Endpoint
[5] Network Security
[6] Vulnerability Management
[7] Case Management
[8] Forensics & Malware Analysis
[9] IT Services
[10] Data Enrichment & Threat Intelligence
[11] Authentication
[12] Database
[13] Deception
[14] Email Gateway
Enter option: 1
Tags of the pack, comma separated values:
Created pack metadata at path : MyNewPack/metadata.json
Do you want to create an integration in the pack? Y/N y
Please input the name of the initialized integration: test
Do you want to use the directory name as an ID for the integration? Y/N y
Finished creating integration: MyNewPack/Integrations/test.
```
### Commit and push
The last step is to commit your changes and push them to the origin to verify that the pre-commit checks pass.
You can also run the hooks locally using Demisto SDK by running the following commands. See [this README](https://app.gitbook.com/s/nozw5MT5S8KZD2eF8roV/README) for more information about Demisto SDK commands and formats.
* `demisto-sdk format` - Auto-corrects formatting for the validation to pass.
* `demisto-sdk validate -g` - Validates the integrity of the YAML files, and verifies they follow the pre-set roles.
* `demisto-sdk pre-commit -i <The path to your changed/newly added content entity>` - Runs lint and pytest on the changed Python files.
1. Run `git commit -m '[some commit message]'`, which automatically runs the pre-validation checks.
```programlisting
(venv) sb@dddd:~/demisto/content$ git commit -m 'Initial commit of MyIntegration'
Validating files...
Starting validating files structure
Using git
Running validation on branch my_integration_name
Validates only committed files
Starting validation against origin/master
The files are valid
Starting secrets detection
Finished validating secrets, no secrets were found.
Skipping running dev tasks (flake8, mypy, pylint, pytest). If you want to run this as part of the precommit hook
set CONTENT_PRECOMMIT_RUN_DEV_TASKS=1. You can add the following line to ~/.zshrc:
echo "export CONTENT_PRECOMMIT_RUN_DEV_TASKS=1" >> ~/.zshrc
Or if you want to manually run dev tasks: ./Tests/scripts/pkg_dev_test_tasks.py -d <integration/script dir>
Example: ./Tests/scripts/pkg_dev_test_tasks.py -d Scripts/ParseEmailFiles
On branch my_integration_name
Untracked files:
.python-version
nothing added to commit but untracked files present
```
<div data-gb-custom-block data-tag="hint" data-style="info" class="hint hint-info"><h3>Note</h3><ul><li>Ignore the <code>.python-version</code> file warning, that is generated by pyenv and is not added to the repository.</li><li>Since there are no files yet in the directory you created (for example, <code>Integrations/MyIntegration</code>), it will not show up in your branch after the commit. However, you can verify that all the components are in place.</li></ul></div>
2. Push to your branch with the command `git push origin [branch_name]`. You will be prompted for your GitHub credentials.
```programlisting
(venv) sb@dddd:~/demisto/content$ git push origin my_integration_name
Username for 'https://github.com': [omitted]
Password for 'https://[omitted]@github.com':
Total 0 (delta 0), reused 0 (delta 0)
remote:
remote: Create a pull request for 'my_integration_name' on GitHub by visiting:
remote: https://github.com/[omitted]/content/pull/new/my_integration_name
remote:
To https://github.com/[omitted]/content
* [new branch] my_integration_name -> my_integration_name
(venv) sb@dddd:~/demisto/content$
```
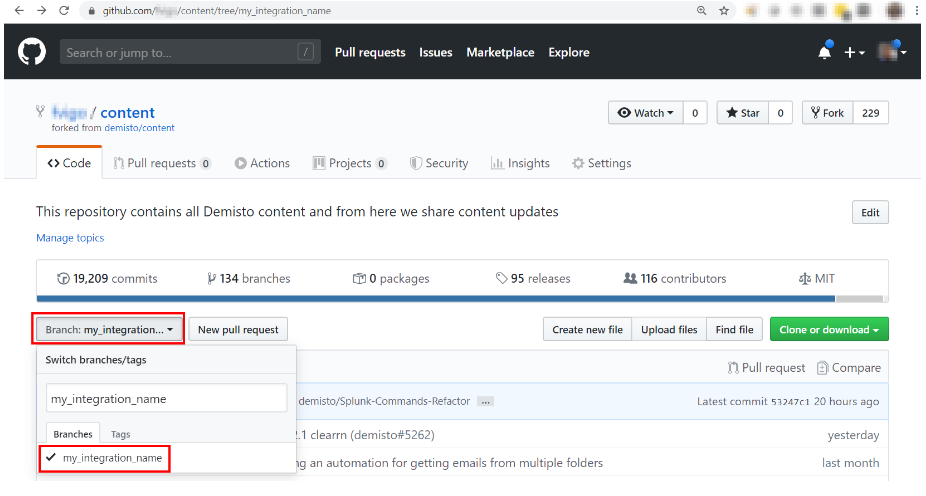
3. Go back to GitHub and under your fork you should be able to see that there is a new branch with the name you provided (for example, my\_integration\_name).
The development environment for Cortex XSIAM is complete, with a fully configured virtual environment where you can run different validation and utility scripts. You can now start writing your code.