Cortex XDR Agent Administrator Guide
Tree viewThis book on one page — search it with your browser’s find (Ctrl+F / ⌘F), or jump from the tree.
Cortex XDR Agent Administrator Guide 9.3
Introduction
Cortex XDR agent is installed on all endpoints in your organization. It works in conjunction with your Cortex platform to monitor and protect these endpoints from a wide range of security threats. The agent collects and sends endpoint telemetry data to the Cortex server, where it is analyzed for suspicious activities, indicators of compromise, and potential security incidents. The Cortex XDR agent plays a crucial role in providing real-time visibility into endpoint activity, detecting and blocking malware, analyzing endpoint behavior for signs of compromise, and facilitating response actions. It helps security teams identify and respond to threats effectively, minimizing the risk of data breaches and unauthorized access. The Cortex XDR agent communicates with the server at a 5-minute heartbeat interval to send status information and retrieve the latest security policy.
This guide explains the installation and configuration procedures for Cortex XDR agent setup and operation on, Windows, MacOS, and Linux operating systems. Additional guides are available for agent installation and operation on Android and iOS devices.
For compatibility with operating systems per agent release versions see the Cortex XDR Compatibility Matrix.
With every Cortex product release, new agent features are released with specific agent versions. For feature support, known and addressed issues, and changes to default behavior by Cortex XDR agent version, see the Cortex XDR Agent Releases.
Cortex XDR agent for Windows
The Cortex XDR agent protects Windows endpoints by preventing known and unknown malware from running on those endpoints and by halting any attempts to leverage software exploits and vulnerabilities. The agent enforces the Security policy that is defined by your organization. When a security event occurs on an endpoint, the agent collects forensic information about that event that you can use to analyze the incident.
The following topics describe how to install and use the Cortex XDR agent for Windows.
Cortex XDR agent for Windows requirements
The following requirements apply to standard and VDI Windows endpoints:
| Requirement | Specification |
|---|---|
| Processor | <ul><li>Intel Pentium Dual Core or later with SSE2 instruction set support</li><li>AMD Opteron/Athlon 64 or later with SSE2 instruction set support</li><li>ARM (A64) with Windows 11 23H2 (release 10.0.22631) and later</li></ul> |
| RAM | 2GB minimum |
| Hard disk space | 5GB minimum; 20 GB recommended |
| Operating system versions | Palo Alto Networks supports the Cortex XDR agent on many operating systems, virtual environments, and virtual applications. To determine the minimum Cortex XDR agent release for a specific operating system, environment, or application, refer to the Windows section of Where can I install the Cortex XDR Agent in the Palo Alto Networks Compatibility Matrix. |
| Networking | <ul><li>Allow communication on the TCP port from the Cortex XDR agent to server (the default is port 443).</li><li>Allow the Cortex XDR management console and agent to communicate with external and internal resources required for enforcing endpoint protection.</li></ul> |
| .NET | <ul><li>Windows 8—.NET 4.5</li><li>Windows 8.1—.NET 4.5.1</li><li>Windows 10 and later releases—.NET 4.6</li><li>Windows Server 2008 R2—.NET 3.5 SP1 or .NET 3.5.1</li><li>Windows Server 2012—.NET 4.5</li><li>Windows Server 2012 R2 and later supported Windows releases—.NET 4.5.1</li></ul> |
| Applications and utilities | <ul><li>Windows Accessories (Notepad) to view logs</li></ul> |
| Localization | To set the language (English, German, Japanese, Spanish, French, Chinese Simplified, Chinese Traditional) of the Cortex XDR agent console, you must install the corresponding language pack. |
Install the Cortex XDR agent for Windows
Standard Cortex XDR agent installation is intended for standard physical endpoints or persistent virtual endpoints. Install Cortex XDR Agent using the MSI or from the command-line using Msiexec.
How to install Cortex XDR agent using the MSI
Use the following workflow to install the Cortex XDR agent using the MSI file.
- Before installing the Cortex XDR agent on a Windows endpoint, verify that the system meets the requirements described in the Cortex XDR Agent for Windows Requirements.
- Download the Cortex XDR agent installer for Windows from Cortex XDR.
-
Run the MSI file on the endpoint.
The installer displays a welcome dialog.
- Click Next.
-
Install the agent.
The installer displays a User Account Control dialog.
- Click Yes.
-
After you complete the installation, verify the Cortex XDR agent can establish a connection.
Note
If the Cortex XDR agent does not connect to Cortex XDR, verify your internet connection and perform a check-in on the endpoint. If the agent still does not connect, verify that the installation package has not been removed from the Cortex XDR management console.
How to install the Cortex XDR agent Using Msiexec
Msiexec provides full control over the installation process and allows you to install, modify, and perform operations on a Windows Installer from the command line interface (CLI). You can also use Msiexec to log any issues encountered during installation.
You can also use Msiexec in conjunction with a System Center Configuration Manager (SCCM), Altiris, Group Policy Object (GPO), or other MSI deployment software to install Cortex XDR on multiple endpoints for the first time.
When you install the Cortex XDR agent with Msiexec, you must install the Cortex XDR agent per-machine and not per-user.
Although Msiexec supports additional options, the Cortex XDR agent installers support only the options listed here. For example, with Msiexec, the option to install the software in a non-standard directory is not supported—you must use the default path.
Note
The following parameters apply to the initial installation on the Cortex XDR agent on the endpoint, except for the CLEAN_AGGRESIVLY=1 parameter which should be used during agent upgrade.
/i<installpath>\<installerfilename>.msi—Install a package. For example,msiexec /i c:\install\cortexxdr.msi./qn—Displays no user interface (quiet installation)./L*v <logpath>\<logfilename>.txt—Log verbose output to a file. For example,/l*v c:\logs\install.txt.VDI_ENABLED=1—Use to install the Cortex XDR agent on the golden image for a non-persistent VDI. This option identifies the session as a VDI in Cortex XDR and applies license and endpoint management policy specific for non-persistent VDI. To set up the Cortex XDR agent on a golden image for non-persistent VDI, see Cortex XDR agent for virtual environments and desktops.TS_ENABLED=1—Use to install the Cortex XDR agent on the golden image for a temporary session. This option identifies the session as a temporary session in Cortex XDR and to apply license and endpoint management policy specific for temporary sessions. To set up the Cortex XDR agent on a golden image for temporary sessions, see Cortex XDR agent for virtual environments and desktops.-
proxy_list—Use to install Cortex XDR agents that communicate with Cortex XDR through an application-specific proxy for Cortex XDR. This option is relevant in environments where Cortex XDR agents communicate with Cortex XDR through a proxy, enabling Cortex XDR admins to control and manage the agent proxy configuration settings without affecting the communication of other applications on the endpoint. To set up a Cortex XDR specific proxy, see Configure Cortex XDR specific proxy section below. The Cortex XDR agent does not support proxy communication in environments where proxy authentication is required.Note
You can also set up a system-wide proxy for all communication on the endpoint.
-
RESTRICT_RESPONSE_ACTIONS=1—Use to permanently disable the option for Cortex XDR to perform all, or a combination, of the following actions on endpoints running a Cortex XDR agent: initiate a Live Terminal remote session on the endpoint, execute Python scripts on the endpoint, and retrieve files from the endpoint to Cortex XDR. Disabling any of these actions is an irreversible action, so if you later want to enable the action on the endpoint, you must uninstall the Cortex XDR agent and install a new package without this flag. To disable a specific action, use the corresponding flag:RESTRICT_LIVE_TERMINAL=1—Use to disable Live Terminal.RESTRICT_SCRIPT_EXECUTION=1—Use to disable script execution.RESTRICT_FILE_RETRIEVAL=1—Use to disable files retrieval.
To disable more than one option, use any combination of these flags.
CLEAN_AGGRESIVLY=1—Use to clean the endpoint from a previous Cortex XDR agent installation that was performed inmsiAdvertise mode. For details, see Cortex XDR Agents Deployed in Advertise Mode.CONTENT={path}\content-XXX-XXXXX.zip—Use to install the Cortex XDR agent with the downloaded content file to ensure the agent can enforce policies and rules on the endpoint immediately after agent startup. For example,CONTENT=\\sccm\share\Traps\Version740\content-181-58641.zip. You can specify the content path either from the local volume or from a shared directory to which the current logged-in user has access. To understand the benefits, workflow, and requirements to support this type of deployment, refer to Install the Cortex XDR Agent with Installer and Content Update Package.ENDPOINT_TAGS="Name1,Name2,Name3"—Use to add tags to the endpoint tags.
To install Cortex XDR using Msiexec:
- Before installing the Cortex XDR agent on a Windows endpoint, verify that the system meets the requirements described in Cortex XDR Agent for Windows Requirements.
- Use one of the following methods to open a command prompt as an administrator.
- Select Start → All Programs → Accessories. Right-click Command prompt and Run as administrator.
- Select Start. In the Start Search box, type cmd. Then, to open the command prompt as an administrator, press CTRL+SHIFT+ENTER.
-
Run the
msiexeccommand followed by one or more supported options and properties.For example:
msiexec /i c:\install\cortexxdr.msi /l*v C:\temp\cortexxdrinstall.log /qn
Configure Cortex XDR specific proxy
In environments where Cortex XDR agents communicate with Cortex XDR through a proxy, you can define a system-wide proxy that affects all communication on the endpoint, or a Cortex XDR specific proxy that you can set, manage, and disable in Cortex XDR. This topic describes how to install a Cortex XDR agent on the endpoint and assign it a Cortex XDR specific proxy.
Note
The Cortex XDR agent does not support proxy communication in environments where proxy authentication is required.
-
Follow the procedure above to install the Cortex XDR agent using Msiexec and include the
proxy_listargument.The argument format is
proxy_list="<proxy>:<port>"-
You can assign up to five different proxies per agent. For each proxy, enter the IP address and port number. You can also configure the proxy by entering the FQDN and port number. When you enter the FQDN, you can use both lowercase and uppercase letters. Avoid using special characters or spaces.
For example:
msiexec /i c:\install\cortexxdr.msi proxy_list="My.Network.Name:808,10.196.20.244:8080" -
To install a Cortex XDR agent communicating through the Palo Alto Networks Broker Service you must enter the Broker VM IP address and a port number. You can use default port 8888 or set another port number.
Warning
You are not permitted to configure port numbers between 0-1024 and 63000-65000, or port numbers 4369, 5671, 5672, 5986, 6379, 8000, 9100, 15672, 25672. Additionally, you are not permitted to reuse port numbers you already assigned to the Syslog Collector applet.
-
-
After the initial installation, you can change the proxy settings if necessary from the Endpoints page of Cortex XDR.
Install the Cortex XDR Agent with Installer and Content Update Package
To reduce the network load and time typically required for the initial roll-out or major upgrades of the Cortex XDR agent, Cortex XDR offers an agent installation and content update distribution package. The distribution package includes the agent installer and the latest supported content available in Cortex XDR, eliminating the content update download phase which is typically required after agent installation. You can deploy the distribution package using a third party tool such as an SCCM, or manually on the endpoint.
To deploy or upgrade agents using the distribution package, you first need to create an agent installation package in Cortex XDR. Then, you can choose to download the distribution package zip along with the latest content zip. The content version included in the package is the latest content available in Cortex XDR at the time of package download. If between the time you created a package and the time you downloaded it a new content version has become available, Cortex XDR will automatically update the content version within the distribution packages available in your tenant. After you download the package, the content version within that zip archive is static and cannot be updated. It is therefore advised to always download a pre-created distribution package only at the time you intend to start the deployment.
The following are prerequisites to use this deployment method:
| Requirement | Description |
|---|---|
| General | <ul><li>Requires Windows 7 SP1/Server 2008 R2 SP1 or later.</li><li>When you deploy using the SCCM system, you must have network credentials in your organization.</li></ul> |
How to install or update agents using the installer and content package manually
To deploy the Cortex XDR agent and content manually on the endpoint, first create an agent installation package with the latest content, download and extract it, and then proceed to Install the Cortex XDR Agent for Windows using the CONTENT runtime argument:
-
Create an agent installation package.
In Cortex XDR, go to Endpoints → Endpoint Management → Agent Installations page, and Create an agent Installation Package.
-
Download the installation and content distribution package locally.
In Agent Installations, right-click the distribution package you created and according to the endpoint architecture, select 64 bit installer → Download 64 bit installer + latest content update (zip).
The extracted downloaded distribution package zip includes two files: the msi installer and the content zip.

-
Install the agent on the endpoint.
Proceed to Install the Cortex XDR agent for Windows and add the
CONTENTruntime argument as explained. For example,CONTENT=\\sccm\share\Traps\Version740\content-181-58641.zip.
How to install or update agents using the installer and content package using SCCM
To deploy the Cortex XDR agent and content on the endpoint using an SCCM, follow these guidelines and fill-in the values as specified.
Note
This high-level workflow refers only to the specific SCCM configurations that you must set for this type of deployment. For the other optional settings that are not included in this workflow, follow the Microsoft official guidelines and your organization needs.
-
Upload the files to your SCCM network Share folder.
Unpack the Cortex XDR agent installation.zip file, and copy both the installation msi and content-XXX-XXXXX.zip files to the Share folder on your SCCM server under a directory of your choice. For example,
\\SCCM\Share\MyCortexXDRAgentDeploymentFolder\. To copy files to the Share folder, you must have network credentials in your organization. - Create the SCCM application package.
-
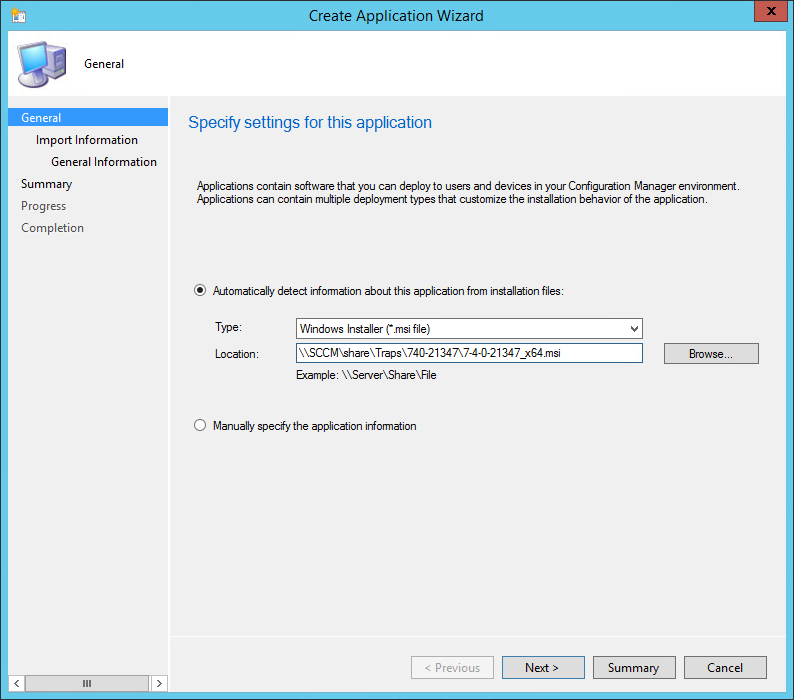
In SCCM Applications, Create Application to launch the Create Application Wizard and specify the following settings for this application:
- Ensure the Automatically detect information about this application from installation files option is selected to enable SCCM to pull both msi and content-XXX-XXXXX.zip files from the Share folder on the SCCM server.
- Type—Windows installer (*.msi file)
- Location—Browse to your Share folder and select the installation file.
- Click Next to continue.
-
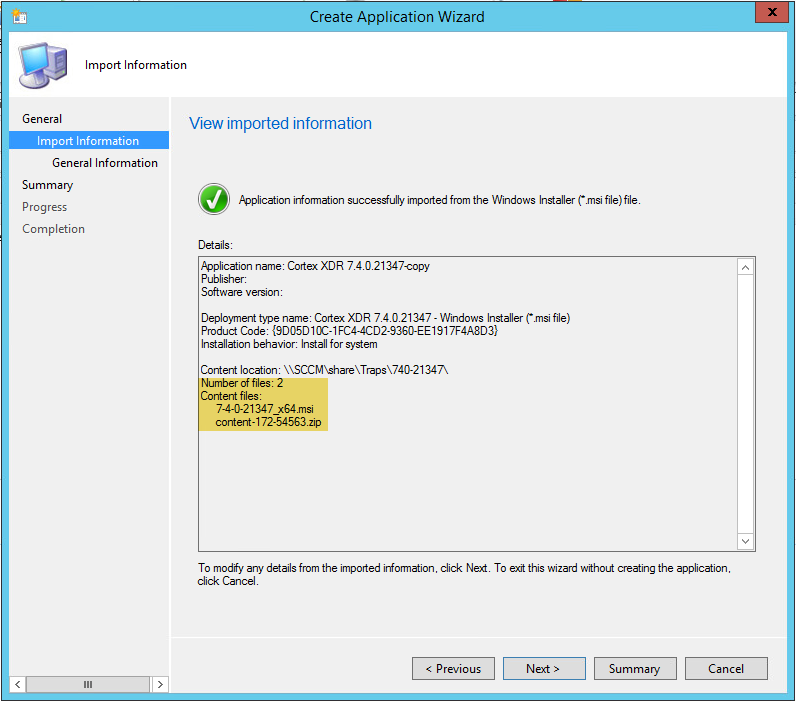
In View imported information, verify that SCCM detected both files in the Share folder, the msi and the content zip files (Number of files: 2). Click Next to continue.
- In Specify info about this application, fill-in the following information:
- Name—Displays the name of your deployment application.
-
Installation program—Enter the Cortex XDR agent installation command line to include the msi and content zip files. For example:
msiexec /i “installer_x64.msi” CONTENT=\\SCCM\Share\MyCortexXDRAgentDeploymentFolder\content-XXX-XXXXX.zip /qn
It is highly recommended to add the
/qninstallation flag for a quiet installation. Other installation flags such as creating a log file are optional and can be added as described in Install the Cortex XDR agent for Windows. - Install behavior—Install for system.
- Proceed to fill-in other fields as required, and click Next to continue.
-
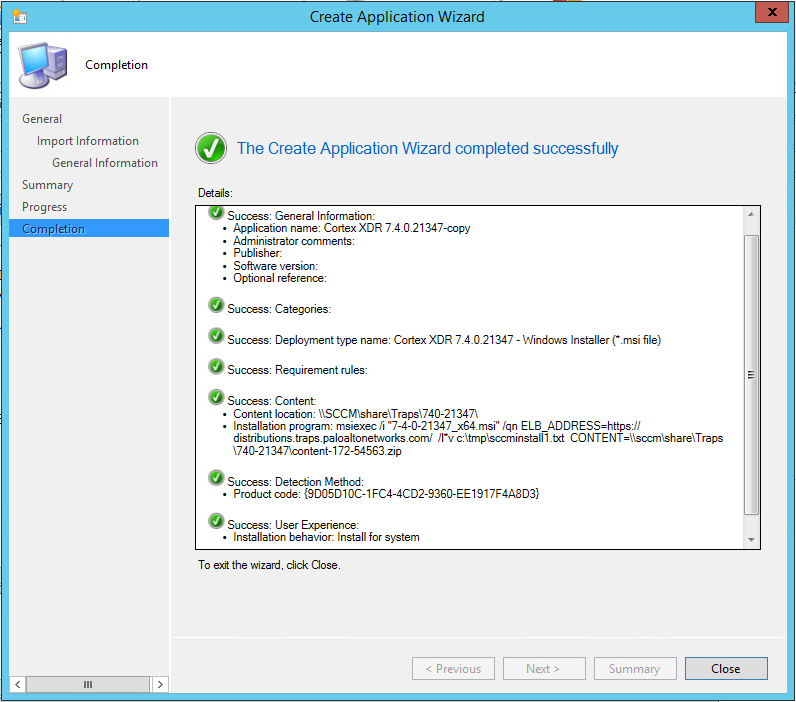
Review the Summary. To confirm the settings for this application, click Next. Wait for the application package to generate and Close to exit the wizard.
-
-
Set the Working Directory.
To ensure that SCCM deploys the Cortex XDR agent installation and content files in the correct folders on the endpoint, you must set the application package working directory.
-
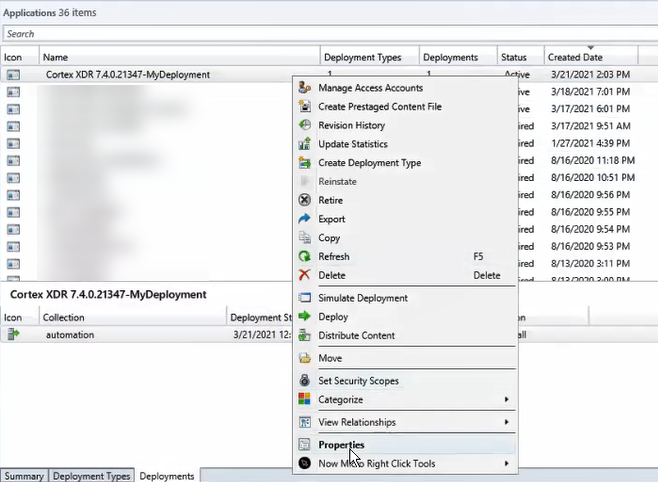
From the SCCM applications list, right-click your application package and select Properties.
-
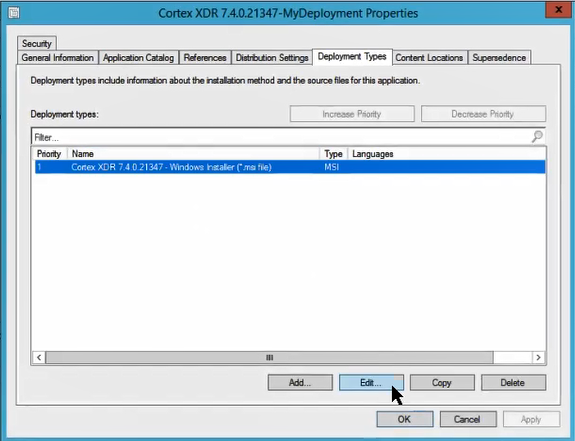
Go to the Deployment Types tab, select the msi file, and Edit.
-
Go to the Programs tab.
In the Installation starts in field, carefully enter the full path to the Share folder on the SCCM server where the msi and content zip files are and Apply. For example,
\\SCCM\Share\MyCortexXDRAgentDeploymentFolder\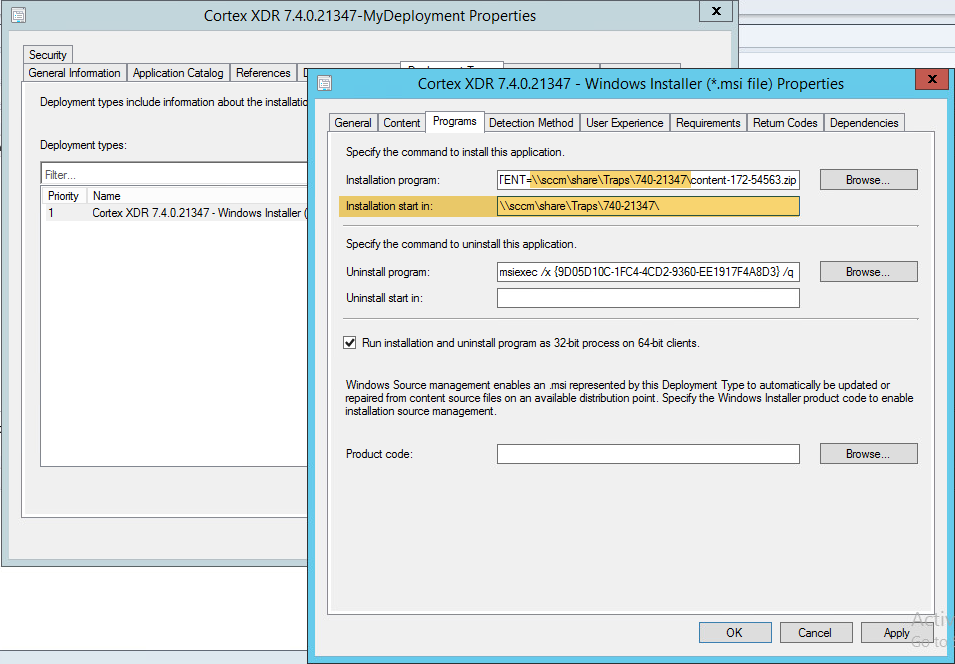
-
- Distribute the application package content.
-
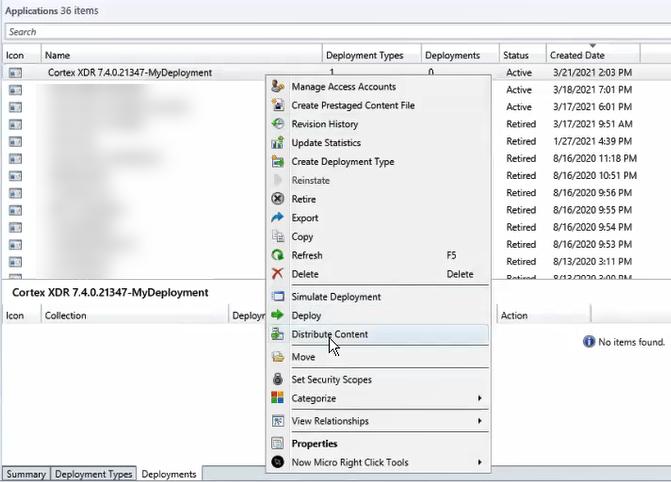
To launch the Distribute Content Wizard from the SCCM applications list, right-click your application and select Distribute Content.
-
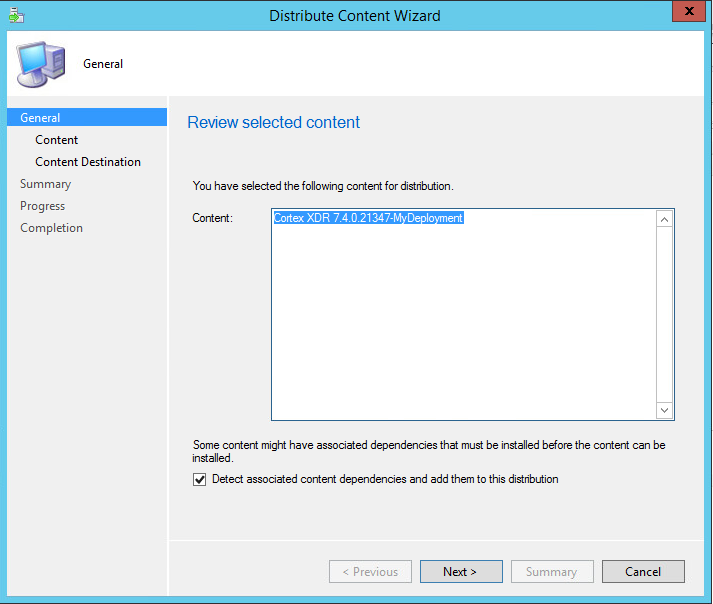
When you Review selected content, ensure that the Detect associated content dependencies and add them to this distribution option is selected. This ensures that SCCM pulls both the msi and content zip files from the Share folder.
-
Continue to configure the other settings in this wizard, and when you are done, Close the wizard to exit.
-
- Proceed to deploy the application package on your endpoints.
-
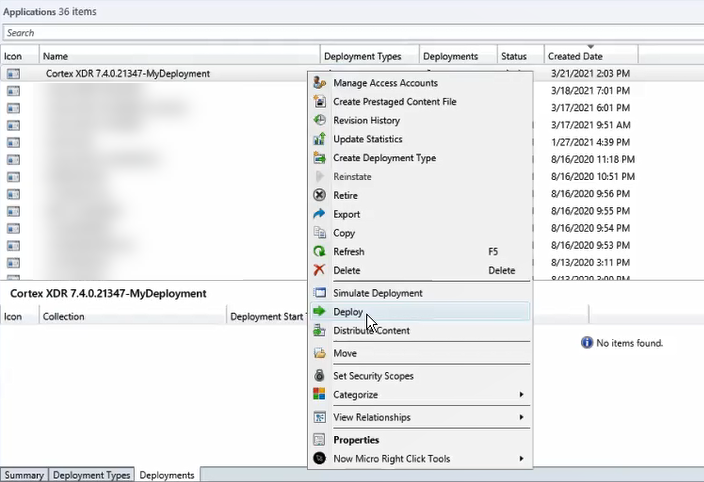
To launch the Deploy Software Wizard from the SCCM applications list, right-click your application and select Deploy.
-
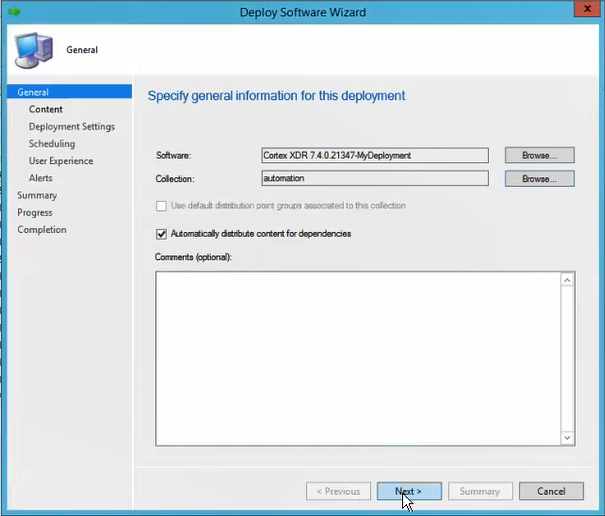
When you Specify general information for this deployment, ensure that the Automatic distribute content for dependencies option is selected. This ensures that SCCM pulls both the msi and content zip files from the Share folder.
-
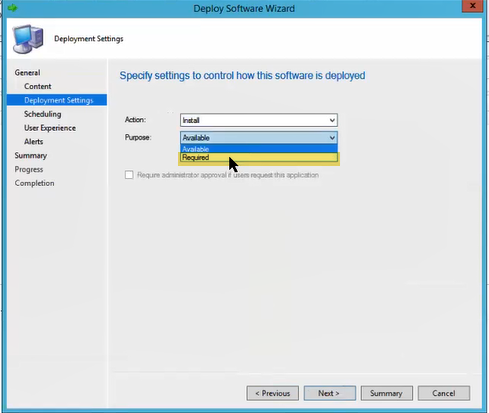
In Deployment Settings, ensure that:
- Action is set to Install.
- Purpose is set to Required. Otherwise, if it is set to Available, SCCM will only advertise the new Cortex XDR agent application but will not install it on the endpoint.
-
- Continue to configure the other settings in this wizard, and when you are done, Close the wizard to exit.
Cortex XDR agent for virtual environments and desktops
Cortex XDR agent virtual desktop infrastructure (VDI)
You can deploy Cortex XDR agents in virtual environments either as a standard installation, or as the following installations. Following the steps in the installation procedure is crucial for maintaining a fully functional and stable environment.
- Non-persistent VDI installation—Intended for non-persistent endpoints that replicate (also referred to as spawn) from a golden image that has the Cortex XDR agent installed. When a new VDI session starts and a connection to the internet is available, the endpoint uses the original golden image policy until the Cortex XDR agent retrieves the new policy from Cortex XDR and applies it after the first user logon. This may take up to 10 minutes. In addition, with VDI installation, the endpoint license returns to license pool either when the user logs off or ends the VDI session, or after a shorter timeout period than a standard Cortex XDR agent installation, thus ensuring that licenses are consumed only by active VDI. To install the Cortex XDR on non-persistent endpoints, follow the procedure to Configure the Cortex XDR Agent in a non-persistent VDI.
- Persistent (Stateful) VDI installation—For Cortex XDR agent installation on a Persistent VDI, follow the standard installation procedure for Windows endpoints.
- Temporary session—Intended for either physical or virtual endpoints (such as Microsoft Terminal Services) that repeatedly revert to a snapshot (or image) on which the Cortex XDR agent is not installed. After you install the Cortex XDR agent, Cortex XDR issues a license to the physical or virtual endpoint but will revoke the license after a short period of inactivity. When the machine reverts to the original state, and the Cortex XDR agent is reinstalled, the machine receives a license again. In a temporary session installation, the machine is protected by Cortex XDR from startup to shutdown, regardless of the time in which you logged on or off the machine. To install the Cortex XDR agent on a snapshot from which temporary sessions will spawn, configure the Cortex XDR agent for temporary sessions.
Note
VDI installation is intended for single-user scenarios, such as full desktop VDI. Temporary Session (TS) installation is best used for multi-user scenarios, such as terminal services.
How to configure the Cortex XDR agent in a non-persistent VDI
In non-persistent VDI mode, each session is temporary. When a user accesses a non-persistent virtual desktop and logs out, the virtual desktop is wiped clean and reverts back to the original pristine state of the golden image. The next time the user logs in, they receive a fresh image.
In non-persistent VDI mode, the machine exhibits the following behavior:
- Licensing—With non-persistent VDI endpoints, the Cortex XDR agent registers with Cortex XDR when the VDI instance boots. However the agent receives a license from the pool of available licenses and enforces endpoint protection only after the first user logon. To identify these endpoints for which protection is not yet available, Cortex XDR displays the status as VDI Pending Log-on. If the Cortex XDR agent does not perform a successful check-in within 1.5 hours since the user log-on, the agent reports back Connection Lost status. Cortex XDR automatically returns the license to the license pool when the user logs off, the agent is uninstalled, the session ends, or when the VDI is inactive. Revoking the license frees it up for use by another Cortex XDR agent.
- Connectivity—When the user logs on to the VDI machine, the Cortex XDR agent connects to Cortex XDR to receive the license and to obtain the relevant updates. The Cortex XDR agent continues to communicate with Cortex XDR throughout the life cycle of the VDI instance. The Cortex XDR agent only protects the machine when a user is logged in. When the user is logged out, the Cortex XDR agent disconnects from Cortex XDR. During this time, the Cortex XDR agent does not receive updated policies or verdicts and does not send heartbeat communications to Cortex XDR.
- Storage—In a non-persistent VDI, many VDI solutions allow you to choose either non-persistent or persistent storage. With non-persistent storage, the user settings and data are stored for the length of the session and are wiped clean when the session ends or a user logs out. With persistent storage, you can select folders or specific locations that persist after a session ends.
To ensure Cortex XDR correctly identifies and treats the agent as a VDI agent, perform the following workflow on the golden image:
- Install any software that you plan to have on the VDI instances.
-
On the golden image, install the Cortext XDR agent for Windows and include the
VDI_ENABLED=1VDI flag.For example:
msiexec /i c:\install\cortexxdr.msi /l*v C:\temp\cortexxdrinstall.log /qn VDI_ENABLED=1 -
Install additional required software.
-
-
Scan your golden image for files and request verdicts.
Use Cytool to scan your endpoint. We recommend this step to populate the golden image with verdicts for different file types. If you do not perform this step, the Cortex XDR agent has to evaluate each file when it attempts to run on an endpoint during each VDI session.
Note
As VDI machine scans are based on the golden image and additional files are examined upon execution, we recommend, for this case, that you disable scheduled scanning.
- Open a command prompt as an administrator and navigate to
C:\Program Files\Palo Alto Networks\Traps. - If you plan to output the scanning report to the Cortex XDR folder, you must run the
cytool protect disablecommand to disable Cortex XDR protection. -
Run the
cytool imageprep scancommand, with any of the following optional parameters:[timeout<timeout in hours>]—Number of hours you permit Cytool to run the scan (default is 4 hours).[upload<upload timeout in minutes>]—Number of minutes that you permit Cytool to upload unknown files to assess the verdict (default is 95 minutes).[path<full path>]—Path to the directory in which you want to output the scanning report.
For example:
cytool imageprep scan timeout 4 upload 60 path c:\reportTip
If you need to install additional software after performing this step, you must re-scan the endpoint to allow the Cortex XDR agent to obtain verdicts for the new software.
-
If you plan to use the Search and Destroy Malicious Files response action, you need to perform an additional scan to map all the files on the endpoint. Run the following commands and wait for them to complete:
cytool file_system_scan startcytool file_system_scan query - If you previously disabled service protection, enable it using the
cytool protect enablecommand after the scan is complete. - Review any portable executable (PE) files that WildFire^(®) determined to be malicious.
- Open the scan report in Microsoft Excel or an editor of your choice.
- Perform one of the following actions for each malicious PE file found:
- Remove the malicious file from the golden image.
- If you believe the WildFire verdict is incorrect, override the verdict for the PE file in Cortex XDR. Then perform a Check In from the Cortex XDR console on the golden image.
- Open a command prompt as an administrator and navigate to
- (Optional) If you later rename the golden image, you must run the
cytool vdi updateto update the golden image name and ID in the persistent database. - After the scripts execute, the machine will shut down, and the App Layering service will proceed to take the snapshot and complete the publishing process automatically.
How to configure the Cortex XDR agent for temporary sessions
To ensure Cortex XDR correctly identifies and manages the agent and associated licenses as a temporary session, perform the following to install the Cortex XDR agent on the snapshot:
-
Install the Cortex XDR agent for Windows and include the
TS_ENABLED=1flag.For example:
msiexec /i c:\install\cortexxdr.msi /l*v C:\temp\cortexxdrinstall.log /qn TS_ENABLED=1
Cortex XDR agent compatibility with virtual applications
You can determine where to deploy the Cortex XDR agent using Where can I install the Cortex XDR agent? in the Palo Alto Networks Compatibility Matrix. The following virtual applications require a unique installation workflow.
Citrix App layering
Note
Cortex XDR agent installations on the Application layer or User layer are not supported.
The Cortex XDR agent can be installed either on the Platform layer or on the OS layer. We recommend installation on the Platform layer. For best performance, all layers must be clean from any previous installations, use the Cortex XDR agent cleaner tool before proceeding.
Prerequisites
Before installing Cortex XDR agent on the platform layer, ensure the following requirements are met:
- App Layering Version: The App Layering ELM version must be at least 2409.
To Install Cortex XDR agent follow these steps:
- Install the Cortex XDR agent on the chosen layer (OS/Platform) during the preparation process of the App Layering image.
-
Add the Cortex XDR agent to the Citrix App Layering exclusion list.
Add the following entry to the Windows Registry:
HKLM\SYSTEM\CurrentControlSet\Services\Unirsd\ExcludeKey [REG_SZ] = "\Registry\Machine\System\Cyvera" - Before finalizing the layer, run
cytool imageprep scan(see here for options) and then perform the extra steps as necessary for MCS or PVS provisioning shown below.
MCS provisioning (Cortex XDR agent on Platform Layer) - Admin controlled shutdown
On the Platform layer, create a specific text file to signal to Citrix to pause the shutdown process during image publishing.
echo Cortex > C:\Windows\Setup\Scripts\kmsdir\Admin_Controlled_Shutdown.txt
When Cortex XDR agent and all other platform layer requirements are installed, complete the setup by running the "Shutdown For Finalize" shortcut located on the desktop.
During image publishing:
- Initiate the publishing process and watch the App Layering job details. Wait until the status reads, "Waiting for the virtual machine to be shutdown so a snapshot can be taken".
- Connect to the running virtual machine.
- Execute the following finalization commands in order:
- Update VDI:
cytool vdi update. - Run
cytool imageprep scan(see here for options) -
Run the completion script as an administrator:
C:\Windows\setup\Scripts\kmsdir\CompleteDepoylment.cmd.
- Update VDI:
- When the scripts have finished running, the machine will shut down. The App Layering service will automatically capture the snapshot and finalize the publishing process.
Note
Stalled UI Status: If the imageprep scan takes more than six hours, the App Layering UI may show the status as Stalled. This is a known cosmetic issue and does not affect the successful publishing of the image.
MCS Provisioning (Cortex XDR agent on OS layer)
When the Cortex XDR agent is installed on the OS layer and you are using MCS for provisioning, the standard imageprep process cannot run automatically when the image is published. Instead, the only method to prepare the image is as follows:
- Boot a machine using the newly created virtual disk (vDisk).
- Manually run
cytool imageprep scan(see here for options) - Create a new vDisk from this now-prepared machine.
PVS Provisioning (Cortex XDR agent on Platform layer and OS layer Installations)
- To successfully execute imageprep on a PVS vDisk, the vDisk must first be booted on a VDI instance with read/write access enabled.
- Run
cytool imageprep scan(see here for options) - When the the imageprep process is completed, revert the vDisk to read-only mode for normal use.
Running imageprep for Citrix non-persistent VDI's that utilize Citrix App Layering
The imageprep process makes non-persistent VDIs run faster. It does this by scanning the entire disk and saving security information about system files. If you don't run this process, VDI performance may be affected.
To make sure imageprep works well, start the scan only when all layers are combined and can be accessed. How you start this process is different depending on whether you are using Machine Creation Services (MCS) or Provisioning Services (PVS).
-
Run the
cytool imageprep scancommand, with any of the following optional parameters:[timeout<timeout in hours>]—Number of hours you permit Cytool to run the scan (default is 4 hours).[upload<upload timeout in minutes>]—Number of minutes that you permit Cytool to upload unknown files to assess the verdict (default is 95 minutes).[path<full path>]—Path to the directory in which you want to output the scanning report.
Example 1.
cytool imageprep scan timeout 4 upload 60 pathc:\reportTip
If you need to install additional software after performing this step, you must re-scan the endpoint to allow the Cortex XDR agent to obtain verdicts for the new software.
-
Return to complete the instruction depending on which provisioning process you are using.
MCS provisioning (Cortex XDR agent on Platform Layer)
MCS provisioning (Cortex XDR agent on Platform Layer) - Admin controlled shutdown
PVS Provisioning (Cortex XDR agent on Platform layer and OS layer Installations)
Recommendations for non-persistent VDI image management
For non-persistent VDI environments, after the vDisk is finalized, all automatic software updates (including operating system and user applications) should be disabled. If a software update is required, the image configuration procedure must be repeated, followed by rerunning the imageprep procedure. Failure to follow this process may lead to performance degradation upon the initial launch of the updated application.
How to configure the Cortex XDR agent for VMWare app volumes
To deploy Cortex XDR agents with VMWare App Volumes, you must add Cortex XDR services to the App Volumes template exclusions list.
Warning
Cortex XDR agent installations with VMWare App Volumes that are not performed according to this flow are not supported.
-
Edit the
Snapvol.cfgfile.Follow the steps described in the VMware Knowledge Base to locate, open, and edit the
Snapvol.cfgfile. -
Add Cortex XDR process exclusions to the App Volumes templates.
Add the following Cortex XDR process exclusions to the App Volumes templates:
################################################################
# Process exclusions
################################################################

# Cortex Agent
exclude_path=\Program Files\Palo Alto Networks\Traps

exclude_path=\ProgramData\Cyvera
################################################################
# 64-Bit OS exclusions
################################################################

# Cortex Agent
exclude_path=\Program Files (x86)\Palo Alto Networks\Traps

################################################################
# Registry exclusions
################################################################

#Cortex Agent
exclude_registry=\REGISTRY\MACHINE\SYSTEM\ControlSet001\services\tlaservice
exclude_registry=\REGISTRY\MACHINE\SYSTEM\ControlSet001\services\cyserver
exclude_registry=\REGISTRY\MACHINE\SYSTEM\ControlSet001\services\cypatchdrv
exclude_registry=\REGISTRY\MACHINE\SYSTEM\ControlSet001\services\cyveraservice
exclude_registry=\REGISTRY\MACHINE\SYSTEM\ControlSet001\services\cyverak
exclude_registry=\REGISTRY\MACHINE\SYSTEM\ControlSet001\services\cyvrfsfd
exclude_registry=\REGISTRY\MACHINE\SYSTEM\ControlSet001\services\cyvrmtgn
exclude_registry=\REGISTRY\MACHINE\SYSTEM\ControlSet001\services\telam
exclude_registry=\REGISTRY\MACHINE\SYSTEM\ControlSet001\services\tedrdrv
exclude_registry=\REGISTRY\MACHINE\SYSTEM\ControlSet001\services\tdevflt
exclude_registry=\REGISTRY\MACHINE\SYSTEM\ControlSet001\services\twdservice
exclude_registry=\REGISTRY\MACHINE\SYSTEM\ControlSet001\services\tedrpers-*

exclude_registry=\REGISTRY\MACHINE\SYSTEM\CurrentControlSet\services\tlaservice
exclude_registry=\REGISTRY\MACHINE\SYSTEM\CurrentControlSet\services\cyserver
exclude_registry=\REGISTRY\MACHINE\SYSTEM\CurrentControlSet\services\cyveraservice
exclude_registry=\REGISTRY\MACHINE\SYSTEM\CurrentControlSet\services\cyverak
exclude_registry=\REGISTRY\MACHINE\SYSTEM\CurrentControlSet\services\cyvrfsfd
exclude_registry=\REGISTRY\MACHINE\SYSTEM\CurrentControlSet\services\cyvrmtgn
exclude_registry=\REGISTRY\MACHINE\SYSTEM\CurrentControlSet\services\telam
exclude_registry=\REGISTRY\MACHINE\SYSTEM\CurrentControlSet\services\tedrdrv
exclude_registry=\REGISTRY\MACHINE\SYSTEM\CurrentControlSet\services\tdevflt
exclude_registry=\REGISTRY\MACHINE\SYSTEM\CurrentControlSet\services\twdservice
exclude_registry=\REGISTRY\MACHINE\SYSTEM\CurrentControlSet\services\tedrpers-*

exclude_registry=\REGISTRY\MACHINE\SYSTEM\CYVERA
exclude_registry=\REGISTRY\MACHINE\SOFTWARE\CYVERA
exclude_registry=\REGISTRY\MACHINE\SOFTWARE\Palo Alto Networks\Traps
- Create new AppStacks and Writable Volumes.
-
Install the Cortex XDR agent on your virtual machines without any volumes attached.
Warning
If you plan to mount any AppStacks and Writable Volumes that were made before the templates update to machines where the Cortex XDR agent is installed, you must update these volumes individually.
-
Verify the process.
Check the new additions were added to the
Snapvol.cfgfile.
Use Cortex XDR Agent for Windows
The Cortex XDR agent installs in the C:\Program Files (x86)\Palo Alto Networks\Traps folder. If you enabled access to the console, the agent console is also accessible from the notification area (system tray).
-
Open the Cortex XDR application.
The console displays active and inactive features by displaying a
 or
or  to the left of the feature type. Select the Advanced tab to display additional tabs along the top of the console. The tabs allow you to navigate to pages that display additional details about security events, protected processes, and updates to the security policy. Usually, an end user will not need to run the Cortex XDR console, but the information can be useful when investigating a security-related event. You can choose to hide the tray icon that launches the console, or prevent its launch altogether.
Use one of the following methods:
- Browse to
C:\Program Files\Palo Alto Networks\Trapsand run the CyveraConsole.exe application. - If you enabled access to Cortex XDR from the notification area, double-click the Cortex XDR icon (
 ) to launch the agent interface.
- Browse to
-
View status information about the Cortex XDR agent:
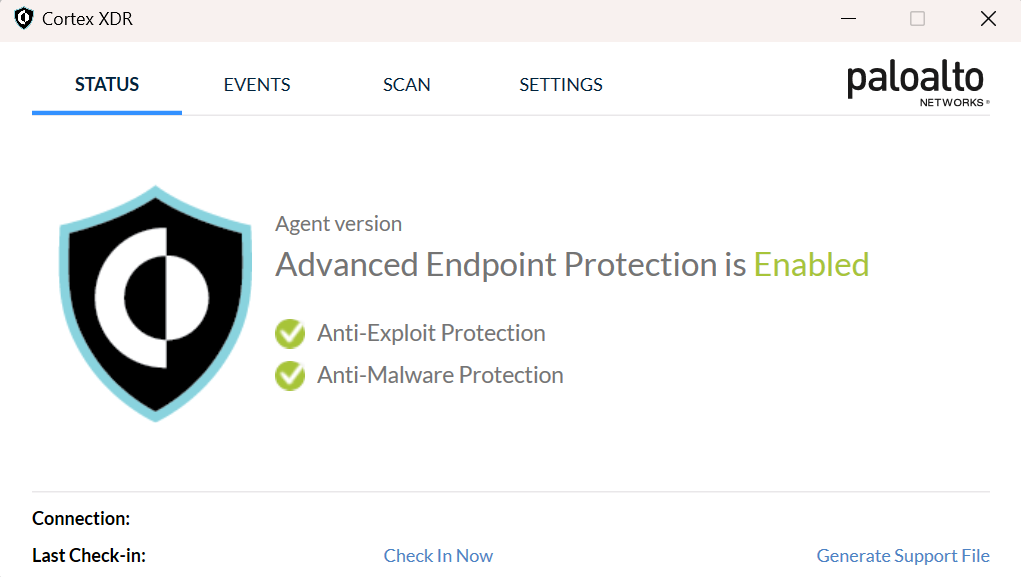
- Advanced Endpoint Protection—Displays the overall protection status of the endpoint as enabled if one or more protection features are enabled, or disabled if no protection features are enabled.
- Anti-Exploit Protection—Indicates whether or not exploit prevention rules are active in the endpoint security policy.
- Anti-Malware Protection—Indicates whether restriction or malware protection modules are enabled in the endpoint security policy.
- Version—Displays the Cortex XDR agent version.
- Connection—Displays the connection status and, if connected, includes the server to which the agent is connected.
- Last Check-in—Displays the local time on the endpoint of the last check-in with the server.
- Advanced Endpoint Protection—Displays the overall protection status of the endpoint as enabled if one or more protection features are enabled, or disabled if no protection features are enabled.
-
Manually connect to the server.
The Cortex XDR agent communicates with the server at a fixed 5-minute heartbeat interval to send status information and retrieve the latest security policy. The Cortex XDR agent performs this operation transparently at regular intervals so it is not typically necessary to connect to the server manually. If your Connection status is Not Connected, you can try to manually connect. This option is available if you do not want to wait for the automated communication interval to become active.
To initiate a manual check-in with the server, Check In Now from the home page of the Cortex XDR console. If the agent successfully establishes a connection with the server, the Connection status changes to Connected.
-
Collect Cortex XDR agent logs in a file that can be sent to a support representative for analysis.
Select Generate Support File. Cortex XDR agent aggregates the logs into a compressed file. Save it, and then send the file to your support representative. For remote endpoints, you can also retrieve logs from the Cortex Action Center.
-
View recent security events that occurred on your endpoint.
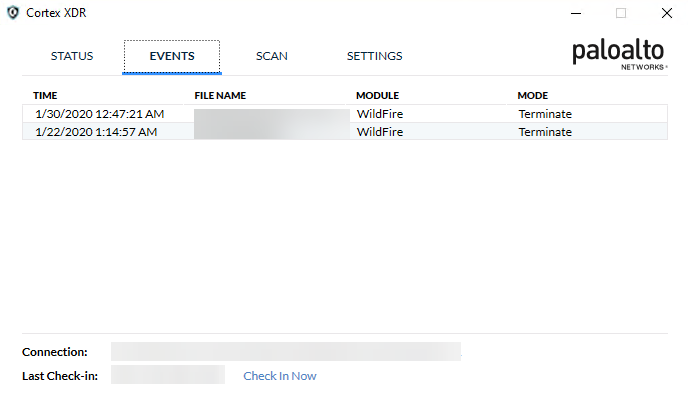
- Click Advanced, if necessary, to display additional actions that you can perform from the Cortex XDR console.
-
Click Events.
For each event, the Cortex XDR console displays the local Time that an event occurred, the name of the Process that exhibited malicious behavior, the Module that triggered the event, and the mode specified for that type of event (Termination or Notification).
-
System and custom file scans.
Cortex XDR malware scans on DLLs, executables, and Office files on Windows endpoints can be triggered from the Cortex XDR server, or manually on the endpoint.
-
System Scan—Scans are initiated from the Cortex XDR sever. You can view the System Scan progress in your Cortex XDR agent console. However, you cannot control this scan from the endpoint.
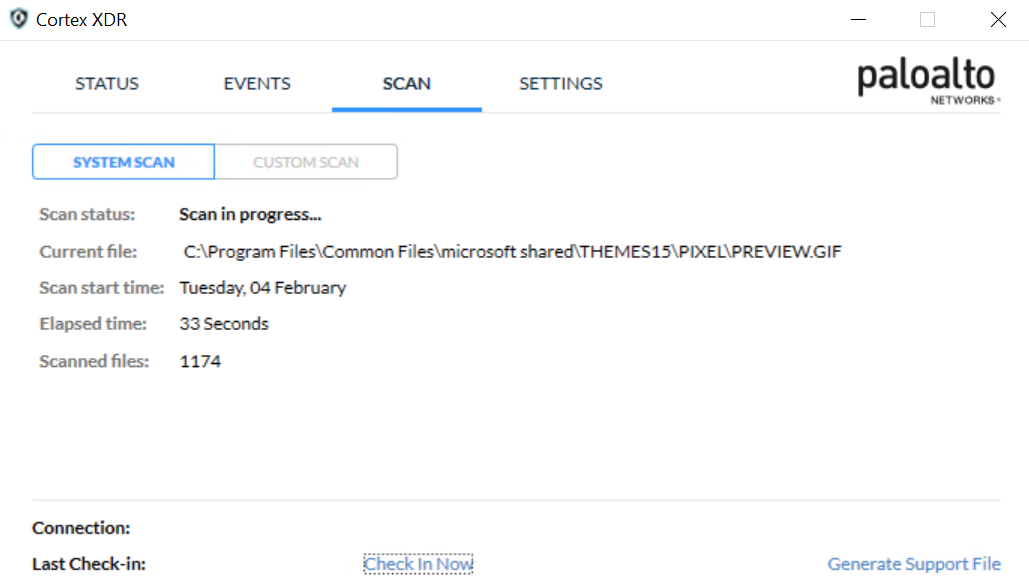
-
Custom Scan—You can initiate file scanning on demand on your Windows endpoints and get an immediate verdict from WildFire, before the file is ever executed on the endpoint. This ability is enabled by default in the Cortex XDR agent Malware profile settings.
To initiate a custom scan on the endpoint:
-
Right-click a file or folder and select Scan with Cortex XDR.
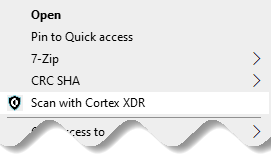
Note
You will not see this option if End-user initiated local scan is disabled on your endpoint.
-
The Cortex XDR agent console opens and you can see the custom scan in progress and eventually the scan verdict for the file. When a malicious file is detected during the custom scan, the event is reported to Cortex XDR directly and will be visible in the Alerts table as Detected (Scanned). However, it will not appear on the Events tab of the Cortex XDR agent console. If the file is unknown to WildFire, the agent applies Local Analysis.
You can scan up to 100 items simultaneously. An item can be single file or a single folder, regardless of the number of files within the folder (for example, a folder containing more than 100 files is considered one item by Cortex XDR).
Note
If you scan an unsupported file type, the Cortex XDR agent console will not show a notification for it, and the file will be considered non-malicious.
-
-
-
Change the display language for the Cortex XDR console.
The Cortex XDR console is localized in the following languages: English, German, French, Spanish, Chinese (traditional and simplified), and Japanese.
- Click Advanced, if necessary, to display additional actions that you can perform from the Cortex XDR console.
- Click Settings.
- Select the display language for Cortex XDR (default is English).
-
Configure proxy communication.
You can use a proxy server on the endpoint for all communications to and from the endpoint, including the communication between the Cortex XDR agent and Cortex XDR.
-
Define proxy settings explicitly—You can define a proxy thorough the operating system Network & Internet settings, or using the
netshcommand from a command prompt. For example:netsh winhttp set proxy proxy-server="<protocol>=<proxyserver>:<port>"where:
<protocol>is either http (unsecure) or https (secure) depending on which protocol you use for proxy communication.<proxyserver>is the IP address or FQDN for your proxy server.<port>is the port number used for communication with the proxy server.
Note
You can configure Windows to use an unsecure or secure proxy server or you can specify both.
For example, to use different proxy servers for unsecure and secure proxy communication:
netsh winhttp set proxy proxy-server="http=myproxy:8080;https=sproxy:8181"You can also specify the same server and same port for both unsecure and secure proxy communication.
There are three options for this command: You can run the command manually (in a command-prompt as an administrator), you can specify the command in a log-in script, or you can use GPO commands.
-
Retrieve proxy settings through a proxy auto-config (PAC) file—Cortex XDR can retrieve automatic proxy settings configured on your endpoint explicitly, in a group policy, or using WPAD. No additional agent settings are required for this use case.
Warning
If the proxy settings on your endpoint are configured via WPAD or a user setup script, when you isolate an endpoint from the network you will also lose connectivity with Cortex XDR server.
-
-
Persistent notification from agent that your machine can’t access the network. Only when the issue is resolved, the notification does not appear.
Upgrade the Cortex XDR Agent
Support for upgrades depends on the agent type:
- Standard endpoints and persistent VDI—Upgrades are distributed from the Cortex XDR server. Follow the steps in the Administrator’s Guide for your license type.
- Non-persistent VDI and temporary sessions—Upgrades from the Cortex XDR server are not supported. To upgrade the agent, you must reinstall the agent on the golden image. For instructions see Cortex XDR Agent for Virtual Environments and Desktops.
Uninstall the Cortex XDR agent for Windows
You can uninstall the Cortex XDR agent using any of the following methods on a Windows endpoint:
- Uninstall an agent or multiple agents from the management console. Refer to Uninstall the Cortex XDR Agent in the Administrator’s Guide for instructions.
- Manually uninstall the Cortex XDR agent for Windows. How to manually uninstall Cortex XDR agent for Windows
- Use Msiexec to uninstall the Cortex XDR Agent for Windows.
After you uninstall the agent, the endpoint is no longer protected by the Security policy of your company and the license returns to the pool of available licenses.
How to manually uninstall Cortex XDR agent for Windows
Use the following workflow to manually uninstall the Cortex XDR agent. If you intend to use Cytool in Step 1, make sure that you know the uninstall password before performing this procedure.
- Use one of the following methods to disable the Cortex XDR agent security protection on the endpoint:
- Run the
Cytool protect disablecommand. - Apply an Agent Settings profile that disables XDR Agent Tampering Protection on the endpoint.
- Run the
- Select Start → Control Panel → (Programs) → Programs and Features.
- Select Cortex XDR from the list and then Uninstall.
- When prompted to continue uninstalling, click Yes and acknowledge any notifications.
How to uninstall Cortex XDR agent for Windows using Msiexec
Use the following workflow to uninstall the Cortex XDR agent using Msiexec. If you intend to use Cytool in Step 1, ensure that you know the uninstall password before performing this procedure.
- If you are uninstalling XDR Agent using the MSI file via SCCM or another software management system, use one of the following methods to disable the Cortex XDR agent security protection on the endpoint:
- Run the
Cytool protect disablecommand. - Apply an Agent Settings profile that disables XDR Agent Tampering Protection on the endpoint.
- Run the
- Use one of the following options to open a command prompt as an administrator:
- Select Start → All Programs → Accessories. Then right-click Command prompt and Run as administrator.
- Select Start. In the Start Search box, type cmd. Then, to open the command prompt as an administrator, press CTRL+ SHIFT+ ENTER.
-
Run the
msiexeccommand followed by one or more of the following options or properties:-
Uninstall and logging options:
/x<installpath>\<installerfilename>.msi—Uninstall a package./l*v <logpath>\<logfilename>.txt—Log verbose output to a file.
For a full list of Msiexec parameters, see https://docs.microsoft.com/en-us/windows/desktop/Msi/command-line-options
For example, to uninstall the Cortex XDR agent using the cortexxdr.msi installer with the specified password and log verbose output to a file called uninstallLogFile.txt, enter the following command:
C:\Users\username>msiexec /x c:\install\cortexxdr.msi /l*v c:\install\uninstallLogFile.txt -
Troubleshooting resources for Windows
| Resource | Description |
| Services, Drivers, and Processes | Services:
Drivers:
Processes:
|
| Cortex XDR installation log | Specifies any errors encountered during installation of agent components. Use this log file when you need to troubleshoot installation issues. On Windows endpoints, the installer stores the log files in the temp or C:\Users<user_name>\AppData\Local\Temp folder. |
| Cortex XDR agent service log | Indicates information, warnings, and errors related to the Cortex XDR. The Service log is located in the following folder on the endpoint:
|
| Cortex XDR agent console log | Indicates information, warnings, and errors related to the agent console. The Console log is located in the following folder on the endpoint:
|
| Supervisor Command Line Tool (cytool.exe) | Allows you to manage agent features and perform advanced troubleshooting on the local endpoint from a command line interface. For more information, see Cytool for Windows. |
| Unknown files for analysis | The agent stores unknown files to send to Cortex XDR in the In some cases, third-party Antivirus (AV) applications raise an alert for this folder. If this occurs, we recommend that you whitelist this folder in the third-party AV application. |
| Cortex XDR Health Helper | Improves the upgrade process of the Cortex XDR agent, which monitors the machine at startup and initiates an upgrade rollback in case of a failed upgrade. As upgrades have multiple re-tries, the next try works on the agent of its original version with no interference. The service only runs at startup and remains in pause mode during other times. To ensure this service is not removed, a periodic task would re-instate the process in case it was removed. |
Cytool for Windows
Cytool is a command-line interface (CLI) that is integrated into the Cortex XDR agent and enables you to query and manage both basic and advanced functions of the agent. Unless stated otherwise, changes you make using Cytool take effect when the agent receives the next heartbeat communication (every five minutes) from Cortex XDR.
On Windows endpoints, you can access Cytool using a Microsoft command prompt that you run as an administrator. Cytool is located in the C:\Program Files\Palo Alto Networks\Traps folder on the endpoint.
The following table displays the Cytool options available on Windows endpoints. Where there is a password required for admin commands, this is the same password as was defined as the Uninstall Password.
Note
Since the Cortex XDR agent 7.6 release for Windows, the cyserver.exe process includes and replaces the previous CyveraService.exe, tlaservice.exe, and twdservice.exe high-privileged processes.
| Command Option | Description |
| adaptive_policy | Adaptive policy agent commands Usage Where:
|
| cert_enforcement | Perform Certificate enforcement related operations. Usage: Where <operation> is one of the following:
|
| checkin | Initiate check-in to the server. Usage: To verify the checkin, view the check-in time on the agent console. |
| clean_and_install | Trigger the XDR Health Helper service to remediate corrupted agent installations or failed upgrades by removing the existing agent and performing a fresh installation.
For example:
|
| edr | Display EDR stats collected on the endpoint. Usage: |
| endpoint_tags | Use Endpoint Tags to identify groups of endpoints. Usage: Where action can be:
Note Tags should be passed as one string, separated by commas, and with no spaces. For example:
|
| enum | Enumerate protected processes. Usage: Note If you change the action mode for protected processes in the Exploit Security Profile in Cortex XDR, you must restart the protected processes for the security policy to be enforced on the processes and its forked processes, and only then you will see them on this list. |
| event_collection | Perform event collection (EDR/DSE) operations. Usage: Where <operation> can be:
|
| image | Display information about a PE file (executable or DLL). Usage: For example: C:\Program Files\Palo Alto Networks\Traps> cytool image json.dll Image Information Location: json.dll Size: 176.98 KB (181224 bytes) File SHA256: a46b8e1ad9a808fb09e7b79bd03b66a611d0c7aa71291c216be555af14d16421 Architecture: x86-64 Subsystem: Windows GUI PE Size: 156.00 KB (159744 bytes) PE SHA256: 8cbca46419bf7260c99aaa3c73a6944e97f5c5b053a8b88e9a17367439b08d7d |
| imageprep | Prepare a golden image by submitting files for cloud analysis and generate a threats report. Usage: where:
For example: C:\Program Files\Palo Alto Networks\Traps> cytool imageprep scan timeout 4 upload 60 path c:\report Start Time : 17:56:46 Elapsed Time : 00:04:17 State : Running Scanned Files : 5427 Suspicious Files : 0 Failed Files : 9 Volume Root Path : \\?\C:\ Window Usage : 0 236 20000 Path : ...t\cache2\entries\9B982CE198BF046E6CCF25478920DDFD9E5842E5 Scan completed successfully Complete report can be found at: C:\report\imageprep_2019-03-06_08-59-30.xml |
| import | Import pre-downloaded content or local support exceptions. Used for solving specific problems with a support representative. |
| info | Display general Cortex XDR agent information. Usage:
|
| isolate | Release endpoint from network isolation. Usage: |
| last_checkin | Display the time of the last successful check-in. Usage: |
| log | Set log level for the desired process/Generate support file archive. Usage: where: <log_level>—An integer value corresponding to the log level:
<Components> can be Use |
| payload_execution | Stop or query payload execution status. Relates to Live Terminal and script execution. Usage:
|
| persist | The Cortex XDR agent stores policy and security event information, such as the list of trusted signers, local verdicts, and one-time actions in local databases on the endpoint. To troubleshoot policy issues and security events, you can use cytool persist operations to import, export, and view information stored in the local database. Usage: Where <action> can be:
To view a list of all local databases, use the |
| policy | Query or compare the applied policy for a process. Usage: where:
Note: If an image name is specified, a new policy is generated as if the process was created. If a process ID is specified, the system queries the effective policy for the running process. For example: To query the policy for future executions of notepad.exe: C:\Program Files\Palo Alto Networks\Traps> cytool policy query notepad.exe Enter supervisor password: Generic Enable 0x00000001 LongHooks 0x00000000 StaticHooks 0x00000000 NoCallSplitting 0x00000000 InitSecurityCookie 0x00000000 DontInjectThinApp 0x00000001 LeanInjection 0x00000000 B01 Enable 0x00000000 BlockAPI 0x00000000 [...] To compare the policy for future executions of notepad.exe to the default policy: C:\Program Files\Palo Alto Networks\Traps> cytool policy compare notepad.exe default Enter supervisor password: Generic Enable 0x00000001 0x00000001 LongHooks 0x00000000 0x00000000 StaticHooks 0x00000000 0x00000000 NoCallSplitting 0x00000000 0x00000000 InitSecurityCookie 0x00000000 0x00000000 DontInjectThinApp 0x00000001 0x00000001 LeanInjection 0x00000000 0x00000000 B01 Enable 0x00000000 0x00000000 BlockAPI 0x00000000 0x00000000 [...]
Query the policy of process with ID 1337.
Compare notepad's and process ID 1337 policies. |
| protect | Enable or disable a protection feature. Usage: cytool protect where:
For example: To disable registry protection,
To enable all protection,
To set protection according to policy,
Note Any protection state change made by Cytool persists until the next reboot and is set according to the policy one hour after reboot. |
| proxy | Set or query cloud-defined proxies for the agent. Usage:
|
| quarantine | View and restore quarantined files. Usage:
|
| queryall | Display a list of imported certificates for troubleshooting purposes. |
| reconnect | Try reconnecting to the server if communication has been disabled, or force registration with a new Usage:
Note The |
| runtime | Stop or start product components. Usage: where:
For example: C:\Program Files\Palo Alto Networks\Traps>cytool runtime stop cyserver cyverak Enter supervisor password: Service State cyverak Stopped cyvrmtgn Running cyvrfsfd Running cyserver Stopped |
| scan | Scan operations. Usage: Where <action>:
Example: C:\Program Files\Palo Alto Networks\Traps> cytool scan start Enter supervisor password: The operation completed successfully. C:\Program Files\Palo Alto Networks\Traps> cytool scan query Enter supervisor password: Start Time : 9:09:0648 Elapsed Time : 00:00:51 State : Running Scanned Files : 3944 Suspicious Files : 0 Failed Files : 1?\C: Volume Root Path : \?\C:\ 8 20000 Window Usage : 0 14 20000 Path : ... |
Cortex XDR Agents Deployed in Advertise Mode
Advertise mode is an msi property you can set manually through the msi execution command line or through a deployment profile in a third-party deployment tool such as Microsoft System Center Configuration Manager (SCCM), allowing the Windows Installer to advertise the availability of an application to users or other applications without actually installing the application. For more information on advertise mode, refer to the Microsoft Windows official documentation.
Caution
When you want to install or upgrade a Cortex XDR agent on an endpoint where a Cortex XDR agent release prior to 7.0.3 was installed in Advertise mode, whether the agent is still running or was removed from the endpoint, you must first clean the endpoint from the remains of the previous installation in Advertise mode. Otherwise, if you don’t clean the endpoint, the installation/upgrade of the Cortex XDR agent will fail.
The following table summarizes the different scenarios of upgrade paths and the recommended workaround according to the different Cortex XDR agent releases:
| Upgrade to Agent Release 5.0.0 or Later | Upgrade to Agent Release 7.0.3 or Later | Upgrade to Agent Release 7.1.1 or Later | |
|---|---|---|---|
| Agent release 5.0.0 or later that was installed in Advertise mode | <p>Not supported, leads to undefined behavior.</p><p>Contact Palo Alto Networks Support for assistance before you can re-install the agent.</p> | <p>Not supported, you will receive an error in the agent installation log.</p><p>Contact Palo Alto Networks Support for assistance before you can re-install the agent.</p> | <p>You will receive an error in the agent installation log.</p><p>Add the CLEAN_AGGRESIVLY=1 msi property to you command line and proceed to install the agent.</p> |
| Agent release 7.0.3 or later that was installed in Advertise mode | N/A | Seamless | Seamless |
Note
Palo Alto Networks recommends that you always upgrade to the latest agent release of the latest major version and use the CLEAN_AGGRESIVLY=1 msi property to mitigate any Advertised mode related issues.
Cortex XDR Agent for MacOS
The Cortex XDR agent protects MacOS endpoints by preventing known and unknown malware from running and halting attempts to leverage software exploits and vulnerabilities. The agent enforces your organization’s security policy as defined in Cortex XDR. When a security event occurs on an endpoint, the agent collects forensic information about that event which you can use to analyze the incident further.
Cortex XDR Agent for Mac Requirements
The Cortex XDR agent for Mac has the following requirements:
| Requirement | Specification |
|---|---|
| Processor | <ul><li>Intel Pentium 4 or later with SSE2 instruction set support</li><li>AMD Opteron/Athlon 64 or later with SSE2 instruction set support</li><li>macOS based devices with Apple Silicon ARM Mx processors</li></ul> |
| RAM | 512 MB minimum; 2 GB recommended |
| Hard disk space | 5 GB minimum; 20 GB recommended |
| Operating system versions | <p>Palo Alto Networks supports Cortex XDR agent on many operating systems. To determine the minimum Cortex XDR agent release for a specific operating system, refer to Where can I install the Cortex XDR Agent for macOS.</p><div data-gb-custom-block data-tag="hint" data-style="info" class="hint hint-info"><p>Note</p><p>You can install the Cortex XDR agent for Mac only on endpoints running macOS.</p></div> |
| Networking | <ul><li>Allow communication on the TCP port from the Cortex XDR agent to server (the default is port 443).</li><li>Allow the Cortex XDR management console and agent to communicate with external and internal resources required for enforcing endpoint protection.</li></ul> |
Install the Cortex XDR Agent for Mac
Choose your preferred method to install the Cortex XDR Agent on your macOS endpoints:
- Install with a Unified Configuration Profile for MDMs
- Install using JAMF
- Install manually
Install with a unified configuration profile for MDMs
You install the Cortex XDR agent by deploying an installation package on the endpoint. When you install the Cortex XDR agent for macOS, the operating system requires the user to approve system extensions, notifications, content filter configuration, login items, and to grant full disk access permissions.
For a seamless installation that does not require end user interaction, Palo Alto Networks provides a unified configuration profile that you can upload to any third-party deployment software of your choice. This unified configuration profile is compatible with all supported macOS versions and all supported Cortex XDR agent versions. If you prefer to manually create the configuration profile in JAMF, refer to Install the Cortex XDR Agent Using JAMF.
These instructions are supplied by Palo Alto Networks to assist our customers. Support with third party vendor tools (with the exception of JAMF) is out of the scope of Palo Alto Networks.
Unified configuration profile payloads
The following payloads are included in the unified configuration profile:
-
Managed Login Items
Payload type:
com.apple.servicemanagementRequired for: macOS 13 and later
-
System Extensions
Payload type:
com.apple.system-extension-policyRequired for: macOS 10.15.4 and later
-
Content Filter
Payload type:
com.apple.webcontent-filterRequired for: macOS 10.15.4 and later
-
Privacy Preferences Policy Control
Payload type:
com.apple.TCC.configuration-profile-policyRequired for: macOS 10.15.0 and later
-
Notifications
Payload type:
com.apple.notificationsettingsRequired for: macOS 10.15.0 and later
Note
There is a new signed profile that is valid until June 2027. Any previous signed configuration profiles may have expired, and should be replaced with the updated profiles attached in this section. While using an expired profile is not recommended, no functional impact is expected. There may be future functional impact if using an expired profile.
It is very important that you first upload the new profiles before replacing expired profiles. To ensure there are no disruptions to your endpoint profiles, make sure to:
- Upload the profiles following the steps described below.
- Ensure all endpoints have both the expired profiles and new profiles. It is recommended to keep both new and old profiles side by side for a month, as ample time to ensure that all deployed agents connect and receive the new profile.
- Only after all endpoints in your environment have the new profiles can you delete the expired profiles.
- When all endpoints have the new profiles, and the expired profiles are removed, there may be a short time (up to of 15 minutes) where an agent could appear as disabled. Any potential affected functionality is network related (event collection, host firewall, isolation). This is resolved automatically, and the agent remains functional during this time period.
This flow details how to deploy the Cortex XDR agent on Mac endpoints using the Palo Alto Networks unified configuration profile file. You must perform the steps consecutively as described below. If you change the order, the configuration profiles may not be available at the time the agent requires them, which could cause unexpected behavior.
-
Upload the unified configuration profile to your MDM tool. If you prefer, or are required to sign the configuration file using your own signing certificate, use the unsigned configuration profile provided here.
-
Download the signed or unsigned configuration profile.
-
Download the signed configuration profile. (CortexXDR_UnifiedConfigProfile_V5_SignedPANW.mobileconfig)
SHA256: 61b41f7395fee559394648602341ab3b8e703940a251102c8d832870403bdbd6
MD5: ec8e1bd188aba606e843c146d1a51722
-
Download the unsigned configuration profile and sign it. (CortexXDR_UnifiedConfigProfile_V5_Unsigned.mobileconfig)
SHA256: 9dd42f3a50016b9f81b60934d756638c9f91d39a122e9924a37dc8e69adc20ee
MD5: 5ef440126d5489f316c708f7768f076c
Note
Palo Alto Networks recommends you upload only a signed configuration profile file to your MDM, avoid uploading an unsigned file directly to your MDM.
-
- Upload the profile to your MDM.
- In the Scope tab of the MDM, add to the targets list set to All Computers.
- Save the configuration profile.
If your MDM solution allows .zip files (such as JAMF) to be uploaded, continue with Step 2. If your MDM solution allows only a .pkg file to be uploaded continue with Step 3.
-
- Upload the Cortex XDR agent installation package (.zip) to your MDM tool.
- Create a new agent installation package in the Cortex XDR management console.
- Upload the ZIP package you downloaded from Cortex XDR to your MDM. Do not extract it.
- Proceed to distribute the Cortex XDR agent package across your endpoints.
- Use this step if your MDM solution allows only a .pkg installation file.
-
Extract the zip package downloaded from the Cortex XDR. Using the standalone install package without the config.xml and the included script will set the distribution ID.
This is a simple bash that calls Cytool and sets the distribution ID accordingly after the installation (the same can be done with proxy).
- Upload only the .pkg file.
-
Run the script, which will set the distribution ID and connect the agent to the given tenant. This action can be run directly after the installation, however an optional delay may be found necessary.
#!/bin/bashsleep 120echo Password1|/Library/Application\ Support/PaloAltoNetworks/Traps/bin/cytool reconnect force <packageDistributionID>; sleep 5; /Library/Application\ Support/PaloAltoNetworks/Traps/bin/cytool checkin -
There is no connection to any tenant at this point in time, so there is no policy, the initial password will always be the default <Password1>. After this, the Cortex XDRagent will register with the given tenant and get its policy.
This is supported by all MDM solutions, either as a single action/policy, where you can define a package to install and a script to run after the install, or as a separate action.
-
Signed configuration profile
Unsigned configuration profile
macOS 15 Sequoia system extensions configuration file
This flow details how to deploy the Cortex XDR agent on macOS 15 Sequoia endpoints using the Palo Alto Networks system extensions configuration file.
When applying the configuration profile on older OS versions, and then upgrading to macOS 15 Sequoia, some fields may not be propagated properly due to known macOS issue. We recommend creating a smart/dynamic group of machines running macOS 15 Sequoia, and applying this profile only to this group.
- If this has not been done previously, follow the instructions for installing the unified configuration profile to your MDM tool. Install with a unified configuration profile for MDMs
- Download the signed or unsigned system extensions configuration profile.
-
Download the signed configuration profile (CortexXDR_SystemExtensionsSequoia_V1_SignedPANW.mobileconfig)
SHA256: 35796ab146072f9beef9fc0398d567cba23432244ff38268124b16aa000ab148
MD5: e354fb7dcf7e17fe21982f3974537e61
-
Download the unsigned configuration profile (CortexXDR_SystemExtensionsSequoia_V1_UnsignedPANW.mobileconfig)
SHA256: f852abf35b525bc4eb25ad05b4590980c72ebfc623eeeda958f4e32cabcf9941
MD5: 66aaf5535d5eba67ef8df9f2bf28980a
-
- Create a smart/dynamic group of machines running macOS 15 Sequoia in your organization.
- Upload/install the profile, and add this smart group to the profile’s targets.
Signed configuration profile
Unsigned configuration profile
MacOS Bluetooth MDM profile
Follow these steps to deploy the MDM profile for macOS endpoints running Cortex XDR agent with the device control Bluetooth feature, using the Palo Alto Networks Bluetooth configuration profile file. This configuration is only needed if you are using the Mac Bluetooth device control feature.
- If this has not been done previously, follow the instructions for installing the unified configuration profile to your MDM tool. Install with a unified configuration profile for MDMs
- Download the signed or unsigned configuration profile.
-
Download the Signed Bluetooth profile (CortexXDR_Bluetooth_Profile_V1_Signed.zip)
SHA256: 4a57adc67db69f176acf8b57dcb8b5ba38f6b584eef3383f1ed7b559b8b47111
MD5: ff66783e221e2ed9031813c0f99f0246
-
Download the Unsigned Bluetooth profile (CortexXDR_Bluetooth_Profile_V1_Unsigned.zip)
SHA256: bce9b1c0f168769b89ef5b61859b853fc9cf93120fce96c2c3e1516624d432da
MD5: 6de66957617145252a65d4faf8d5c49d
-
- Upload/install the profile.
Signed Bluetooth profile
Unsigned Bluetooth profile
Install the Cortex XDR Agent Using JAMF
To deploy the Cortex XDR agent to multiple endpoints, you can set up a JAMF profile. As part of your JAMF deployment you must grant full disk access, approve system extensions, content filter configuration, notifications and managed login items. Depending on your macOS version.
For a seamless configuration using JAMF that does not require creating the configuration profile manually, refer to Install with a unified configuration profile for MDMs.
Caution
Following the changes Apple introduced in macOS 11.3 for MDMs, when you remove an MDM configuration profile that includes permissions for system extensions (for Cortex XDR agents or Global Protect), the system extensions will be instantly unloaded from all endpoints. As a result, the Cortex XDR protection status will be disabled.
To set up a JAMF profile step-by-step, use the following workflow. The figures given here are as examples only. For additional information, refer directly to the JAMF documentation on configuring configuration profiles.
-
Create a new Computer Configuration Profile in JAMF.
Under General Options, assign the following:
- Name:
Cortex XDR Agent Unified Configuration Profile - Level: Select Computer level.
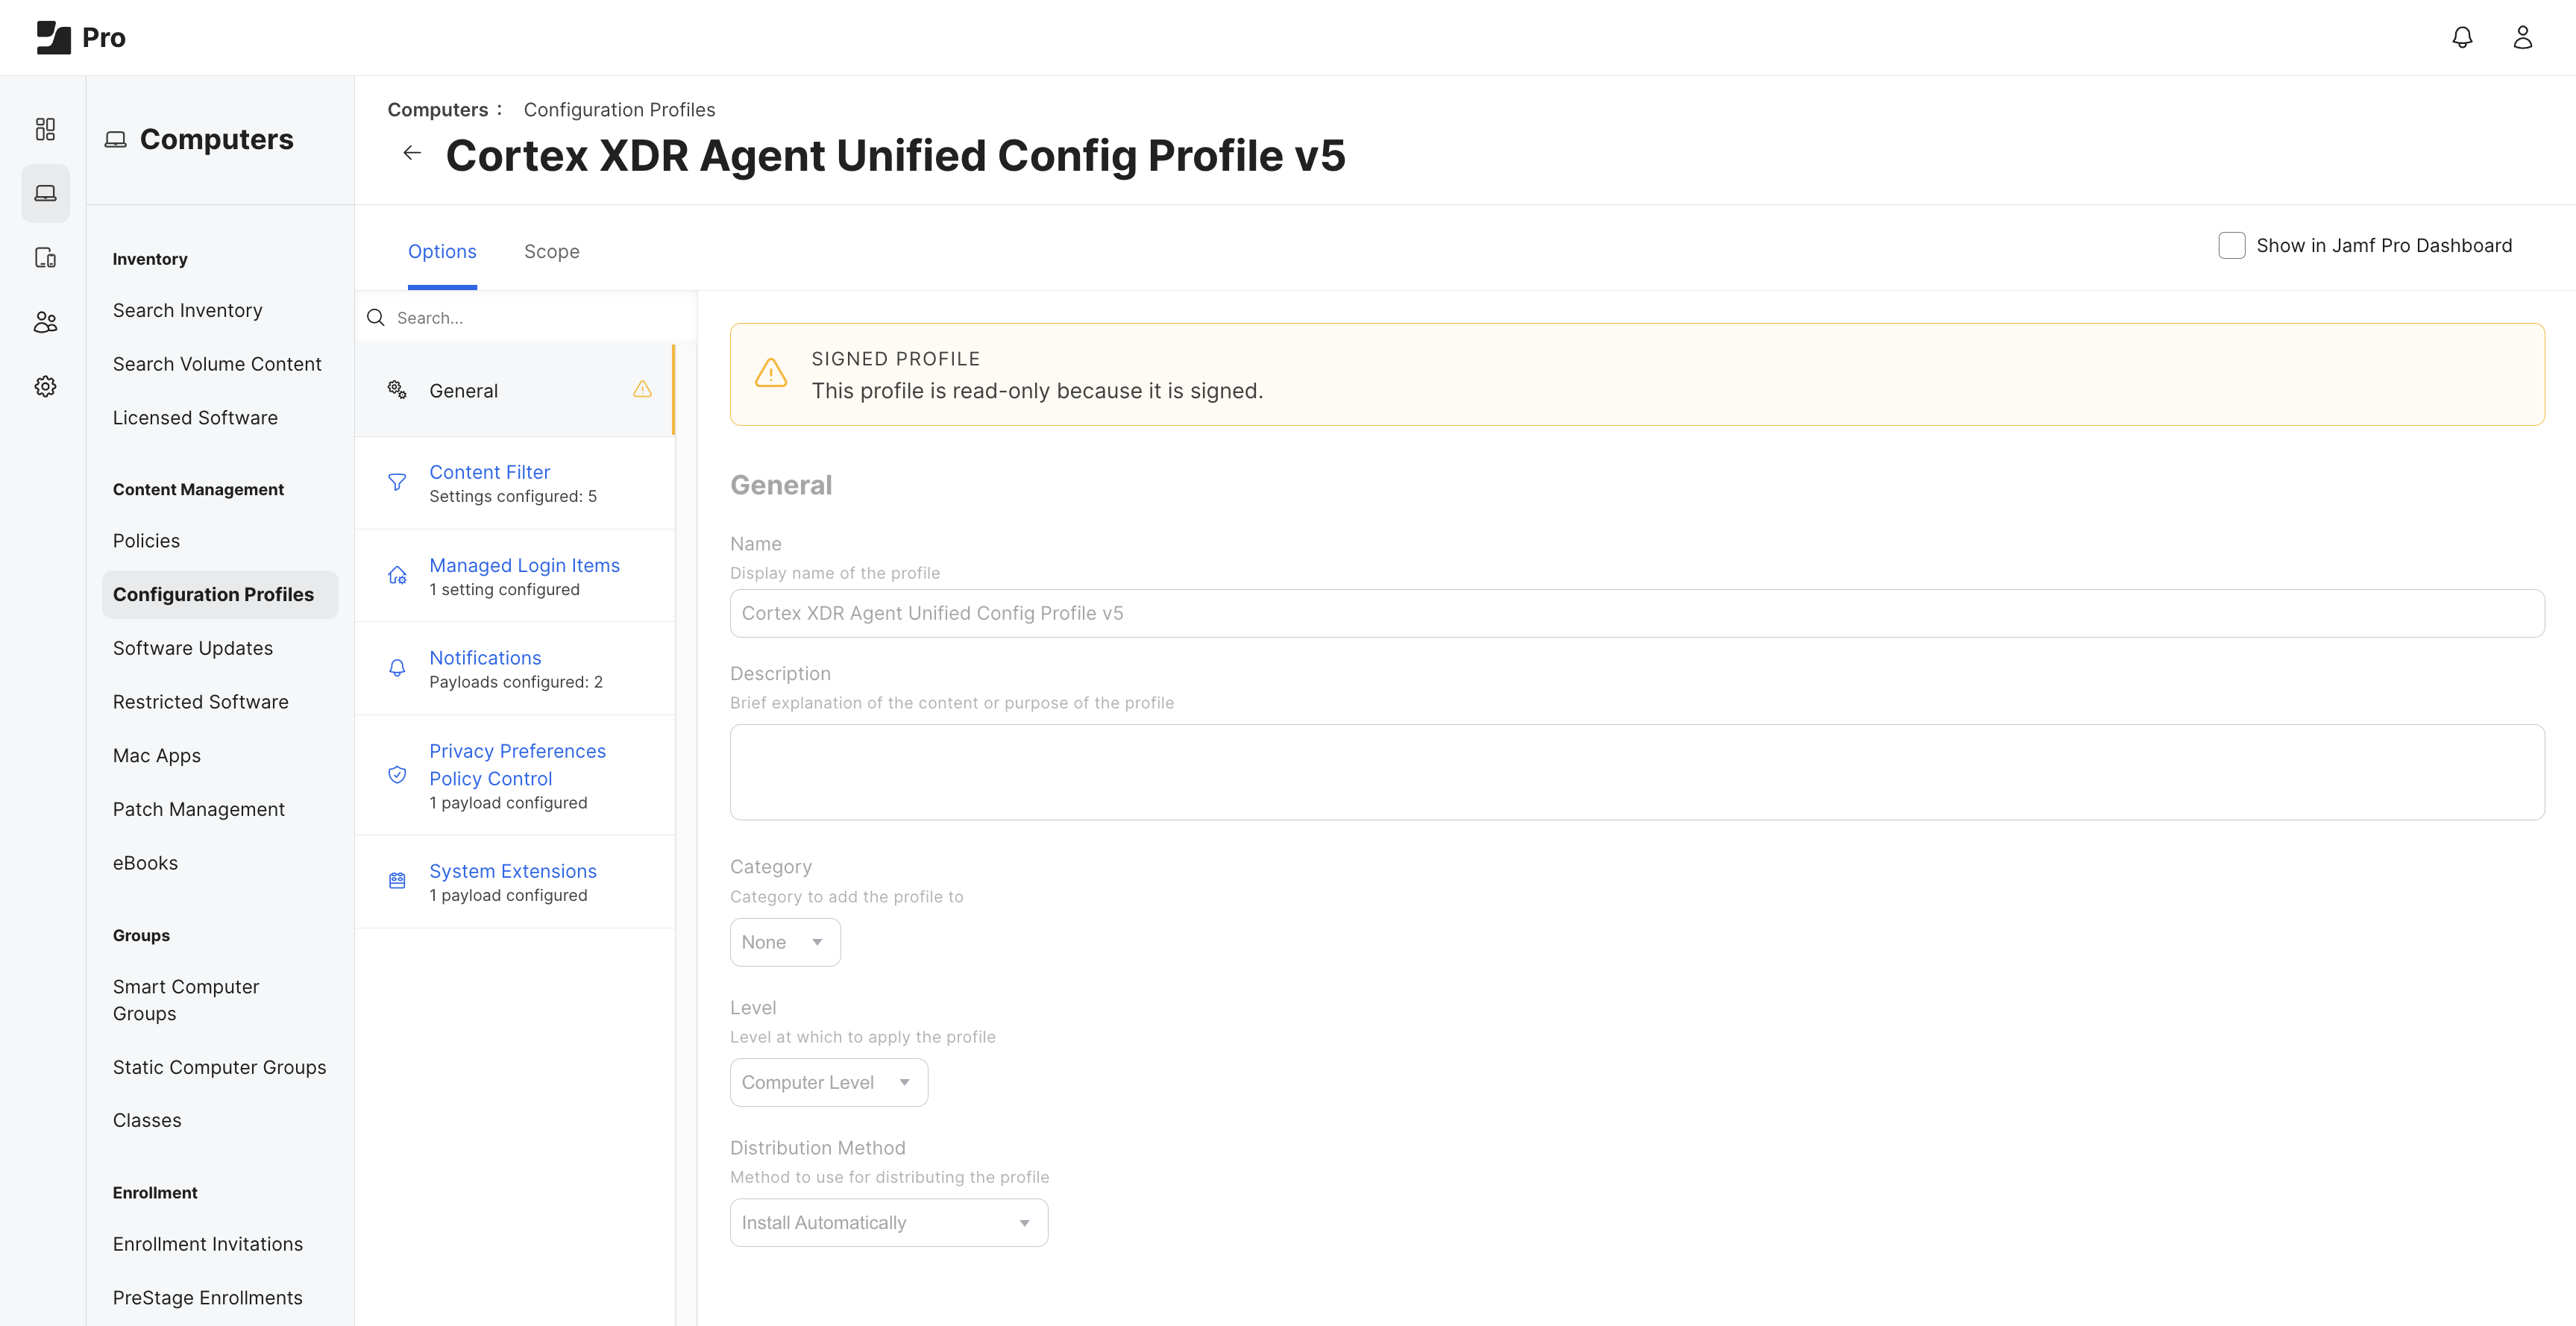
- Name:
-
Configure System Extensions.
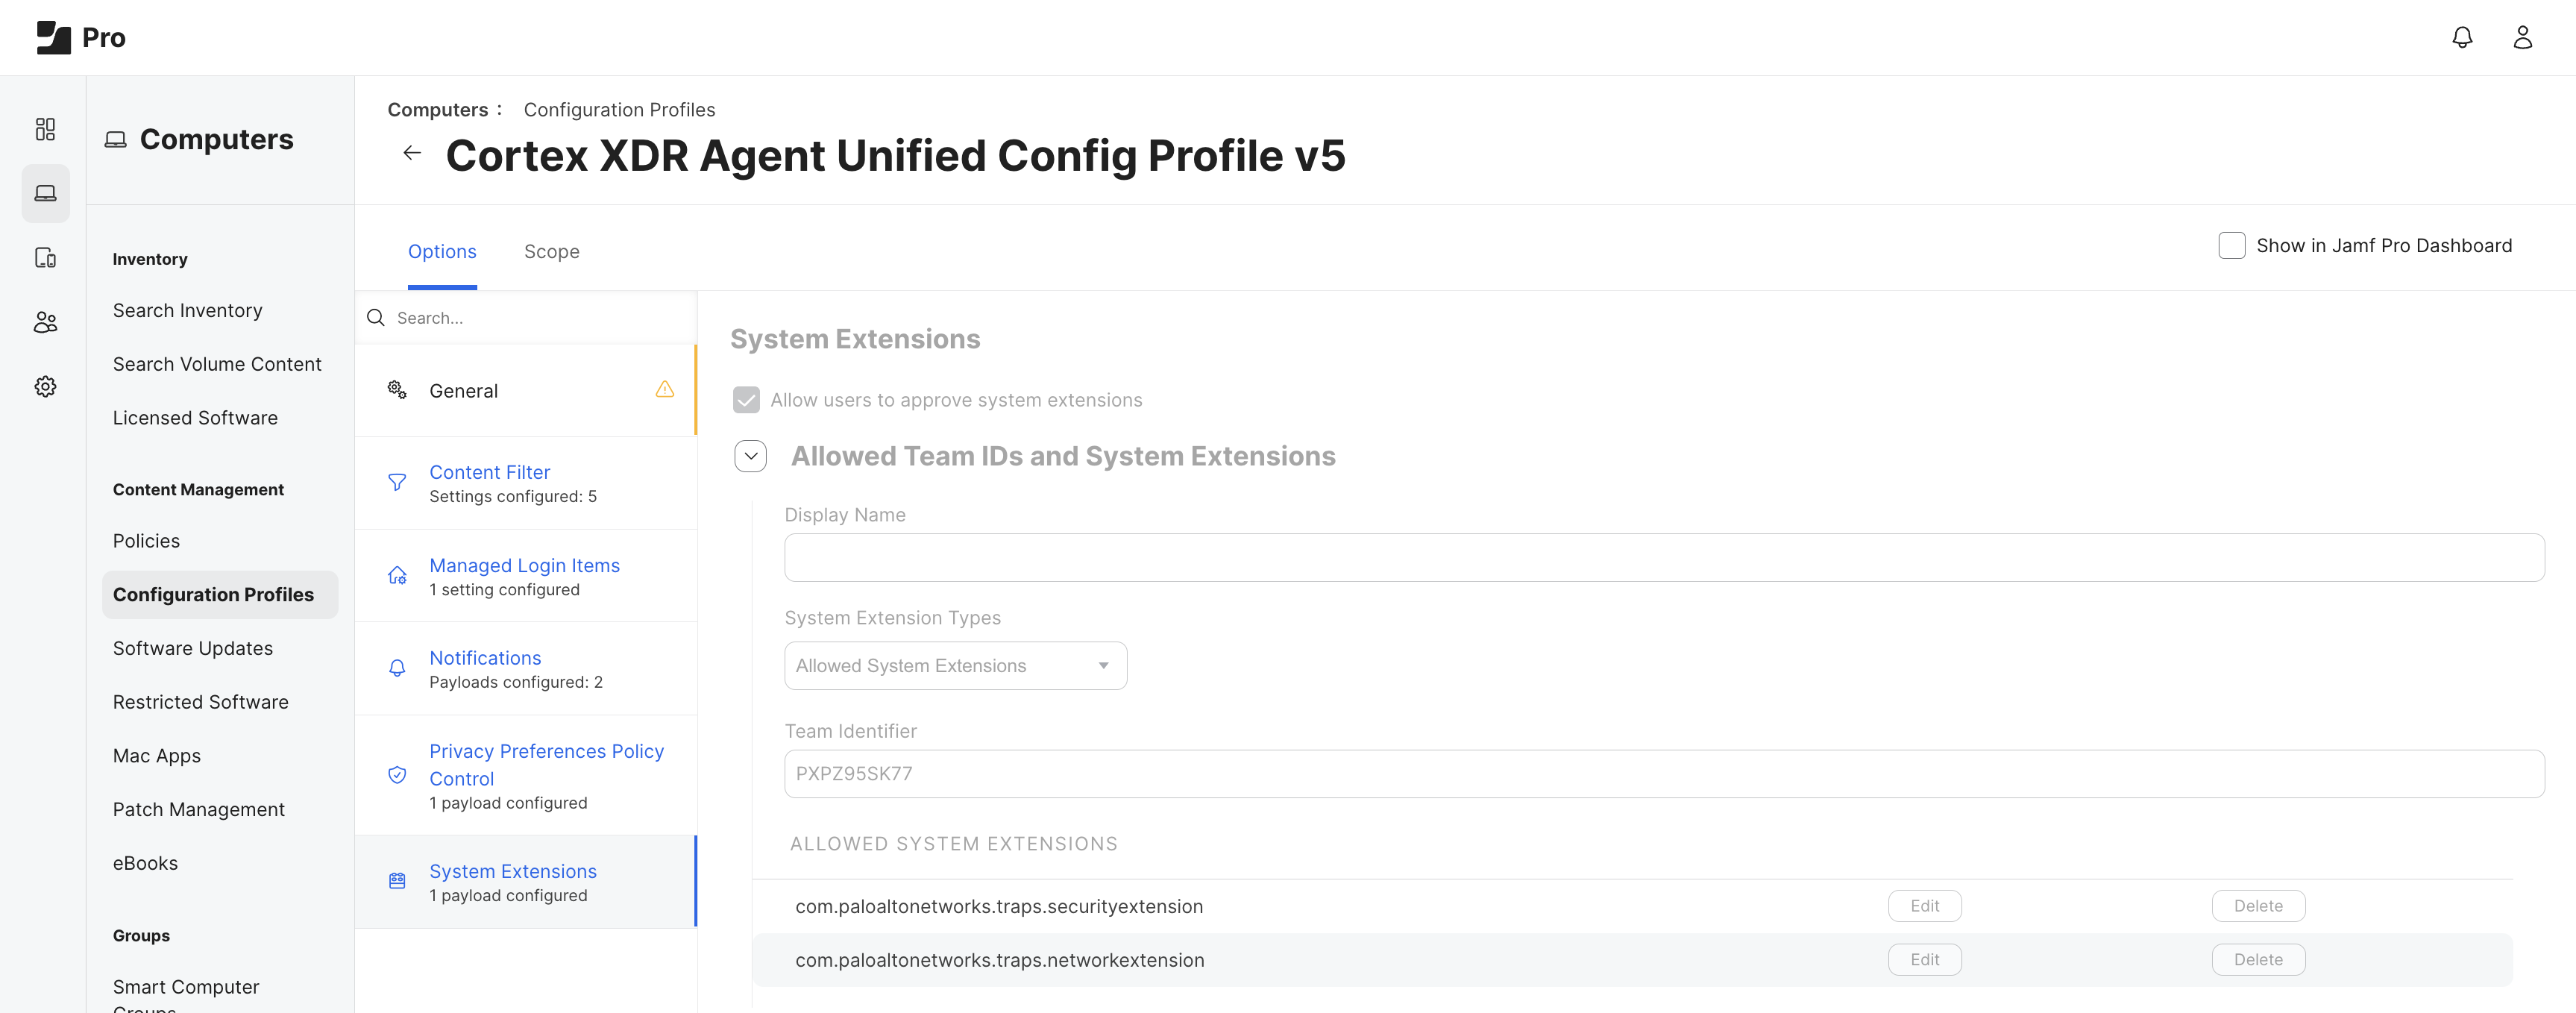
- SelectAllow users to approve system extensions.
- Add an approved Team ID for Palo Alto Networks:
- System Extension Types—Allowed System Extensions
- Team Identifier—
PXPZ95SK77 - Allowed system extension bundles—
com.paloaltonetworks.traps.securityextensionandcom.paloaltonetworks.traps.networkextension
- Add the allowed system extensions and save each item.
-
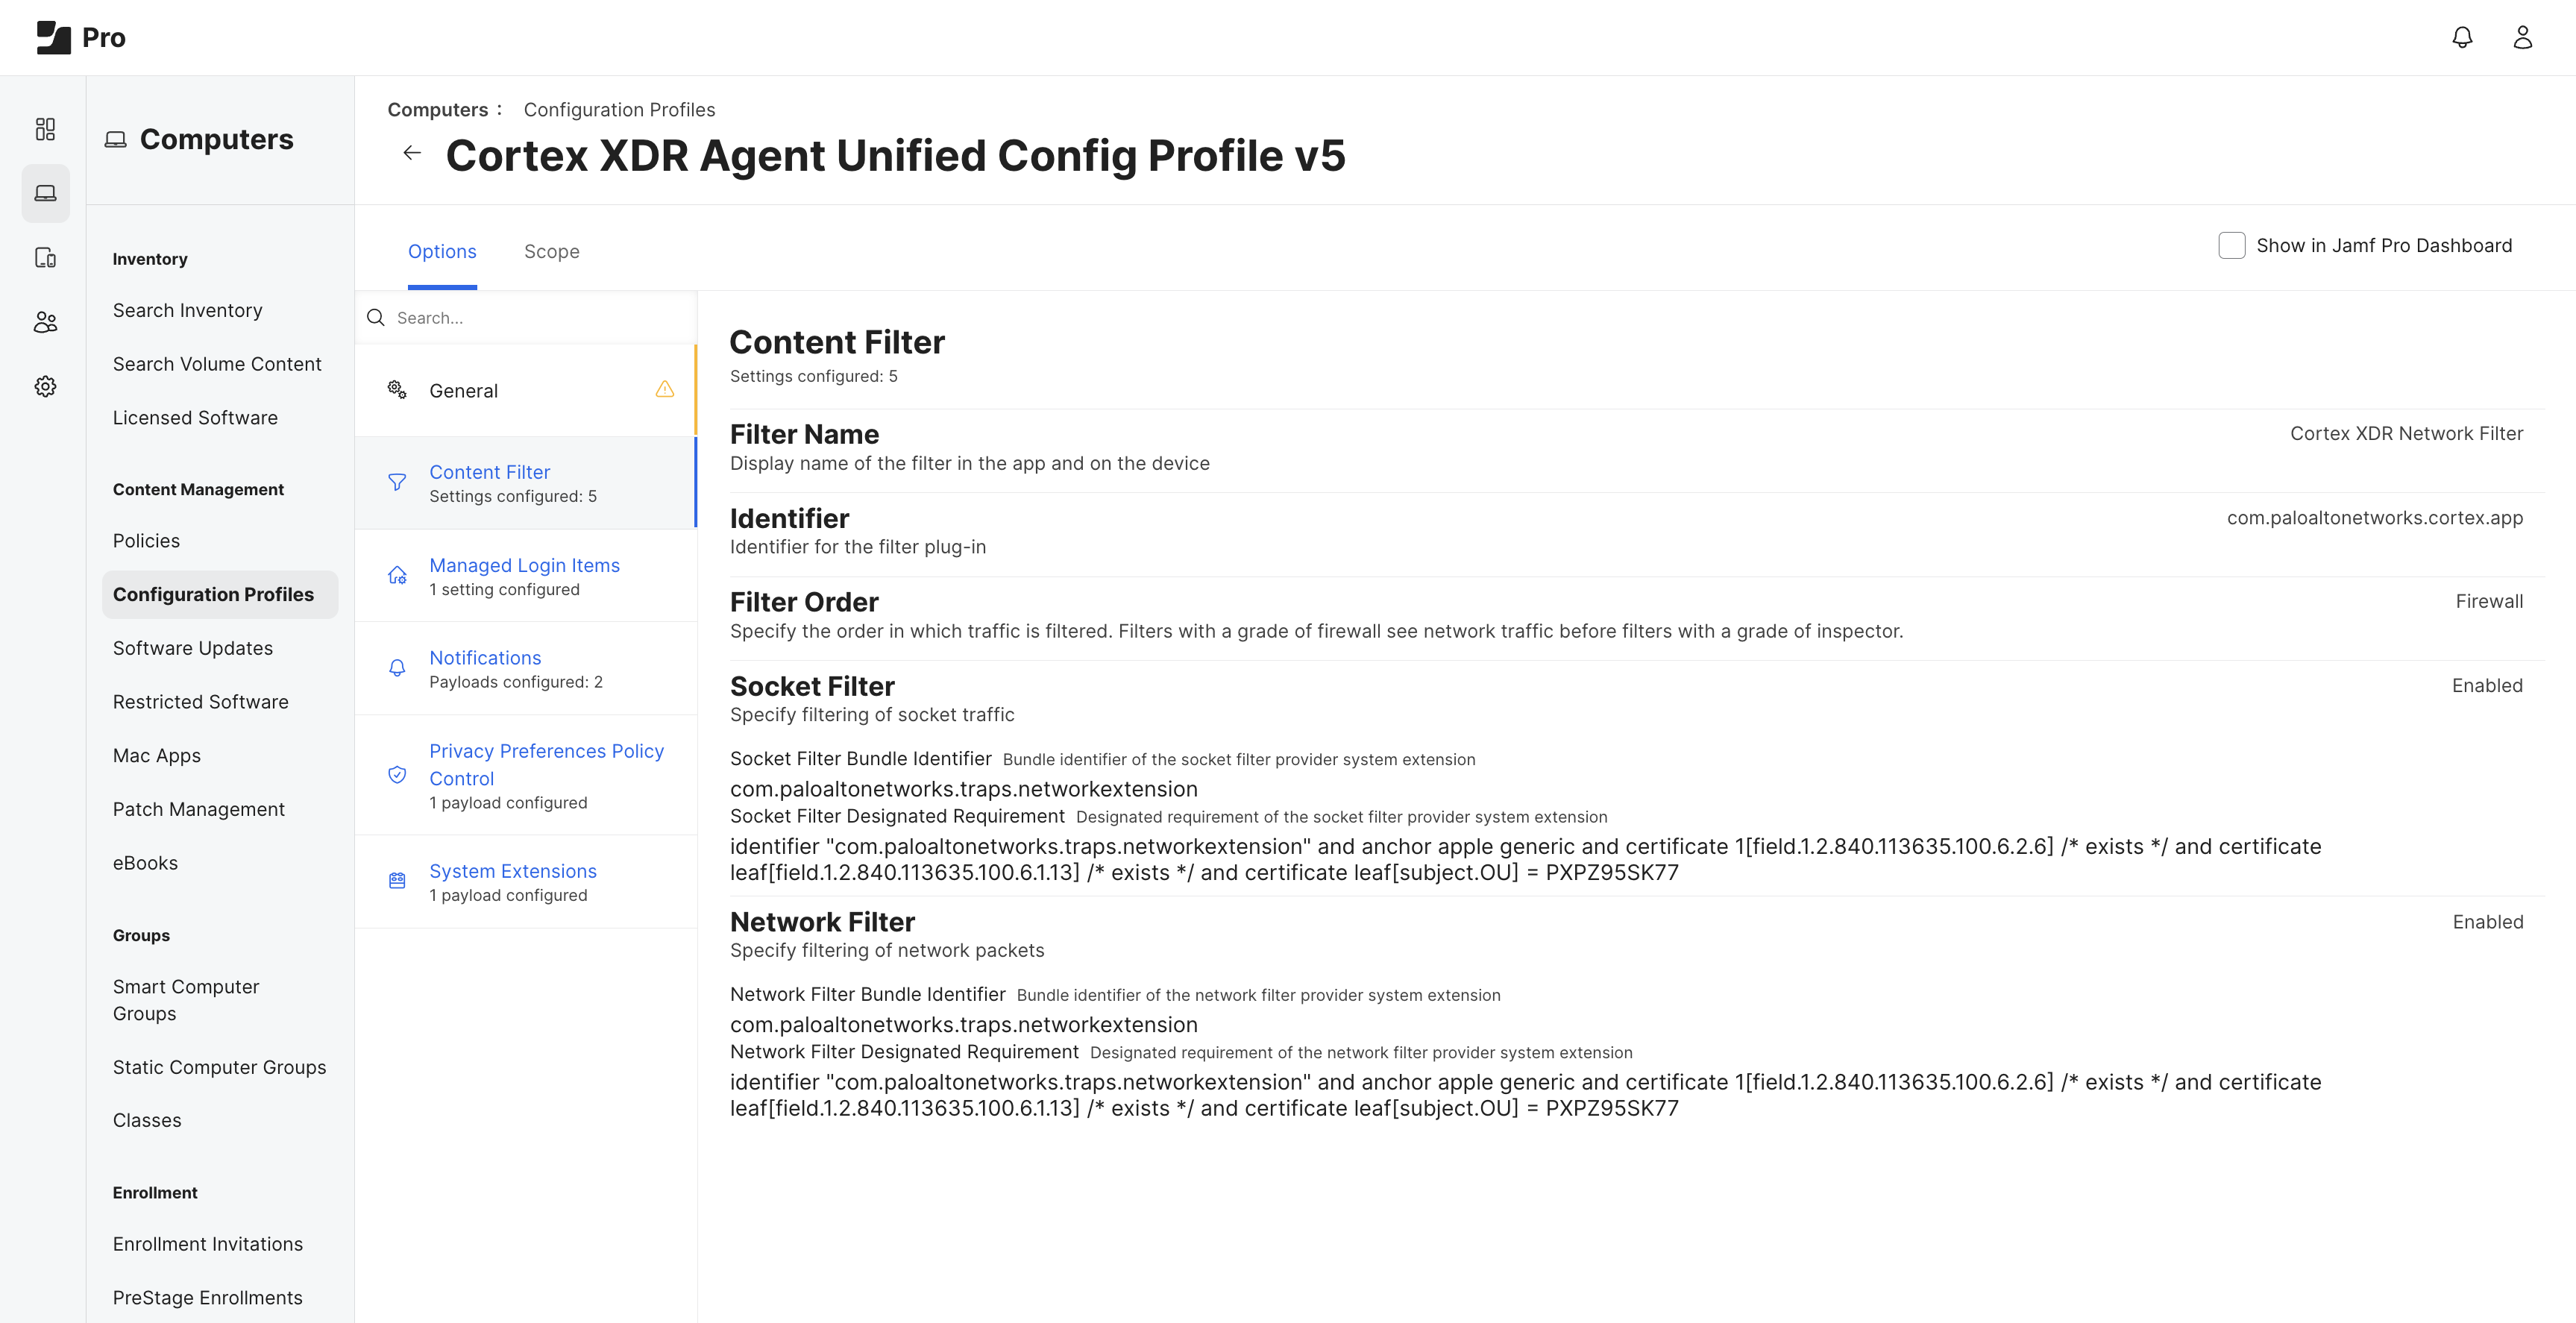
Configure Content Filter.
- Configure the following Content Filter in your JAMF profile:
- Filter name:
Cortex XDR Network Filter - Identifier:
com.paloaltonetworks.cortex.app - Filter Order:
Firewall
- Filter name:
- Set the socket filter to enabled, and define the following:
- Socket Filter Bundle Identifier:
com.paloaltonetworks.traps.networkextension - Socket Filter Designated Requirement:
identifier "com.paloaltonetworks.traps.networkextension" and anchor apple generic and certificate 1[field.1.2.840.113635.100.6.2.6] /* exists / and certificate leaf[field.1.2.840.113635.100.6.1.13] / exists */ and certificate leaf[subject.OU] = PXPZ95SK77
- Socket Filter Bundle Identifier:
- The network (packet) filter is set to enabled. Cortex XDR agent disables the filter when it gets a default policy. The packet filter provider is enabled by the Cortex XDR agent when it is required.
- Network Filter Bundle Identifier:
com.paloaltonetworks.traps.networkextension - Network Filter Designated Requirement:
identifier "com.paloaltonetworks.traps.networkextension" and anchor apple generic and certificate 1[field.1.2.840.113635.100.6.2.6] /* exists / and certificate leaf[field.1.2.840.113635.100.6.1.13] / exists */ and certificate leaf[subject.OU] = PXPZ95SK77
- Network Filter Bundle Identifier:
- Configure the following Content Filter in your JAMF profile:
-
Configure Privacy Preferences Policy Control as described in Steps 4, 5, and 6:
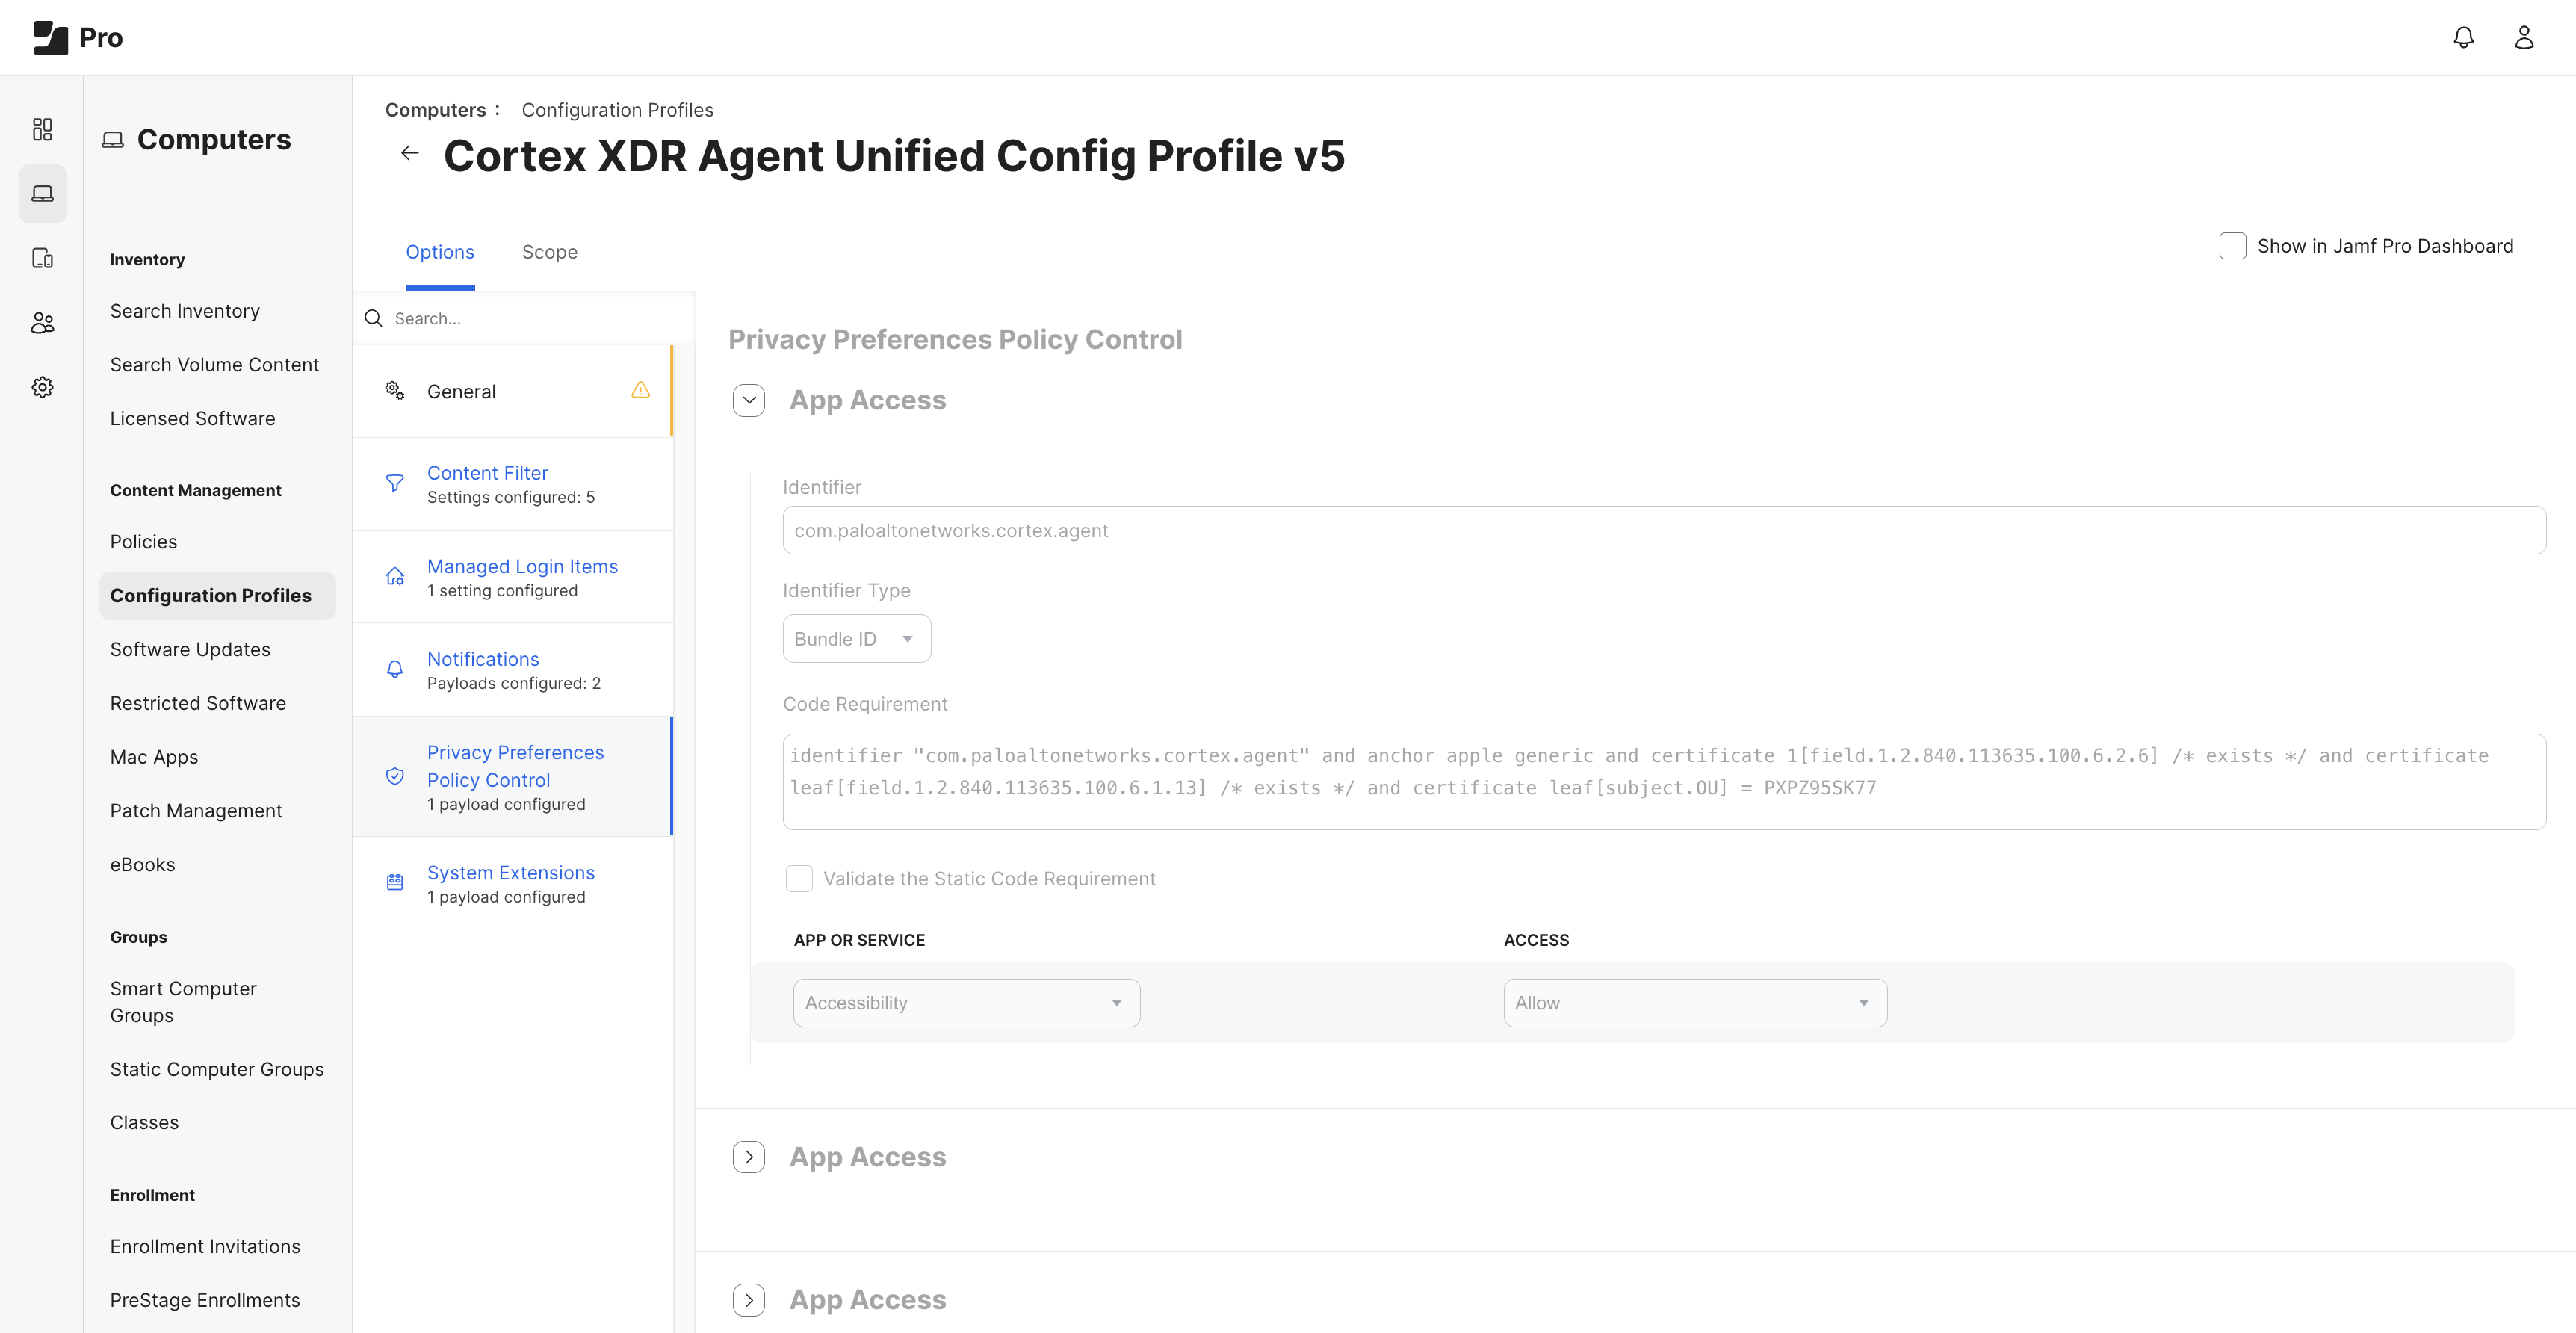
- Use the following settings to define the entity:
- Identifier:
com.paloaltonetworks.cortex.agent - Identifier Type: Bundle ID
- Code Requirement:
identifier "com.paloaltonetworks.cortex.agent" and anchor apple generic and certificate 1[field.1.2.840.113635.100.6.2.6] /* exists / and certificate leaf[field.1.2.840.113635.100.6.1.13] / exists */ and certificate leaf[subject.OU] = PXPZ95SK77
- Identifier:
- Add and Allow Accessibility service.
- Save the app or service item.
- Use the following settings to define the entity:
-
Add a new App Access configuration to grant Full Disk Access to the Cortex XDR security extension.
This configuration is required to enable the security extension to communicate with the OS.
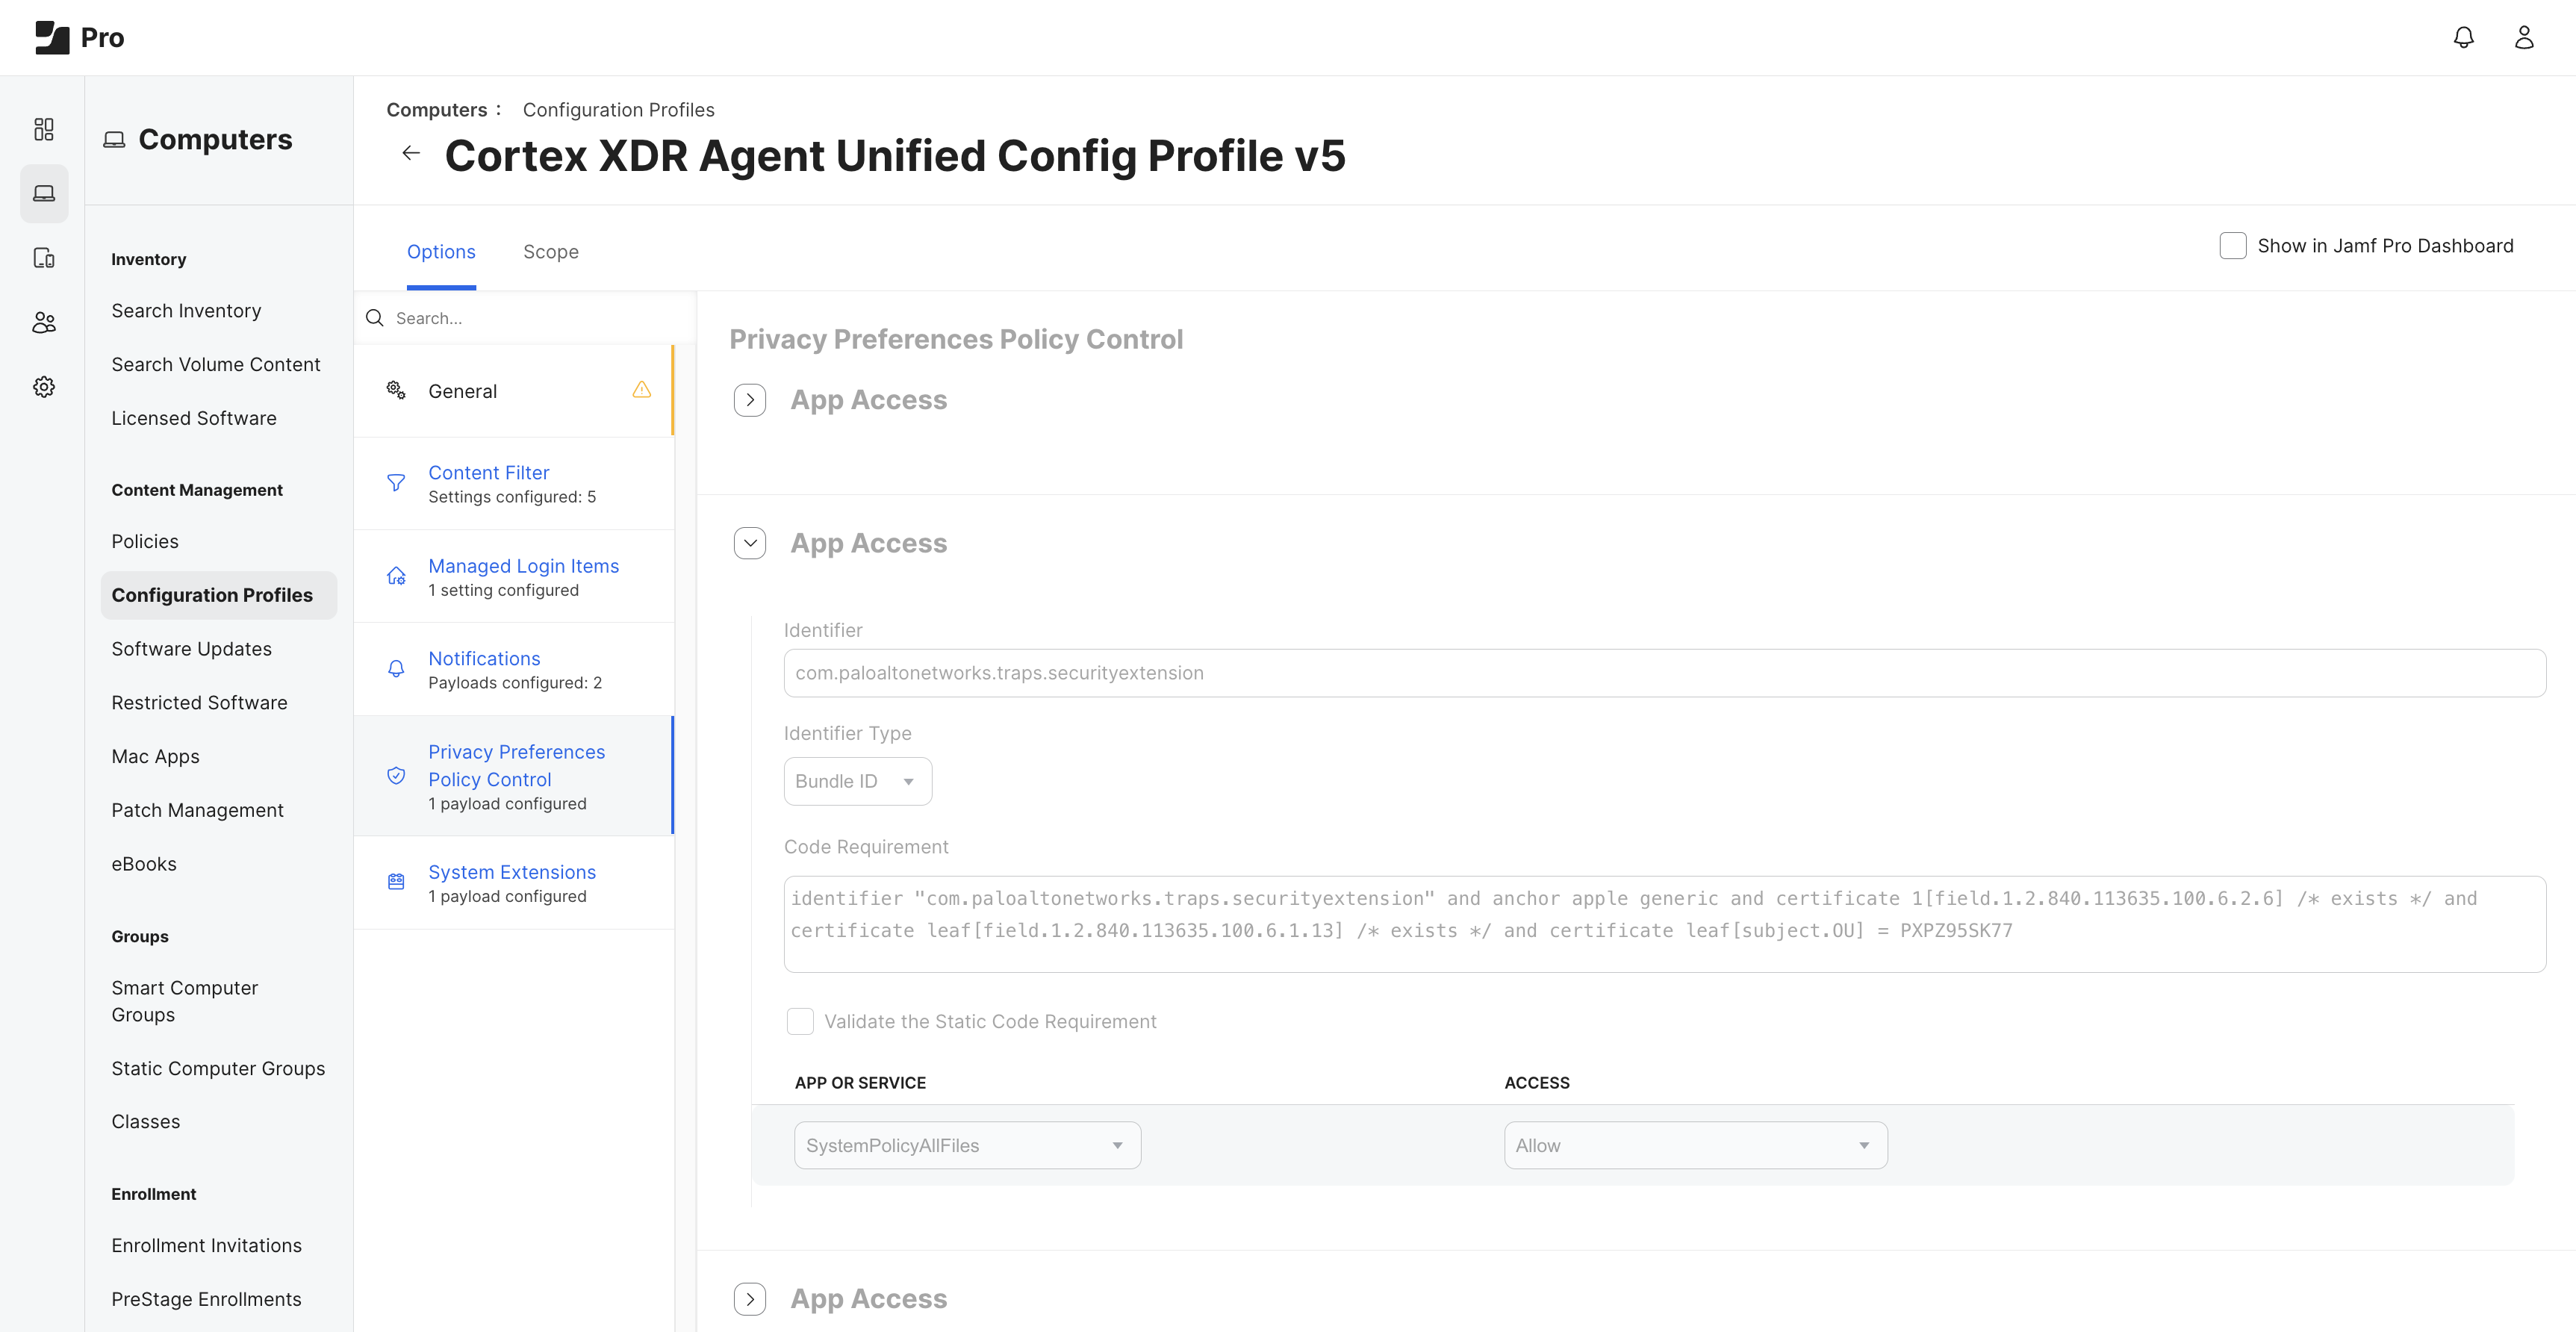
- Use the following settings to define the following entity:
- Identifier:
com.paloaltonetworks.traps.securityextension - Identifier Type: Bundle ID
- Code Requirement:
identifier "com.paloaltonetworks.traps.securityextension" and anchor apple generic and certificate 1[field.1.2.840.113635.100.6.2.6] /* exists */ and certificate leaf[field.1.2.840.113635.100.6.1.13] /* exists */ and certificate leaf[subject.OU] = PXPZ95SK77
- Identifier:
- In App or Service, set SystemPolicyAllFiles to Allow.
- Save the app or service item.
- Use the following settings to define the following entity:
-
Add a new App Access configuration to grant Full Disk Access to Cortex XDR pmd.
This configuration allows the daemon access to analyze processes, files, disk access, utilities and more.
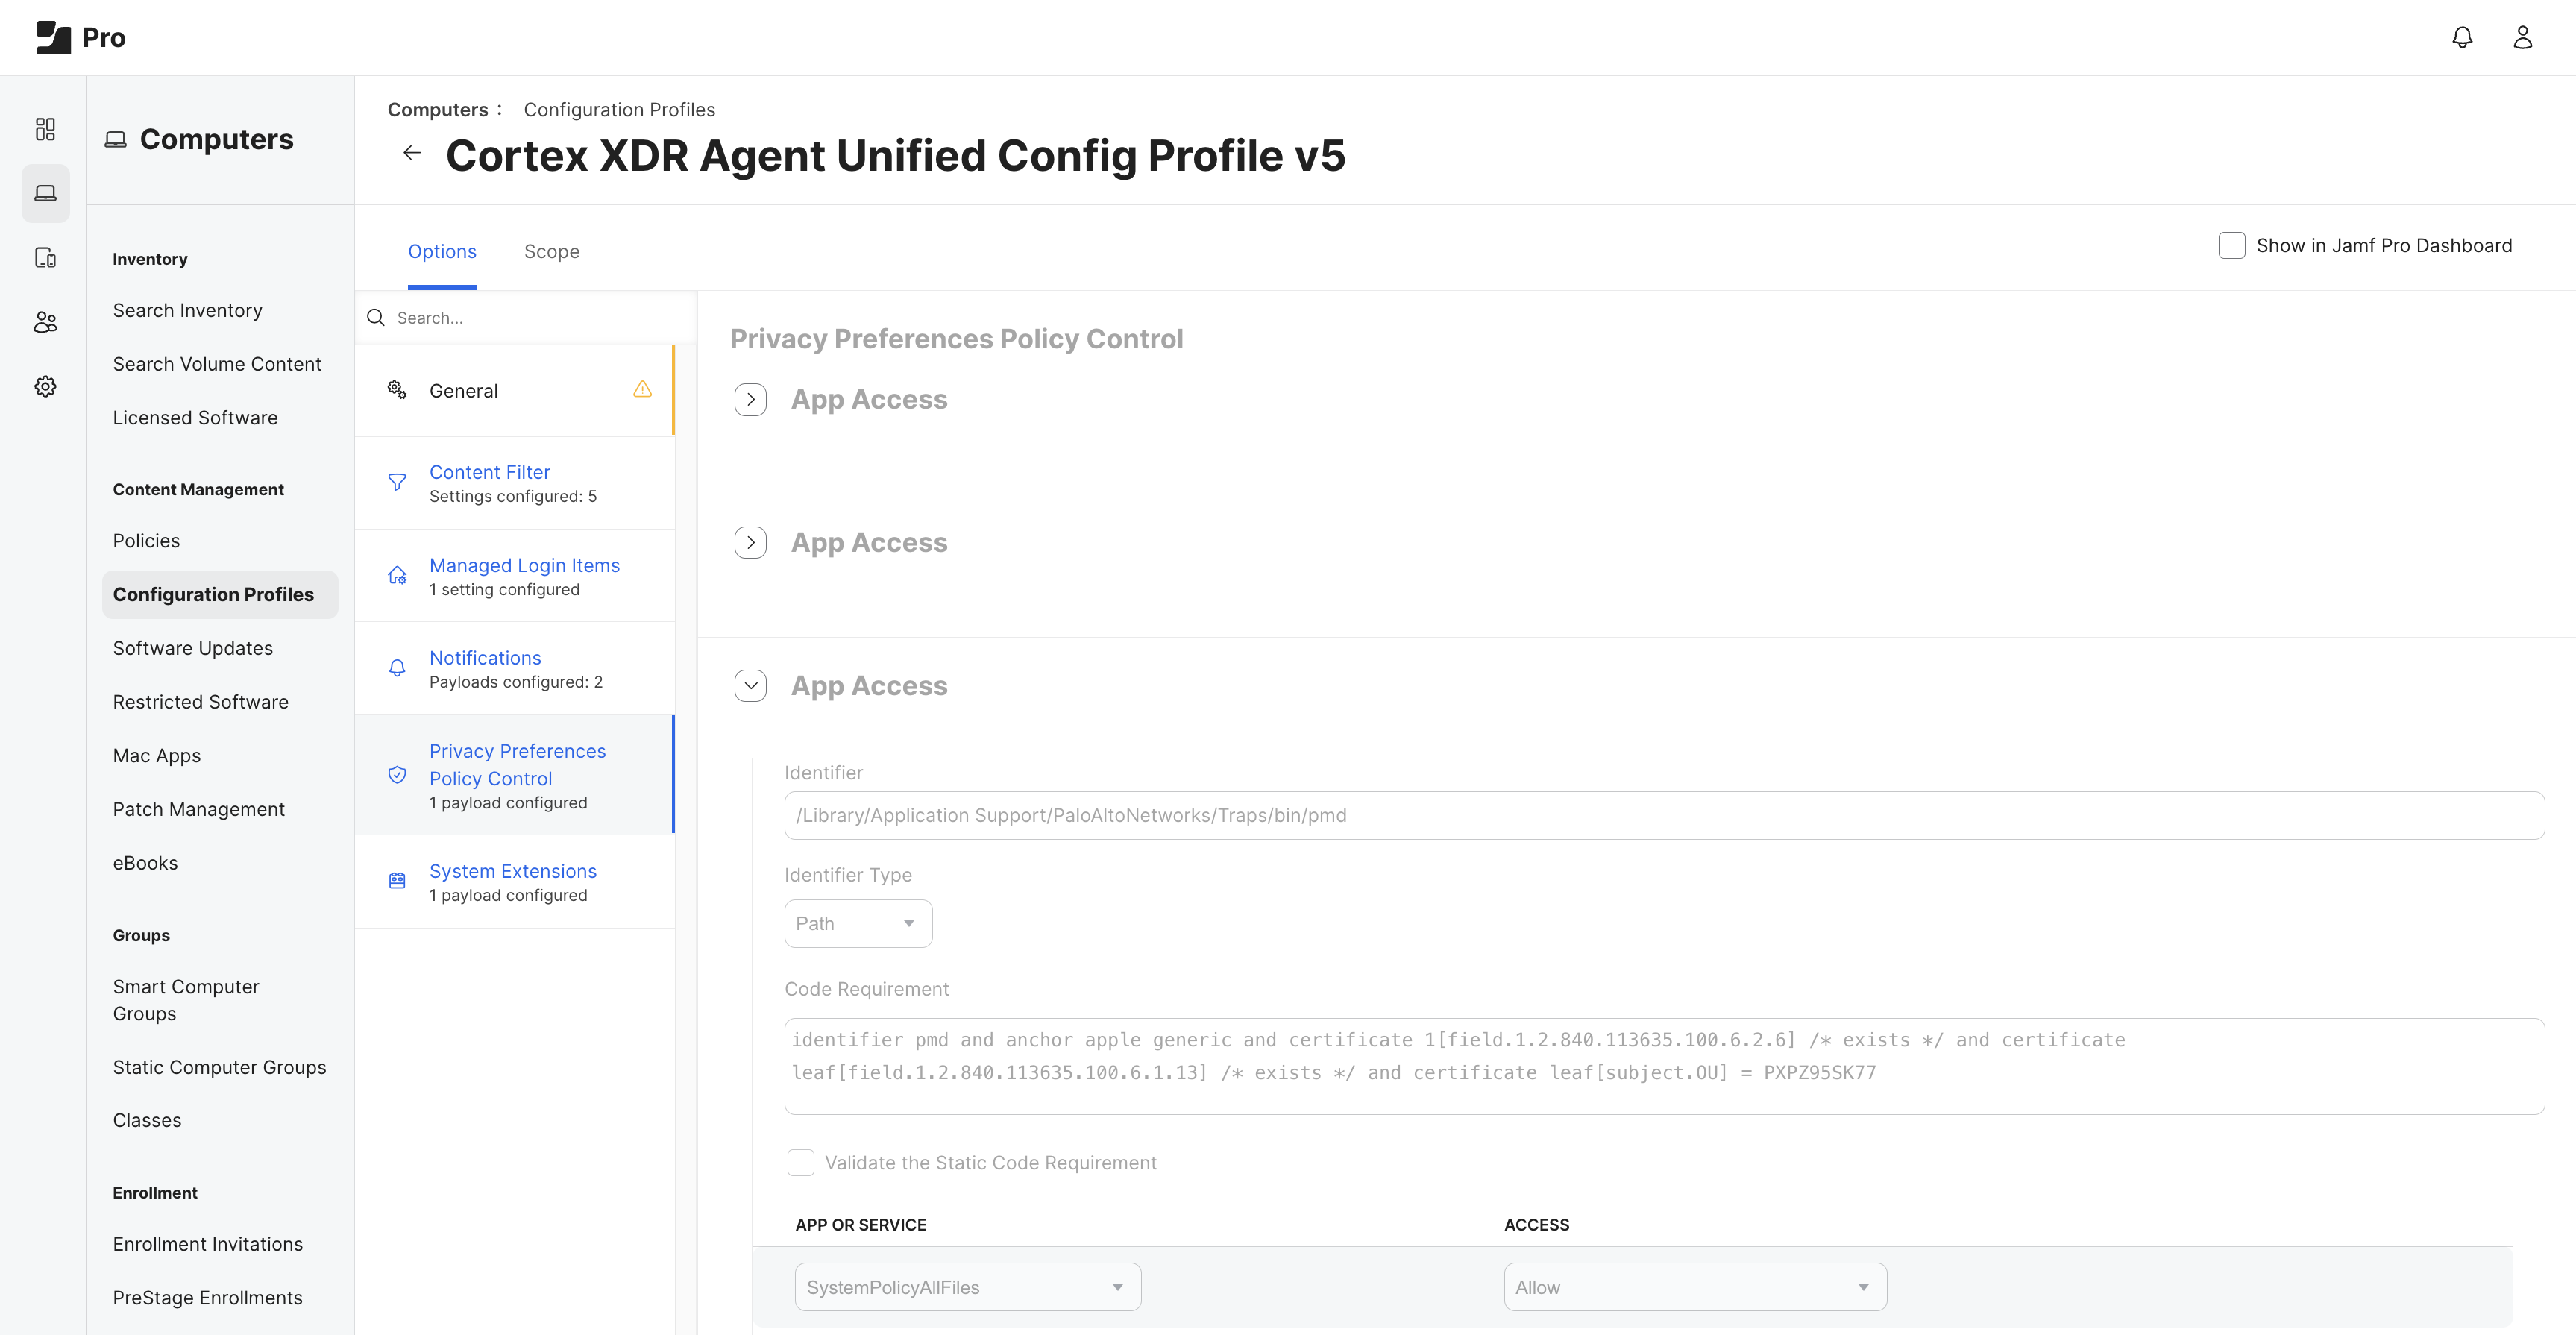
- Use the following settings to define the entity:
- Identifier:
/Library/Application Support/PaloAltoNetworks/Traps/bin/pmd - Identifier Type: Path
- Code Requirement:
identifier pmd and anchor apple generic and certificate 1[field.1.2.840.113635.100.6.2.6] /* exists */ and certificate leaf[field.1.2.840.113635.100.6.1.13] /* exists */ and certificate leaf[subject.OU] = PXPZ95SK77
- Identifier:
- In App or Service, set SystemPolicyAllFiles to Allow.
- Save the app or service item.
- Use the following settings to define the entity:
-
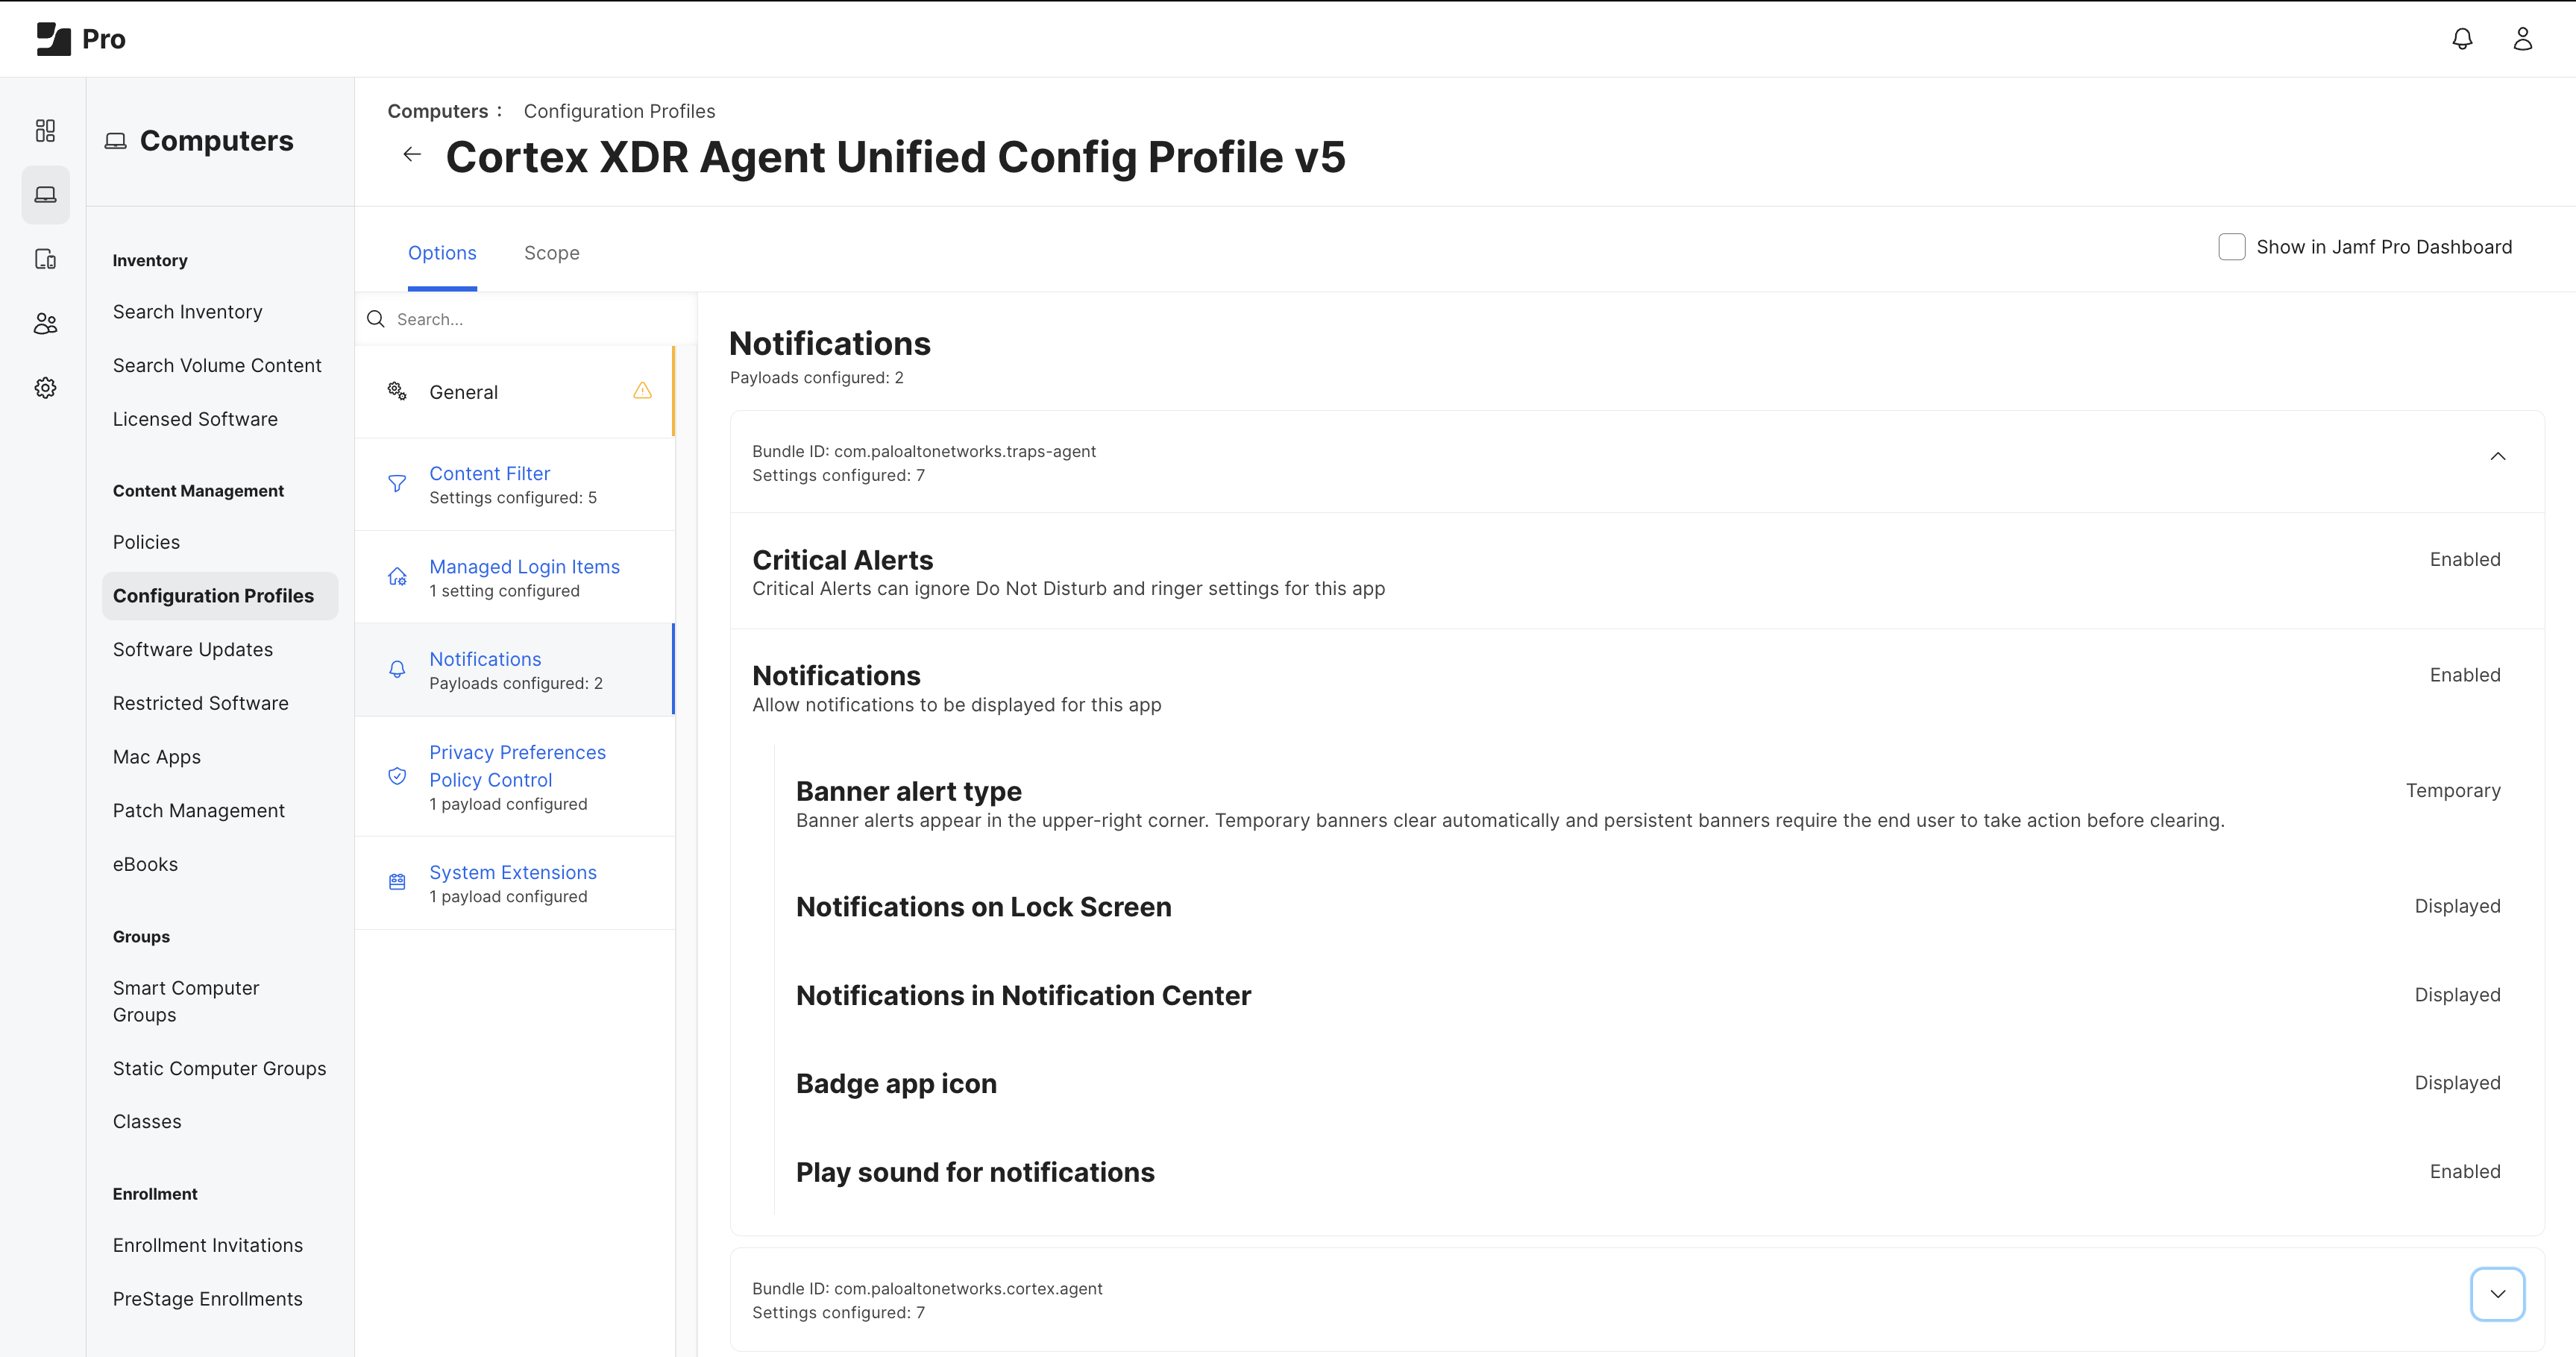
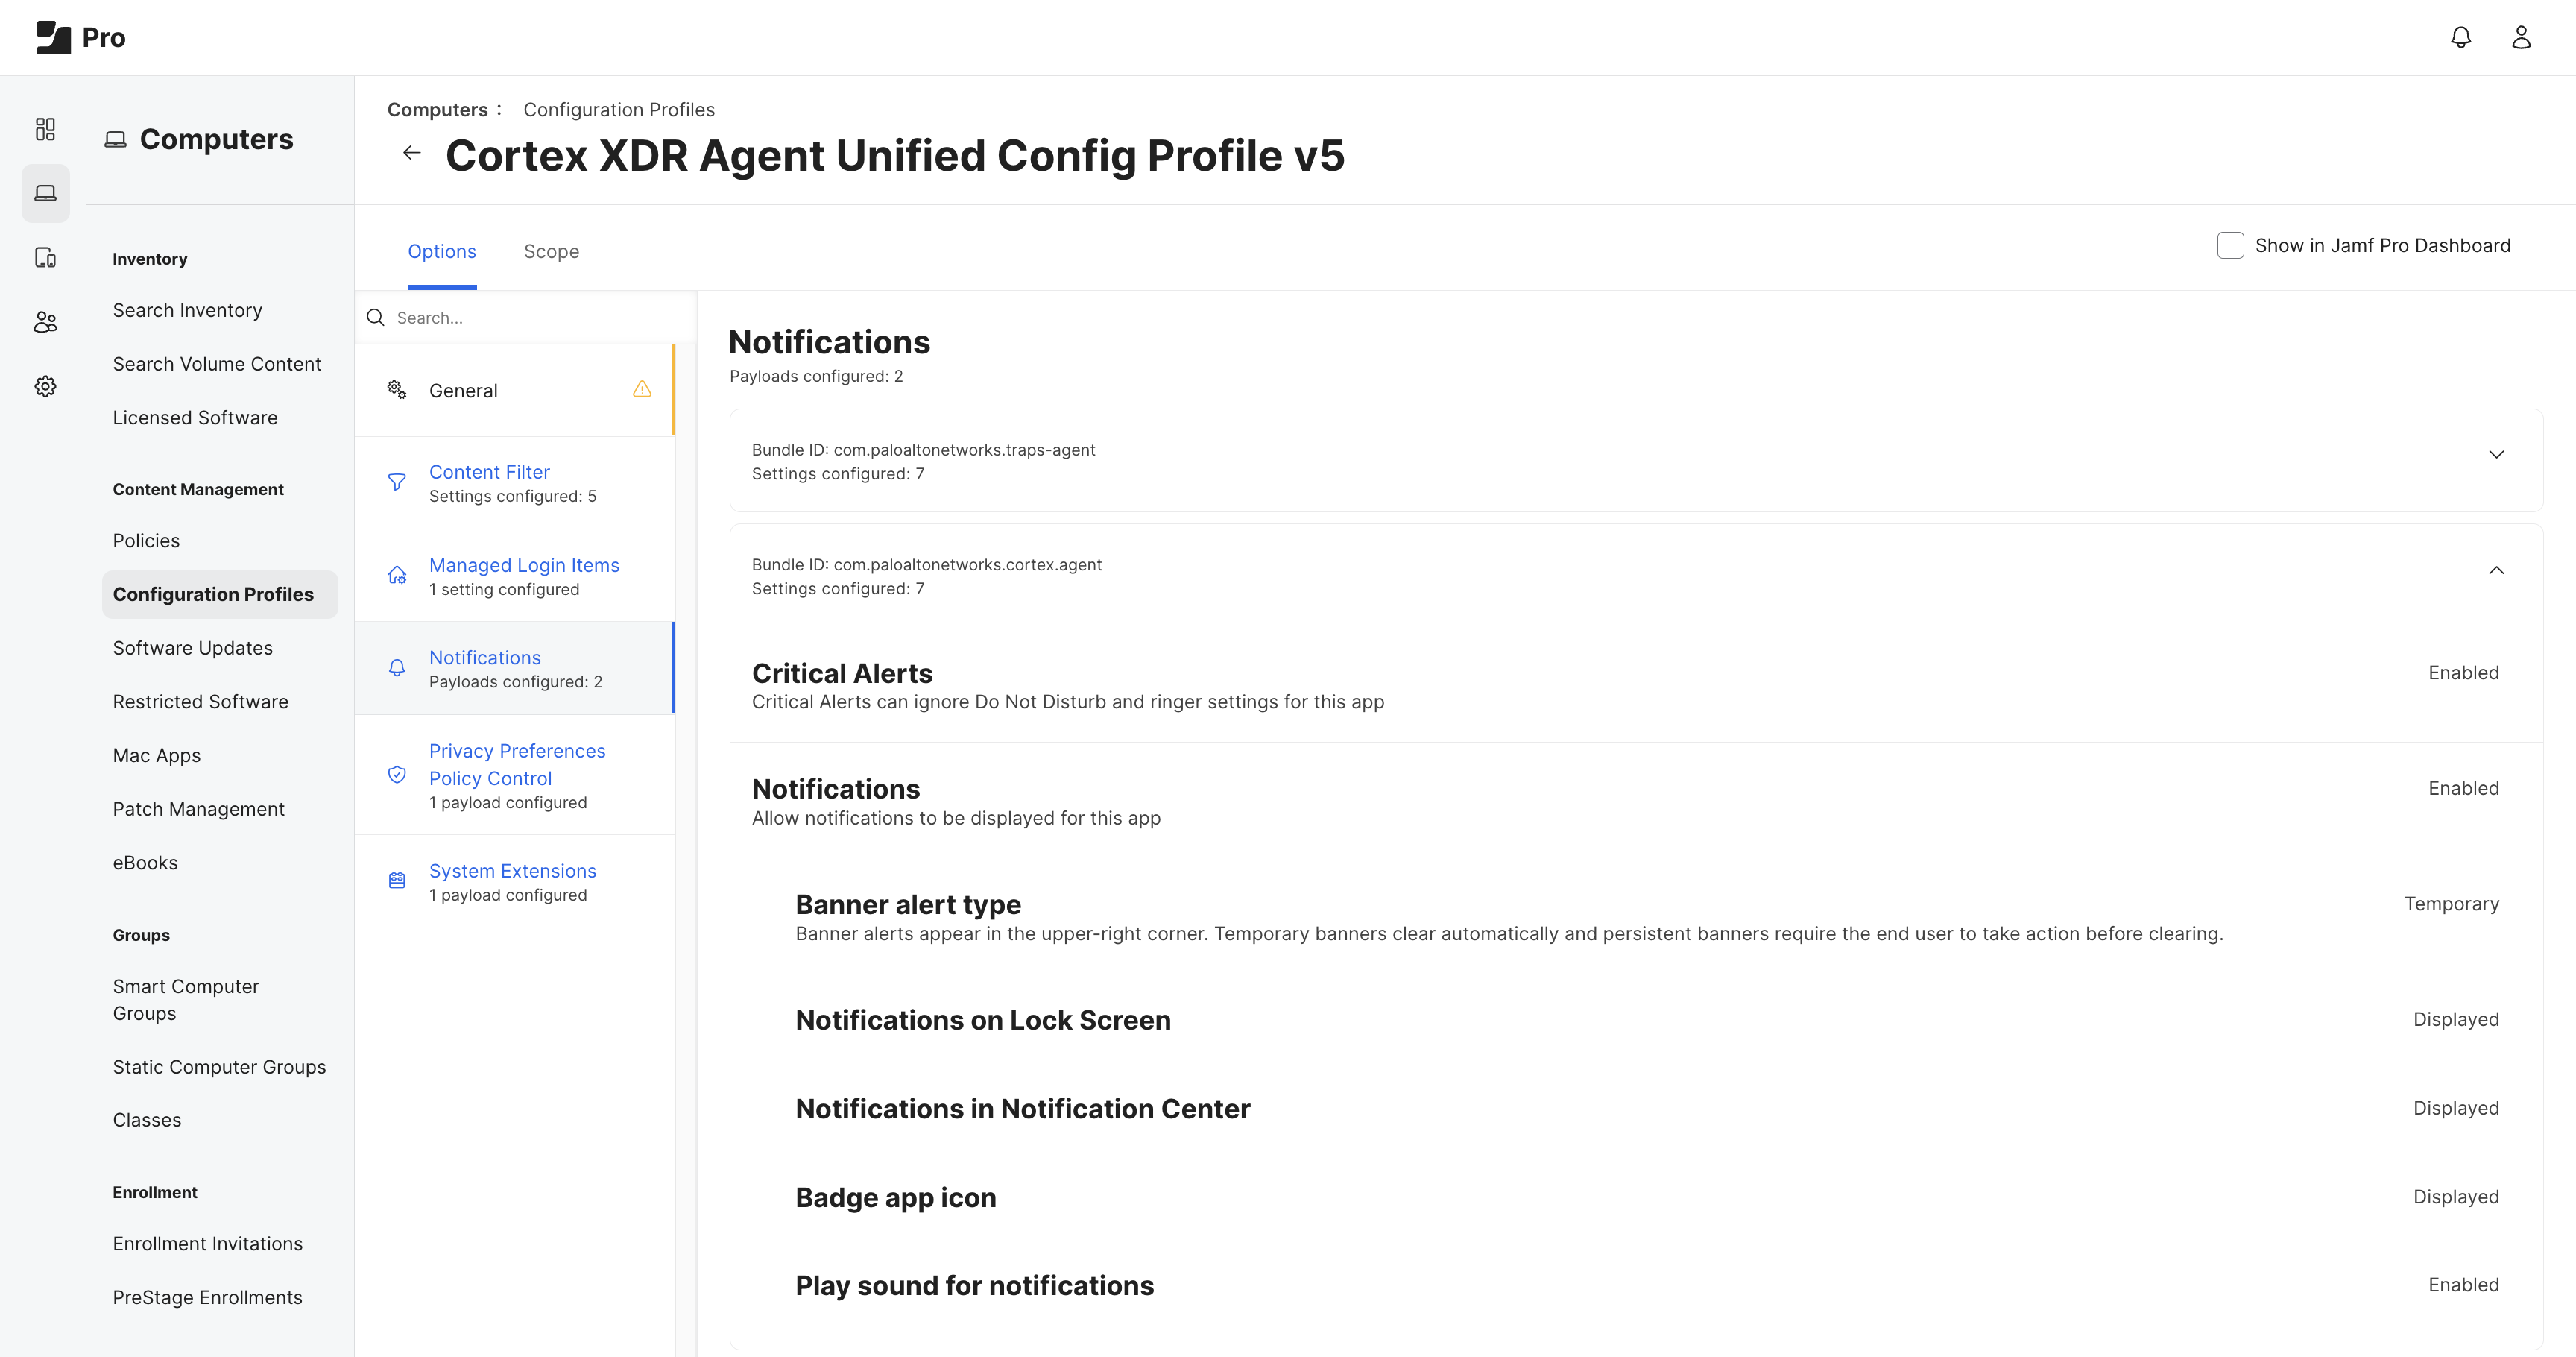
Configure Notifications.
Configure the following Notifications payload in your JAMF profile:
-
Bundle ID for agent 8.2 and earlier:
com.paloaltonetworks.traps-agentBundle ID for agent 8.3 and later:
com.paloaltonetworks.cortex.agent - Critical alerts:
Enable and include. - Notifications:
Enable and include. - Banner alert type:
Temporary and include. - Notifications on Lock Screen:
Display and include. - Notifications on Notification Center:
Display and include. - Badge app icon:
Display and include. - Play sound for notifications:
Enable.
-
-
Configure Managed Login Items.
- Rule type:
Label prefix - Rule value:
com.paloaltonetworks.cortex - Team identifier:
PXPZ95SK77 - Rule comment:
Allows Cortex XDR launch daemons and launch agents
- Rule type:
- Configure Application & Custom Settings and click Upload.
-
Select +Add to add the configuration details for each web browser:
Chrome:
- Preference Domain:
com.google.Chrome -
Property List:
<?xml version="1.0" encoding="UTF-8"?>
<!DOCTYPE plist PUBLIC "-//Apple//DTD PLIST 1.0//EN" "http://www.apple.com/DTDs/PropertyList-1.0.dtd">
<plist version="1.0">
  <dict>
    <key>ExtensionSettings</key>
    <dict>
      <key>aalncdhjokfcbldaemnehledpfpibopi</key>
      <dict>
        <key>installation_mode</key>
        <string>force_installed</string>
        <key>toolbar_pin</key>
        <string>force_pinned</string>
        <key>update_url</key>
        <string>file:///Library/Application Support/PaloAltoNetworks/Traps/cdsx/extension.xml</string>
      </dict>
    </dict>
  </dict>
</plist>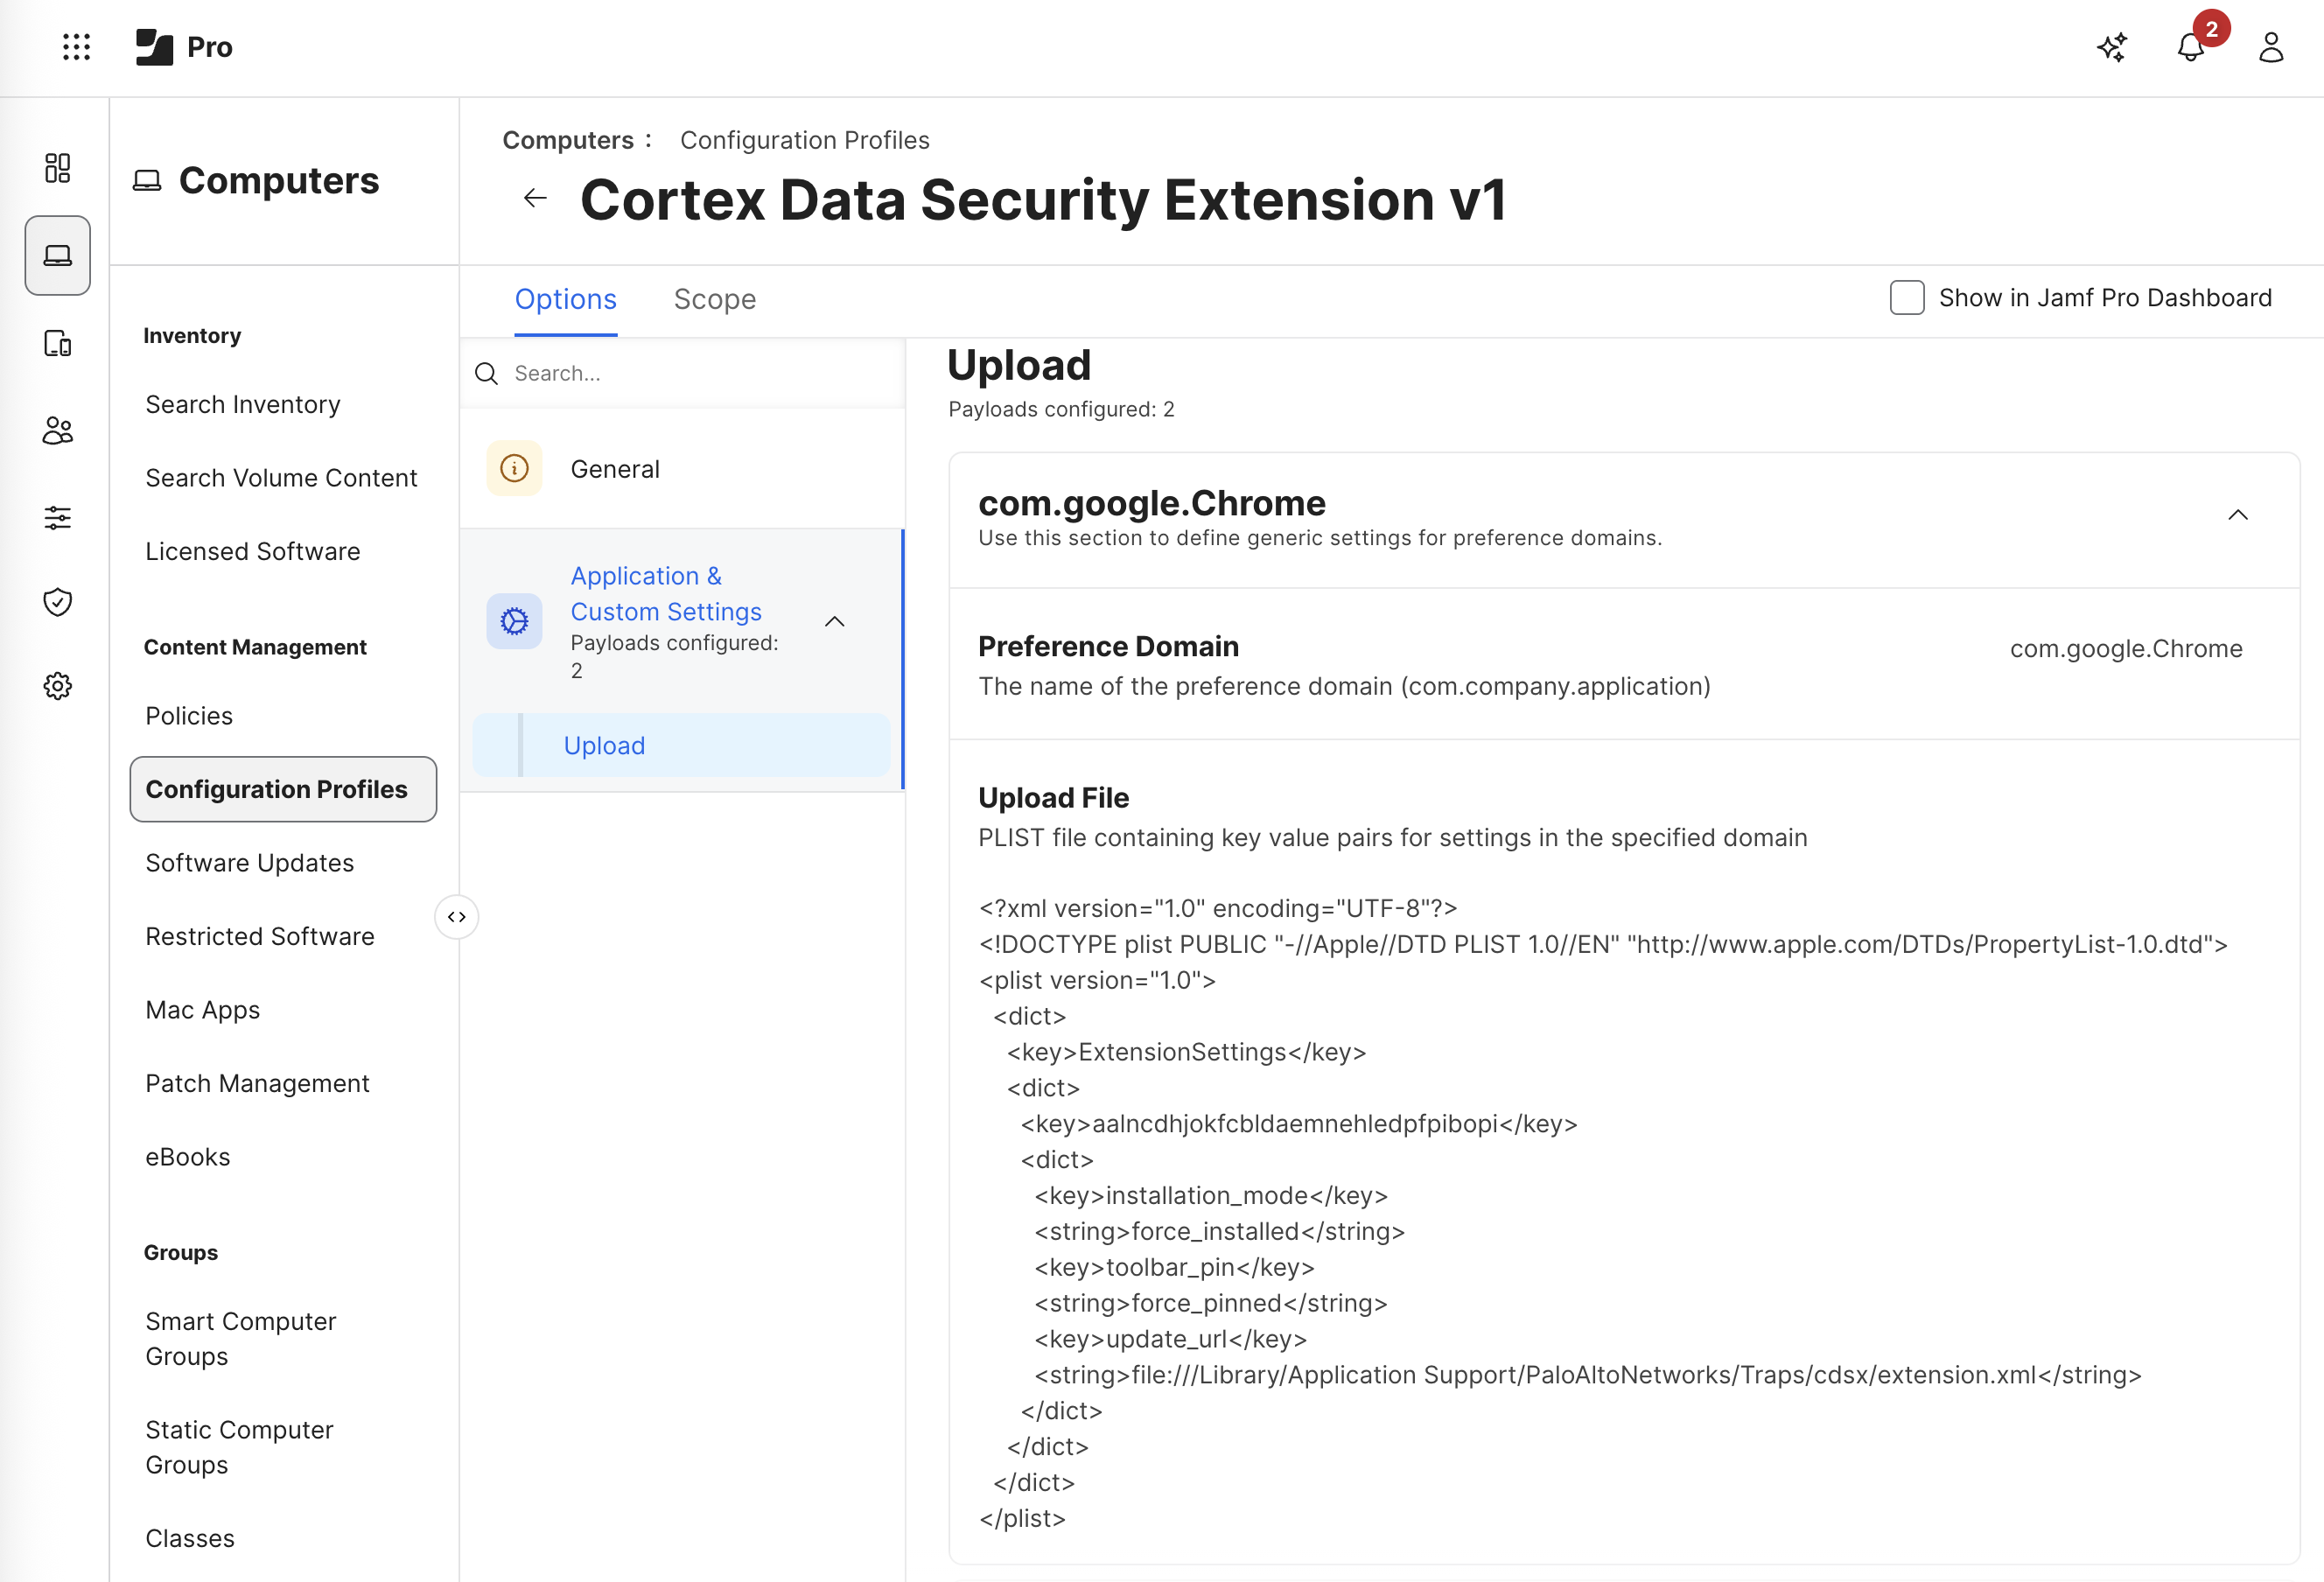
Edge
- Preference Domain:
com.microsoft.Edge -
Property List:
<?xml version="1.0" encoding="UTF-8"?>
<!DOCTYPE plist PUBLIC "-//Apple//DTD PLIST 1.0//EN" "http://www.apple.com/DTDs/PropertyList-1.0.dtd">
<plist version="1.0">
  <dict>
    <key>ExtensionSettings</key>
    <dict>
      <key>aalncdhjokfcbldaemnehledpfpibopi</key>
      <dict>
        <key>installation_mode</key>
        <string>force_installed</string>
        <key>toolbar_state</key>
        <string>force_shown</string>
        <key>update_url</key>
        <string>file:///Library/Application Support/PaloAltoNetworks/Traps/cdsx/extension.xml</string>
      </dict>
    </dict>
  </dict>
</plist>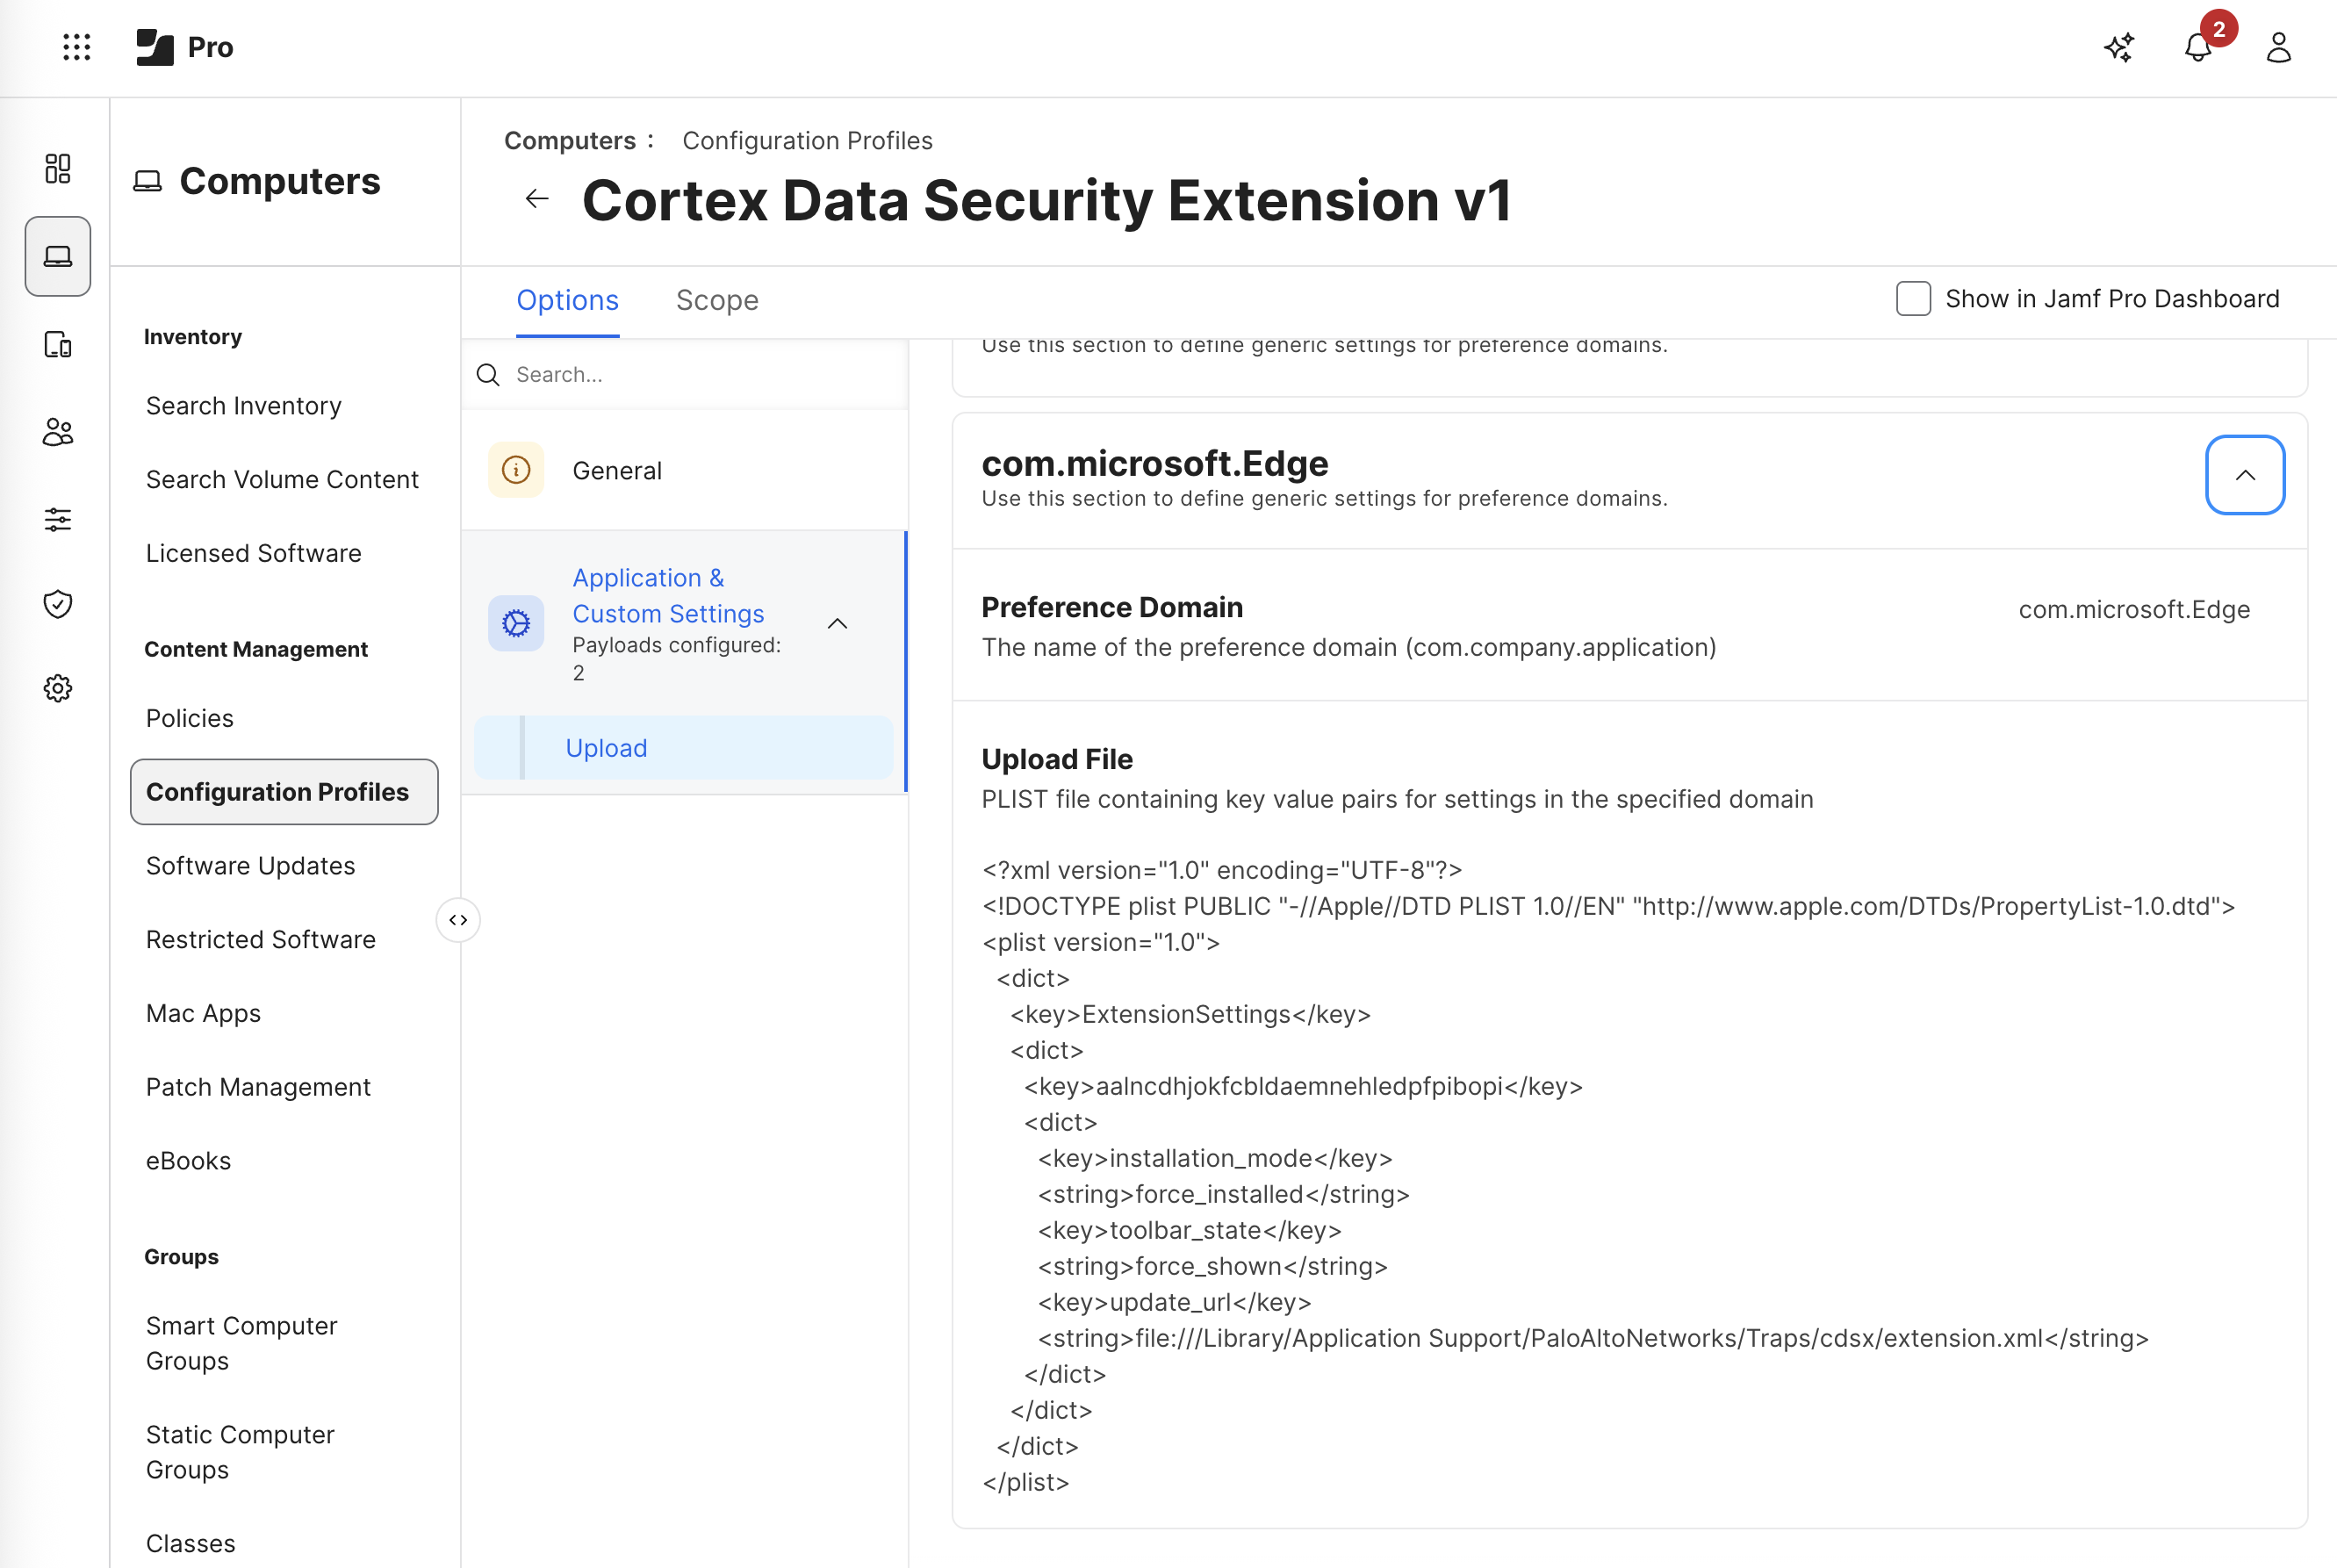
- Preference Domain:
-
- Save the configuration profile.
-
After you set up your computer configuration profiles, create a new agent installation package in the Cortex XDR management console, upload the ZIP package you downloaded from Cortex XDR to your MDM (do not extract it), and then add it to a distribution point.
For instructions, see the following documentation resource from JAMF: Manually Adding a Package to a Distribution Point and Jamf Pro.
- Create a new policy and install the package.
- JAMF Package Deployment instructions.
- JAMF Policy Management instructions.
Install the Cortex XDR Agent Manually
To install the Cortex XDR agent manually on a macOS endpoint:
- Download the installation package you want to install from Cortex XDR.
- Copy the installation package to the endpoint on which you want to install the Cortex XDR agent software.
- Unzip the installation package.
-
(Optional) Configure a Cortex XDR agent specific proxy on the endpoint.
If you are deploying Cortex XDR in an environment where the agents communicate with Cortex XDR through a proxy, you must assign the proxy IP address and port number during the agent installation on the endpoint.
Note
The Cortex XDR agent does not support proxy communication in environments where proxy authentication is required.
- Locate the
Config.xmlfile in the unzipped installation folder. - Edit the
<proxy_list><proxyserver>:<port></proxy_list>tag.-
To enforce a proxy specific to the Cortex XDR agent, enter your proxy IP address and port number. You can also configure the proxy by entering the FQDN and port number. When you enter the FQDN, you can use both lowercase and uppercase letters. Avoid using special characters or spaces. You can assign up to five different IP addresses per agent, and the proxy for communication is selected randomly with equal probability.
<proxy_list>My.Network.Name:808,10.196.20.244:8080</proxy_list> -
To install an agent communicating through the Palo Alto Networks Broker Service, enter only the broker VM IP address and port number 8888.
-
- If needed, you can later change the proxy settings from the Cortex XDR management console.
- Locate the
-
(Optional) Disable Live Terminal, script execution, and file retrieval on the endpoint
You can permanently disable the option for Cortex XDR to perform all, or a combination, of the following actions on endpoints running a Cortex XDR agent: initiate a Live Terminal remote session on the endpoint execute Python scripts on the endpoint, and retrieve files from the endpoint to Cortex XDR. Disabling any of these payloads in the
Config.xmlfile is an irreversible action, so if you later want to enable the action on the endpoint, you must uninstall your Cortex XDR agent and install a new agent with the corresponding values in theConfig.xmlfile.- Locate the
Config.xmlfile in the unzipped installation folder. - Enter the value
1for this tag, as follows:<restrict_invasive_response_actions>1</restrict_invasive_response_actions>.-
To disable a specific action, update only the value of the relevant tag:
<restrict_live_terminal>1</restrict_live_terminal> <restrict_script_execution>1</restrict_script_execution> <restrict_file_retrieval>1</restrict_file_retrieval>
-
- Locate the
- (Optional) Add tags to the endpoint tag list.
- Locate the
Config.xmlfile in the unzipped installation folder. - Add**
<endpoint_tags>tag1,tag2,tag3</endpoint_tags>** to the file and save.
- Locate the
- Install the Cortex XDR agent software.
- Execute the
CortexXDR.pkgfile in the unzipped installation folder. - Click Continue to proceed with the installation.
- If prompted to confirm the destination, click Continue.
- Click Install to begin the installation.
- Enter the User Name and Password of the administrator with access to install software on the endpoint, and then click Install Software.
-
Wait for the Cortex XDR agent installation to complete.
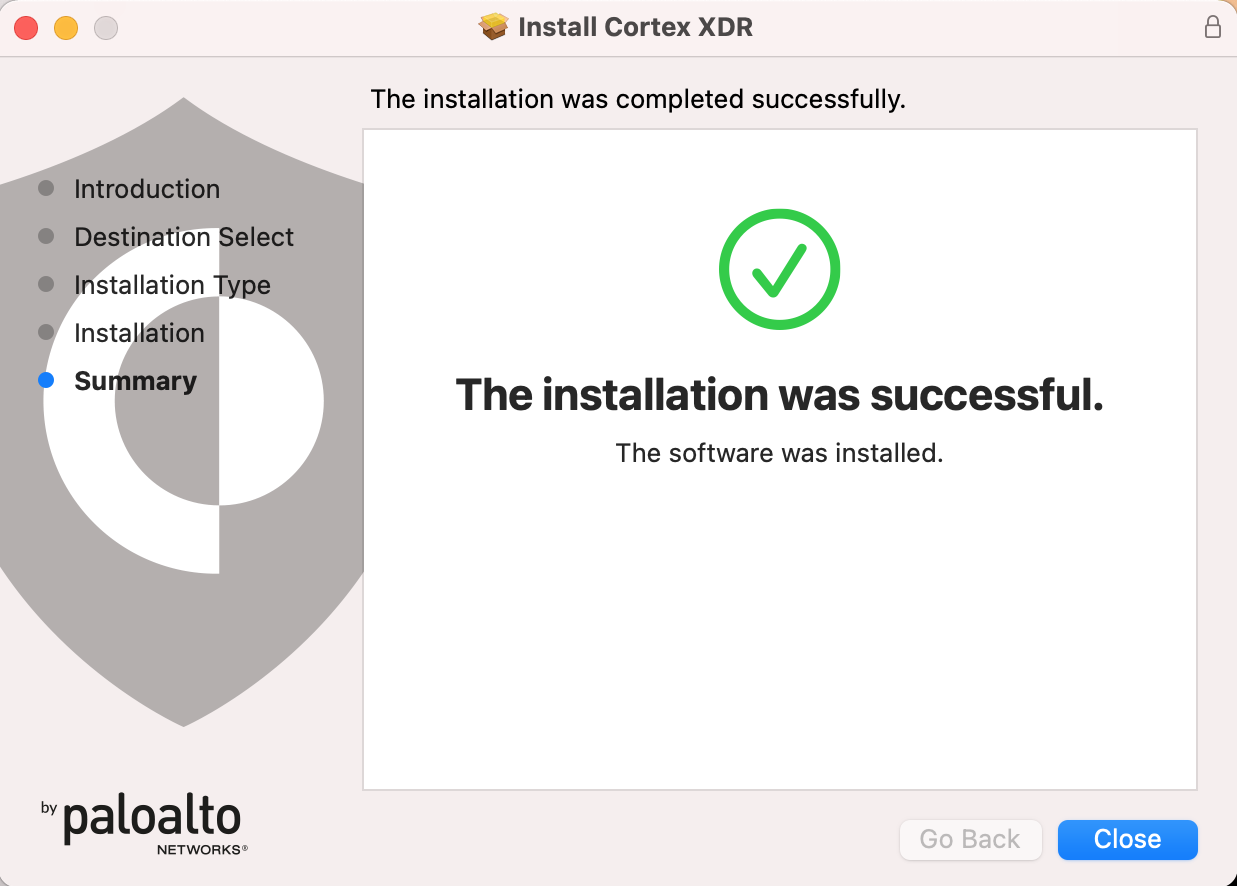
Tip
The Cortex XDR agent logs any installation errors to
/var/log/install.log. If installation fails for any reason, you can view this log to better understand the cause of the installation failure.
- Execute the
- Approve Cortex XDR System Extensions.
-
When you are installing the Cortex XDR agent, this warning will be seen twice: first for the Security Extension and then for the Network Extension. However, in both warnings, the operating system displays
System Extension Blocked.Select Open Security Preferences to enable the extensions.
- Go to System Settings → Privacy & Security, and click Details.
-
Select both Cortex XDR System Extensions and click OK to allow them. Ignore the message informing that
The system needs to be restarted before it can be usedsince this step is not required.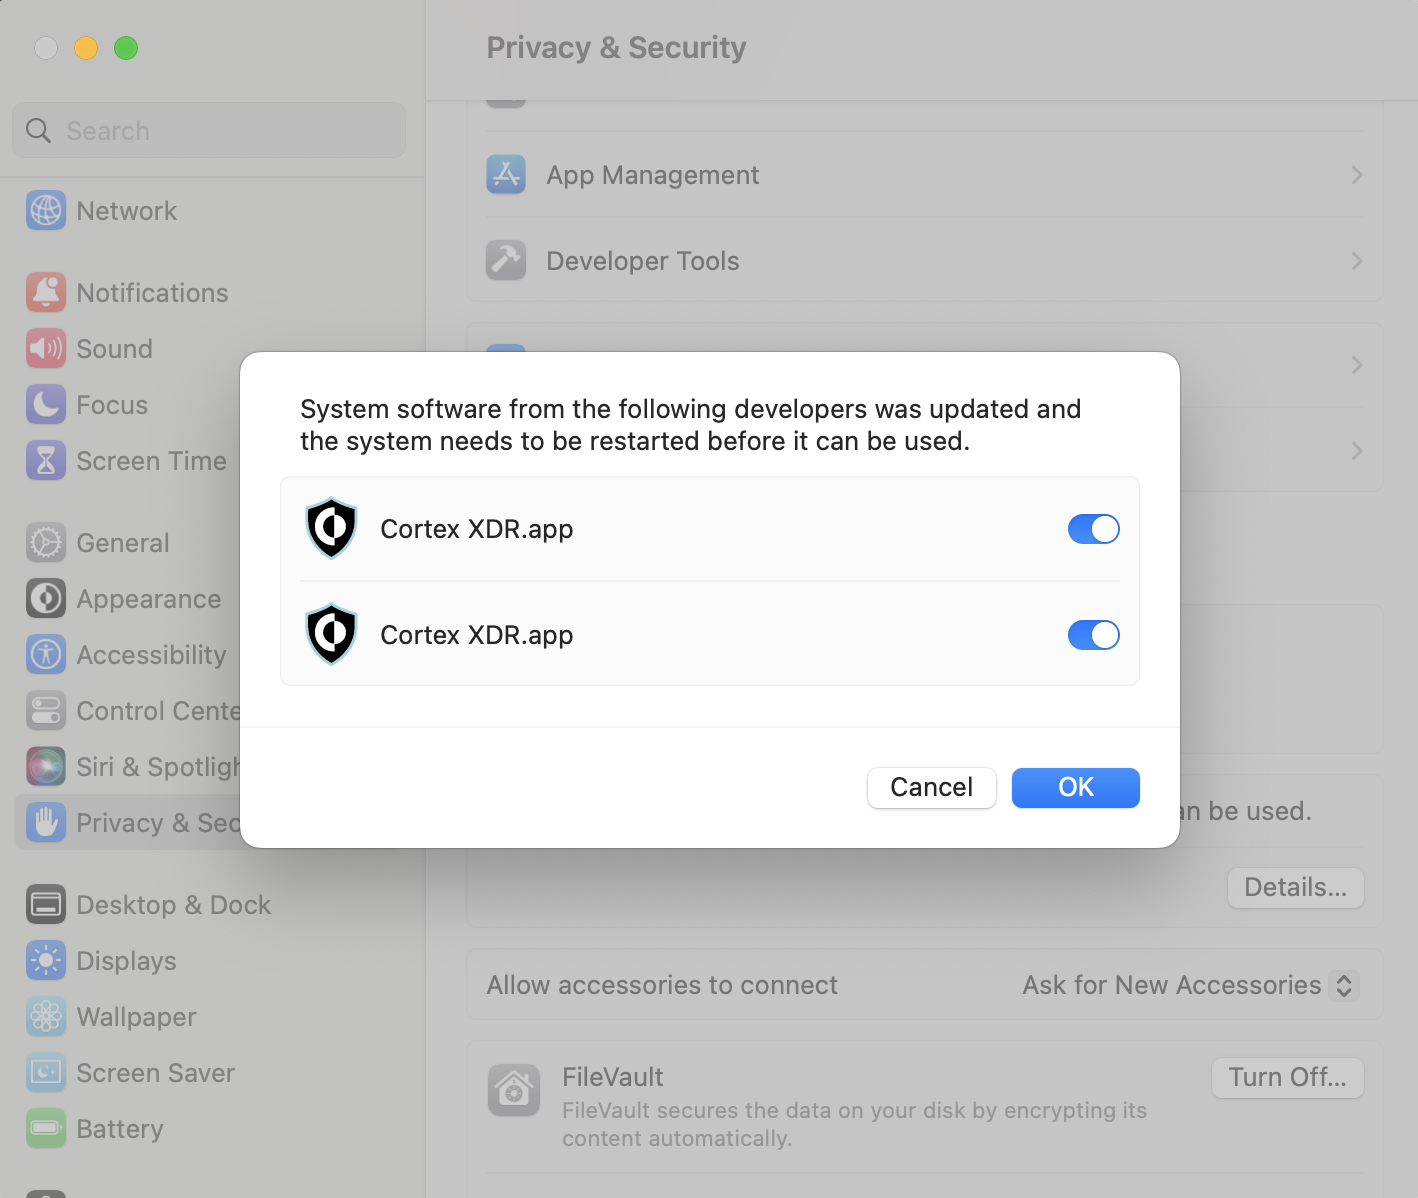
-
Approve Cortex XDR Web Content Filter.
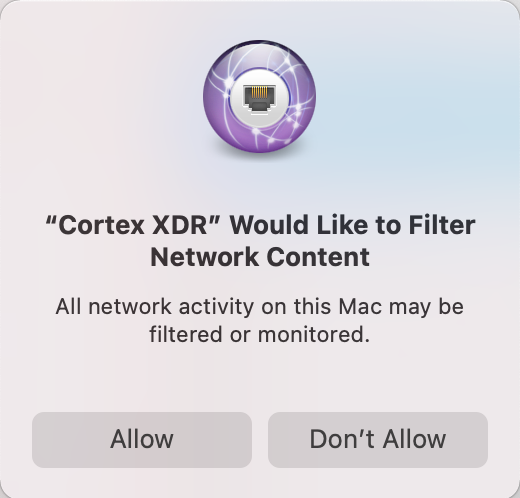
Click Allow to enable the Cortex XDR agent to monitor network events.
Warning
If you dismiss this notification, the Cortex XDR agent does not monitor the network traffic on the endpoint, and cannot report network events back to Cortex XDR. Consequently, BIOC and BIOC to Behavioral Threat Protection (BTP) rules you have for network events will not work, and you will not be able to query about network events in the Query builder. For Cortex XDR agent 7.3 and later, network isolation will not work as well.
-
-
Grant full disk access.
Due to the security settings, you must allow the Cortex XDR agent full disk access on your endpoint to enable full protection. If you do not authorize the agent full disk access on your endpoint, the agent provides only partial protection of files in the /Applications directory. The first time the agent detects an attempt to run an executable file located in another protected location on the endpoint as part of the anti-malware flow, macOS will deny the Cortex XDR agent access and prompts the user to grant full disk access.
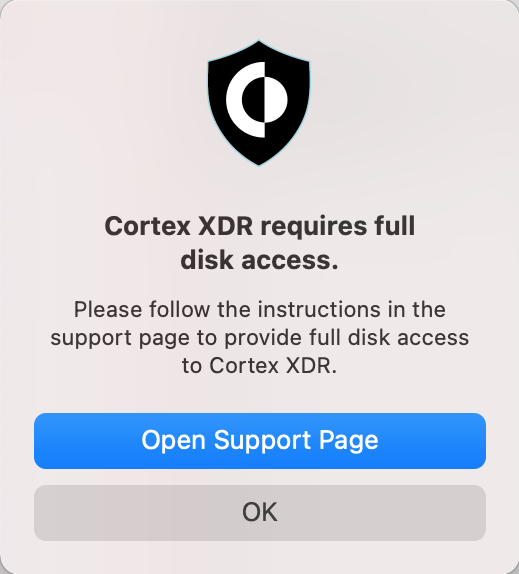
To grant the Cortex XDR agent full disk access locally on the endpoint:
- Go to System Settings → Privacy & Security tab, and select Full Disk Access.
- To make changes, click lock icon on the bottom left and enter your credentials.
- Select pmd.
-
Select TrapsSecurityExtension.
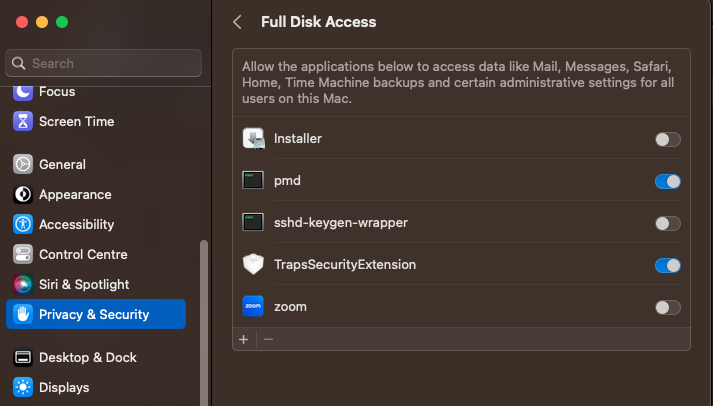
- Approve Cortex XDR agent notifications.
- After you install the Cortex XDR agent on the endpoint, the operating system will prompt a system notification requesting permissions to show Cortex XDR agent notifications.
-
Click Options, and then click Allow.
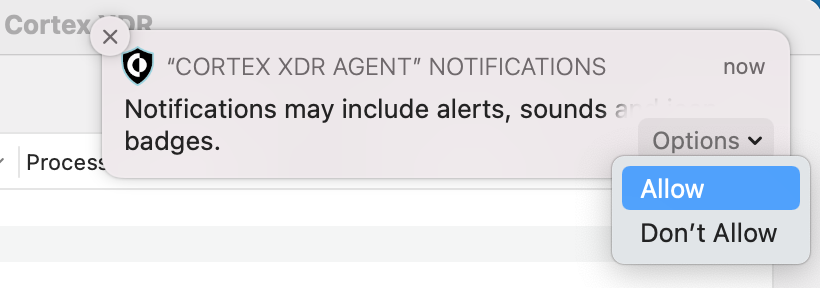
- If the system notification is no longer visible, you can approve permissions in System Settings → Notifications. Select Cortex XDR agent and click Allow Notifications.
- Verify the Cortex XDR agent connection and protection status.
- To open the Cortex XDR agent console, click the agent icon in the menu bar, and select Open Console.
-
Click Check In Now to initiate a connection with your Cortex XDR tenant. If successful, the Connection field updates to display your Cortex XDR tenant, and the Last Check In field updates to display the last check in date and time.
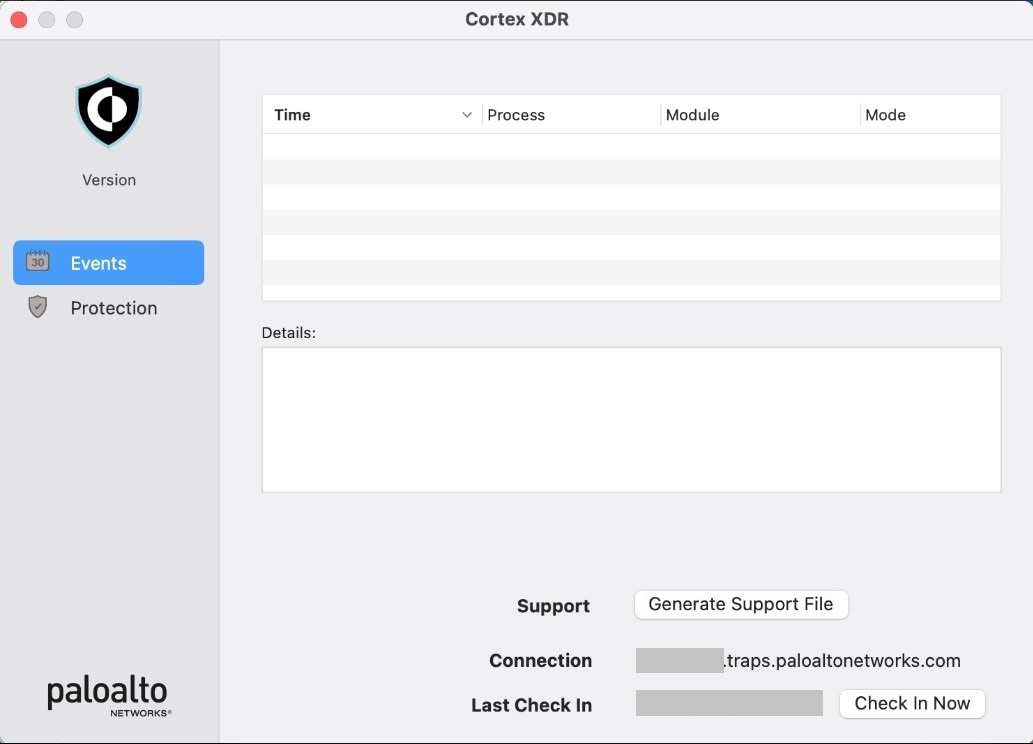
Warning
If the Cortex XDR agent does not connect to Cortex XDR, verify your internet connection and check the Cortex XDR Agent for Mac Requirements. If the agent still does not connect, contact Palo Alto Networks support.
Configure Cortex XDR Agent for Mac
As part of the agent installation on a macOS endpoint, as a non-MDM user, you can run the installation check option from the agent installer. The installation check launches a wizard, which guides you through the settings required to enable the agent to run on the endpoint.
- In the installer, from the Installation Check option, click Continue to launch the Cortex XDR Configuration Wizard.
- Navigate through the pages of the wizard:
- Welcome page
- System Extensions & Network Filters—Select Cortex XDR system extensions and enable the Cortex XDR Web Content Filter notification to monitor network events.
- Full Disk Access page—Drop the applications into the Full Disk Access list offered in the wizard.
- Notifications—Enable notifications for Cortex XDR agent.
- In the Summary page, if all permissions were added successfully, click Done. If permissions were not added correctly, click Go Back to adjust the settings.
Use the Cortex XDR Agent for Mac
-
Open the Cortex XDR Agent application.
Use one of the following methods:
- Browse to the Traps folder in Finder.
- If you enabled access to the agent console, click the Cortex XDR agent icon in the menu bar, and select Open Console.
- View status information about the Cortex XDR agent:
- Version—Displays the agent version.
-
Protection—Displays the active policies in bold.
Note
On Mac endpoints running macOS 10.15.4, the Protection Status in the agent console indicates the status of both Malware and Exploit modules on the endpoint.
- Connection—Displays the connection status and, if connected, includes the server to which the agent is connected.
- Last Check-in—Displays the local time on the endpoint of the last check-in with the server.
-
Manually connect to the server.
The Cortex XDR agent communicates with the server at a fixed 5-minute heartbeat interval to send status information and retrieve the latest security policy. The agent performs this operation transparently at regular intervals so it is not typically necessary to connect to the server manually. If your Connection status is Not Connected, you can manually retry your connection. This option is available if you do not want to wait for the automated communication interval to begin.
To initiate a manual check-in with the server: On the home page of the Cortex XDR agent console, click Check In Now. If the agent successfully establishes a connection with the server, the Connection status changes to indicated the service to which the agent is connected.
-
Collect Cortex XDR agent logs in a file that can be sent to a support representative for analysis.
Select Generate Support File. Cortex XDR agent aggregates the logs into a compressed file. Save it, and then send the file to your support representative. For remote endpoints, you can also retrieve logs from the Action Center.
-
View recent security events that occurred on your endpoint.
For each event, the agent console displays the local Time an event occurred, the name of the Process that exhibited malicious behavior, the Module that triggered the event, and the mode specified for the type of event (Termination or Notification).
-
View protected processes on the Mac endpoint.
The Protection tab of the agent console displays all running processes in which the Cortex XDR agent is injected to prevent malicious execution or behavior. The agent console also indicates the process ID (PID) associated with each process.
-
Configure proxy communication.
The agent can communicate with Cortex XDR using the system proxy server that you define for the endpoint. For information on How to Enter Proxy Settings, see the documentation for your Mac operating system version. If you prefer to use an application proxy, configure a Cortex XDR agent specific proxy.
- Persistent notification from agent that your machine can’t access the network. Only when the issue is resolved, the notification does not appear.
Uninstall the Cortex XDR Agent for Mac
From the Cortex XDR management console, you can uninstall the Cortex XDR agent on an endpoint (refer to Uninstall the Cortex XDR Agent in the Administrator's Guide for your Cortex XDR license type). You can also uninstall the agent from the endpoint directly by using the uninstaller that comes with the Cortex XDR agent installation package that you downloaded from the Cortex XDR management console to install the agent (Endpoints → Endpoint Management → Agent Installations).
After you uninstall the agent, the endpoint is no longer protected by Cortex XDR security policies and the license returns to the pool of available licenses.
Danger
To uninstall the agent, you need the uninstall password or a temporary token. See Manage Agent Tokens to obtain a temporary token.
Ensure that you extract the uninstaller from the installer package which is the same version as the Cortex XDR agent for Mac currently installed on the endpoint.
Ensure that the installer file, called Cortex XDR Uninstaller.app, is saved in the following location: /Library/Application\Support/PaloAltoNetworks/Traps/bin
- Run the Cortex XDR agent uninstaller
Cortex XDR Uninstaller.appfrom:/Library/Application\Support/PaloAltoNetworks/Traps/bin. - When prompted, enter the Cortex XDR agent uninstall password or temporary token, and click OK.
-
When prompted, enter the macOS credentials for a user that has permissions to uninstall apps and click OK.
The uninstaller completes the uninstall process and removes the Cortex XDR agent and related files.
Manage the Agent Deployment Notifications for Mac
When you install, upgrade, or remove the Cortex XDR agent from your Mac endpoint, both the operating system and the Cortex XDR agent prompt specific notifications the end user has to approve. The operating system notifications are in line with Apple’s security improvements that started from macOS 10.15.4, which included the deprecation of kernel extensions by third-party providers. As a result, Cortex XDR agent 7.1 and later releases no longer use the kernel extension. Instead, the agent is designed to deploy two System Extensions.
Since the 7.1 release, the Cortex XDR agent deploys the Endpoint Security extension to monitor system events, and since the 7.2.1 agent release, a Network extension was added to monitor network events. Together, these two System extensions provide full coverage of the endpoint traffic and replace the deprecated kernel extension. To suppress the extension notifications for the Cortex XDR agent installation process, refer to Install the Cortex XDR Agent Using JAMF. For a one-click installation using a MDM of your choice, refer to Install with a Unified Configuration Profile for MDMs.
The following tables describe the extension and notification approval workflow the end user is required to perform on a Mac endpoint during agent installation, upgrade, and removal processes.
Installing a Cortex XDR Agent
The following table describes the extension approval workflow the end user is required to perform on the endpoint during agent installation, when performed manually or using an MDM.
| macOS 10.15.4 and later | |
|---|---|
| Install a Cortex XDR agent | <ul><li>Endpoint Security extension—Requires user approval. Can be suppressed in your MDM profile.</li><li>Network extension—Requires user approval. Can be suppressed in your MDM profile.</li><li>Network content filter—Requires user approval. Can be suppressed in your MDM profile. You can also suppress this operating system prompt by uploading a configuration file provided by Palo Alto Networks.</li></ul> |
Upgrading a Cortex XDR Agent
The following table describes the extension approval workflow the end user is required to perform on the endpoint during agent upgrade, when performed manually or using an MDM.
| macOS 10.15.4 and later | |
|---|---|
| Upgrade a Cortex XDR agent | <ul><li>Endpoint Security extension—If already allowed during initial agent installation, nothing to allow during upgrade. Otherwise, allow once. Can be suppressed in your MDM profile.</li><li>Network extension—If already allowed during initial agent installation, nothing to allow during upgrade. Otherwise, allow once. Can be suppressed in your MDM profile.</li><li>Network content filter— If you are using an MDM to deploy the agents in your networks, you can suppress this operating system prompt by uploading a configuration file provided by Palo Alto Networks. Otherwise, if you are upgrading from a 7.2.1 agent or later and approval was already provided, nothing to allow during upgrade.</li></ul> |
Removing a Cortex XDR Agent
The following table describes the approval workflow the end user is required to perform on the endpoint during agent removal, when performed manually or using an MDM.
| macOS 10.15.4 and later | |
|---|---|
| Remove a Cortex XDR agent | <ul><li>User approval and password are required by Apple for each System extension. In the current operating system release, you cannot suppress this option in your MDM profile, and will be required to approve twice.</li></ul> |
Troubleshooting Resources for Mac
| Resource | Description |
| Processes | Launch Daemons:
Launch Agents:
System Extensions:
Payload:
|
| Cortex XDR agent installation log | Specifies any errors encountered during the installation of agent components. Use this log file when you need to troubleshoot installation issues. On Mac OS endpoints, the system records installation events in the global install log located at /var/log/install.log. |
| Cortex XDR agent console log | Indicates information, warnings, and errors related to the agent console. The Console log is located in the following folder on the endpoint:
|
| Cortex XDR agent service log | Indicates information, warnings, and errors related to Cortex XDR. The Service log is located in the following folder on the endpoint:
|
| Supervisor Command Line Tool (cytool) | Allows you to manage agent features and perform advanced troubleshooting on the local endpoint from a command line interface. For more information, see Cytool for Mac. |
Cytool for Mac
Cytool is a command-line interface that is integrated into the Cortex XDR agent that enables you to query and manage both basic and advanced functions of the agent. Unless stated otherwise, changes you make using Cytool take effect when the agent receives the next heartbeat communication (every five minutes) from Cortex XDR.
On Mac endpoints, access Cytool as a super user using a terminal. Cytool is located in the /Library/Application Support/PaloAltoNetworks/Traps/bin directory on the endpoint.
The following table displays the Cytool options available on Mac endpoints. For the Cytool admin commands that require a password, the password is the same as is defined as the Uninstall password.
Note
Since Cortex XDR agent 7.6, the pmd process includes and replaces the trapsd process.
| Command Option | Description |
| cert_enforcement | Perform Certificate enforcement related operations. Usage: Where <operation> is one of the following:
|
| checkin | Initiate check-in to the server. Usage: To verify the checkin, view the check-in time on the Cortex XDR agent console. |
| connectivity_test | Perform a connectivity test to Cortex XDR servers. Usage: |
| dump | Enable or disable dump generation or restore policy settings. Traps-Mac:bin Traps$ sudo ./cytool dump enable Traps-Mac:bin Traps$ sudo ./cytool dump disable Traps-Mac:bin Traps$ sudo ./cytool dump restore |
| endpoint_tags | Use Endpoint Tags to identify groups of endpoints. Usage: where
Note Tags should be passed as one string separated by comas. For example:
|
| enum | Enumerate protected processes. Usage: For example: Traps-Mac:bin Traps$ sudo ./cytool enum
List of protected processes:
Process name Process ID User
Photos 2047 User1
Mail 2099 User2
Note If you change the action mode for protected processes in the Exploit Security Profile in Cortex XDR, you must restart the protected processes for the security policy to be enforced on the processes and its forked processes, and only then you will see them on this list. |
| -h --help | Traps-Mac:bin Traps$ sudo ./cytool Usage: cytool<options> cytool - Support tool Options: -h --help Display help information. enum List processes protected by Cortex XDR. startup query List startup status for Cortex XDR agent and daemons. startup <enable | disable> <process_name | all> Enable/Disable Cortex XDR agent and daemons after reboot. runtime query List runtime status for agent, daemons, and kernel extensions. runtime <start | stop> <process_name | all> Start/Stop Cortex XDR agent, daemons, and kernel extensions immediately. persist list Display persistent databases. persist export <db_name | db_path> Export databases in JSON format. persist import <db_name | db_path> <file_name> Import data into the database from the given JSON file. persist print <db_name | db_path> [csv] Print database to the command prompt. log <log_level> <process_name | all> Set log level for the desired process. log collect Generate support file archive. wakeup Wake up from OS incompatibility state. dump <enable | disable | restore> Enable/Disable dump generation or restore policy settings. checkin Update Cortex XDR from server. opswat <installed | running | protected | version> Check Cortex XDR Agent status and version. |
| import suex | Import pre-downloaded content or local support exceptions. Used for solving specific problems with a support representative. |
| isolate | Usage: Release endpoint from network isolation. |
| log |
Usage: where:
For example: Traps-Mac:bin Traps$ sudo ./cytool log set_level 2 all
Use the |
| opswat | Check the Cortex XDR agent status and version. Usage: where <parameter> is:
Traps-Mac:bin Traps$ sudo ./cytool opswat version 8.1.0.1042 Traps-Mac:bin Traps$ sudo ./cytool opswat installed Password: true Traps-Mac:bin Traps$ sudo ./cytool opswat running true Traps-Mac:bin Traps$ sudo ./cytool opswat protected true |
| persist | The Cortex XDR agent stores policy and security event information such as the list of trusted signers, local verdicts, and one-time actions in local databases on the endpoint. To troubleshoot policy issues and security events, you can use cytool persist operations to import, export, and view information stored in the local database. Usage: where <action>:
To view a list of all local databases, use the |
| queryall | The cytool queryall command displays a list of imported certificates, for troubleshooting purposes. |
| reconnect | Try reconnecting to the server if communication has been disabled, or force registration with a new Usage:
Note The |
| runtime | Stop or start product components. Usage: where:
For example: Traps-Mac:bin Traps$ sudo ./cytool runtime query
Name PID User Status Command
cortex xdr 1055 User1 Running /Library/Application Support/PaloAltoNetworks/Traps/bin/cortex xdr.app/Contents/MacOS/cortex xdr
authorized 927 _traps_panw Running /Library/Application Support/PaloAltoNetworks/Traps/bin/authorized
pmd 909 root Running /Library/Application Support/PaloAltoNetworks/Traps/bin/pmd
kproc-ctrl 159 root Loaded com.paloaltonetworks.driver.kproc-ctrl
Traps-Mac:bin Traps$ sudo ./cytool runtime stop all
Name PID User Status Command
authorized N/A N/A STOPPED N/A
pmd N/A N/A STOPPED N/A
cortex xdr N/A N/A STOPPED N/A
kproc-ctrl N/A N/A Unloaded N/A
Traps-Mac:bin Traps$ sudo ./cytool runtime start all
Name PID User Status Command
system call failed for command='/usr/bin/su -l Traps -c "/bin/launchctl start cortex xdr.plist"', returned status code=768
authorized 1883 _traps_panw Running /Library/Application Support/PaloAltoNetworks/Traps/bin/authorized
pmd 1889 root Running /Library/Application Support/PaloAltoNetworks/Traps/bin/pmd
cortex xdr N/A N/A FAILED TO START N/A
kproc-ctrl 160 root Loaded com.paloaltonetworks.driver.kproc-ctrl
|
| security_modules | Query, enable, disable or return to policy the Cortex XDR agent anti-tampering protection. Usage: Where:
Example: To disable the Cortex XDR agent anti-tampering protection:
|
| startup | Enable, disable, or query the startup state of Cortex XDR agent components. Usage: where:
For example: Traps-Mac:bin Traps$ sudo ./cytool startup disable cortex xdr pmd
Process name Startup status
cortex xdr Disabled
authorized Enabled
pmd Disabled
kproc-ctrl Loaded
Traps-Mac:bin Traps$ sudo ./cytool startup enable all
Process name Startup status
cortex xdr Enabled
authorized Enabled
pmd Enabled
kproc-ctrl Loaded
|
| wakeup | Wake up the endpoint from an OS incompatibility state.
|
Cortex XDR Agent for Linux
The Cortex XDR agent protects Linux servers by preventing known and unknown malware from running by halting any attempts to leverage software exploits and vulnerabilities to compromise the server. The agent also extends exploit and malware protection to processes that run in Linux containers. When you install the agent on a Linux server that uses containers, it automatically protects any new and existing containerized processes regardless of the container solution (for example, docker). Because Cortex XDR issues the license per Linux server, each container does not consume any additional licenses.
The protection capabilities and features that the Cortex XDR agent for Linux provide depend on the operation modes you choose to deploy the Cortex XDR agent on your Linux server:
-
Kernel Mode
Cortex XDR agent installs a Kernel module which must be compatible with the endpoint's kernel. See the list of supported Linux Kernel versions.
-
User Mode (eBPF based)
This mode allows you to leverage the protection provided by Cortex XDR agent on Linux distributions running Kernel 5.0 and above without loading a kernel module. The Palo Alto Networks Compatibility Matrix provides more information about supported Linux distribution versions.
To operate in user mode, make sure of the following:
- In the Agent Profile, configure the Agent Operation Mode as User Space.
- Linux agents support fallback from Kernel mode to user mode via the Agent Settings, if Kernel is not supported or cannot be loaded for other reasons.
- If fallback from Kernel mode to user mode is not set up, then you must create and deploy the new YAML installer for Kubernetes based installations.
The following table details protection capabilities provided according to each operation mode.
| Protection Capabilities | Kernel | User Mode (eBPF based) |
|---|---|---|
| Exploit Protection | ✓ | ✓ |
| Malware Protection | ✓ | ✓ |
| Endpoint EDR Data Collection | ✓ | ✓ |
| Event Monitoring | ✓ | ✓ |
| Kernel Integrity Monitoring and Kernel Module Examination | ✓ | — |
| Local Privilege Escalation Protection | ✓ | — |
The following topics describe how to install and use the Cortex XDR agent for Linux:
Cortex XDR supported Kernel Module versions by distribution
On Linux endpoints, to perform malware analysis of Executable and Linkable Format (ELF) files and collect data for endpoint detection and response (EDR) and behavioral threat analysis, the Cortex XDR agent requires a Linux Kernel module.
Caution
To deploy on a supported Kernel version, you must ensure it is possible to load third party Kernel modules. To do so, you can either:
- Disable UEFI SecureBoot.
- If UEFI SecureBoot is enabled, you must load the Cortex XDR certificate.
To load the certificate, follow the instructions detailed in Cortex XDR Agent Administrator Guide → Cortex XDR Agent for Linux → Install the Cortex XDR Agent for Linux → Load SecureBoot Certificates.
Changes to the Kernel module versions are distributed with content updates. For earlier Cortex XDR agent releases, changes to the kernel module versions are distributed with the agent releases.
Latest Kernel Module versions supported
See the latest Kernel Module versions that are supported.
Cortex XDR Agent for Linux Requirements
The Cortex XDR agent for Linux has the following requirements:
Cortex XDR Agent for Linux Requirements
The Cortex XDR agent for Linux has the following requirements:
| Requirement | Minimum Specification |
| Processor | Processor 2.3 GHz dual-core processor |
| RAM | 4GB; 8GB recommended |
| Hard disk space | 10 GB (available for the /opt/traps directory) |
| Architecture | x86_64 (x86 64bit) For aarch64 (ARM 64 bit) see Cortex XDR agent for Linux compatibilty matrix for details. |
| Operating system versions | See the Cortex XDR Compatibility Matrix. |
| Kernel version | Kernel Mode On Linux endpoints, to perform malware analysis of Executable and Linkable Format (ELF) files and collect data for endpoint detection and response (EDR) and behavioral threat analysis, the Cortex XDR agent requires one of the Linux Kernels that are listed in supported Kernel Module Versions. If you deploy the Cortex XDR agent on a Linux server that is not running one of the kernel versions required for these additional protection capabilities, the agent will operate in asynchronous mode. User Space Mode User Space operation mode is supported from Cortex XDR agent version 7.7 User space operation mode requires Kubernetes node to run one of the supported operation systems with Kernel version 5.0 or later. |
| Software packages | The following software packages are required to be installed on your endpoint, depending on the operating system.
|
| Networking |
|
Install the Cortex XDR agent for Linux
The Cortex XDR agent for Linux is designed to protect Linux servers and operates transparently in the background as a system process. The agent also extends exploit and malware protection to processes that run in Linux containers. When you install the Cortex XDR agent on a Linux server, running either on Kernel or User Space mode, the agent automatically protects any new and existing containerized processes regardless of the container solution (for example, Docker). Each Linux server receives a single license which includes protection for container processes.
You can also deploy Cortex XDR agents on virtual Linux servers as temporary sessions, to ensure the Cortex XDR agent license returns to the license pool after 90 minutes of session inactivity and to improve your network temporary workloads.
After you install the Cortex XDR agent for Linux, it is typically not necessary to interact with the agent; however, to perform common actions, such as initiating a manual check-in with Cortex XDR, you can use the command-line utility named Cytool. Cytool is available in the /opt/traps/bin/cytool directory and must be run as root or with root permissions.
Before installing the agent on a Linux server, verify that the system meets the requirements described in Cortex XDR Agent for Linux Requirements.
Note
If you intend to use SELinux, make sure to enable it before you proceed with the Cortex XDR agent installation. This ensures that the agent disables any injection-based modules that cause compatibility issues.
If you later enable SELinux (change from disabled to enabled - regardless of its mode - permissive to enforcing), you must reinstall the agent to avoid any compatibility issues.
If you later change SELinux operation mode (between permissive and enforcing or vice versa), you must restart the agent to avoid any compatibility issues.
To install a Cortex XDR agent:
- Download the relevant Cortex XDR agent Linux installer for your system from Cortex XDR.
-
Copy the installer to the Linux server on which you want to install the Cortex XDR agent software.
For example, to copy the file securely from a local machine to the Linux server:
user@local ~ scp linux.sh.tar.gz root@centos.example.com:/tmp linux.sh.tar.gz 100% 52MB 95.2MB/s 00:00 -
Log on to the Linux server.
For example:
user@local ~ ssh root@centos.example.com root@centos.example.com's password: -
Install the Cortex XDR agent software.
You can install the Cortex XDR agent on the endpoint manually using the shell installer or using the Linux package manager for
.rpmand.debinstallers.-
Unpack the installation archive by running.
tar xf filename.tar.gz -
Copy the configuration file into
/etc/panwdirectory.sudo mkdir -p /etc/panwsudo cp cortex.conf /etc/panw/
To deploy using package manager:
- (Optional) For Linux distributions RHEL, CentOS, Oracle, or SUSE that have signature-checking configured or you would like to manually check the integrity of the Cortex XDR package:
- Download the Cortex XDR Public Key.
- Unzip the public key by running
unzip cortex-xdr-agent.zip. - Import the public key by running
rpm --import cortex-xdr-agent.asc.
- Depending on your Linux distribution, install the Cortex XDR agent using one of the following commands:
Distribution Install Command RHEL, CentOS, or Oracle yum install ./filename.rpmorrpm -i ./filename.rpmUbuntu or Debian apt-get install ./filename.debordpkg -i ./filename.debSUSE zypper install ./filename.rpmorrpm -i ./filename.rpm- Verify the agent was installed on the endpoint.
Enter the following command on the endpoint:
dpkg -l | grep cortex-agentorrpm -qa | grep cortex-agent. To deploy the shell installer:- Enable execution of the script using the
chmod +xfilenamecommand. - Run the install script as root or with root permissions.
For example on CentOS 7:
[root@centos]#
 cd /tmp
[root@centos tmp]#
 ls
cortex-7.7.0.59559.sh
cortex.conf
linux.sh.tar.gz
README.md
[root@centos tmp]#
 chmod +x cortex-7.7.0.59559.sh
[root@centos tmp]#
 ./cortex-7.7.0.59559.sh
Verifying archive integrity... All good.
Uncompressing Cortex XDR 7.7.0.59559 installer  100%
[!] Path '/bin' is not in PATH
[!] Path '/sbin' is not in PATH
[ 1] Checking prerequisites
Verifying RHEL/CentOS 7 (rpm) packages:
  * openssl ... OK
  * ca-certificates ... OK
  * policycoreutils-python ... OK
  * selinux-policy-devel ... OK
Done
[ 2] Installing Cortex XDR [7.7.0.59559] at /opt/traps
Using packaged compatibility libraries
Done
[ 3] Creating runtime directory
Done
[ 4] Installing SELinux policies
  Compiling ... OK
  Installing ... OK
  Updating contexts ... OK
Done
[ 5] Verifying iptables prerequisite
Done
[ 6] Defining Cortex XDR local services (systemd)
Created symlink from /etc/systemd/system/multi-user.target.wants/traps_pmd.service to /etc/systemd/system/traps_pmd.service.
Done
[ 7] Creating/Verifying Cortex XDR auxiliary user
Done
[ 8] Configuring connection to server
Done
[ 9] Starting Cortex XDR security services
Redirecting to /bin/systemctl start traps_pmd.service
          Name       PID           User                Status               Command
               pmd      6072           root               Running               /opt/traps/bin/pmd
         analyzerd       N/A            N/A               STOPPED               N/A
              dypd      6138           root               Running               /opt/traps/bin/dypd  -s -- 175
              lted       N/A            N/A               STOPPED               N/A
Done
Additional options are available to help you customize your installation if needed. The following table describes common options and parameters that you can use but does not provide an exhaustive list. Use the --help option to print the help for the installer.
Note
If you are using
rpm,deborshinstallers, you must also add these parameters to the/etc/panw/cortex.conffile prior to installation.Make sure to remove the first couple of leading double dashes. For example, instead of :
-- --proxy-list ”<proxyserver>:<port>”, add this:--proxy-list="10.196.21.223:808".Applies to:
--proxy-list="10.196.21.223:808" --no-km --restrict=live_terminalOption Description --no-kmWithout Kernel Module Installation
Use the
--no-kmoption if you do not want to install the Cortex XDR agent kernel module. If you install the agent without the Cortex XDR kernel module or your Linux server runs an unsupported kernel version, the Cortex XDR agent will operate in asynchronous mode.--install-path=</custom/path>Custom Agent Installation Directory
Install the Cortex XDR agent in a custom directory on the endpoint instead of using the default
./optdirectory. Custom installation directory is a persistent change, and after you install the Cortex XDR to the custom path, all following upgrades and the removal of the agent from the endpoint are executed in the same location.Before you start, ensure the custom directory exists on the endpoint and has user and group executable permissions.
SH installer—Run the following command for example:
root@ubuntu:/tmp# ./linuxshell.sh -- --install-path=/home/customDirRPM and DEB installers—
1. Create a
cortex.conffile on the endpoint, under/ect/panw/2. Add to the
cortex.confyour custom directory parameter, for example:--install-path=/home/customDir
If you are installing Cortex XDR to a custom directory on SELinux enabled systems, ensure:
1. The custom installation directory must have an SELinux context that allows:
- File execution (execute permission)
- Library loading (execute permission for shared libraries)
Recommended contexts:
- usr_t - Standard user application files
- bin_t - Executable binaries (for the bin/ subdirectory)
2. Pre-Installation Steps
Option A: Set context on the parent directory (Recommended)
Before installation, configure the SELinux file context for the custom directory.
Example: If installing to
/data/cortex/traps, set the context for the entire directory tree:sudo semanage fcontext -a -t usr_t "/data/cortex(/.)?"sudo mkdir -p /data/cortexsudo restorecon -Rv /data/cortexOption B: Set context after installation
If the agent is already installed but failing to start, set
bin_tcontext for executable binaries:sudo semanage fcontext -a -t bin_t "/data/cortex/traps/bin(/.)?"sudo restorecon -Rv /data/cortex/traps/bin3. Verification - After setting the contexts, verify they are applied correctly.
Check the context of the installation directory:
ls -laZ /data/cortex/traps/Check the context of binaries:
ls -laZ /data/cortex/traps/bin/Expected output should show
bin_torusr_t, NOT default_tExample:
-rwx------. root root system_u:object_r:bin_t:s0 pmd4. Verify Cortex XDR agent starts successfully
Start the agent
sudo systemctl start traps_pmdCheck status
sudo systemctl status traps_pmdCheck for SELinux denials
sudo ausearch -m avc -ts recent-- --proxy-list ”<proxyserver>:<port>”Proxy Communication
Configure the Cortex XDR agent to communicate through an intermediary such as a proxy or the Palo Alto Networks Broker Service.
To enable the agent to direct communication to an intermediary, you use this installation option to assign the IP address and port number you want the Cortex XDR agent to use. You can also configure the proxy by entering the FQDN and port number. When you enter the FQDN, you can use both lowercase and uppercase letters. Avoid using special characters or spaces.
Use commas to separate multiple addresses. For example:
-- --proxy-list "My.Network.Name:808, 10.196.20.244:8080"You can assign up to five different proxies per agent, and the proxy for communication is selected randomly with equal probability.
To enable the agent to use the Broker Service, you must set up broker VM in your network and use this option to assign the agent the Broker VM IP address with port number 8888.
After the initial installation, you can change the proxy settings from Cortex XDR.
Note
The Cortex XDR agent does not support proxy communication in environments where proxy authentication is required.
VM Template
--vm-templateTemporary session
--temporary-sessionVirtual Installation
Deploy Cortex XDR agents on virtual Linux endpoints as temporary instances, ensuring the Cortex XDR agent license returns back to the license pool after 90 minutes of session inactivity and improving your network temporary workloads. Choose your preferred workflow:
Pre-install—Install the Cortex XDR agent only on the Linux endpoint you are using to create the VM template. Every instance you create using this template, will include the pre-installed Cortex XDR agent. For example:
$ ./installer.sh -- --vm-templateFresh install—Install the Cortex XDR agent on the Linux VM after creating the VM template, as part of provisioning. For example:
$ ./installer.sh -- --temporary-session-- --restrict=<flag>Disable Live Terminal, script execution, and file retrieval on the endpoint
Use to permanently disable the option for Cortex XDR to perform all, or a combination, of the following actions on endpoints running a Cortex XDR agent: initiate a remote session on the endpoint, (see Run Scripts on an Endpoint), and from the endpoint to the management console.
Caution
Disabling any of these actions is an irreversible action, so if you later want to enable the action on the endpoint, you must uninstall the Cortex XDR agent and install a new package without this flag.
To disable all actions, use the corresponding flag:
--restrict=allTo disable a specific action, use the corresponding flag:
--restrict=live_terminal—Use to disable Live Terminal.--restrict=script_execution—Use to disable script execution.--restrict=file_retrieval—Use to disable file retrieval.
To disable more than one option, use any combination of these flags.
-- --endpoint-tags`` ``<tag>Add Endpoint Tags
Add tags to the endpoint tags list.
SH installer—Run the following command for example:
traps_linux.sh -- --endpoint-tagstag1,tag2,tag3Spaces in tags are not allowed, if spaces are required, use the configuration file method below.
Note
The double dash (--) before the --endpoint-tags argument is mandatory, and the argument and the value must be separated by a space.
RPM/DEB/Shell installers—
1. Create a
cortex.conffile on the endpoint, under/ect/panw/2. Add to the
cortex.confyour custom directory parameter, for example:--endpoint-tagstag1,tag2,tag3Note
If one or more tags contains spaces, the entire tags string must be enclosed in quotes ("), for example:
--endpoint-tags "tag1,tag multi word2,tag3".
-
-
(For Kernel Mode only) Load SecureBoot Certificates.
If you enabled the SecureBoot kernel, perform the following to add the Cortex XDR kernel module certificate, available for:
- RHEL 8, AlmaLinux 8, RockyLinux 8, Oracle 8 and later
- Ubuntu 18 and later
- SLES 15 and later
- On your server, navigate to
/opt/traps/download/content/km/modules/<os_name>/and locate key namexdr_kernel_cert.derto access the public key. -
Load the key to the MOK by running the command:
mokutil --import xdr_kernel_cert.der - Set a password.
-
Reboot the system.
During the machine reboot, the Unified Extensible Firmware Interface (UEFI) will ask you to Enroll MOK. When prompted whether to download the key, select Yes and enter the password you defined.
- Verify the key was loaded by running the command
mokutil --list-enrolledand locating the key with thePalo Alto Networksissuer.
- See the Use the Cortex XDR agent for Linux section for a list of available options and functions. Enter the
cytoolcommand without any arguments or with-hor--helpfor a full list of available functions.
Cortex XDR Public key
Install the Cortex XDR Agent for Kubernetes Hosts
You can deploy the Cortex XDR agent for Linux on Kubernetes Clusters as a DaemonSet on any Kubernetes cluster. To deploy the agent, you first create a Cortex XDR agent YAML installation package in Cortex XDR, which allows you to configure attributes such as namespace default value and nodeselector. Once the Kubernetes agent is running on the endpoint, the agent offers the same protection capabilities and operates as any standard Cortex XDR agent for Linux. Cortex XDR issues a license for every node on which the agent is running, and will revoke the license once the agent is removed or the node is deleted. The Cortex XDR management console displays the Kubernetes Cluster and includes in the causality card a visual indication on processes that are running within containers, including information about the container itself such as its name, ID, image, etc.
Warning
Palo Alto Networks supports only Cortex XDR agent deployments carried out with the original YAML installation package generated directly from the Cortex XDR management console and carried out as a DaemonSet. If you attempt to edit the YAML settings after you created the package, the installation could fail or cause the agent to display unexpected behavior.
The Helm Installer package may be used for fresh installations and upgrades of agents running on Kubernetes clusters.
Prerequisites
| Requirement/Limitation | Description |
|---|---|
| Requirements | <ul><li>A Cortex XDR agent 7.9 or later.</li><li>To enable User Space operation mode you must deploy YAML installer for Cortex XDR agent 7.7 or later.</li><li>A Cortex XDR Cloud per Host license.</li><li>A supported Kubernetes deployment according to cloud provider and OS (both docker and containerd). See also Kubernetes platforms supported with Cortex XDR and Cloud platforms supported.</li><li>Managed Kubernetes, such as GKE Autopilot, are supported from Cortex XDR agent version 9.0.</li><li>For GKE Autopilot running a privileged workload requires adding the path (Palo-Alto-Networks/cortex-agent/*) to the corresponding allowlist file to an AllowlistSynchronizer custom resource. Then deploy the AllowlistSynchronizer to your cluster. For more details, visit https://cloud.google.com/kubernetes-engine/docs/how-to/run-autopilot-partner-workloads#create-allowlistsynchronizer</li></ul> |
| Limitations | <ul><li>You cannot upgrade, uninstall, or change the management server of a Cortex XDR agent running on Kubernetes Clusters directly from the Cortex XDR management console. These actions must be performed from your Kubernetes cluster.</li><li><p>If the Kubernetes clusters are based on Google Cloud Container-Optimized OS (COS), on some Google COS milestones, the Cortex XDR agent operates in asynchronous mode, due to kernel configuration limitations.</p><ul><li>Kernel Mode (KM) is not supported, due to restrictions on loading 3rd party kernel modules.</li><li>Cortex XDR agent deployment in a COS environment will enforce User Space Mode (overriding the settings in the profile).</li></ul></li><li><p>If the Kubernetes clusters are based on Red Hat OpenShift Container Platform with RHCOS, on some RHCOS versions, the Cortex XDR agent operates in asynchronous mode without its kernel module support due to kernel configuration limitations.</p><ul><li>Kernel Mode (KM) is not supported, due to restrictions on loading 3rd party kernel modules.</li><li>Cortex XDR agent deployment in an RHCOS environment will enforce User Space Mode (overriding the settings in the profile).</li></ul></li><li>GKE Autopilot, as a managed platform, does not allow running live terminal instances or initiate remote script execution.</li><li><p>If you are installing Cortex XDR alongside Prisma Cloud Compute, you must disable Runtime protection in Prisma Cloud Compute for as long as the two agents are working together. You can do so by either deleting any Runtime policy that exists in Prisma Cloud Compute, or moving Prisma Cloud Compute policies to Runtime Disabled.</p><p>From the Prisma Cloud Compute console, go to Defend → Runtime and delete or move all policies to Disable accordingly (Container policy, Host policy, Server policy, App-Embedded policy).</p></li><li>Installing Cortex XDR within Kubernetes in Docker (or any other container) is not supported.</li><li><p>Installing Cortex XDR on Kubernetes version 1.30 and below requires one of the following actions:</p><ul><li>Run the 'kubectl apply' command with the flag: --validate = false</li><li><p>Remove the following from the deamonset.yaml file:</p><p>appArmorProfile: type: Unconfined</p></li></ul></li></ul> |
To install the agent on your cluster
Note
Setting up the system and creating installation packages can be found in the Install and Manage endpoints section in the documentation for your license.
- Download the Cortex XDR agent YAML installation file from Cortex XDR.
- Copy the YAML file to the Kubernetes cluster you want to deploy it on.
- Log on to your Kubernetes cluster.
-
Deploy the YAML file. Run a standard YAML installation command line.
For example,
kubectl apply -f cortex-xdr.yamlNote
For GKE Autopilot: If there is a timing issue during installation (GKE Warden constraints violations), the YAML installation command should be repeated.
-
Verify the agents are running.
Run
kubectl get pods -A -o wide, and verify the Cortex XDR agent pod is running on your target node(s).Run
cat /proc/$(pidof pmd)/maps | grep bpfec, and verify the agent is running in user space mode by checking the operational status. -
Use the Cortex XDR Agent for Kubernetes.
To learn more, refer to Use the Cortex XDR agent for Linux.
To upgrade the agent on your cluster
- To upgrade the agent you must create a new YAML installation file from the Cortex XDR management console and re-install the agent.
To uninstall an agent from the cluster
- Uninstall the agent from your Kubernetes cluster.
- To uninstall the agent, remove the DaemonSet using the standard command line, for example:
kubectl delete -n cortex-xdr daemonset/cortex-agent.
Use the Cortex XDR agent for Linux
After you install Cortex XDR agent for Linux, the agent operates transparently in the background as a system process. The Cortex XDR agent communicates with the server at a fixed 5-minute heartbeat interval to send status information and retrieve the latest security policy. Typically, it is not necessary to interact with the agent; however, to perform common actions, such as initiating a manual check in with Cortex XDR, you can use the command-line utility (also available for Mac and Windows) named Cytool. Cytool is available in the /opt/traps/bin/cytool directory and must be run as root or with root permissions.
-
Display the Cytool help.
From the Linux server, run the
cytoolcommand without any arguments or with-hor--helpoptions.root@ubuntu:~$ /opt/traps/bin/cytool Usage: cytool<options> cytool - Support tool Options: -h --help Display help information. enum List processes protected by Cortex XDR. startup query List startup status for Cortex XDR endpoint agent(s) and daemon(s). startup <enable | disable> <process_name | all> Enable/Disable agent(s) and daemon(s) after reboot. runtime query List runtime status for agent(s), daemon(s) and kernel extensions. runtime <start | stop> <process_name | all> Start/Stop agent(s), daemon(s) and kernel extensions immediately. persist list Display list of persistent databases. persist export <db_name | db_path> Export database(s) to the file(s) in JSON format. persist import <db_name | db_path> <file_name> Import data into the database from the given JSON file. persist print <db_name | db_path> [csv] Print database to the command prompt. log <log_level> <process_name | all> Set log level for the desired process. log collect Generate support file archive. dump <enable | disable | restore> Enable/Disable dump generation or restore policy settings. checkin Initiate Check In Now (send heartbeat to ESM).
Follow the usage guidelines to run additional Cytool commands.
-
List processes protected by the agent.
Enter the
cytool enumcommand.root@ubuntu:~$ cytool enum ----------------------------------- Cortex XDR list of protected processes: ----------------------------------- PID CMD UID 1098 /usr/sbin/cron -f 0 1131 /usr/sbin/rsyslogd -n 104
To view processes for all users including those initiated by the operating system, specify the
/aoption.Note
If you change the action mode for protected processes in the Exploit Security Profile in Cortex XDR, you must restart the protected processes for the security policy to be enforced on the processes and its forked processes, and only then you will see them on this list.
-
Start or stop Cortex XDR agent daemons.
The agent comprises the pmd, dypd, analyzerd and lted processes. pmd is the main process and it automatically starts/stops dypd, analyzerd and lted. To start or stop all daemons, enter either the
cytool runtime [start | stop] allcommand or thecytool startup [enable | disable] allcommand. The behavior of both commands changes both the current running state and the startup registration status of the daemons when the server boots.For example:
root@ubuntu16:~# /opt/traps/bin/cytool runtime stop all Name PID User Status Command pmd N/A N/A STOPPED N/A analyzerd N/A N/A STOPPED N/A dypd N/A N/A STOPPED N/A lted N/A N/A STOPPED N/A root@ubuntu16:~# /opt/traps/bin/cytool runtime start all Name PID User Status Command pmd 20798 root Running /opt/traps/bin/pmd analyzerd 21027 cortexu+ Running /opt/traps/analyzerd/analyzerd 109 111 113 dypd 20999 root Running /opt/traps/bin/dypd -a -- 99 lted 20982 cortexu+ Running /opt/traps/ltee/lted -type 2 -config ltee_decryptor.json -
View the Cortex XDR agent security policy.
The agent stores policy and security event information such as the list of trusted signers, local verdicts, and one-time actions in local databases in the
/opt/traps/persist/directory. To troubleshoot policy issues and security events, you can use Cytool to import, export, and view information stored in the local database.To view a list of all local databases, use the
cytool persist listcommand.root@ubuntu:~$ /opt/traps/bin/cytool persist list Persistent database list: post_detection.db Database of post-detection candidates agent_actions.db Database of one time actions cloud_frontend.db Database of Cloud frontend settings hashes_lru.dbLeastrecently used verdicts database cloud_reports.db Database of Cloud reports hashes.db Database of the verdicts received from WildFire esm_frontend.db Database of ESM frontend settings policy.db Policy database fvhash.db Database of blacklisted fvhashes trusted_signers.db Database of trusted signers hash_paths.db Database of file paths hash_override.db Database of hashes override (Admin exeptions) esm_reports.db Database of ESM reports security_events.db Database of security events (preventions) file_upload.db Database of files being uploaded to ESM hashes_retransmit.db Database of hashes to be retransmitted agent_settings.db Database of agent settingsTo view the records of a database, use the
cytool persistprint [<database_name>|<database_path>]command where you specify either the name of database (see thecytoolpersist listcommand) or the path to the database. Or, to export the records of a database to a JSON file, use thecytoolpersist export [<database_name>|<database_path>]command. For example:root@ubuntu:~$ /opt/traps/bin/cytool persist print security_events.db Database security_events: persistence::DB: /opt/traps/persist/security_events.db: Open persistence::DB: /opt/traps/persist/security_events.db: Open: IO error: lock /opt/traps/persist/security_events.db/LOCK: Resource temporarily unavailable 3c34dcc1-bc37-ffef-ed55-f5512df05884, Prevention ID: 3c34dcc1-bc37-ffef-ed55-f5512df05884 Time: 2018-05-02T10:31:51Z Timezone offset (min): 240 Module ID (CyveraComponent): 277 Module status (CyStatus): 0xC0400015 Blocked: false Source process ID: 14818 Source process terminated: true Source process command line: /root/Desktop/Linux_testers/ROP/lighttpd system 0 Source process file index: 0 Target process ID: 0 Target process terminated: false Target process command line: Target process file index: 0 User ID: 0 User name: Cortex XDR version: 7.3.0.0 OS name: Linux OS version: Red Hat Enterprise Linux Server release 6.9 (Santiago) Machine name: Saar_redhat64x64 Dump path: /opt/traps/forensics/3c34dcc1-bc37-ffef-ed55-f5512df05884/ Content version: 17-3805 IP Address: 10.200.0.55 Verdict (WildFire/Hash Control): 0 1 Files: Name: lighttpd Path: /root/Desktop/Linux_testers/ROP Size: 0 Hash: 8630c9e57ca58fb7966c80525c36f572416e0a8db617b8a43c946d4fa966a71c Version: Publisher: Quarantine ID: Signers: '' ------------------------------------------------ ---------- END Security Event Files ---------- root@ubuntu:~$ /opt/traps/bin/cytool persist export security_events.db persistence::DB: /opt/traps/persist/security_events.db: Open -rw-r--r-- 1 ubuntu root 25824 Jan 2 18:10 /home/ubuntu/traps/cytool/security_events.db_18.10.04.427_02.01.2018.json
To add records to the database, use the
cytoolpersist import [<database_name>|<database_path>]<input_filename>command where<input_filename>is a JSON file. -
Collect logs.
Use the
cytool log set_level<log_level>[<process_name>|all]command to change the log level of an agent component where:<log_level>is an integer value corresponding to the log level:- 1—Fatal
- 2—Critical
- 3—Error
- 4—Warning
- 5—Notice
- 6—Information
- 7—Debug
- 8—Trace
<process_name>is the Cortex XDR agent component:trapsd,authorized,pmd, ordypd.
Then use the
cytool log collectcommand to collect all logs in a TGZ file.root@ubuntu:~$ /opt/traps/bin/cytool log 1 trapsd root@ubuntu:~$ /opt/traps/bin/cytool log collect -rw-r--r-- 1 root root 1651939 Dec 30 20:33 /tmp/Traps_log_2017-12-30_20-33-22/Traps_log_2017-12-30_20-33-22.tgz
-
Manually initiate a check in with the server.
Use the
cytool checkincommand to initiate the manual check-in. To verify the status of the check-in on Cortex XDR, view the LAST SEEN date from the additional details view of an endpoint on the Endpoints page. -
Configure proxy communication.
Note
To configure system-wide proxy settings for your endpoints, follow the instructions below. You can also configure a Cortex XDR agent specific proxy.
If defined, the agent uses the proxy settings defined in the system environment in
/etc/environment. If proxy settings are not defined, you can add the proxy server to the system environment by specifying the following setting in theenvironmentfile:https_proxy="http://<proxyserver>:<port>"where:
<proxyserver>is the IP address of the proxy server<port>is the port number used for proxy communication.
For example:
https_proxy="http://10.196.20.244:8080" -
View the version of the Cortex XDR agent.
To view the version of the agent on the Linux server, open or read the
version.txtfile in the/opt/traps/directory. For example:root@ubuntu:~$ cat /opt/traps/version.txt traps_linux-6.1.0.1040 ce1707dadbbb67effb7bf08cd4edee60d9508377
Uninstall the Cortex XDR Agent for Linux
From the Cortex XDR management console you can uninstall the Cortex XDR agent on a Linux server (refer to Uninstall the Cortex XDR Agent in the Administrator’s Guide for your license version. You can also uninstall the agent directly on the server. Successfully uninstalling the Cortex XDR agent program effectively removes the agent from the server.
After you uninstall the agent, your server will no longer be protected by your organization’s security policies in Cortex XDR.
- Uninstall using package manager.
- Depending on your Linux distribution, uninstall the Cortex XDR agent using one of the following commands:
- For RHEL, CentOS, or Oracle distributions, use the
yum remove cortex-agentorrpm —e cortex—agentcommand. - For Ubuntu or Debian distributions, use the
apt—get remove cortex—agentcommand. - For SuSE distributions, use the
zypper rm cortex—agentorrpm —e cortex—agentcommand.
- For RHEL, CentOS, or Oracle distributions, use the
- Depending on your Linux distribution, uninstall the Cortex XDR agent using one of the following commands:
-
Uninstall using a shell script.
If you used the shell script to install the Cortex XDR agent, you can use the corresponding uninstall shell script to uninstall the agent. You cannot use the script to uninstall agents installed using other methods.
-
On the Linux server, run the uninstall.sh script and confirm you want to uninstall the Cortex XDR agent.
The
uninstall.shscript is located in the/opt/traps/scriptsdirectory. By default, the script removes all logs, keys, and other files related to the Cortex XDR agent. If you want to preserve the logs, run the uninstall script in light mode using the—loption.Note
To use the uninstall script, you must run it from the default location in the scripts directory, and as root or with root permissions.
root@ubuntu:/$ /opt/traps/scripts/uninstall.sh This operation will uninstall Cortex XDR agent, are you sure? [y/N]: y [1] Shutting down Cortex XDR services Done [2] Waiting on active AppArmor policy updates Done [3] Removing AppArmor policies * cortex xdr Done [4] Stopping Cortex XDR security services (systemd) Removed symlink /etc/systemd/system/multi-user.target.wants/traps_trapsd.service. Removed symlink /etc/systemd/system/multi-user.target.wants/traps_pmd.service. Removed symlink /etc/systemd/system/multi-user.target.wants/traps_authorized.service. Done [5] Removing Cortex XDR agent Done -
Confirm that the agent is no longer installed.
From the Linux server you can verify the removal of the traps folder in /opt/. From Cortex XDR, you can also verify that the server was removed from the Endpoints page.
-
Troubleshooting Resources for Linux
| Resource | Description |
| Services and Processes | Services:
Processes:
|
| Memory usage of lted processes | All lted instances are forks of the same process, sharing most of the physical memory pages. Using ps and sum of RSS of all lted instances could be misleading, since the same shared memory pages will be counted several times. The correct way to analyze memory usage of lted processes is using PSS (Proportional set size), which can be calculated by the smem utility. |
| Cortex XDR agent logs | Indicates information, warnings, and errors related to Cortex XDR that are stored on the endpoint, accessible to privileged users only.
|
| Kernel Module | The installed Cortex XDR agent kernel module. Kernel modules are updated through Content updates. See the admin guide for more information about content updates. Latest content releases are listed here. For supported Kernel Modules see here.
|
Cytool for Linux
Cytool is a command-line tool that is integrated into the Cortex XDR agent that enables you to query and manage both basic and advanced functions of the agent. Unless stated otherwise, changes you make using Cytool take effect when the agent receives the next heartbeat communication (every five minutes) from Cortex XDR.
The following table displays the Cytool options available on Linux endpoints. Where there is a password required for admin commands, this is the same password as was defined as the Uninstall Password.
Note
Since Cortex XDR agent 7.6, the pmd process includes and replaces the trapsd process.
| Command Option | Description |
| adaptive_policy | Adaptive policy agent commands. Usage: where:
|
| anti_malware | Perform Anti Malware related operations.
Usage: where:
|
| cert_enforcement | Perform Certificate enforcement related operations. Usage: Where <operation> is one of the following:
|
| checkin | Initiate check-in to the server. Usage: To verify the check in, view the check-in time on the Cortex XDR agent console. |
| connectivity_test | Perform a connectivity test to Cortex XDR servers. Usage: |
| dump | Enable/disable dump generation or restore policy settings. Usage:
|
| endpoint_tags | Usage: where <action> can be:
Note Tags should be passed as one string separated by comas. Linux does not support tag names with spaces as command line arguments to the shell installer. Instead, tags can be set in the For example:
|
| enum | Enumerate protected processes. Usage: For example: root@ubuntu: cytool enum ----------------------------------- Cortex XDR list of protected processes: ----------------------------------- PID CMD UID 1098 /usr/sbin/cron -f 0 1131 /usr/sbin/rsyslogd -n 104 To view processes for all users including those initiated by the operating system, specify the Note If you change the action mode for protected processes in the Exploit Security Profile in Cortex XDR, you must restart the protected processes for the security policy to be enforced on the processes and its forked processes; only then you will see them on this list. |
| event_collection | Stop or start event collection status (EDR/DSE). Usage: Options are: |
| health | Shows the agent status, protection level and connectivity. |
| -h --help | Displays the available help information |
| import suex | Import pre-downloaded content or local support exceptions. Used for solving specific problems with a support representative. |
| isolate stop | Release machine from network isolation. |
| last_checkin | Display last successful check-in time. |
| log | Set the log level for the desired process. Usage: where:
For example: cytool log set_level 2 all Then use the |
| log collect | Generate support file archive of all logs in a TGZ file. |
| persist | The Cortex XDR agent stores policy and security event information such as the list of trusted signers, local verdicts, and one-time actions in local databases on the endpoint. To troubleshoot policy issues and security events. Use cytool persist operations to import, export, and view information stored in the local database. Usage: where <action>:
To view a list of all local databases, use the |
| queryall | The cytool queryall command displays a list of imported certificates, for troubleshooting purposes. |
| reconnect | Try reconnecting to the server if communication has been disabled, or force registration with a new Usage:
Note The |
| runtime | Stop or start product components. Usage: where:
For example: cytool runtime query
Name PID User Status Command
cortex xdr 1055 User1 Running /Library/Application Support/PaloAltoNetworks/Traps/bin/cortex xdr.app/Contents/MacOS/cortex xdr
authorized 927 _traps_panw Running /Library/Application Support/PaloAltoNetworks/Traps/bin/authorized
pmd 909 root Running /Library/Application Support/PaloAltoNetworks/Traps/bin/pmd
kproc-ctrl 159 root Loaded com.paloaltonetworks.driver.kproc-ctrl
cytool runtime stop all
Name PID User Status Command
authorized N/A N/A STOPPED N/A
pmd N/A N/A STOPPED N/A
cortex xdr N/A N/A STOPPED N/A
kproc-ctrl N/A N/A Unloaded N/A
cytool runtime start all
Name PID User Status Command
system call failed for command='/usr/bin/su -l Traps -c "/bin/launchctl start cortex xdr.plist"', returned status code=768
authorized 1883 _traps_panw Running /Library/Application Support/PaloAltoNetworks/Traps/bin/authorized
pmd 1889 root Running /Library/Application Support/PaloAltoNetworks/Traps/bin/pmd
cortex xdr N/A N/A FAILED TO START N/A
kproc-ctrl 160 root Loaded com.paloaltonetworks.driver.kproc-ctrl
|
| scan | Perform Scan operations on the endpoint. Options: |
| startup | Enable, disable, or query the startup state of Cortex XDR agent components. Usage: where:
For example: root@ubuntu: sudo ./cytool startup disable cortex xdr pmd
Process name Startup status
cortex xdr Disabled
authorized Enabled
pmd Disabled
kproc-ctrl Loaded
root@ubuntu: sudo ./cytool startup enable all
Process name Startup status
cortex xdr Enabled
authorized Enabled
pmd Enabled
kproc-ctrl Loaded
|