Documentation — August 20, 2026
232 files changed, 1551 insertions, 588 deletions — view the commit on the mirror.
233 Cortex XSIAM pages restyled for search; SaaS section renamed; 18 compliance standards added
- Every changed file is in the Cortex XSIAM book: 192 modified and 41 renamed, with no page added or deleted.
- Mostly an authoring pass — 97 pages changed only by gaining a
description:frontmatter line, and 12 page titles were rewritten into keyword-rich forms. - The SaaS Security onboarding section moved from
onboard-a-supported-saas-applicationtoconnect-a-saas-application, taking 40 application pages with it. - The one substantive change is the compliance standards catalog, which gained 18 standards including CIS benchmarks for Ubuntu 24.04 LTS, Debian 13 and AWS Foundations v7.0.0.
- Egress, inbound and engine IP tables, supported regions, retention periods and licence tiers were all re-headed, but no value in them changed.
Highlights
-
The SaaS Security onboarding section was renamed, moving 41 pages
`onboard-a-supported-saas-application` became `connect-a-saas-application`; 40 of the 41 pages moved at 100% similarity, and the parent page's own per-app link table was left untouched and still points at the old segment.
-
The compliance standards catalog gained 18 standards
New CIS benchmarks for Alibaba Cloud 2.0.0, Debian 13, Ubuntu 24.04 LTS, Red Hat OpenShift 1.9.0, EKS 1.8.0, AWS Foundations v7.0.0 and Azure Foundations v6.0.0, each at Level 1 and Level 2, plus NIST SP 800-190.
-
The allowlist and region reference pages changed only in their headings
The egress, inbound, engine-IP and FedRAMP resource pages were retitled and given real `###` headings in place of bold labels, but every IP address, FQDN, port and App-ID in their tables is unchanged.
-
97 pages changed only by gaining a search description
Each added a four- or six-line `description:` frontmatter block and nothing else — zero deletions, no body text touched.
-
12 page titles were rewritten and the navigation manifest followed
`.meta/xsiam.json` records the new titles: "Engine IP addresses (outbound)" became "Cortex XSIAM engine outbound IP addresses", "Use the interface" became "Use the Cortex XSIAM interface", and "Limitations & supported regions" became "FedRAMP limitations and supported government cloud regions".
-
Role-based access control hub pages now link to their children
Plain-text component lists became cross-links — configuration permissions went from 8 bare names to 19 linked sub-pages, and cloud security and posture management gained links to its 9.
Changes
232 files listed, 14 written up and shaded below.
-
▸ ▾ Navigation manifest (xsiam) modified +55 −55
.meta/xsiamThe book's page tree and ordering — not a documentation page, so no diff is kept. The counts above still say how much moved.
-
▸ ▾ Connect a SaaS application renamed +6 −8 Renamed from "Onboard a Supported SaaS Application"; the per-app link table was left untouched and still points at the old path segment.
xsiam/cloud-security/cortex-cloud-saas-security/connect-a-saas-applicationRead it on the Cortex docs portal ↗ Read it here → This file's diff on GitHub ↗ moved from
xsiam/cloud-security/cortex-cloud-saas-security/onboard-a-supported-saas-application.mdBefore After@@ -1,27 +1,25 @@------description: >-description: >-Onboard a supported SaaS application to track and monitor misconfigurationsConnect a supported SaaS application to track and monitor misconfigurationsand compliance violations.and compliance violations.------# Onboard a Supported SaaS Application# Connect a SaaS applicationTo detect posture risks, applications must first be connected to SaaS Security and have the necessary permissions to scan SaaS applications settings. During onboarding, SaaS Security prompts you for the configuration information required to establish a connection with the SaaS app. The configuration information that SaaS Security requires differs from app to app, and you might need to collect configuration information prior to onboarding.To detect posture risks, applications must first be connected to Cortex SaaS Security and have the necessary permissions to scan SaaS application settings. During data connection, Cortex SaaS Security prompts you for the configuration information required to establish a connection with the SaaS app. The configuration information that SaaS Security requires differs from app to app, and you might need to collect configuration information prior to onboarding.When you onboard a SaaS app, SaaS Security may prompt you for information used to connect to the SaaS app, such as administrator credentials for a service account. The required information varies from app to app, and in many cases you must first take some actions on the SaaS app, such as creating an API key.When you connect an application you may also be prompted to provide required for application connection, such as administrator credentials for a service account. The required information varies, and in many cases you must first take some actions on the SaaS app, such as creating an API key.The following table provides links to detailed onboarding instructions for most applications. Where detailed instructions are not available for a particular SaaS application, the table includes the relevant onboarding steps.The following table provides links to detailed connection instructions for most applications. Where detailed instructions are not available for a particular SaaS application, the table includes the relevant onboarding steps.### Available onboarding instructionsSaaS app connection stepsSaaS App Onboarding Instructions| ----------------------------------------------------------------------------------------------------------------------------------------------------------------------------------------------------------------------------------------------------------------------------------------------------------------------------------------------------------------------------------------------------------------------------------------------------------------------------------------------------------------------------------------------------------------------------------------------------------------------------------------------------------------------------------------------------------------------------------------------------------------------------------------------------------------------------------------------------------------------------------------------------------------------------------------------------------------------------------------------------------------------------------------------------------------------------------------------------------------------------------------------------------------------------------------------------------------------------------------------------------------------------------------------------------------------------------------------------------------------------------------------------------------------------------------------------------------------------------- || ----------------------------------------------------------------------------------------------------------------------------------------------------------------------------------------------------------------------------------------------------------------------------------------------------------------------------------------------------------------------------------------------------------------------------------------------------------------------------------------------------------------------------------------------------------------------------------------------------------------------------------------------------------------------------------------------------------------------------------------------------------------------------------------------------------------------------------------------------------------------------------------------------------------------------------------------------------------------------------------------------------------------------------------------------------------------------------------------------------------------------------------------------------------------------------------------------------------------------------------------------------------------------------------------------------------------------------------------------------------------------------------------------------------------------------------------------------------------------------- |Aha.ioAha.ioAsanaAsanaAtlassianAtlassianAutomoxAutomoxBusinessMapBusinessMapCelonisCelonisCisco DuoCisco DuoShow markdown source
@@ -1,27 +1,25 @@ --- description: >- - Onboard a supported SaaS application to track and monitor misconfigurations + Connect a supported SaaS application to track and monitor misconfigurations and compliance violations. --- -# Onboard a Supported SaaS Application +# Connect a SaaS application -To detect posture risks, applications must first be connected to SaaS Security and have the necessary permissions to scan SaaS applications settings. During onboarding, SaaS Security prompts you for the configuration information required to establish a connection with the SaaS app. The configuration information that SaaS Security requires differs from app to app, and you might need to collect configuration information prior to onboarding. +To detect posture risks, applications must first be connected to Cortex SaaS Security and have the necessary permissions to scan SaaS application settings. During data connection, Cortex SaaS Security prompts you for the configuration information required to establish a connection with the SaaS app. The configuration information that SaaS Security requires differs from app to app, and you might need to collect configuration information prior to onboarding. -When you onboard a SaaS app, SaaS Security may prompt you for information used to connect to the SaaS app, such as administrator credentials for a service account. The required information varies from app to app, and in many cases you must first take some actions on the SaaS app, such as creating an API key. +When you connect an application you may also be prompted to provide required for application connection, such as administrator credentials for a service account. The required information varies, and in many cases you must first take some actions on the SaaS app, such as creating an API key. -The following table provides links to detailed onboarding instructions for most applications. Where detailed instructions are not available for a particular SaaS application, the table includes the relevant onboarding steps. +The following table provides links to detailed connection instructions for most applications. Where detailed instructions are not available for a particular SaaS application, the table includes the relevant onboarding steps. -### Available onboarding instructions - -| **SaaS App Onboarding Instructions** | +| **SaaS app connection steps** | | ----------------------------------------------------------------------------------------------------------------------------------------------------------------------------------------------------------------------------------------------------------------------------------------------------------------------------------------------------------------------------------------------------------------------------------------------------------------------------------------------------------------------------------------------------------------------------------------------------------------------------------------------------------------------------------------------------------------------------------------------------------------------------------------------------------------------------------------------------------------------------------------------------------------------------------------------------------------------------------------------------------------------------------------------------------------------------------------------------------------------------------------------------------------------------------------------------------------------------------------------------------------------------------------------------------------------------------------------------------------------------------------------------------------------------------------------------------------------------------- | | [Aha.io](../cortex-cloud-ai-security/cortex-cloud-saas-security/onboard-a-supported-saas-application/onboard-aha.io) | | [Asana](../cortex-cloud-ai-security/cortex-cloud-saas-security/onboard-a-supported-saas-application/onboard-asana) | | [Atlassian](../cortex-cloud-ai-security/cortex-cloud-saas-security/onboard-a-supported-saas-application/onboard-atlassian) | | [Automox](../cortex-cloud-ai-security/cortex-cloud-saas-security/onboard-a-supported-saas-application/onboard-automox) | | [BusinessMap](../cortex-cloud-ai-security/cortex-cloud-saas-security/onboard-a-supported-saas-application/onboard-businessmap) | | [Celonis](../cortex-cloud-ai-security/cortex-cloud-saas-security/onboard-a-supported-saas-application/onboard-celonis) | | [Cisco Duo](../cortex-cloud-ai-security/cortex-cloud-saas-security/onboard-a-supported-saas-application/onboard-cisco-duo) |
-
▸ ▾ Onboard Aha.io renamed +0 −0
xsiam/cloud-security/cortex-cloud-saas-security/connect-a-saas-application/onboard-aha.ioRead it on the Cortex docs portal ↗ Read it here → This file's diff on GitHub ↗ moved from
xsiam/cloud-security/cortex-cloud-saas-security/onboard-a-supported-saas-application/onboard-aha.io.md -
▸ ▾ Onboard Asana renamed +0 −0
xsiam/cloud-security/cortex-cloud-saas-security/connect-a-saas-application/onboard-asanaRead it on the Cortex docs portal ↗ Read it here → This file's diff on GitHub ↗ moved from
xsiam/cloud-security/cortex-cloud-saas-security/onboard-a-supported-saas-application/onboard-asana.md -
▸ ▾ Onboard Atlassian renamed +0 −0
xsiam/cloud-security/cortex-cloud-saas-security/connect-a-saas-application/onboard-atlassianRead it on the Cortex docs portal ↗ Read it here → This file's diff on GitHub ↗ moved from
xsiam/cloud-security/cortex-cloud-saas-security/onboard-a-supported-saas-application/onboard-atlassian.md -
▸ ▾ Onboard Automox renamed +0 −0
xsiam/cloud-security/cortex-cloud-saas-security/connect-a-saas-application/onboard-automoxRead it on the Cortex docs portal ↗ Read it here → This file's diff on GitHub ↗ moved from
xsiam/cloud-security/cortex-cloud-saas-security/onboard-a-supported-saas-application/onboard-automox.md -
▸ ▾ Onboard Businessmap renamed +0 −0
xsiam/cloud-security/cortex-cloud-saas-security/connect-a-saas-application/onboard-businessmapRead it on the Cortex docs portal ↗ Read it here → This file's diff on GitHub ↗ moved from
xsiam/cloud-security/cortex-cloud-saas-security/onboard-a-supported-saas-application/onboard-businessmap.md -
▸ ▾ Onboard Celonis renamed +0 −0
xsiam/cloud-security/cortex-cloud-saas-security/connect-a-saas-application/onboard-celonisRead it on the Cortex docs portal ↗ Read it here → This file's diff on GitHub ↗ moved from
xsiam/cloud-security/cortex-cloud-saas-security/onboard-a-supported-saas-application/onboard-celonis.md -
▸ ▾ Onboard Cisco Duo renamed +0 −0
xsiam/cloud-security/cortex-cloud-saas-security/connect-a-saas-application/onboard-cisco-duoRead it on the Cortex docs portal ↗ Read it here → This file's diff on GitHub ↗ moved from
xsiam/cloud-security/cortex-cloud-saas-security/onboard-a-supported-saas-application/onboard-cisco-duo.md -
▸ ▾ Onboard Cisco Meraki renamed +0 −0
xsiam/cloud-security/cortex-cloud-saas-security/connect-a-saas-application/onboard-cisco-merakiRead it on the Cortex docs portal ↗ Read it here → This file's diff on GitHub ↗ moved from
xsiam/cloud-security/cortex-cloud-saas-security/onboard-a-supported-saas-application/onboard-cisco-meraki.md -
▸ ▾ Onboard ClickUp renamed +0 −0
xsiam/cloud-security/cortex-cloud-saas-security/connect-a-saas-application/onboard-clickupRead it on the Cortex docs portal ↗ Read it here → This file's diff on GitHub ↗ moved from
xsiam/cloud-security/cortex-cloud-saas-security/onboard-a-supported-saas-application/onboard-clickup.md -
▸ ▾ Onboard Contentful renamed +0 −0
xsiam/cloud-security/cortex-cloud-saas-security/connect-a-saas-application/onboard-contentfulRead it on the Cortex docs portal ↗ Read it here → This file's diff on GitHub ↗ moved from
xsiam/cloud-security/cortex-cloud-saas-security/onboard-a-supported-saas-application/onboard-contentful.md -
▸ ▾ Onboard Couchbase renamed +0 −0
xsiam/cloud-security/cortex-cloud-saas-security/connect-a-saas-application/onboard-couchbaseRead it on the Cortex docs portal ↗ Read it here → This file's diff on GitHub ↗ moved from
xsiam/cloud-security/cortex-cloud-saas-security/onboard-a-supported-saas-application/onboard-couchbase.md -
▸ ▾ Onboard Coveo renamed +0 −0
xsiam/cloud-security/cortex-cloud-saas-security/connect-a-saas-application/onboard-coveoRead it on the Cortex docs portal ↗ Read it here → This file's diff on GitHub ↗ moved from
xsiam/cloud-security/cortex-cloud-saas-security/onboard-a-supported-saas-application/onboard-coveo.md -
▸ ▾ Onboard Databricks renamed +0 −0
xsiam/cloud-security/cortex-cloud-saas-security/connect-a-saas-application/onboard-databricksRead it on the Cortex docs portal ↗ Read it here → This file's diff on GitHub ↗ moved from
xsiam/cloud-security/cortex-cloud-saas-security/onboard-a-supported-saas-application/onboard-databricks.md -
▸ ▾ Onboard Datadog renamed +0 −0
xsiam/cloud-security/cortex-cloud-saas-security/connect-a-saas-application/onboard-datadogRead it on the Cortex docs portal ↗ Read it here → This file's diff on GitHub ↗ moved from
xsiam/cloud-security/cortex-cloud-saas-security/onboard-a-supported-saas-application/onboard-datadog.md -
▸ ▾ Onboard Gainsight PX renamed +0 −0
xsiam/cloud-security/cortex-cloud-saas-security/connect-a-saas-application/onboard-gainsight-pxRead it on the Cortex docs portal ↗ Read it here → This file's diff on GitHub ↗ moved from
xsiam/cloud-security/cortex-cloud-saas-security/onboard-a-supported-saas-application/onboard-gainsight-px.md -
▸ ▾ Onboard Grammarly renamed +0 −0
xsiam/cloud-security/cortex-cloud-saas-security/connect-a-saas-application/onboard-grammarlyRead it on the Cortex docs portal ↗ Read it here → This file's diff on GitHub ↗ moved from
xsiam/cloud-security/cortex-cloud-saas-security/onboard-a-supported-saas-application/onboard-grammarly.md -
▸ ▾ Onboard Harness renamed +0 −0
xsiam/cloud-security/cortex-cloud-saas-security/connect-a-saas-application/onboard-harnessRead it on the Cortex docs portal ↗ Read it here → This file's diff on GitHub ↗ moved from
xsiam/cloud-security/cortex-cloud-saas-security/onboard-a-supported-saas-application/onboard-harness.md -
▸ ▾ Onboard Intercom renamed +0 −0
xsiam/cloud-security/cortex-cloud-saas-security/connect-a-saas-application/onboard-intercomRead it on the Cortex docs portal ↗ Read it here → This file's diff on GitHub ↗ moved from
xsiam/cloud-security/cortex-cloud-saas-security/onboard-a-supported-saas-application/onboard-intercom.md -
▸ ▾ Onboard Jamf Pro renamed +0 −0
xsiam/cloud-security/cortex-cloud-saas-security/connect-a-saas-application/onboard-jamf-proRead it on the Cortex docs portal ↗ Read it here → This file's diff on GitHub ↗ moved from
xsiam/cloud-security/cortex-cloud-saas-security/onboard-a-supported-saas-application/onboard-jamf-pro.md -
▸ ▾ Onboard JumpCloud renamed +0 −0
xsiam/cloud-security/cortex-cloud-saas-security/connect-a-saas-application/onboard-jumpcloudRead it on the Cortex docs portal ↗ Read it here → This file's diff on GitHub ↗ moved from
xsiam/cloud-security/cortex-cloud-saas-security/onboard-a-supported-saas-application/onboard-jumpcloud.md -
▸ ▾ Onboard Kustomer renamed +0 −0
xsiam/cloud-security/cortex-cloud-saas-security/connect-a-saas-application/onboard-kustomerRead it on the Cortex docs portal ↗ Read it here → This file's diff on GitHub ↗ moved from
xsiam/cloud-security/cortex-cloud-saas-security/onboard-a-supported-saas-application/onboard-kustomer.md -
▸ ▾ Onboard Microsoft Entra ID renamed +0 −0
xsiam/cloud-security/cortex-cloud-saas-security/connect-a-saas-application/onboard-microsoft-entra-idRead it on the Cortex docs portal ↗ Read it here → This file's diff on GitHub ↗ moved from
xsiam/cloud-security/cortex-cloud-saas-security/onboard-a-supported-saas-application/onboard-microsoft-entra-id.md -
▸ ▾ Onboard Monday.com renamed +0 −0
xsiam/cloud-security/cortex-cloud-saas-security/connect-a-saas-application/onboard-monday.comRead it on the Cortex docs portal ↗ Read it here → This file's diff on GitHub ↗ moved from
xsiam/cloud-security/cortex-cloud-saas-security/onboard-a-supported-saas-application/onboard-monday.com.md -
▸ ▾ Onboard MongoDB Atlas renamed +0 −0
xsiam/cloud-security/cortex-cloud-saas-security/connect-a-saas-application/onboard-mongodb-atlasRead it on the Cortex docs portal ↗ Read it here → This file's diff on GitHub ↗ moved from
xsiam/cloud-security/cortex-cloud-saas-security/onboard-a-supported-saas-application/onboard-mongodb-atlas.md -
▸ ▾ Onboard MuleSoft renamed +0 −0
xsiam/cloud-security/cortex-cloud-saas-security/connect-a-saas-application/onboard-mulesoftRead it on the Cortex docs portal ↗ Read it here → This file's diff on GitHub ↗ moved from
xsiam/cloud-security/cortex-cloud-saas-security/onboard-a-supported-saas-application/onboard-mulesoft.md -
▸ ▾ Onboard Mural renamed +0 −0
xsiam/cloud-security/cortex-cloud-saas-security/connect-a-saas-application/onboard-muralRead it on the Cortex docs portal ↗ Read it here → This file's diff on GitHub ↗ moved from
xsiam/cloud-security/cortex-cloud-saas-security/onboard-a-supported-saas-application/onboard-mural.md -
▸ ▾ Onboard Office 365 renamed +0 −0
xsiam/cloud-security/cortex-cloud-saas-security/connect-a-saas-application/onboard-office-365Read it on the Cortex docs portal ↗ Read it here → This file's diff on GitHub ↗ moved from
xsiam/cloud-security/cortex-cloud-saas-security/onboard-a-supported-saas-application/onboard-office-365.md -
▸ ▾ Onboard Okta renamed +0 −0
xsiam/cloud-security/cortex-cloud-saas-security/connect-a-saas-application/onboard-oktaRead it on the Cortex docs portal ↗ Read it here → This file's diff on GitHub ↗ moved from
xsiam/cloud-security/cortex-cloud-saas-security/onboard-a-supported-saas-application/onboard-okta.md -
▸ ▾ Onboard PagerDuty renamed +0 −0
xsiam/cloud-security/cortex-cloud-saas-security/connect-a-saas-application/onboard-pagerdutyRead it on the Cortex docs portal ↗ Read it here → This file's diff on GitHub ↗ moved from
xsiam/cloud-security/cortex-cloud-saas-security/onboard-a-supported-saas-application/onboard-pagerduty.md -
▸ ▾ Onboard Redis Labs renamed +0 −0
xsiam/cloud-security/cortex-cloud-saas-security/connect-a-saas-application/onboard-redis-labsRead it on the Cortex docs portal ↗ Read it here → This file's diff on GitHub ↗ moved from
xsiam/cloud-security/cortex-cloud-saas-security/onboard-a-supported-saas-application/onboard-redis-labs.md -
▸ ▾ Onboard Salesforce renamed +0 −0
xsiam/cloud-security/cortex-cloud-saas-security/connect-a-saas-application/onboard-salesforceRead it on the Cortex docs portal ↗ Read it here → This file's diff on GitHub ↗ moved from
xsiam/cloud-security/cortex-cloud-saas-security/onboard-a-supported-saas-application/onboard-salesforce.md -
▸ ▾ Onboard SAP Ariba renamed +0 −0
xsiam/cloud-security/cortex-cloud-saas-security/connect-a-saas-application/onboard-sap-aribaRead it on the Cortex docs portal ↗ Read it here → This file's diff on GitHub ↗ moved from
xsiam/cloud-security/cortex-cloud-saas-security/onboard-a-supported-saas-application/onboard-sap-ariba.md -
▸ ▾ Onboard Sentry renamed +0 −0
xsiam/cloud-security/cortex-cloud-saas-security/connect-a-saas-application/onboard-sentryRead it on the Cortex docs portal ↗ Read it here → This file's diff on GitHub ↗ moved from
xsiam/cloud-security/cortex-cloud-saas-security/onboard-a-supported-saas-application/onboard-sentry.md -
▸ ▾ Onboard ServiceNow renamed +0 −0
xsiam/cloud-security/cortex-cloud-saas-security/connect-a-saas-application/onboard-servicenowRead it on the Cortex docs portal ↗ Read it here → This file's diff on GitHub ↗ moved from
xsiam/cloud-security/cortex-cloud-saas-security/onboard-a-supported-saas-application/onboard-servicenow.md -
▸ ▾ Onboard Shopify renamed +0 −0
xsiam/cloud-security/cortex-cloud-saas-security/connect-a-saas-application/onboard-shopifyRead it on the Cortex docs portal ↗ Read it here → This file's diff on GitHub ↗ moved from
xsiam/cloud-security/cortex-cloud-saas-security/onboard-a-supported-saas-application/onboard-shopify.md -
▸ ▾ Onboard Slack Enterprise renamed +0 −0
xsiam/cloud-security/cortex-cloud-saas-security/connect-a-saas-application/onboard-slack-enterpriseRead it on the Cortex docs portal ↗ Read it here → This file's diff on GitHub ↗ moved from
xsiam/cloud-security/cortex-cloud-saas-security/onboard-a-supported-saas-application/onboard-slack-enterprise.md -
▸ ▾ Onboard Sumo Logic renamed +0 −0
xsiam/cloud-security/cortex-cloud-saas-security/connect-a-saas-application/onboard-sumo-logicRead it on the Cortex docs portal ↗ Read it here → This file's diff on GitHub ↗ moved from
xsiam/cloud-security/cortex-cloud-saas-security/onboard-a-supported-saas-application/onboard-sumo-logic.md -
▸ ▾ Onboard Workday renamed +0 −0
xsiam/cloud-security/cortex-cloud-saas-security/connect-a-saas-application/onboard-workdayRead it on the Cortex docs portal ↗ Read it here → This file's diff on GitHub ↗ moved from
xsiam/cloud-security/cortex-cloud-saas-security/onboard-a-supported-saas-application/onboard-workday.md -
▸ ▾ Onboard Wrike renamed +0 −0
xsiam/cloud-security/cortex-cloud-saas-security/connect-a-saas-application/onboard-wrikeRead it on the Cortex docs portal ↗ Read it here → This file's diff on GitHub ↗ moved from
xsiam/cloud-security/cortex-cloud-saas-security/onboard-a-supported-saas-application/onboard-wrike.md -
▸ ▾ Onboard YouTrack renamed +0 −0
xsiam/cloud-security/cortex-cloud-saas-security/connect-a-saas-application/onboard-youtrackRead it on the Cortex docs portal ↗ Read it here → This file's diff on GitHub ↗ moved from
xsiam/cloud-security/cortex-cloud-saas-security/onboard-a-supported-saas-application/onboard-youtrack.md -
▸ ▾ Remediation Actions modified +1 −1
xsiam/cloud-security/cortex-cloud-saas-security/remediation-actionsRead it on the Cortex docs portal ↗ Read it here → This file's diff on GitHub ↗
Before After@@ -1,17 +1,17 @@------description: Learn more about actions available to remediate Issues.description: Learn more about actions available to remediate Issues.------# Remediation Actions# Remediation ActionsReview remediation actions to see a prioritized list of steps you can take to resolve posture issues originating from SaaS Applications. Follow the steps below to view all the Remediation options:Review remediation actions to see a prioritized list of steps you can take to resolve posture issues originating from SaaS Applications. Follow the steps below to view all the Remediation options:
 1. Navigate to Modules > SaaS Security > Security Issues > Posture to view a list of all issues with vulnerabilities originating from SaaS Application Posture.1. Navigate to Modules > SaaS Security > Security Issues > Posture to view a list of all issues with vulnerabilities originating from SaaS Application Posture.2. Click on any Issue to be taken to the Issue view.2. Click on any Issue to be taken to the Issue view.3. Select the Issue you wish to investigate. This opens the Remediation Actions side panel.3. Select the Issue you wish to investigate. This opens the Remediation Actions side panel.4. The detailed side panel provides the following investigation and remediation options:4. The detailed side panel provides the following investigation and remediation options:1. The Overview tab on the Vulnerability Issues panel captures all the relevant details to further investigate the vulnerability including Summary, Details, Affected Assets, and Evidence.1. The Overview tab on the Vulnerability Issues panel captures all the relevant details to further investigate the vulnerability including Summary, Details, Affected Assets, and Evidence.2. Select Resolution to view remediation options including Remediation Guidance. Detailed manual steps are listed to resolve the issue.2. Select Resolution to view remediation options including Remediation Guidance. Detailed manual steps are listed to resolve the issue.3. Click War Room for real-time investigation capabilities. In the War Room you can capture case context from different sources and collaborate and execute remote actions across integrated products.3. Click War Room for real-time investigation capabilities. In the War Room you can capture case context from different sources and collaborate and execute remote actions across integrated products.
Show markdown source
@@ -1,17 +1,17 @@ --- description: Learn more about actions available to remediate Issues. --- # Remediation Actions Review remediation actions to see a prioritized list of steps you can take to resolve posture issues originating from SaaS Applications. Follow the steps below to view all the Remediation options: -<figure><img src="https://2786854933-files.gitbook.io/~/files/v0/b/gitbook-x-prod.appspot.com/o/spaces%2FAEIjuYE3RXcIfmuQnBbm%2Fuploads%2FoUA3785rtlcJyMIjTxHF%2Fimage.png?alt=media&token=8a607716-c174-4f97-a440-fd96a70edcf0" alt=""><figcaption></figcaption></figure> +<figure><img src="https://2786854933-files.gitbook.io/~/files/v0/b/gitbook-x-prod.appspot.com/o/spaces%2FAEIjuYE3RXcIfmuQnBbm%2Fuploads%2FSBidnXL0Nq0WkaHZTEoe%2Fimage.png?alt=media&token=4e0d0c5f-0d5b-4047-9bc3-3294d0787f22" alt=""><figcaption></figcaption></figure> 1. Navigate to **Modules > SaaS Security > Security Issues > Posture** to view a list of all issues with vulnerabilities originating from SaaS Application Posture.  2. Click on any Issue to be taken to the Issue view.  3. Select the Issue you wish to investigate. This opens the Remediation Actions side panel. 4. The detailed side panel provides the following investigation and remediation options: 1. The **Overview** tab on the Vulnerability Issues panel captures all the relevant details to further investigate the vulnerability including Summary, Details, Affected Assets, and Evidence. 2. Select **Resolution** to view remediation options including Remediation Guidance. Detailed manual steps are listed to resolve the issue. 3. Click **War Room** for real-time investigation capabilities. In the War Room you can capture case context from different sources and collaborate and execute remote actions across integrated products. -
▸ ▾ Standards catalog modified +40 −22 Adds 18 compliance standards — CIS benchmarks for Alibaba Cloud, Debian 13, Ubuntu 24.04 LTS, OpenShift 1.9.0, EKS 1.8.0, AWS v7.0.0 and Azure v6.0.0, plus NIST SP 800-190.
xsiam/cloud-security/monitor-and-track-compliance-adherence/choose-compliance-standards-from-the-compliance-catalog/standards-catalogRead it on the Cortex docs portal ↗ Read it here → This file's diff on GitHub ↗
Before After@@ -28,138 +28,156 @@ Click on a specific standard to open the standard overview side panel with detaiFrom the side panel, you can view and filter controls associated with the standard, and click on a control to view its details and the rules associated with it.From the side panel, you can view and filter controls associated with the standard, and click on a control to view its details and the rules associated with it.## Built-in compliance standards## Built-in compliance standardsCompliance Standard│VersionCompliance Standard│Version| ---------------------------------------------------------------------------------- | --------------- || ---------------------------------------------------------------------------------- | --------------- |Australian Cyber Security Centre (ACSC) Essential Eight│–Australian Cyber Security Centre (ACSC) Essential Eight│–Australian Cyber Security Centre (ACSC) Essential Eight - Level 1│Level 1Australian Cyber Security Centre (ACSC) Essential Eight - Level 1│–Australian Cyber Security Centre (ACSC) Essential Eight - Level 2│Level 2Australian Cyber Security Centre (ACSC) Essential Eight - Level 2│–Australian Cyber Security Centre (ACSC) Essential Eight - Level 3│Level 3Australian Cyber Security Centre (ACSC) Essential Eight - Level 3│–Australian Cyber Security Centre's (ACSC) Information Security Manual (ISM)│–Australian Cyber Security Centre's (ACSC) Information Security Manual (ISM)│–Australian Cyber Security Centre's (ACSC) Information Security Manual (ISM) Latest│–Australian Cyber Security Centre's (ACSC) Information Security Manual (ISM) Latest│–Australian Energy Sector Cyber Security Framework (AESCSF)│1Australian Energy Sector Cyber Security Framework (AESCSF)│1Australian Energy Sector Cyber Security Framework (AESCSF) v2│2Australian Energy Sector Cyber Security Framework (AESCSF) v2│2Australian Energy Sector Cyber Security Framework (AESCSF) v2 - Lite Framework│2Australian Energy Sector Cyber Security Framework (AESCSF) v2 - Lite Framework│2Australian Prudential Regulation Authority (APRA) - CPS 234 Information Security│–Australian Prudential Regulation Authority (APRA) - CPS 234 Information Security│–AWS Foundational Security Best Practices standard│1.2.0AWS Foundational Security Best Practices standard│1.2.0AWS Well-Architected Framework│–AWS Well-Architected Framework│–Azure Security Benchmark (v3)│3Azure Security Benchmark│3Brazilian Data Protection Law (LGPD)│–Brazilian Data Protection Law (LGPD)│–California Consumer Privacy Act (CCPA)│2018California Consumer Privacy Act (CCPA)│2018CIS Alibaba Cloud Foundation Benchmark - Level 1│2.0.0CIS Alibaba Cloud Foundation Benchmark - Level 2│2.0.0CIS Amazon Elastic Kubernetes Service (EKS) Benchmark│1.4CIS Amazon Elastic Kubernetes Service (EKS) Benchmark│1.4CIS Amazon Elastic Kubernetes Service (EKS) Benchmark v1.7.0│1.7.0CIS Amazon Elastic Kubernetes Service (EKS) Benchmark│1.7.0CIS Amazon Elastic Kubernetes Service (EKS) Benchmark│1.8.0CIS Amazon Linux 2 Benchmark│1.0.0CIS Amazon Linux 2 Benchmark│1.0.0CIS Amazon Linux 2 STIG Benchmark│2.0.0CIS Amazon Linux 2 STIG Benchmark│2.0.0CIS Amazon Web Services Foundations Benchmark v3.0.0 - Level 1│3.0.0CIS Amazon Web Services Foundations Benchmark v3.0.0 - Level 1│3.0.0CIS Amazon Web Services Foundations Benchmark v3.0.0 - Level 2│3.0.0CIS Amazon Web Services Foundations Benchmark v3.0.0 - Level 2│3.0.0CIS Amazon Web Services Foundations Benchmark v4.0.0 - Level 1│4.0.0CIS Amazon Web Services Foundations Benchmark v4.0.0 - Level 1│4.0.0CIS Amazon Web Services Foundations Benchmark v4.0.0 - Level 2│4.0.0CIS Amazon Web Services Foundations Benchmark v4.0.0 - Level 2│4.0.0CIS Amazon Web Services Foundations Benchmark v5.0.0 - Level 1│5.0.0CIS Amazon Web Services Foundations Benchmark v5.0.0 - Level 1│5.0.0CIS Amazon Web Services Foundations Benchmark v5.0.0 - Level 2│5.0.0CIS Amazon Web Services Foundations Benchmark v5.0.0 - Level 2│5.0.0CIS Amazon Web Services Foundations Benchmark v6.0.0 - Level 1│6.0.0CIS Amazon Web Services Foundations Benchmark v6.0.0 - Level 1│6.0.0CIS Amazon Web Services Foundations Benchmark v6.0.0 - Level 2│6.0.0CIS Amazon Web Services Foundations Benchmark v6.0.0 - Level 2│6.0.0CIS Amazon Web Services Foundations Benchmark v7.0.0 - Level 1│7.0.0CIS Amazon Web Services Foundations Benchmark v7.0.0 - Level 2│7.0.0CIS AWS Storage Services Benchmark│1.0.0CIS AWS Storage Services Benchmark│1.0.0CIS Azure Kubernetes Service (AKS) Benchmark│1.5CIS Azure Kubernetes Service (AKS) Benchmark│1.5CIS Azure Kubernetes Service (AKS) Benchmark v1.8.0│1.8.0CIS Azure Kubernetes Service (AKS) Benchmark v1.8.0│1.8.0CIS Critical Security Controls v8│8CIS Critical Security Controls v8│8CIS Critical Security Controls v8.1│8.1CIS Critical Security Controls v8.1│8.1CIS Debian Linux 13 - Server Level 1│1.0.0CIS Debian Linux 13 - Server Level 2│1.0.0CIS Debian Linux 13 - Workstation Level 1│1.0.0CIS Debian Linux 13 - Workstation Level 2│1.0.0CIS Distribution Independent Linux│2.0.0CIS Distribution Independent Linux│2.0.0CIS Docker Benchmark│1.7.0CIS Docker Benchmark│1.7.0CIS GitHub Benchmark│1.0.0CIS GitHub Benchmark│1.0.0CIS GitLab Benchmark│1.0.1CIS GitLab Benchmark│1.0.1CIS Google Cloud Platform Foundation Benchmark v3.0.0 - Level 1│3.0.0CIS Google Cloud Platform Foundation Benchmark v3.0.0 - Level 1│3.0.0CIS Google Cloud Platform Foundation Benchmark v3.0.0 - Level 2│3.0.0CIS Google Cloud Platform Foundation Benchmark v3.0.0 - Level 2│3.0.0CIS Google Cloud Platform Foundation Benchmark v4.0.0 - Level 1│4.0.0CIS Google Cloud Platform Foundation Benchmark v4.0.0 - Level 1│4.0.0CIS Google Cloud Platform Foundation Benchmark v4.0.0 - Level 2│4.0.0CIS Google Cloud Platform Foundation Benchmark v4.0.0 - Level 2│4.0.0CIS Google Kubernetes Engine (GKE) Benchmark│1.6CIS Google Kubernetes Engine (GKE) Benchmark v1.6.0│1.6.0CIS Google Kubernetes Engine (GKE) Benchmark v1.8.0│1.8.0CIS Google Kubernetes Engine (GKE) Benchmark v1.8.0│1.8.0CIS Kubernetes Benchmark│1.11.0CIS Kubernetes Benchmark│1.11.0CIS Microsoft Azure Foundations Benchmark v3.0.0 - Level 1│3.0.0CIS Microsoft Azure Foundations Benchmark v3.0.0 - Level 1│3.0.0CIS Microsoft Azure Foundations Benchmark v3.0.0 Level 2│3.0.0CIS Microsoft Azure Foundations Benchmark v3.0.0 Level 2│3.0.0CIS Microsoft Azure Foundations Benchmark v4.0.0 - Level 1│4.0.0CIS Microsoft Azure Foundations Benchmark v4.0.0 - Level 1│4.0.0CIS Microsoft Azure Foundations Benchmark v4.0.0 - Level 2│4.0.0CIS Microsoft Azure Foundations Benchmark v4.0.0 - Level 2│4.0.0CIS Microsoft Azure Foundations Benchmark v5.0.0 - Level 1│5.0.0CIS Microsoft Azure Foundations Benchmark v5.0.0 - Level 1│5.0.0CIS Microsoft Azure Foundations Benchmark v5.0.0 - Level 2│5.0.0CIS Microsoft Azure Foundations Benchmark v5.0.0 - Level 2│5.0.0CIS Microsoft Azure Foundations Benchmark v.6.0.0 - Level 1│6.0.0CIS Microsoft Azure Foundations Benchmark v.6.0.0 - Level 2│6.0.0CIS Microsoft Azure Storage Services Benchmark│1.0.0CIS Microsoft Azure Storage Services Benchmark│1.0.0CIS Microsoft Windows 11 Enterprise Benchmark│4.0.0CIS Microsoft Windows 11 Enterprise Benchmark│4.0.0CIS Microsoft Windows Server 2016 Benchmark│3.0.0CIS Microsoft Windows Server 2016 Benchmark│3.0.0CIS Microsoft Windows Server 2019 Benchmark│3.0.1CIS Microsoft Windows Server 2019 Benchmark│3.0.1CIS Microsoft Windows Server 2022 Benchmark│3.0.0CIS Microsoft Windows Server 2022 Benchmark│3.0.0CIS Oracle Cloud Infrastructure Foundations Benchmark v.2.0.0 - Level 1│2.0.0CIS Oracle Cloud Infrastructure Foundations Benchmark v.2.0.0 - Level 1│2.0.0CIS Oracle Cloud Infrastructure Foundations Benchmark v.2.0.0 - Level 2│2.0.0CIS Oracle Cloud Infrastructure Foundations Benchmark v.2.0.0 - Level 2│2.0.0CIS Oracle Cloud Infrastructure Foundations Benchmark v.3.0.0 - Level 1│3.0.0CIS Oracle Cloud Infrastructure Foundations Benchmark v.3.0.0 - Level 1│3.0.0CIS Oracle Cloud Infrastructure Foundations Benchmark v.3.0.0 - Level 2│3.0.0CIS Oracle Cloud Infrastructure Foundations Benchmark v.3.0.0 - Level 2│3.0.0CIS Red Hat OpenShift Container Platform│1.7.0CIS Red Hat OpenShift Container Platform│1.7.0CIS Red Hat OpenShift Container Platform Benchmark - Level 1│1.9.0CIS Red Hat OpenShift Container Platform Benchmark - Level 2│1.9.0CIS Ubuntu Linux 24.04 LTS Benchmark - Server Level 1│1.0.0CIS Ubuntu Linux 24.04 LTS Benchmark - Server Level 2│1.0.0CIS Ubuntu Linux 24.04 LTS Benchmark - Workstation Level 1│1.0.0CIS Ubuntu Linux 24.04 LTS Benchmark - Workstation Level 2│1.0.0Cloud Security Assurance Program (CSAP) - IaaS│IaaSCloud Security Assurance Program (CSAP) - IaaS│IaaSCloud Security Assurance Program (CSAP) - Low│LowCloud Security Assurance Program (CSAP) - Low│LowCloud Security Assurance Program (CSAP) - Low SaaS│Low SaaSCloud Security Assurance Program (CSAP) - Low SaaS│Low SaaSCloud Security Assurance Program (CSAP) - SaaS Simplified│SaaS SimplifiedCloud Security Assurance Program (CSAP) - SaaS Simplified│SaaS SimplifiedCloud Security Assurance Program (CSAP) - SaaS Standard│SaaS StandardCloud Security Assurance Program (CSAP) - SaaS Standard│SaaS StandardCSA Cloud Controls Matrix (CCM)│4.0.12CSA Cloud Controls Matrix (CCM)│4.0.12CSA Cloud Controls Matrix (CCM) v4.0.6│4.0.6CSA Cloud Controls Matrix (CCM) v4.0.6│4.0.6Cyber Risk Institute (CRI) Profile│1.2.1Cyber Risk Institute (CRI) Profile│1.2.1Cyber Risk Institute (CRI) Profile│2Cyber Risk Institute (CRI) Profile│2.0Cyber Risk Institute (CRI) Profile│2.1Cyber Risk Institute (CRI) Profile│2.1CyberSecurity Law of the People's Republic of China│–CyberSecurity Law of the People's Republic of China│–Cybersecurity Maturity Model Certification (CMMC)│1.02Cybersecurity Maturity Model Certification (CMMC)│1.02Cybersecurity Maturity Model Certification (CMMC) Level 1│2Cybersecurity Maturity Model Certification (CMMC) Level 1│2Cybersecurity Maturity Model Certification (CMMC) Level 2│2Cybersecurity Maturity Model Certification (CMMC) Level 2│2Digital Operational Resilience Act (DORA)│–Digital Operational Resilience Act (DORA)│–EU AI Act│–EU AI Act│–Federal Financial Institutions Examination Council (FFIEC)│–Federal Financial Institutions Examination Council (FFIEC)│–FedRamp (High)│–FedRamp (High)│–Fedramp (Low)│LowFedramp (Low)│–Fedramp (Moderate)│ModerateFedramp (Moderate)│–Framework for Adoption of Cloud Services by SEBI Regulated Entities (REs)│–Framework for Adoption of Cloud Services by SEBI Regulated Entities (REs)│–General Data Protection Regulation (GDPR)│–General Data Protection Regulation (GDPR)│–Health Insurance Portability and Accountability Act (HIPAA)│–Health Insurance Portability and Accountability Act (HIPAA)│–HITRUST CSF│11.2.0HITRUST CSF│11.2.0HITRUST CSF│11.7.0HITRUST CSF│11.7.0HITRUST CSF v9.6.0│9.6.0HITRUST CSF│9.6.0Information Technology Security Guidance (ITSG-33)│–Information Technology Security Guidance (ITSG-33)│–Insurance Regulatory And Development Authority Of India│1Insurance Regulatory And Development Authority Of India│1ISO/IEC 27001:2022│2022ISO/IEC 27001:2022│2022ISO/IEC 27002:2022│2022ISO/IEC 27002:2022│2022ISO/IEC 27017:2015│2015ISO/IEC 27017:2015│2015ISO/IEC 27018:2019│2019ISO/IEC 27018:2019│2019ISO/IEC 42001:2023│2023ISO/IEC 42001:2023│2023Korea – Information Security Management System (ISMS)│–Korea – Information Security Management System (ISMS)│–Korea – Information Security Management System (ISMS) For Finance│-Korea – Information Security Management System (ISMS) For Finance│-MAS Technology Risk Management (TRM)│2021MAS Technology Risk Management (TRM)│2021Microsoft Cloud Security Benchmark│1Microsoft Cloud Security Benchmark│1MITRE ATT\&CK Cloud IaaS for Enterprise│15.1MITRE ATT\&CK Cloud IaaS for Enterprise│15.1Motion Picture Association (MPA) Content Protection Best Practices│4.08Motion Picture Association (MPA) Content Protection Best Practices│4.08Multi-Level Protection Scheme (MLPS) v2.0 - Level 1│2Multi-Level Protection Scheme (MLPS) v2.0 - Level 1│2.0Multi-Level Protection Scheme (MLPS) v2.0 - Level 2│2Multi-Level Protection Scheme (MLPS) v2.0 - Level 2│2.0Multi-Level Protection Scheme (MLPS) v2.0 - Level 3│2Multi-Level Protection Scheme (MLPS) v2.0 - Level 3│2.0NCSC - Cloud Security Principles│2.1NCSC - Cloud Security Principles│2.1NCSC - Cyber Essentials│3.1NCSC - Cyber Essentials│3.1NEW YORK STATE DEPARTMENT OF FINANCIAL SERVICES (NYDFS) 23 CRR-NY 500.0│–NEW YORK STATE DEPARTMENT OF FINANCIAL SERVICES (NYDFS) 23 CRR-NY 500.0│–New Zealand Information Security Manual (NZISM)│3.4New Zealand Information Security Manual (NZISM)│3.4New Zealand Information Security Manual (NZISM)│3.9New Zealand Information Security Manual (NZISM)│3.9NIST AI 600-1│–NIST AI 600-1│–NIST Cybersecurity Framework (CSF)│1.1NIST Cybersecurity Framework (CSF)│2NIST Cybersecurity Framework (CSF)│2NIST Cybersecurity Framework (CSF) v1.1│1.1NIST SP 800-171│Rev 2NIST SP 800-171 Rev. 2│Rev 2NIST SP 800-171│Rev 3NIST SP 800-171 Rev. 3│Rev 3NIST SP 800-172│–NIST SP 800-172│–NIST SP 800-53 Rev. 5│Rev 5NIST SP 800-53│Rev 5NIST SP 800-190│-Otoritas Jasa Keuangan (OJK)│38/POJK.03/2016Otoritas Jasa Keuangan (OJK)│38/POJK.03/2016OWASP Top 10 for Agentic Applications│2026OWASP Top 10 for Agentic Applications│2026OWASP TOP 10 CI/CD Security Risks│2025OWASP TOP 10 CI/CD Security Risks│2025OWASP Top 10 for LLM Applications 2025│–OWASP Top 10 for LLM Applications│2025PCI DSS v4.0.1│4.0.1PCI DSS│4.0.1Personal Information Protection and Electronic Documents Act (PIPEDA)│–Personal Information Protection and Electronic Documents Act (PIPEDA)│–RBI Baseline Cyber Security and Resilience Requirements│–RBI Baseline Cyber Security and Resilience Requirements│–Risk Management in Technology (RMiT)│–Risk Management in Technology (RMiT)│–Sarbanes Oxley Act (SOX)│–Sarbanes Oxley Act (SOX)│–SEBI - Consolidated Cybersecurity and Cyber Resilience Framework (CSCRF)│–SEBI - Consolidated Cybersecurity and Cyber Resilience Framework (CSCRF)│–Secure Controls Framework (SCF)│2024.2Secure Controls Framework (SCF)│2024.2Secure Controls Framework (SCF) v2022.2.1│2022.2.1Secure Controls Framework (SCF)│2022.2.1SOC 2│–SOC 2│–Telecommunications Security Act (TSA)│–Telecommunications Security Act (TSA)│–Texas Risk and Authorization Management Program (TX-RAMP) - Level 1│Level 1Texas Risk and Authorization Management Program (TX-RAMP) - Level 1│-Texas Risk and Authorization Management Program (TX-RAMP) - Level 2│Level 2Texas Risk and Authorization Management Program (TX-RAMP) - Level 2│-The Digital Personal Data Protection Act 2023│–The Digital Personal Data Protection Act 2023│–Trusted Information Security Assessment Exchange (TISAX)│6Trusted Information Security Assessment Exchange (TISAX)│6Show markdown source
@@ -28,138 +28,156 @@ Click on a specific standard to open the standard overview side panel with detai From the side panel, you can view and filter controls associated with the standard, and click on a control to view its details and the rules associated with it. ## Built-in compliance standards | Compliance Standard | Version | | ---------------------------------------------------------------------------------- | --------------- | | Australian Cyber Security Centre (ACSC) Essential Eight | – | -| Australian Cyber Security Centre (ACSC) Essential Eight - Level 1 | Level 1 | -| Australian Cyber Security Centre (ACSC) Essential Eight - Level 2 | Level 2 | -| Australian Cyber Security Centre (ACSC) Essential Eight - Level 3 | Level 3 | +| Australian Cyber Security Centre (ACSC) Essential Eight - Level 1 | – | +| Australian Cyber Security Centre (ACSC) Essential Eight - Level 2 | – | +| Australian Cyber Security Centre (ACSC) Essential Eight - Level 3 | – | | Australian Cyber Security Centre's (ACSC) Information Security Manual (ISM) | – | | Australian Cyber Security Centre's (ACSC) Information Security Manual (ISM) Latest | – | | Australian Energy Sector Cyber Security Framework (AESCSF) | 1 | | Australian Energy Sector Cyber Security Framework (AESCSF) v2 | 2 | | Australian Energy Sector Cyber Security Framework (AESCSF) v2 - Lite Framework | 2 | | Australian Prudential Regulation Authority (APRA) - CPS 234 Information Security | – | | AWS Foundational Security Best Practices standard | 1.2.0 | | AWS Well-Architected Framework | – | -| Azure Security Benchmark (v3) | 3 | +| Azure Security Benchmark | 3 | | Brazilian Data Protection Law (LGPD) | – | | California Consumer Privacy Act (CCPA) | 2018 | +| CIS Alibaba Cloud Foundation Benchmark - Level 1 | 2.0.0 | +| CIS Alibaba Cloud Foundation Benchmark - Level 2 | 2.0.0 | | CIS Amazon Elastic Kubernetes Service (EKS) Benchmark | 1.4 | -| CIS Amazon Elastic Kubernetes Service (EKS) Benchmark v1.7.0 | 1.7.0 | +| CIS Amazon Elastic Kubernetes Service (EKS) Benchmark | 1.7.0 | +| CIS Amazon Elastic Kubernetes Service (EKS) Benchmark | 1.8.0 | | CIS Amazon Linux 2 Benchmark | 1.0.0 | | CIS Amazon Linux 2 STIG Benchmark | 2.0.0 | | CIS Amazon Web Services Foundations Benchmark v3.0.0 - Level 1 | 3.0.0 | | CIS Amazon Web Services Foundations Benchmark v3.0.0 - Level 2 | 3.0.0 | | CIS Amazon Web Services Foundations Benchmark v4.0.0 - Level 1 | 4.0.0 | | CIS Amazon Web Services Foundations Benchmark v4.0.0 - Level 2 | 4.0.0 | | CIS Amazon Web Services Foundations Benchmark v5.0.0 - Level 1 | 5.0.0 | | CIS Amazon Web Services Foundations Benchmark v5.0.0 - Level 2 | 5.0.0 | | CIS Amazon Web Services Foundations Benchmark v6.0.0 - Level 1 | 6.0.0 | | CIS Amazon Web Services Foundations Benchmark v6.0.0 - Level 2 | 6.0.0 | +| CIS Amazon Web Services Foundations Benchmark v7.0.0 - Level 1 | 7.0.0 | +| CIS Amazon Web Services Foundations Benchmark v7.0.0 - Level 2 | 7.0.0 | | CIS AWS Storage Services Benchmark | 1.0.0 | | CIS Azure Kubernetes Service (AKS) Benchmark | 1.5 | | CIS Azure Kubernetes Service (AKS) Benchmark v1.8.0 | 1.8.0 | | CIS Critical Security Controls v8 | 8 | | CIS Critical Security Controls v8.1 | 8.1 | +| CIS Debian Linux 13 - Server Level 1 | 1.0.0 | +| CIS Debian Linux 13 - Server Level 2 | 1.0.0 | +| CIS Debian Linux 13 - Workstation Level 1 | 1.0.0 | +| CIS Debian Linux 13 - Workstation Level 2 | 1.0.0 | | CIS Distribution Independent Linux | 2.0.0 | | CIS Docker Benchmark | 1.7.0 | | CIS GitHub Benchmark | 1.0.0 | | CIS GitLab Benchmark | 1.0.1 | | CIS Google Cloud Platform Foundation Benchmark v3.0.0 - Level 1 | 3.0.0 | | CIS Google Cloud Platform Foundation Benchmark v3.0.0 - Level 2 | 3.0.0 | | CIS Google Cloud Platform Foundation Benchmark v4.0.0 - Level 1 | 4.0.0 | | CIS Google Cloud Platform Foundation Benchmark v4.0.0 - Level 2 | 4.0.0 | -| CIS Google Kubernetes Engine (GKE) Benchmark | 1.6 | +| CIS Google Kubernetes Engine (GKE) Benchmark v1.6.0 | 1.6.0 | | CIS Google Kubernetes Engine (GKE) Benchmark v1.8.0 | 1.8.0 | | CIS Kubernetes Benchmark | 1.11.0 | | CIS Microsoft Azure Foundations Benchmark v3.0.0 - Level 1 | 3.0.0 | | CIS Microsoft Azure Foundations Benchmark v3.0.0 Level 2 | 3.0.0 | | CIS Microsoft Azure Foundations Benchmark v4.0.0 - Level 1 | 4.0.0 | | CIS Microsoft Azure Foundations Benchmark v4.0.0 - Level 2 | 4.0.0 | | CIS Microsoft Azure Foundations Benchmark v5.0.0 - Level 1 | 5.0.0 | | CIS Microsoft Azure Foundations Benchmark v5.0.0 - Level 2 | 5.0.0 | +| CIS Microsoft Azure Foundations Benchmark v.6.0.0 - Level 1 | 6.0.0 | +| CIS Microsoft Azure Foundations Benchmark v.6.0.0 - Level 2 | 6.0.0 | | CIS Microsoft Azure Storage Services Benchmark | 1.0.0 | | CIS Microsoft Windows 11 Enterprise Benchmark | 4.0.0 | | CIS Microsoft Windows Server 2016 Benchmark | 3.0.0 | | CIS Microsoft Windows Server 2019 Benchmark | 3.0.1 | | CIS Microsoft Windows Server 2022 Benchmark | 3.0.0 | | CIS Oracle Cloud Infrastructure Foundations Benchmark v.2.0.0 - Level 1 | 2.0.0 | | CIS Oracle Cloud Infrastructure Foundations Benchmark v.2.0.0 - Level 2 | 2.0.0 | | CIS Oracle Cloud Infrastructure Foundations Benchmark v.3.0.0 - Level 1 | 3.0.0 | | CIS Oracle Cloud Infrastructure Foundations Benchmark v.3.0.0 - Level 2 | 3.0.0 | | CIS Red Hat OpenShift Container Platform | 1.7.0 | +| CIS Red Hat OpenShift Container Platform Benchmark - Level 1 | 1.9.0 | +| CIS Red Hat OpenShift Container Platform Benchmark - Level 2 | 1.9.0 | +| CIS Ubuntu Linux 24.04 LTS Benchmark - Server Level 1 | 1.0.0 | +| CIS Ubuntu Linux 24.04 LTS Benchmark - Server Level 2 | 1.0.0 | +| CIS Ubuntu Linux 24.04 LTS Benchmark - Workstation Level 1 | 1.0.0 | +| CIS Ubuntu Linux 24.04 LTS Benchmark - Workstation Level 2 | 1.0.0 | | Cloud Security Assurance Program (CSAP) - IaaS | IaaS | | Cloud Security Assurance Program (CSAP) - Low | Low | | Cloud Security Assurance Program (CSAP) - Low SaaS | Low SaaS | | Cloud Security Assurance Program (CSAP) - SaaS Simplified | SaaS Simplified | | Cloud Security Assurance Program (CSAP) - SaaS Standard | SaaS Standard | | CSA Cloud Controls Matrix (CCM) | 4.0.12 | | CSA Cloud Controls Matrix (CCM) v4.0.6 | 4.0.6 | | Cyber Risk Institute (CRI) Profile | 1.2.1 | -| Cyber Risk Institute (CRI) Profile | 2 | +| Cyber Risk Institute (CRI) Profile | 2.0 | | Cyber Risk Institute (CRI) Profile | 2.1 | | CyberSecurity Law of the People's Republic of China | – | | Cybersecurity Maturity Model Certification (CMMC) | 1.02 | | Cybersecurity Maturity Model Certification (CMMC) Level 1 | 2 | | Cybersecurity Maturity Model Certification (CMMC) Level 2 | 2 | | Digital Operational Resilience Act (DORA) | – | | EU AI Act | – | | Federal Financial Institutions Examination Council (FFIEC) | – | | FedRamp (High) | – | -| Fedramp (Low) | Low | -| Fedramp (Moderate) | Moderate | +| Fedramp (Low) | – | +| Fedramp (Moderate) | – | | Framework for Adoption of Cloud Services by SEBI Regulated Entities (REs) | – | | General Data Protection Regulation (GDPR) | – | | Health Insurance Portability and Accountability Act (HIPAA) | – | | HITRUST CSF | 11.2.0 | | HITRUST CSF | 11.7.0 | -| HITRUST CSF v9.6.0 | 9.6.0 | +| HITRUST CSF | 9.6.0 | | Information Technology Security Guidance (ITSG-33) | – | | Insurance Regulatory And Development Authority Of India | 1 | | ISO/IEC 27001:2022 | 2022 | | ISO/IEC 27002:2022 | 2022 | | ISO/IEC 27017:2015 | 2015 | | ISO/IEC 27018:2019 | 2019 | | ISO/IEC 42001:2023 | 2023 | | Korea – Information Security Management System (ISMS) | – | | Korea – Information Security Management System (ISMS) For Finance | - | | MAS Technology Risk Management (TRM) | 2021 | | Microsoft Cloud Security Benchmark | 1 | | MITRE ATT\&CK Cloud IaaS for Enterprise | 15.1 | | Motion Picture Association (MPA) Content Protection Best Practices | 4.08 | -| Multi-Level Protection Scheme (MLPS) v2.0 - Level 1 | 2 | -| Multi-Level Protection Scheme (MLPS) v2.0 - Level 2 | 2 | -| Multi-Level Protection Scheme (MLPS) v2.0 - Level 3 | 2 | +| Multi-Level Protection Scheme (MLPS) v2.0 - Level 1 | 2.0 | +| Multi-Level Protection Scheme (MLPS) v2.0 - Level 2 | 2.0 | +| Multi-Level Protection Scheme (MLPS) v2.0 - Level 3 | 2.0 | | NCSC - Cloud Security Principles | 2.1 | | NCSC - Cyber Essentials | 3.1 | | NEW YORK STATE DEPARTMENT OF FINANCIAL SERVICES (NYDFS) 23 CRR-NY 500.0 | – | | New Zealand Information Security Manual (NZISM) | 3.4 | | New Zealand Information Security Manual (NZISM) | 3.9 | | NIST AI 600-1 | – | +| NIST Cybersecurity Framework (CSF) | 1.1 | | NIST Cybersecurity Framework (CSF) | 2 | -| NIST Cybersecurity Framework (CSF) v1.1 | 1.1 | -| NIST SP 800-171 Rev. 2 | Rev 2 | -| NIST SP 800-171 Rev. 3 | Rev 3 | +| NIST SP 800-171 | Rev 2 | +| NIST SP 800-171 | Rev 3 | | NIST SP 800-172 | – | -| NIST SP 800-53 Rev. 5 | Rev 5 | +| NIST SP 800-53 | Rev 5 | +| NIST SP 800-190 | - | | Otoritas Jasa Keuangan (OJK) | 38/POJK.03/2016 | | OWASP Top 10 for Agentic Applications | 2026 | | OWASP TOP 10 CI/CD Security Risks | 2025 | -| OWASP Top 10 for LLM Applications 2025 | – | -| PCI DSS v4.0.1 | 4.0.1 | +| OWASP Top 10 for LLM Applications | 2025 | +| PCI DSS | 4.0.1 | | Personal Information Protection and Electronic Documents Act (PIPEDA) | – | | RBI Baseline Cyber Security and Resilience Requirements | – | | Risk Management in Technology (RMiT) | – | | Sarbanes Oxley Act (SOX) | – | | SEBI - Consolidated Cybersecurity and Cyber Resilience Framework (CSCRF) | – | | Secure Controls Framework (SCF) | 2024.2 | -| Secure Controls Framework (SCF) v2022.2.1 | 2022.2.1 | +| Secure Controls Framework (SCF) | 2022.2.1 | | SOC 2 | – | | Telecommunications Security Act (TSA) | – | -| Texas Risk and Authorization Management Program (TX-RAMP) - Level 1 | Level 1 | -| Texas Risk and Authorization Management Program (TX-RAMP) - Level 2 | Level 2 | +| Texas Risk and Authorization Management Program (TX-RAMP) - Level 1 | - | +| Texas Risk and Authorization Management Program (TX-RAMP) - Level 2 | - | | The Digital Personal Data Protection Act 2023 | – | | Trusted Information Security Assessment Exchange (TISAX) | 6 |
-
▸ ▾ Manage quarantined files modified +1 −1
xsiam/detect-investigate-and-respond-to-threats/investigation-and-response/investigate-files/manage-quarantined-filesRead it on the Cortex docs portal ↗ Read it here → This file's diff on GitHub ↗
Before After@@ -21,17 +21,17 @@ You can quarantine a file in the following ways:• Enable the agent to automatically quarantine malicious executables by configuring quarantine settings in a Malware prevention profile. For more information, see Set up malware prevention profiles.• Enable the agent to automatically quarantine malicious executables by configuring quarantine settings in a Malware prevention profile. For more information, see Set up malware prevention profiles.• Right-click a specific file from the causality view and select Quarantine.• Right-click a specific file from the causality view and select Quarantine.### Retention and Expiration Timeframes### Retention and Expiration Timeframes• Quarantine List Retention: Quarantined file records remain in the Quarantine List for a default retention period of 180 days (6 months).• Quarantine List Retention: Quarantined file records remain in the Quarantine List for a default retention period of 180 days (6 months).• Pending Action Expiration: When a Quarantine command is issued to an offline or unreachable endpoint, the command stays in Pending status for 4 days by default before expiring. This setting is configurable between 1 and 30 days.• Pending Action Expiration: When a Quarantine command is issued to an offline or unreachable endpoint, the command stays in Pending status for 4 days by default before expiring. This setting is configurable between 1 and 30 days.To update the Pending Action Expiration setting, go to Settings → Configurations → Action Center Expiration (or Settings → Configurations → Security & Server Settings, depending on tenant version), locate Quarantine under the Response category, modify the Expiration (Days) field, and click Save.To update the Pending Action Expiration setting, go to Settings → Configurations → Agent Configurations → Action Center Expiration and locate Quarantine under the Response category, modify the Expiration (Days) field, and click Save.### View and manage quarantined files### View and manage quarantined fileshint infohint infoRequires the Cortex XSIAM Premium, Enterprise, or any other XSIAM license with the Enterprise Runtime Security or the Cloud Runtime Security add-on.Requires the Cortex XSIAM Premium, Enterprise, or any other XSIAM license with the Enterprise Runtime Security or the Cloud Runtime Security add-on.endhintendhint1. To view the quarantined files in your network, go to Investigation & Response → Response → Action Center → File Quarantine.1. To view the quarantined files in your network, go to Investigation & Response → Response → Action Center → File Quarantine.Show markdown source
@@ -21,17 +21,17 @@ You can quarantine a file in the following ways: * Enable the agent to automatically quarantine malicious executables by configuring quarantine settings in a Malware prevention profile. For more information, see [Set up malware prevention profiles](https://app.gitbook.com/s/mxWuY3s7AUvWfzCV9p1A/endpoint-security/install-and-manage-endpoints/set-up-endpoint-protection/set-up-endpoint-profiles-and-exception-rules/set-up-malware-prevention-profiles). * Right-click a specific file from the causality view and select **Quarantine**. ### Retention and Expiration Timeframes * **Quarantine List Retention:** Quarantined file records remain in the Quarantine List for a default retention period of 180 days (6 months). * **Pending Action Expiration:** When a Quarantine command is issued to an offline or unreachable endpoint, the command stays in Pending status for 4 days by default before expiring. This setting is configurable between 1 and 30 days. -To update the Pending Action Expiration setting, go to **Settings → Configurations → Action Center Expiration** (or **Settings → Configurations → Security & Server Settings**, depending on tenant version), locate **Quarantine** under the **Response** category, modify the Expiration (Days) field, and click **Save**. +To update the Pending Action Expiration setting, go to **Settings → Configurations → Agent Configurations → Action Center Expiration** and locate **Quarantine** under the **Response** category, modify the Expiration (Days) field, and click **Save**. ### View and manage quarantined files {% hint style="info" %} Requires the Cortex XSIAM Premium, Enterprise, or any other XSIAM license with the Enterprise Runtime Security or the Cloud Runtime Security add-on. {% endhint %} 1. To view the quarantined files in your network, go to **Investigation & Response → Response → Action Center →** **File Quarantine**. -
▸ ▾ Cortex XSIAM license tiers and product licenses modified +23 −23 Retitled to "license tiers and product licenses" and gains a three-bullet tier comparison; the NG-SIEM, Enterprise and Premium feature tables are unchanged.
xsiam/learn-about-cortex-xsiam/cortex-xsiam-product-licensesRead it on the Cortex docs portal ↗ Read it here → This file's diff on GitHub ↗
Before After@@ -1,60 +1,60 @@------description: >-description: >-Understand the Cortex XSIAM product licenses: NG-SIEM, Enterprise, andCompare Cortex XSIAM license tiers and product licenses: NG-SIEM, Enterprise,Premium.Premium, included capabilities, and add-ons.------# Cortex XSIAM product licenses# Cortex XSIAM license tiers and product licensesCortex XSIAM is available in the following subscription tiers, designed to support specific security use cases:Cortex XSIAM product licenses are available in NG-SIEM, Enterprise, and Premium subscription tiers. Compare each Cortex XSIAM license tier, its included capabilities, and available security add-ons to select the subscription for your security use case.hint infohint info### NoteYou can upgrade your license by purchasing add-ons or moving to a different XSIAM license.You can upgrade your license by purchasing add-ons or moving to a different XSIAM license.endhintendhint### Cortex XSIAM NG-SIEM### Compare Cortex XSIAM license tiers• NG-SIEM provides analytics, data collection, detection, and security automation.• Enterprise adds Cortex XDR agent coverage and extended endpoint visibility.• Premium adds cloud posture security, cloud runtime security, and threat intelligence capabilities.### Cortex XSIAM NG-SIEM licenseCortex XSIAM NG-SIEM is an analytics subscription tier that includes data collection and full automation, suitable for users who want to enhance their security without immediately replacing their existing SIEM and endpoint solutions.Cortex XSIAM NG-SIEM is an analytics subscription tier that includes data collection and full automation, suitable for users who want to enhance their security without immediately replacing their existing SIEM and endpoint solutions.Key features include:Key features include:Feature Description AI and Big Data Integrates data analytics, AI/ML, and automation into a unified platform. Comprehensive Data Collection Offers extensive cloud data collection with out-of-the-box analytics, detection, and cloud asset discovery. Advanced Analytics Provides capabilities for threat hunting, analysis, response, and automation. User and Entity Behavior Analytics (UEBA) Uses machine learning to profile users and entities, alerting on anomalous behavior that could indicate a compromised account or insider threat Feature Description AI and Big Data Integrates data analytics, AI/ML, and automation into a unified platform. Comprehensive Data Collection Offers extensive cloud data collection with out-of-the-box analytics, detection, and cloud asset discovery. Advanced Analytics Provides capabilities for threat hunting, analysis, response, and automation. User and Entity Behavior Analytics (UEBA) Uses machine learning to profile users and entities, alerting on anomalous behavior that could indicate a compromised account or insider threat ### Cortex XSIAM Enterprise### Cortex XSIAM Enterprise licenseCortex XSIAM Enterprise includes all the features of Cortex XSIAM NG-SIEM and builds upon them by adding advanced endpoint visibility and data collection:Cortex XSIAM Enterprise includes all the features of Cortex XSIAM NG-SIEM and builds upon them by adding advanced endpoint visibility and data collection:Key additions include:Key additions include:Feature│DescriptionFeature│Description| ------------------------------------- | --------------------------------------------------------------------------------------------------------------------------------------------------------------------------------------- || ------------------------------------- | --------------------------------------------------------------------------------------------------------------------------------------------------------------------------------------- |Cortex XDR agent│Entitles you to one Cortex XDR agent per endpoint, which provides tailored endpoint data and third-party logs collection to optimize detection and investigation visibility.Cortex XDR agent│Entitles you to one Cortex XDR agent per endpoint, which provides tailored endpoint data and third-party logs collection to optimize detection and investigation visibility.Extended Detection and Response (XDR)│Incorporates extended data collection and ingestion of endpoint logs and alerts, firewalls, and third-party audit and flow logs through Host Insights and Extended Threat Hunting Data.Extended Detection and Response (XDR)│Incorporates extended data collection and ingestion of endpoint logs and alerts, firewalls, and third-party audit and flow logs through Host Insights and Extended Threat Hunting Data.### Cortex XSIAM Premium### Cortex XSIAM Premium licenseCortex XSIAM Premium is the most comprehensive tier, providing the highest level of security by combining all Enterprise features together with the following capabilities:Cortex XSIAM Premium is the most comprehensive tier, providing the highest level of security by combining all Enterprise features together with the following capabilities:Feature Details Cloud Posture Security Delivers comprehensive visibility and continuous monitoring of cloud environments to ensure configurations meet security best practices, compliance standards, and vulnerability management. This bundle includes the following advanced modules:
- Cloud Security Posture Management (CSPM): Continuously scans your cloud environment (AWS, Azure, GCP) to detect misconfigurations, compliance violations, and drift from secure baselines.
- Cloud Infrastructure Entitlement Management (CIEM): Enforces least-privilege access to cloud infrastructure. It protects and manages access to resources by analyzing identity misconfigurations, reducing excessive permissions, and providing real-time monitoring of identity anomalies.
- AI Security Posture Management (AI-SPM): Secures AI-powered applications and models against misuse and vulnerabilities.
- Data Security Posture Management (DSPM): Discovers, classifies, and secures sensitive data across your cloud environment.
- Agentless Workload Scanning: Scans cloud workloads for vulnerabilities, malware, and exposed secrets without requiring an agent installation.
Application Security Posture Management (ASPM): Provides a consolidated view of application risks and vulnerabilities across your environment, enabling you to understand and manage your overall security posture.
Note
Full code security scanning requires a separate add-on.
- CI/CD: Focuses on securing your continuous integration and continuous delivery pipelines, ensuring the integrity and security of your automated build and deployment processes
Cloud Runtime Security Prevents attackers from exploiting risks present in your cloud environment. Provides real-time protection, detection, and response for cloud workloads, crucial for applications, containers, serverless functions, and APIs. Includes
- Cloud Workload Rules: Cloud Workload Rules define the criteria for identifying security violations. This criteria can be applied to assets in your cloud environment and to findings generated by Cortex XSIAM.
- Cloud Workload Policies: Cloud Workload Policies help you prevent and manage security violations in your cloud runtime instances.
- Web and API Security: Cortex Web and API Security (WAAS) capabilities offer comprehensive protection of APIs across integrated API gateways and web-based applications and APIs running on Linux-based workloads.
Cortex XSIAM Premium users can install an XDR agent on endpoints and on any host or cloud workload, including Kubernetes hosts, based on the user's per-unit subscription parameters and workload demands. The XDR agent offers cloud-based endpoint protection and detection support, along with tailored endpoint and third-party log data collection.
For more information about the license relationship between the XDR agent on endpoints and the XDR agent on host or cloud workloads, and how the licenses are allocated, see License allocation.
Extended Threat Intelligence (XTI) Provides operationalized Threat Intelligence (TI) seamlessly integrated across the Cortex platform. Threat Intel Management Investigates indicators and files, applies indicator rules, generates reports, and integrates feed integrations. Attack Surface Management Provides internet-facing assets and ASM enrichment, external services, external IP ranges, attack surface rules and alerts, ASM widgets, and report capabilities. Feature Details Cloud Posture Security Delivers comprehensive visibility and continuous monitoring of cloud environments to ensure configurations meet security best practices, compliance standards, and vulnerability management. This bundle includes the following advanced modules:
- Cloud Security Posture Management (CSPM): Continuously scans your cloud environment (AWS, Azure, GCP) to detect misconfigurations, compliance violations, and drift from secure baselines.
- Cloud Infrastructure Entitlement Management (CIEM): Enforces least-privilege access to cloud infrastructure. It protects and manages access to resources by analyzing identity misconfigurations, reducing excessive permissions, and providing real-time monitoring of identity anomalies.
- AI Security Posture Management (AI-SPM): Secures AI-powered applications and models against misuse and vulnerabilities.
- Data Security Posture Management (DSPM): Discovers, classifies, and secures sensitive data across your cloud environment.
- Agentless Workload Scanning: Scans cloud workloads for vulnerabilities, malware, and exposed secrets without requiring an agent installation.
Application Security Posture Management (ASPM): Provides a consolidated view of application risks and vulnerabilities across your environment, enabling you to understand and manage your overall security posture.
Full code security scanning requires a separate add-on.
- CI/CD: Focuses on securing your continuous integration and continuous delivery pipelines, ensuring the integrity and security of your automated build and deployment processes
Cloud Runtime Security Prevents attackers from exploiting risks present in your cloud environment. Provides real-time protection, detection, and response for cloud workloads, crucial for applications, containers, serverless functions, and APIs. Includes
- Cloud Workload Rules: Cloud Workload Rules define the criteria for identifying security violations. This criteria can be applied to assets in your cloud environment and to findings generated by Cortex XSIAM.
- Cloud Workload Policies: Cloud Workload Policies help you prevent and manage security violations in your cloud runtime instances.
- Web and API Security: Cortex Web and API Security (WAAS) capabilities offer comprehensive protection of APIs across integrated API gateways and web-based applications and APIs running on Linux-based workloads.
Cortex XSIAM Premium users can install an XDR agent on endpoints and on any host or cloud workload, including Kubernetes hosts, based on the user's per-unit subscription parameters and workload demands. The XDR agent offers cloud-based endpoint protection and detection support, along with tailored endpoint and third-party log data collection.
For more information about the license relationship between the XDR agent on endpoints and the XDR agent on host or cloud workloads, and how the licenses are allocated, see License allocation.
Extended Threat Intelligence (XTI) Provides operationalized Threat Intelligence (TI) seamlessly integrated across the Cortex platform. Threat Intel Management Investigates indicators and files, applies indicator rules, generates reports, and integrates feed integrations. Attack Surface Management Provides internet-facing assets and ASM enrichment, external services, external IP ranges, attack surface rules and alerts, ASM widgets, and report capabilities. hint infohint info### NoteExisting users with a Cortex XSIAM Enterprise Plus license retain all Cortex XSIAM Enterprise features, including cloud agent features. You can deploy agents for runtime detection on cloud sources, such as Kubernetes nodes, OpenShift clusters, or cloud VMs, whether in the cloud or on-premises. If you want the full cloud posture security bundle (Cloud Posture Security or Cloud Runtime Security), you need to upgrade to Cortex XSIAM Premium.Existing users who have a Cortex XSIAM Enterprise Plus license retain all Cortex XSIAM Enterprise features, with cloud agent features. You can deploy agents for runtime detection on cloud sources, such as Kubernetes nodes, OpenShift clusters, or cloud VMs, whether in the cloud or on-premises. If you want the full cloud posture security bundle (Cloud Posture Security or Cloud Runtime Security), you need to upgrade to Cortex XSIAM Premium.Some add-ons, such as Advanced Email Security and Exposure Management, are available with Cortex XSIAM Premium, Enterprise, and NG-SIEM licenses.Some add-ons, such as Advanced Email Security and Exposure Management, are only available for Cortex XSIAM Premium, Enterprise, and NG-SIEM licenses.endhintendhinttabs### License capabilities and add-onstab Capabilities and add-onsCortex offers a modular set of license packages that work interchangeably with each other, allowing them to become add-ons to subsequent products seamlessly. The table below shows the breakdown of each type of license package:Cortex offers a modular set of license packages that work interchangeably, allowing them to serve as add-ons to subsequent products seamlessly. The table below shows the breakdown of each type of license package:Feature Description Cortex XSIAM NG SIEM Cortex XSIAM Enterprise Cortex XSIAM Premium Core Analytics Detects anomalies and threats using machine learning and behavioral models. Included in license Included in license Included in license Automation Orchestrates and automates security workflows with prebuilt and customizable playbooks. Included in license Included in license Included in license Data Ingestion Analytics tier: Collects and normalizes data, creating a unified foundation for analytics, investigation, and detection. GB/day-based, with a minimum of 100 GB/day.
Cortex Data Lake tier: Provides cost-efficient ingestion and storage of security data at scale for use cases such as threat hunting, forensic investigations, and compliance audits. This tier is available as an optional add-on with a minimum of 50 GB/day, provided the mandatory 100 GB/day Analytics tier license is already met. For more information, see Configure Cortex Data Lake tier.
Included in license Included in license Included in license Enterprise Runtime Security (XDR) Comprehensive endpoint and server protection by combining AI-driven analytics, endpoint controls, next-generation antivirus, and automated investigation to detect and respond to threats across various environments. Add-on Included in license Included in license Cloud Posture Security Agentless comprehensive visibility across your cloud environment. Includes:
- Up to 400 workloads, dependent on the license plan
- Cloud Security Posture Management (CSPM)
- Cloud Infrastructure Entitlement Management (CIEM)
- Data Security Posture Management (DSPM)
- AI Security Posture Management (AI-SPM)
- Continuous Integration/Continuous Deployment (CI/CD)
For Cortex XSIAM Enterprise and NG SIEM, if purchasing Cloud Posture Security only, a minimum number of workloads is required. If you purchase Cloud Runtime Security or Cortex XSIAM Premium, this add-on is included with the subscription.
Add-on Add-on Included with Cloud Runtime Security Cloud Runtime Security Full cloud protection, detection, and response. In addition to Cloud Posture Security:
- For Cortex XSIAM Premium: Minimum 200 workloads (priced per workload).
- Cloud Detection and Response (CDR)
- Cloud Workload Protection (CWP)
- Web Application and API Security (WAAS)
For all Cortex XSIAM licenses, a minimum number of workloads is required.
Add-on Add-on Included in license Application Security Comprehensive protection for your software development lifecycle (SDLC) from code-to-cloud, offering visibility, detection, contextual analysis, prioritization, prevention, and remediation.
To access the Application Security module, you must have a Cloud Posture Security, Cloud Runtime Security, or Cortex XSIAM Premium license. These licenses include Application Security Posture Management (ASPM) and CI/CD Security.
Add-on component: Code Security
Code Security requires a separate Application Security add-on as well as a Cloud Posture Security, Cloud Runtime Security, or Cortex XSIAM Premium license.
Add-on Add-on Add-on Extended Threat Intelligence (XTI) Provides operationalized Threat Intelligence (TI) seamlessly integrated across the Cortex platform Add-on Add-on Included in license Threat Intelligence Management Investigates indicators and files, uses indicator rules, reports, and feed integrations. Add-on Add-on Included in license Attack Surface Management Provides internet-facing assets and ASM enrichment, external services, external IP ranges, attack surface rules and alerts, ASM widgets, and report capabilities. Add-on Add-on Included in license Identity Threat Detection & Response Enables asset role configuration, advanced analytics alert layout, Risk Management dashboard, User/Host Risk view, designated analytics for compromised accounts, and insider threat coverage. This solution helps organizations proactively secure identities, accelerate threat response, and reduce the complexity of security operations. Add-on Add-on Add-on Forensics Detect attacker activity by reviewing key artifacts such as event logs, registry keys, browser history, etc. Forensics simplifies investigations so you can trace every move an adversary made and swiftly contain threats from one place without needing to pivot between security tools. Add-on Add-on Add-on Host Insights Host Insights combines Vulnerability Management, Host Inventory, and a powerful Search and Destroy feature to help you identify and contain threats. It offers a holistic approach to endpoint visibility and attack containment, helping reduce your exposure to threats so you can avoid future breaches. Add-on Included in license Included in license Extended Threat Hunting Investigates everyday activities in real time and analyzes patterns to discover new threats, aiming to proactively minimize risk for an organization. Add-on Included in license Included in license Data Retention Retention per dataset ensures extended access to data, strengthening threat investigation, compliance, and long-term visibility. Add-on Add-on Add-on Extended Compute Units Additional computing resources beyond the annual allocation. You can purchase more units or enable dynamic allocation for flexible access. This ensures uninterrupted service, supports scaling during peak workloads, and optimizes resource management to maintain performance during high-demand periods. Add-on Add-on Add-on Endpoint Event Forwarding Enables exporting the raw telemetry collected by XDR Agents and event data from cloud endpoints to external systems (if relevant). Add-on Add-on Add-on GB Event Forwarding Enables exporting parsed logs to an external SIEM for storage, so you can keep data in your own storage in addition to the Cortex XSIAMdata layer, for compliance requirements and machine learning purposes. Add-on Add-on Add-on Advanced Email Security Investigate and respond to threats within modern, distributed email infrastructures. The module is a scalable, API-based solution that passively analyzes cloud-hosted email environments to detect threats. It ingests data from messages, attachments, and user identities to identify early-stage threats and high-risk behaviors without requiring any changes to mail flow. Add-on Add-on Add-on Exposure Management Gain comprehensive visibility, actionable prioritization, and automation-first remediation to help security teams proactively assess and respond to organizational exposures. Add-on Add-on Add-on DLP (Data Loss Prevention) The Cortex Data Loss Prevention (DLP) module provides a unified and flexible solution to prevent sensitive data exfiltration. It continuously enforces policies on endpoints (even offline) across web, local, and USB channels, protecting both on-premise and cloud environments. Add-on Add-on Add-on Feature Description Cortex XSIAM NG SIEM Cortex XSIAM Enterprise Cortex XSIAM Premium Core Analytics Detects anomalies and threats using machine learning and behavioral models. Included in license Included in license Included in license Automation Orchestrates and automates security workflows with prebuilt and customizable playbooks. Included in license Included in license Included in license Data Ingestion Analytics tier: Collects and normalizes data, creating a unified foundation for analytics, investigation, and detection. GB/day-based, with a minimum of 100 GB/day.
Cortex Data Lake tier: Provides cost-efficient ingestion and storage of security data at scale for use cases such as threat hunting, forensic investigations, and compliance audits. This tier is available as an optional add-on with a minimum of 50 GB/day, provided the mandatory 100 GB/day Analytics tier license is already met. For more information, see Configure Cortex Data Lake tier.
Included in license Included in license Included in license Enterprise Runtime Security (XDR) Comprehensive endpoint and server protection by combining AI-driven analytics, endpoint controls, next-generation antivirus, and automated investigation to detect and respond to threats across various environments. Add-on Included in license Included in license Cloud Posture Security Agentless comprehensive visibility across your cloud environment. Includes:
- Up to 400 workloads, dependent on the license plan
- Cloud Security Posture Management (CSPM)
- Cloud Infrastructure Entitlement Management (CIEM)
- Data Security Posture Management (DSPM)
- AI Security Posture Management (AI-SPM)
- Continuous Integration/Continuous Deployment (CI/CD)
Note
For Cortex XSIAM Enterprise and NG SIEM, if purchasing Cloud Posture Security only, a minimum number of workloads is required. If you purchase Cloud Runtime Security or Cortex XSIAM Premium, this add-on is included with the subscription.
Add-on Add-on Included with Cloud Runtime Security Cloud Runtime Security Full cloud protection, detection, and response. In addition to Cloud Posture Security:
- For Cortex XSIAM Premium: Minimum 200 workloads (priced per workload).
- Cloud Detection and Response (CDR)
- Cloud Workload Protection (CWP)
- Web Application and API Security (WAAS)
Note
For all Cortex XSIAM license plans, a minimum number of workloads is required.
Add-on Add-on Included in license Application Security Comprehensive protection for your software development lifecycle (SDLC) from code-to-cloud, offering visibility, detection, contextual analysis, prioritization, prevention, and remediation.
To access the Application Security module, you must have a Cloud Posture Security, Cloud Runtime Security, or Cortex XSIAM Premium license. These licenses include Application Security Posture Management (ASPM) and CI/CD Security.
Add-on component: Code Security
Code Security requires a separate Application Security add-on as well as a Cloud Posture Security, Cloud Runtime Security, or Cortex XSIAM Premium license.
Add-on Add-on Add-on Extended Threat Intelligence (XTI) Provides operationalized Threat Intelligence (TI) seamlessly integrated across the Cortex platform Add-on Add-on Included in license Threat Intelligence Management Investigates indicators and files, uses indicator rules, reports, and feed integrations. Add-on Add-on Included in license Attack Surface Management Provides internet-facing assets and ASM enrichment, external services, external IP ranges, attack surface rules and alerts, ASM widgets, and report capabilities. Add-on Add-on Included in license Identity Threat Detection & Response Enables asset role configuration, advanced analytics alert layout, Risk Management dashboard, User/Host Risk view, designated analytics for compromised accounts, and insider threat coverage. This solution helps organizations proactively secure identities, accelerate threat response, and reduce the complexity of security operations. Add-on Add-on Add-on Forensics Detect attacker activity by reviewing key artifacts such as event logs, registry keys, browser history, etc. Forensics simplifies investigations so you can trace every move an adversary made and swiftly contain threats from one place without needing to pivot between security tools. Add-on Add-on Add-on Host Insights Host Insights combines Vulnerability Management, Host Inventory, and a powerful Search and Destroy feature to help you identify and contain threats. It offers a holistic approach to endpoint visibility and attack containment, helping reduce your exposure to threats so you can avoid future breaches. Add-on Included in license Included in license Extended Threat Hunting Investigates everyday activities in real time and analyzes patterns to discover new threats, aiming to proactively minimize risk for an organization. Add-on Included in license Included in license Data Retention Retention per dataset ensures extended access to data, strengthening threat investigation, compliance, and long-term visibility. Add-on Add-on Add-on Extended Compute Units Additional computing resources beyond the annual allocation. You can purchase more units or enable dynamic allocation for flexible access. This ensures uninterrupted service, supports scaling during peak workloads, and optimizes resource management to maintain performance during high-demand periods. Add-on Add-on Add-on Endpoint Event Forwarding Enables exporting the raw telemetry collected by XDR Agents and event data from cloud endpoints to external systems (if relevant). Add-on Add-on Add-on GB Event Forwarding Enables exporting parsed logs to an external SIEM for storage, so you can keep data in your own storage in addition to the Cortex XSIAMdata layer, for compliance requirements and machine learning purposes. Add-on Add-on Add-on Advanced Email Security Investigate and respond to threats within modern, distributed email infrastructures. The module is a scalable, API-based solution that passively analyzes cloud-hosted email environments to detect threats. It ingests data from messages, attachments, and user identities to identify early-stage threats and high-risk behaviors without requiring any changes to mail flow. Add-on Add-on Add-on Exposure Management Gain comprehensive visibility, actionable prioritization, and automation-first remediation to help security teams proactively assess and respond to organizational exposures. Add-on Add-on Add-on DLP (Data Loss Prevention) The Cortex Data Loss Prevention (DLP) module provides a unified and flexible solution to prevent sensitive data exfiltration. It continuously enforces policies on endpoints (even offline) across web, local, and USB channels, protecting both on-premise and cloud environments. Add-on Add-on Add-on #### Tiers and key capabilitiesendtabtab Tiers and key capabilities🖼 image🖼 Cortex_XSIAM_Licenses_Jan22.pngendtabendtabsShow markdown source
@@ -1,60 +1,60 @@ --- description: >- - Understand the Cortex XSIAM product licenses: NG-SIEM, Enterprise, and - Premium. + Compare Cortex XSIAM license tiers and product licenses: NG-SIEM, Enterprise, + Premium, included capabilities, and add-ons. --- -# Cortex XSIAM product licenses +# Cortex XSIAM license tiers and product licenses -Cortex XSIAM is available in the following subscription tiers, designed to support specific security use cases: +Cortex XSIAM product licenses are available in NG-SIEM, Enterprise, and Premium subscription tiers. Compare each Cortex XSIAM license tier, its included capabilities, and available security add-ons to select the subscription for your security use case. {% hint style="info" %} -### Note - You can upgrade your license by purchasing add-ons or moving to a different XSIAM license. {% endhint %} -### Cortex XSIAM NG-SIEM +### Compare Cortex XSIAM license tiers + +* **NG-SIEM** provides analytics, data collection, detection, and security automation. +* **Enterprise** adds Cortex XDR agent coverage and extended endpoint visibility. +* **Premium** adds cloud posture security, cloud runtime security, and threat intelligence capabilities. + +### Cortex XSIAM NG-SIEM license Cortex XSIAM NG-SIEM is an analytics subscription tier that includes data collection and full automation, suitable for users who want to enhance their security without immediately replacing their existing SIEM and endpoint solutions. Key features include: <table><thead><tr><th width="342.5">Feature</th><th>Description</th></tr></thead><tbody><tr><td>AI and Big Data</td><td>Integrates data analytics, AI/ML, and automation into a unified platform.</td></tr><tr><td>Comprehensive Data Collection</td><td>Offers extensive cloud data collection with out-of-the-box analytics, detection, and cloud asset discovery.</td></tr><tr><td>Advanced Analytics</td><td>Provides capabilities for threat hunting, analysis, response, and automation.</td></tr><tr><td>User and Entity Behavior Analytics (UEBA)</td><td>Uses machine learning to profile users and entities, alerting on anomalous behavior that could indicate a compromised account or insider threat</td></tr></tbody></table> -### Cortex XSIAM Enterprise +### Cortex XSIAM Enterprise license Cortex XSIAM Enterprise includes all the features of Cortex XSIAM NG-SIEM and builds upon them by adding advanced endpoint visibility and data collection: Key additions include: | Feature | Description | | ------------------------------------- | --------------------------------------------------------------------------------------------------------------------------------------------------------------------------------------- | | Cortex XDR agent | Entitles you to one Cortex XDR agent per endpoint, which provides tailored endpoint data and third-party logs collection to optimize detection and investigation visibility. | | Extended Detection and Response (XDR) | Incorporates extended data collection and ingestion of endpoint logs and alerts, firewalls, and third-party audit and flow logs through Host Insights and Extended Threat Hunting Data. | -### Cortex XSIAM Premium +### Cortex XSIAM Premium license Cortex XSIAM Premium is the most comprehensive tier, providing the highest level of security by combining all Enterprise features together with the following capabilities: -<table><thead><tr><th width="227">Feature</th><th>Details</th></tr></thead><tbody><tr><td>Cloud Posture Security</td><td><p>Delivers comprehensive visibility and continuous monitoring of cloud environments to ensure configurations meet security best practices, compliance standards, and vulnerability management. This bundle includes the following advanced modules:</p><ul><li>Cloud Security Posture Management (CSPM): Continuously scans your cloud environment (AWS, Azure, GCP) to detect misconfigurations, compliance violations, and drift from secure baselines.</li><li>Cloud Infrastructure Entitlement Management (CIEM): Enforces least-privilege access to cloud infrastructure. It protects and manages access to resources by analyzing identity misconfigurations, reducing excessive permissions, and providing real-time monitoring of identity anomalies.</li><li>AI Security Posture Management (AI-SPM): Secures AI-powered applications and models against misuse and vulnerabilities.</li><li>Data Security Posture Management (DSPM): Discovers, classifies, and secures sensitive data across your cloud environment.</li><li>Agentless Workload Scanning: Scans cloud workloads for vulnerabilities, malware, and exposed secrets without requiring an agent installation.</li><li><p>Application Security Posture Management (ASPM): Provides a consolidated view of application risks and vulnerabilities across your environment, enabling you to understand and manage your overall security posture.</p><div data-gb-custom-block data-tag="hint" data-style="info" class="hint hint-info"><p><strong>Note</strong></p><p>Full code security scanning requires a separate add-on.</p></div></li><li>CI/CD: Focuses on securing your continuous integration and continuous delivery pipelines, ensuring the integrity and security of your automated build and deployment processes</li></ul></td></tr><tr><td>Cloud Runtime Security</td><td><p>Prevents attackers from exploiting risks present in your cloud environment. Provides real-time protection, detection, and response for cloud workloads, crucial for applications, containers, serverless functions, and APIs. Includes</p><ul><li>Cloud Workload Rules: Cloud Workload Rules define the criteria for identifying security violations. This criteria can be applied to assets in your cloud environment and to findings generated by Cortex XSIAM.</li><li>Cloud Workload Policies: Cloud Workload Policies help you prevent and manage security violations in your cloud runtime instances.</li><li>Web and API Security: Cortex Web and API Security (WAAS) capabilities offer comprehensive protection of APIs across integrated API gateways and web-based applications and APIs running on Linux-based workloads.</li></ul><p>Cortex XSIAM Premium users can install an XDR agent on endpoints and on any host or cloud workload, including Kubernetes hosts, based on the user's per-unit subscription parameters and workload demands. The XDR agent offers cloud-based endpoint protection and detection support, along with tailored endpoint and third-party log data collection.</p><p>For more information about the license relationship between the XDR agent on endpoints and the XDR agent on host or cloud workloads, and how the licenses are allocated, see <a href="cortex-xsiam-product-licenses/license-allocation">License allocation</a>.</p></td></tr><tr><td>Extended Threat Intelligence (XTI)</td><td>Provides operationalized Threat Intelligence (TI) seamlessly integrated across the Cortex platform.</td></tr><tr><td>Threat Intel Management</td><td>Investigates indicators and files, applies indicator rules, generates reports, and integrates feed integrations.</td></tr><tr><td>Attack Surface Management</td><td>Provides internet-facing assets and ASM enrichment, external services, external IP ranges, attack surface rules and alerts, ASM widgets, and report capabilities.</td></tr></tbody></table> +<table><thead><tr><th width="227">Feature</th><th>Details</th></tr></thead><tbody><tr><td>Cloud Posture Security</td><td><p>Delivers comprehensive visibility and continuous monitoring of cloud environments to ensure configurations meet security best practices, compliance standards, and vulnerability management. This bundle includes the following advanced modules:</p><ul><li>Cloud Security Posture Management (CSPM): Continuously scans your cloud environment (AWS, Azure, GCP) to detect misconfigurations, compliance violations, and drift from secure baselines.</li><li>Cloud Infrastructure Entitlement Management (CIEM): Enforces least-privilege access to cloud infrastructure. It protects and manages access to resources by analyzing identity misconfigurations, reducing excessive permissions, and providing real-time monitoring of identity anomalies.</li><li>AI Security Posture Management (AI-SPM): Secures AI-powered applications and models against misuse and vulnerabilities.</li><li>Data Security Posture Management (DSPM): Discovers, classifies, and secures sensitive data across your cloud environment.</li><li>Agentless Workload Scanning: Scans cloud workloads for vulnerabilities, malware, and exposed secrets without requiring an agent installation.</li><li><p>Application Security Posture Management (ASPM): Provides a consolidated view of application risks and vulnerabilities across your environment, enabling you to understand and manage your overall security posture.</p><div data-gb-custom-block data-tag="hint" data-style="info" class="hint hint-info"><p>Full code security scanning requires a separate add-on.</p></div></li><li>CI/CD: Focuses on securing your continuous integration and continuous delivery pipelines, ensuring the integrity and security of your automated build and deployment processes</li></ul></td></tr><tr><td>Cloud Runtime Security</td><td><p>Prevents attackers from exploiting risks present in your cloud environment. Provides real-time protection, detection, and response for cloud workloads, crucial for applications, containers, serverless functions, and APIs. Includes</p><ul><li>Cloud Workload Rules: Cloud Workload Rules define the criteria for identifying security violations. This criteria can be applied to assets in your cloud environment and to findings generated by Cortex XSIAM.</li><li>Cloud Workload Policies: Cloud Workload Policies help you prevent and manage security violations in your cloud runtime instances.</li><li>Web and API Security: Cortex Web and API Security (WAAS) capabilities offer comprehensive protection of APIs across integrated API gateways and web-based applications and APIs running on Linux-based workloads.</li></ul><p>Cortex XSIAM Premium users can install an XDR agent on endpoints and on any host or cloud workload, including Kubernetes hosts, based on the user's per-unit subscription parameters and workload demands. The XDR agent offers cloud-based endpoint protection and detection support, along with tailored endpoint and third-party log data collection.</p><p>For more information about the license relationship between the XDR agent on endpoints and the XDR agent on host or cloud workloads, and how the licenses are allocated, see <a href="cortex-xsiam-product-licenses/license-allocation">License allocation</a>.</p></td></tr><tr><td>Extended Threat Intelligence (XTI)</td><td>Provides operationalized Threat Intelligence (TI) seamlessly integrated across the Cortex platform.</td></tr><tr><td>Threat Intel Management</td><td>Investigates indicators and files, applies indicator rules, generates reports, and integrates feed integrations.</td></tr><tr><td>Attack Surface Management</td><td>Provides internet-facing assets and ASM enrichment, external services, external IP ranges, attack surface rules and alerts, ASM widgets, and report capabilities.</td></tr></tbody></table> {% hint style="info" %} -### Note +Existing users with a Cortex XSIAM Enterprise Plus license retain all Cortex XSIAM Enterprise features, including cloud agent features. You can deploy agents for runtime detection on cloud sources, such as Kubernetes nodes, OpenShift clusters, or cloud VMs, whether in the cloud or on-premises. If you want the full cloud posture security bundle (Cloud Posture Security or Cloud Runtime Security), you need to upgrade to Cortex XSIAM Premium. -Existing users who have a Cortex XSIAM Enterprise Plus license retain all Cortex XSIAM Enterprise features, with cloud agent features. You can deploy agents for runtime detection on cloud sources, such as Kubernetes nodes, OpenShift clusters, or cloud VMs, whether in the cloud or on-premises. If you want the full cloud posture security bundle (Cloud Posture Security or Cloud Runtime Security), you need to upgrade to Cortex XSIAM Premium. - -Some add-ons, such as Advanced Email Security and Exposure Management, are only available for Cortex XSIAM Premium, Enterprise, and NG-SIEM licenses. +Some add-ons, such as Advanced Email Security and Exposure Management, are available with Cortex XSIAM Premium, Enterprise, and NG-SIEM licenses. {% endhint %} -{% tabs %} -{% tab title="Capabilities and add-ons" %} -Cortex offers a modular set of license packages that work interchangeably with each other, allowing them to become add-ons to subsequent products seamlessly. The table below shows the breakdown of each type of license package: +### License capabilities and add-ons + +Cortex offers a modular set of license packages that work interchangeably, allowing them to serve as add-ons to subsequent products seamlessly. The table below shows the breakdown of each type of license package: + +<table><thead><tr><th width="114.5">Feature</th><th width="220.5">Description</th><th width="117.5" align="center">Cortex XSIAM NG SIEM</th><th width="120.5" align="center">Cortex XSIAM Enterprise</th><th align="center">Cortex XSIAM Premium</th></tr></thead><tbody><tr><td>Core Analytics</td><td>Detects anomalies and threats using machine learning and behavioral models.</td><td align="center">Included in license</td><td align="center">Included in license</td><td align="center">Included in license</td></tr><tr><td>Automation</td><td>Orchestrates and automates security workflows with prebuilt and customizable playbooks.</td><td align="center">Included in license</td><td align="center">Included in license</td><td align="center">Included in license</td></tr><tr><td>Data Ingestion</td><td><p><strong>Analytics tier</strong>: Collects and normalizes data, creating a unified foundation for analytics, investigation, and detection. GB/day-based, with a minimum of 100 GB/day.<br></p><p><strong>Cortex Data Lake tier</strong>: Provides cost-efficient ingestion and storage of security data at scale for use cases such as threat hunting, forensic investigations, and compliance audits. This tier is available as an optional add-on with a minimum of 50 GB/day, provided the mandatory 100 GB/day Analytics tier license is already met. For more information, see <a href="../configure-cortex-xsiam/data-management/configure-cortex-data-lake-tier">Configure Cortex Data Lake tier</a>.</p></td><td align="center">Included in license</td><td align="center">Included in license</td><td align="center">Included in license</td></tr><tr><td>Enterprise Runtime Security (XDR)</td><td>Comprehensive endpoint and server protection by combining AI-driven analytics, endpoint controls, next-generation antivirus, and automated investigation to detect and respond to threats across various environments.</td><td align="center">Add-on</td><td align="center">Included in license</td><td align="center">Included in license</td></tr><tr><td>Cloud Posture Security</td><td><p>Agentless comprehensive visibility across your cloud environment. Includes:</p><ul><li>Up to 400 workloads, dependent on the license plan</li><li>Cloud Security Posture Management (CSPM)</li><li>Cloud Infrastructure Entitlement Management (CIEM)</li><li>Data Security Posture Management (DSPM)</li><li>AI Security Posture Management (AI-SPM)</li><li>Continuous Integration/Continuous Deployment (CI/CD)</li></ul><div data-gb-custom-block data-tag="hint" data-style="info" class="hint hint-info"><p>For Cortex XSIAM Enterprise and NG SIEM, if purchasing Cloud Posture Security only, a minimum number of workloads is required. If you purchase Cloud Runtime Security or Cortex XSIAM Premium, this add-on is included with the subscription.</p></div></td><td align="center">Add-on</td><td align="center">Add-on</td><td align="center">Included with Cloud Runtime Security</td></tr><tr><td>Cloud Runtime Security</td><td><p>Full cloud protection, detection, and response. In addition to Cloud Posture Security:</p><ul><li>For Cortex XSIAM Premium: Minimum 200 workloads (priced per workload).</li><li>Cloud Detection and Response (CDR)</li><li>Cloud Workload Protection (CWP)</li><li>Web Application and API Security (WAAS)</li></ul><div data-gb-custom-block data-tag="hint" data-style="info" class="hint hint-info"><p>For all Cortex XSIAM licenses, a minimum number of workloads is required.</p></div></td><td align="center">Add-on</td><td align="center">Add-on</td><td align="center">Included in license</td></tr><tr><td>Application Security</td><td><p>Comprehensive protection for your software development lifecycle (SDLC) from code-to-cloud, offering visibility, detection, contextual analysis, prioritization, prevention, and remediation.</p><div data-gb-custom-block data-tag="hint" data-style="info" class="hint hint-info"><p>To access the Application Security module, you must have a Cloud Posture Security, Cloud Runtime Security, or Cortex XSIAM Premium license. These licenses include Application Security Posture Management (ASPM) and CI/CD Security.</p></div><p><strong>Add-on component: Code Security</strong></p><p>Code Security requires a separate Application Security add-on as well as a Cloud Posture Security, Cloud Runtime Security, or Cortex XSIAM Premium license.</p></td><td align="center">Add-on</td><td align="center">Add-on</td><td align="center">Add-on</td></tr><tr><td>Extended Threat Intelligence (XTI)</td><td>Provides operationalized Threat Intelligence (TI) seamlessly integrated across the Cortex platform</td><td align="center">Add-on</td><td align="center">Add-on</td><td align="center">Included in license</td></tr><tr><td>Threat Intelligence Management</td><td>Investigates indicators and files, uses indicator rules, reports, and feed integrations.</td><td align="center">Add-on</td><td align="center">Add-on</td><td align="center">Included in license</td></tr><tr><td>Attack Surface Management</td><td>Provides internet-facing assets and ASM enrichment, external services, external IP ranges, attack surface rules and alerts, ASM widgets, and report capabilities.</td><td align="center">Add-on</td><td align="center">Add-on</td><td align="center">Included in license</td></tr><tr><td>Identity Threat Detection & Response</td><td>Enables asset role configuration, advanced analytics alert layout, Risk Management dashboard, User/Host Risk view, designated analytics for compromised accounts, and insider threat coverage. This solution helps organizations proactively secure identities, accelerate threat response, and reduce the complexity of security operations.</td><td align="center">Add-on</td><td align="center">Add-on</td><td align="center">Add-on</td></tr><tr><td>Forensics</td><td>Detect attacker activity by reviewing key artifacts such as event logs, registry keys, browser history, etc. Forensics simplifies investigations so you can trace every move an adversary made and swiftly contain threats from one place without needing to pivot between security tools.</td><td align="center">Add-on</td><td align="center">Add-on</td><td align="center">Add-on</td></tr><tr><td>Host Insights</td><td>Host Insights combines Vulnerability Management, Host Inventory, and a powerful Search and Destroy feature to help you identify and contain threats. It offers a holistic approach to endpoint visibility and attack containment, helping reduce your exposure to threats so you can avoid future breaches.</td><td align="center">Add-on</td><td align="center">Included in license</td><td align="center">Included in license</td></tr><tr><td>Extended Threat Hunting</td><td>Investigates everyday activities in real time and analyzes patterns to discover new threats, aiming to proactively minimize risk for an organization.</td><td align="center">Add-on</td><td align="center">Included in license</td><td align="center">Included in license</td></tr><tr><td>Data Retention</td><td>Retention per dataset ensures extended access to data, strengthening threat investigation, compliance, and long-term visibility.</td><td align="center">Add-on</td><td align="center">Add-on</td><td align="center">Add-on</td></tr><tr><td>Extended Compute Units</td><td>Additional computing resources beyond the annual allocation. You can purchase more units or enable dynamic allocation for flexible access. This ensures uninterrupted service, supports scaling during peak workloads, and optimizes resource management to maintain performance during high-demand periods.</td><td align="center">Add-on</td><td align="center">Add-on</td><td align="center">Add-on</td></tr><tr><td>Endpoint Event Forwarding</td><td>Enables exporting the raw telemetry collected by XDR Agents and event data from cloud endpoints to external systems (if relevant).</td><td align="center">Add-on</td><td align="center">Add-on</td><td align="center">Add-on</td></tr><tr><td>GB Event Forwarding</td><td>Enables exporting parsed logs to an external SIEM for storage, so you can keep data in your own storage in addition to the Cortex XSIAMdata layer, for compliance requirements and machine learning purposes.</td><td align="center">Add-on</td><td align="center">Add-on</td><td align="center">Add-on</td></tr><tr><td>Advanced Email Security</td><td>Investigate and respond to threats within modern, distributed email infrastructures. The module is a scalable, API-based solution that passively analyzes cloud-hosted email environments to detect threats. It ingests data from messages, attachments, and user identities to identify early-stage threats and high-risk behaviors without requiring any changes to mail flow.</td><td align="center">Add-on</td><td align="center">Add-on</td><td align="center">Add-on</td></tr><tr><td>Exposure Management</td><td>Gain comprehensive visibility, actionable prioritization, and automation-first remediation to help security teams proactively assess and respond to organizational exposures.</td><td align="center">Add-on</td><td align="center">Add-on</td><td align="center">Add-on</td></tr><tr><td>DLP (Data Loss Prevention)</td><td>The Cortex Data Loss Prevention (DLP) module provides a unified and flexible solution to prevent sensitive data exfiltration. It continuously enforces policies on endpoints (even offline) across web, local, and USB channels, protecting both on-premise and cloud environments.</td><td align="center">Add-on</td><td align="center">Add-on</td><td align="center">Add-on</td></tr></tbody></table> -<table><thead><tr><th width="114.5">Feature</th><th width="220.5">Description</th><th width="117.5" align="center">Cortex XSIAM NG SIEM</th><th width="120.5" align="center">Cortex XSIAM Enterprise</th><th align="center">Cortex XSIAM Premium</th></tr></thead><tbody><tr><td>Core Analytics</td><td>Detects anomalies and threats using machine learning and behavioral models.</td><td align="center">Included in license</td><td align="center">Included in license</td><td align="center">Included in license</td></tr><tr><td>Automation</td><td>Orchestrates and automates security workflows with prebuilt and customizable playbooks.</td><td align="center">Included in license</td><td align="center">Included in license</td><td align="center">Included in license</td></tr><tr><td>Data Ingestion</td><td><p><strong>Analytics tier</strong>: Collects and normalizes data, creating a unified foundation for analytics, investigation, and detection. GB/day-based, with a minimum of 100 GB/day.<br></p><p><strong>Cortex Data Lake tier</strong>: Provides cost-efficient ingestion and storage of security data at scale for use cases such as threat hunting, forensic investigations, and compliance audits. This tier is available as an optional add-on with a minimum of 50 GB/day, provided the mandatory 100 GB/day Analytics tier license is already met. For more information, see <a href="../configure-cortex-xsiam/data-management/configure-cortex-data-lake-tier">Configure Cortex Data Lake tier</a>.</p></td><td align="center">Included in license</td><td align="center">Included in license</td><td align="center">Included in license</td></tr><tr><td>Enterprise Runtime Security (XDR)</td><td>Comprehensive endpoint and server protection by combining AI-driven analytics, endpoint controls, next-generation antivirus, and automated investigation to detect and respond to threats across various environments.</td><td align="center">Add-on</td><td align="center">Included in license</td><td align="center">Included in license</td></tr><tr><td>Cloud Posture Security</td><td><p>Agentless comprehensive visibility across your cloud environment. Includes:</p><ul><li>Up to 400 workloads, dependent on the license plan</li><li>Cloud Security Posture Management (CSPM)</li><li>Cloud Infrastructure Entitlement Management (CIEM)</li><li>Data Security Posture Management (DSPM)</li><li>AI Security Posture Management (AI-SPM)</li><li>Continuous Integration/Continuous Deployment (CI/CD)</li></ul><div data-gb-custom-block data-tag="hint" data-style="info" class="hint hint-info"><p><strong>Note</strong></p><p>For Cortex XSIAM Enterprise and NG SIEM, if purchasing Cloud Posture Security only, a minimum number of workloads is required. If you purchase Cloud Runtime Security or Cortex XSIAM Premium, this add-on is included with the subscription.</p></div></td><td align="center">Add-on</td><td align="center">Add-on</td><td align="center">Included with Cloud Runtime Security</td></tr><tr><td>Cloud Runtime Security</td><td><p>Full cloud protection, detection, and response. In addition to Cloud Posture Security:</p><ul><li>For Cortex XSIAM Premium: Minimum 200 workloads (priced per workload).</li><li>Cloud Detection and Response (CDR)</li><li>Cloud Workload Protection (CWP)</li><li>Web Application and API Security (WAAS)</li></ul><div data-gb-custom-block data-tag="hint" data-style="info" class="hint hint-info"><p><strong>Note</strong></p><p>For all Cortex XSIAM license plans, a minimum number of workloads is required.</p></div></td><td align="center">Add-on</td><td align="center">Add-on</td><td align="center">Included in license</td></tr><tr><td>Application Security</td><td><p>Comprehensive protection for your software development lifecycle (SDLC) from code-to-cloud, offering visibility, detection, contextual analysis, prioritization, prevention, and remediation.</p><div data-gb-custom-block data-tag="hint" data-style="info" class="hint hint-info"><p>To access the Application Security module, you must have a Cloud Posture Security, Cloud Runtime Security, or Cortex XSIAM Premium license. These licenses include Application Security Posture Management (ASPM) and CI/CD Security.</p><p></p></div><p><strong>Add-on component: Code Security</strong></p><p>Code Security requires a separate Application Security add-on as well as a Cloud Posture Security, Cloud Runtime Security, or Cortex XSIAM Premium license.</p></td><td align="center">Add-on</td><td align="center">Add-on</td><td align="center">Add-on</td></tr><tr><td>Extended Threat Intelligence (XTI)</td><td>Provides operationalized Threat Intelligence (TI) seamlessly integrated across the Cortex platform</td><td align="center">Add-on</td><td align="center">Add-on</td><td align="center">Included in license</td></tr><tr><td>Threat Intelligence Management</td><td>Investigates indicators and files, uses indicator rules, reports, and feed integrations.</td><td align="center">Add-on</td><td align="center">Add-on</td><td align="center">Included in license</td></tr><tr><td>Attack Surface Management</td><td>Provides internet-facing assets and ASM enrichment, external services, external IP ranges, attack surface rules and alerts, ASM widgets, and report capabilities.</td><td align="center">Add-on</td><td align="center">Add-on</td><td align="center">Included in license</td></tr><tr><td>Identity Threat Detection & Response</td><td>Enables asset role configuration, advanced analytics alert layout, Risk Management dashboard, User/Host Risk view, designated analytics for compromised accounts, and insider threat coverage. This solution helps organizations proactively secure identities, accelerate threat response, and reduce the complexity of security operations.</td><td align="center">Add-on</td><td align="center">Add-on</td><td align="center">Add-on</td></tr><tr><td>Forensics</td><td>Detect attacker activity by reviewing key artifacts such as event logs, registry keys, browser history, etc. Forensics simplifies investigations so you can trace every move an adversary made and swiftly contain threats from one place without needing to pivot between security tools.</td><td align="center">Add-on</td><td align="center">Add-on</td><td align="center">Add-on</td></tr><tr><td>Host Insights</td><td>Host Insights combines Vulnerability Management, Host Inventory, and a powerful Search and Destroy feature to help you identify and contain threats. It offers a holistic approach to endpoint visibility and attack containment, helping reduce your exposure to threats so you can avoid future breaches.</td><td align="center">Add-on</td><td align="center">Included in license</td><td align="center">Included in license</td></tr><tr><td>Extended Threat Hunting</td><td>Investigates everyday activities in real time and analyzes patterns to discover new threats, aiming to proactively minimize risk for an organization.</td><td align="center">Add-on</td><td align="center">Included in license</td><td align="center">Included in license</td></tr><tr><td>Data Retention</td><td>Retention per dataset ensures extended access to data, strengthening threat investigation, compliance, and long-term visibility.</td><td align="center">Add-on</td><td align="center">Add-on</td><td align="center">Add-on</td></tr><tr><td>Extended Compute Units</td><td>Additional computing resources beyond the annual allocation. You can purchase more units or enable dynamic allocation for flexible access. This ensures uninterrupted service, supports scaling during peak workloads, and optimizes resource management to maintain performance during high-demand periods.</td><td align="center">Add-on</td><td align="center">Add-on</td><td align="center">Add-on</td></tr><tr><td>Endpoint Event Forwarding</td><td>Enables exporting the raw telemetry collected by XDR Agents and event data from cloud endpoints to external systems (if relevant).</td><td align="center">Add-on</td><td align="center">Add-on</td><td align="center">Add-on</td></tr><tr><td>GB Event Forwarding</td><td>Enables exporting parsed logs to an external SIEM for storage, so you can keep data in your own storage in addition to the Cortex XSIAMdata layer, for compliance requirements and machine learning purposes.</td><td align="center">Add-on</td><td align="center">Add-on</td><td align="center">Add-on</td></tr><tr><td>Advanced Email Security</td><td>Investigate and respond to threats within modern, distributed email infrastructures. The module is a scalable, API-based solution that passively analyzes cloud-hosted email environments to detect threats. It ingests data from messages, attachments, and user identities to identify early-stage threats and high-risk behaviors without requiring any changes to mail flow.</td><td align="center">Add-on</td><td align="center">Add-on</td><td align="center">Add-on</td></tr><tr><td>Exposure Management</td><td>Gain comprehensive visibility, actionable prioritization, and automation-first remediation to help security teams proactively assess and respond to organizational exposures.</td><td align="center">Add-on</td><td align="center">Add-on</td><td align="center">Add-on</td></tr><tr><td>DLP (Data Loss Prevention)</td><td>The Cortex Data Loss Prevention (DLP) module provides a unified and flexible solution to prevent sensitive data exfiltration. It continuously enforces policies on endpoints (even offline) across web, local, and USB channels, protecting both on-premise and cloud environments.</td><td align="center">Add-on</td><td align="center">Add-on</td><td align="center">Add-on</td></tr></tbody></table> -{% endtab %} +#### Tiers and key capabilities -{% tab title="Tiers and key capabilities" %} -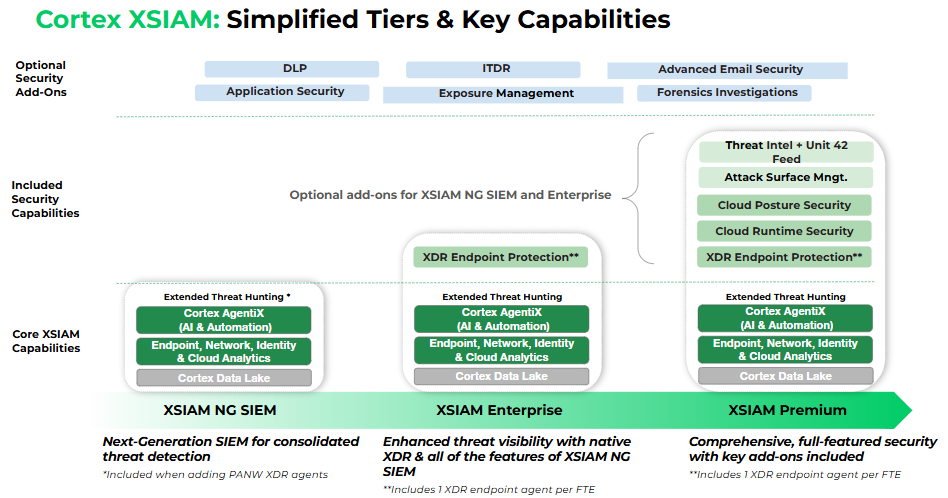 -{% endtab %} -{% endtabs %} + -
▸ ▾ Data retention modified +10 −10 Bold labels become headings and redundant "Note" titles are dropped; the 31-, 186- and 365-day default retention periods are unchanged.
xsiam/learn-about-cortex-xsiam/cortex-xsiam-product-licenses/data-retentionRead it on the Cortex docs portal ↗ Read it here → This file's diff on GitHub ↗
Before After@@ -3,30 +3,30 @@ description: >-Learn more about the default retention periods for all Cortex XSIAM licensesLearn more about the default retention periods for all Cortex XSIAM licensesand the available retention add-ons.and the available retention add-ons.------# Data retention# Data retentionAfter purchasing your license retention add-ons, you can view details about your Cortex XSIAM licenses and retention add-ons by selecting Settings → Cortex XSIAM License. For more information on your storage license details, see Dataset Management.After purchasing your license retention add-ons, you can view details about your Cortex XSIAM licenses and retention add-ons by selecting Settings → Cortex XSIAM License. For more information on your storage license details, see Dataset Management.Default retention periods### Default retention periodsThe following table summarizes the default retention periods for Cortex XSIAM:The following table summarizes the default retention periods for Cortex XSIAM:Data Type│Default Retention PeriodData Type│Default Retention Period| ------------------------------ | ------------------------------------------------------------------------------------------------------------------------------------------------------------------------------------------------------------------------------------------------------------------------------------------------------------------------------------------------------------------------------------------------------------------------------------------------------------------------------------------------------------------------------------------- || ------------------------------ | --------------------------------------------------------------------------------------------------------------------------------------------------------------------------------------------------------------------------------------------------------------------------------------------------------------------------------------------------------------------------------------------------------------------------------------------------------------------------------------------------------------- |Ingested data│31 daysIngested data│31 daysCases and Issues data│186 days
Note
Case data is retained according to the Last Updated date.
Issue data is retained according to the Observation Time. Data collected within these dates is kept and displayed for 186 days. To ensure the accuracy of issues, Cortex XSIAM provides a grace period of up to 31 days for issues displayed in the Issues View, Issues table, and Cases View.
Cases and Issues data│186 days
Case data is retained according to the Last Updated date.
Issue data is retained according to the Observation Time. Data collected within these dates is kept and displayed for 186 days. To ensure the accuracy of issues, Cortex XSIAM provides a grace period of up to 31 days for issues displayed in the Issues View, Issues table, and Cases View.
Agentic AI chats and artifacts│186 daysAgentic AI chats and artifacts│186 daysForensic data│365 days
Note
Requires the Forensics add-on.
Forensic data│365 days
Requires the Forensics add-on.
Audit logs│365 daysAudit logs│365 daysQuery data│186 daysQuery data│186 daysRetention add-ons### Retention add-onsRetention add-ons are provided for ingested data and Cases and Issues data. Minimum requirements are dependent on the license type. You can purchase one or more of the following add-ons:Retention add-ons are provided for ingested data and Cases and Issues data. Minimum requirements are dependent on the license type. You can purchase one or more of the following add-ons:Feature│DescriptionFeature│Description| --------------------------------------------------- | ----------------------------------------------------------------------------------------------------------------------------------------------------------------------------------------------------------------------------------------------------------------------------------------------- || --------------------------------------------------- | ----------------------------------------------------------------------------------------------------------------------------------------------------------------------------------------------------------------------------------------------------------------------------------------------- |Additional Cases and Issues Retention│An additional 31-day hot storage of Case and Issue data apart from the default 186 days.Available for purchase per month for each endpoint. This retention add-on also extends agentic AI chats and artifacts retention by 31 days.
Additional Cases and Issues Retention│An additional 31-day hot storage of Case and Issue data apart from the default 186 days.Available for purchase per month for each endpoint. This retention add-on also extends agentic AI chats and artifacts retention by 31 days.
Period-Based Retention - Hot Storage (All datasets)│Fully searchable storage for investigation and threat hunting of ingested data, and Cases and Issues data.Requires purchasing a minimum of one month of the additional retention.
Period-Based Retention - Hot Storage (All datasets)│Fully searchable storage for investigation and threat hunting of ingested data, and Cases and Issues data.Requires purchasing a minimum of one month of the additional retention.
Additional Hot Storage (Selected datasets)│Flexible hot storage-based retention to help accommodate varying storage requirements for different retention periods and datasets. Fully searchable storage for investigation and threat hunting of ingested data.Available for purchase with storage for a minimum of 1,000 GB.
Additional Hot Storage (Selected datasets)│Flexible hot storage-based retention to help accommodate varying storage requirements for different retention periods and datasets. Fully searchable storage for investigation and threat hunting of ingested data.Available for purchase with storage for a minimum of 1,000 GB.
Show markdown source
@@ -3,30 +3,30 @@ description: >- Learn more about the default retention periods for all Cortex XSIAM licenses and the available retention add-ons. --- # Data retention After purchasing your license retention add-ons, you can view details about your Cortex XSIAM licenses and retention add-ons by selecting **Settings** → **Cortex XSIAM License**. For more information on your storage license details, see [Dataset Management](../../configure-cortex-xsiam/data-management/dataset-management). -**Default retention periods** +### **Default retention periods** The following table summarizes the default retention periods for Cortex XSIAM: -| Data Type | Default Retention Period | -| ------------------------------ | ------------------------------------------------------------------------------------------------------------------------------------------------------------------------------------------------------------------------------------------------------------------------------------------------------------------------------------------------------------------------------------------------------------------------------------------------------------------------------------------------------------------------------------------- | -| Ingested data | 31 days | -| Cases and Issues data | <p>186 days</p><div data-gb-custom-block data-tag="hint" data-style="info" class="hint hint-info"><p><strong>Note</strong></p><p>Case data is retained according to the <strong>Last Updated</strong> date.</p><p>Issue data is retained according to the <strong>Observation Time</strong>. Data collected within these dates is kept and displayed for 186 days. To ensure the accuracy of issues, Cortex XSIAM provides a grace period of up to 31 days for issues displayed in the Issues View, Issues table, and Cases View.</p></div> | -| Agentic AI chats and artifacts | 186 days | -| Forensic data | <p>365 days</p><div data-gb-custom-block data-tag="hint" data-style="info" class="hint hint-info"><p><strong>Note</strong></p><p>Requires the Forensics add-on.</p></div> | -| Audit logs | 365 days | -| Query data | 186 days | +| Data Type | Default Retention Period | +| ------------------------------ | --------------------------------------------------------------------------------------------------------------------------------------------------------------------------------------------------------------------------------------------------------------------------------------------------------------------------------------------------------------------------------------------------------------------------------------------------------------------------------------------------------------- | +| Ingested data | 31 days | +| Cases and Issues data | <p>186 days</p><div data-gb-custom-block data-tag="hint" data-style="info" class="hint hint-info"><p>Case data is retained according to the <strong>Last Updated</strong> date.</p><p>Issue data is retained according to the <strong>Observation Time</strong>. Data collected within these dates is kept and displayed for 186 days. To ensure the accuracy of issues, Cortex XSIAM provides a grace period of up to 31 days for issues displayed in the Issues View, Issues table, and Cases View.</p></div> | +| Agentic AI chats and artifacts | 186 days | +| Forensic data | <p>365 days</p><div data-gb-custom-block data-tag="hint" data-style="info" class="hint hint-info"><p>Requires the Forensics add-on.</p></div> | +| Audit logs | 365 days | +| Query data | 186 days | -**Retention add-ons** +### **Retention add-ons** Retention add-ons are provided for ingested data and Cases and Issues data. Minimum requirements are dependent on the license type. You can purchase one or more of the following add-ons: | Feature | Description | | --------------------------------------------------- | ----------------------------------------------------------------------------------------------------------------------------------------------------------------------------------------------------------------------------------------------------------------------------------------------- | | Additional Cases and Issues Retention | <p>An additional 31-day hot storage of Case and Issue data apart from the default 186 days.</p><p>Available for purchase per month for each endpoint. This retention add-on also extends agentic AI chats and artifacts retention by 31 days.</p> | | Period-Based Retention - Hot Storage (All datasets) | <p>Fully searchable storage for investigation and threat hunting of ingested data, and Cases and Issues data.</p><p>Requires purchasing a minimum of one month of the additional retention.</p> | | Additional Hot Storage (Selected datasets) | <p>Flexible hot storage-based retention to help accommodate varying storage requirements for different retention periods and datasets. Fully searchable storage for investigation and threat hunting of ingested data.</p><p>Available for purchase with storage for a minimum of 1,000 GB.</p> |
-
▸ ▾ Data storage lifecycle modified +7 −3
xsiam/learn-about-cortex-xsiam/cortex-xsiam-product-licenses/data-storage-lifecycleRead it on the Cortex docs portal ↗ Read it here → This file's diff on GitHub ↗
Before After@@ -1,15 +1,21 @@---description: >-Understand the Cortex XSIAM data storage lifecycle, including hot and coldstorage, retention extensions, and Event Forwarding exports.---# Data storage lifecycle# Data storage lifecycleCortex XSIAM data storage is managed in the Cortex XSIAM Data Layer. You receive data storage based on the amount associated with your licenses, determined by factors such as daily ingestion needs and the number of users. All licenses provide default retention periods, which can be extended for hot and cold storage.Cortex XSIAM data storage is managed in the Cortex XSIAM Data Layer. You receive data storage based on the amount associated with your licenses, determined by factors such as daily ingestion needs and the number of users. All licenses provide default retention periods, which can be extended for hot and cold storage.To determine your requirements, you must understand the differences between the available storage options. The following image shows examples of these differences:To determine your requirements, you must understand the differences between the available storage options. The following image shows examples of these differences:🖼 Dataset_storage_timeline.png🖼 imageData Ingestion PipelineData Ingestion PipelineData enters via a data stream called the Data Ingestion Pipeline, where manipulation, such as normalization, enrichment, and analytics, occurs. Once ready, it is transferred to the following locations based on your licenses:Data enters via a data stream called the Data Ingestion Pipeline, where manipulation, such as normalization, enrichment, and analytics, occurs. Once ready, it is transferred to the following locations based on your licenses:</details></details>@@ -65,12 +71,10 @@ A regular license does not provide default export capabilities.To optimize your data strategy and prevent data loss, consider the following best practices:To optimize your data strategy and prevent data loss, consider the following best practices:• Synchronize license purchases: For your cold storage data to align perfectly with your hot storage data, you must purchase your cold storage license at the same time as your regular Cortex XSIAM license. This ensures the Data Ingestion Pipeline begins feeding both streams simultaneously from day one.• Synchronize license purchases: For your cold storage data to align perfectly with your hot storage data, you must purchase your cold storage license at the same time as your regular Cortex XSIAM license. This ensures the Data Ingestion Pipeline begins feeding both streams simultaneously from day one.• Manage retention proactively: To ensure no data is lost and that extensions can be retroactively applied to your hot and cold datasets, always make changes to your data retention licenses while the current license is still active. If a license expires or the data retention period passes, the data is purged and cannot be recovered or extended retroactively.• Manage retention proactively: To ensure no data is lost and that extensions can be retroactively applied to your hot and cold datasets, always make changes to your data retention licenses while the current license is still active. If a license expires or the data retention period passes, the data is purged and cannot be recovered or extended retroactively.</details></details>hint infohint info### TipYou can view details about your Cortex XSIAM licenses by selecting Settings → Cortex XSIAM License.You can view details about your Cortex XSIAM licenses by selecting Settings → Cortex XSIAM License.endhintendhintShow markdown source
@@ -1,15 +1,21 @@ +--- +description: >- + Understand the Cortex XSIAM data storage lifecycle, including hot and cold + storage, retention extensions, and Event Forwarding exports. +--- + # Data storage lifecycle Cortex XSIAM data storage is managed in the Cortex XSIAM Data Layer. You receive data storage based on the amount associated with your licenses, determined by factors such as daily ingestion needs and the number of users. All licenses provide default retention periods, which can be extended for hot and cold storage. To determine your requirements, you must understand the differences between the available storage options. The following image shows examples of these differences: -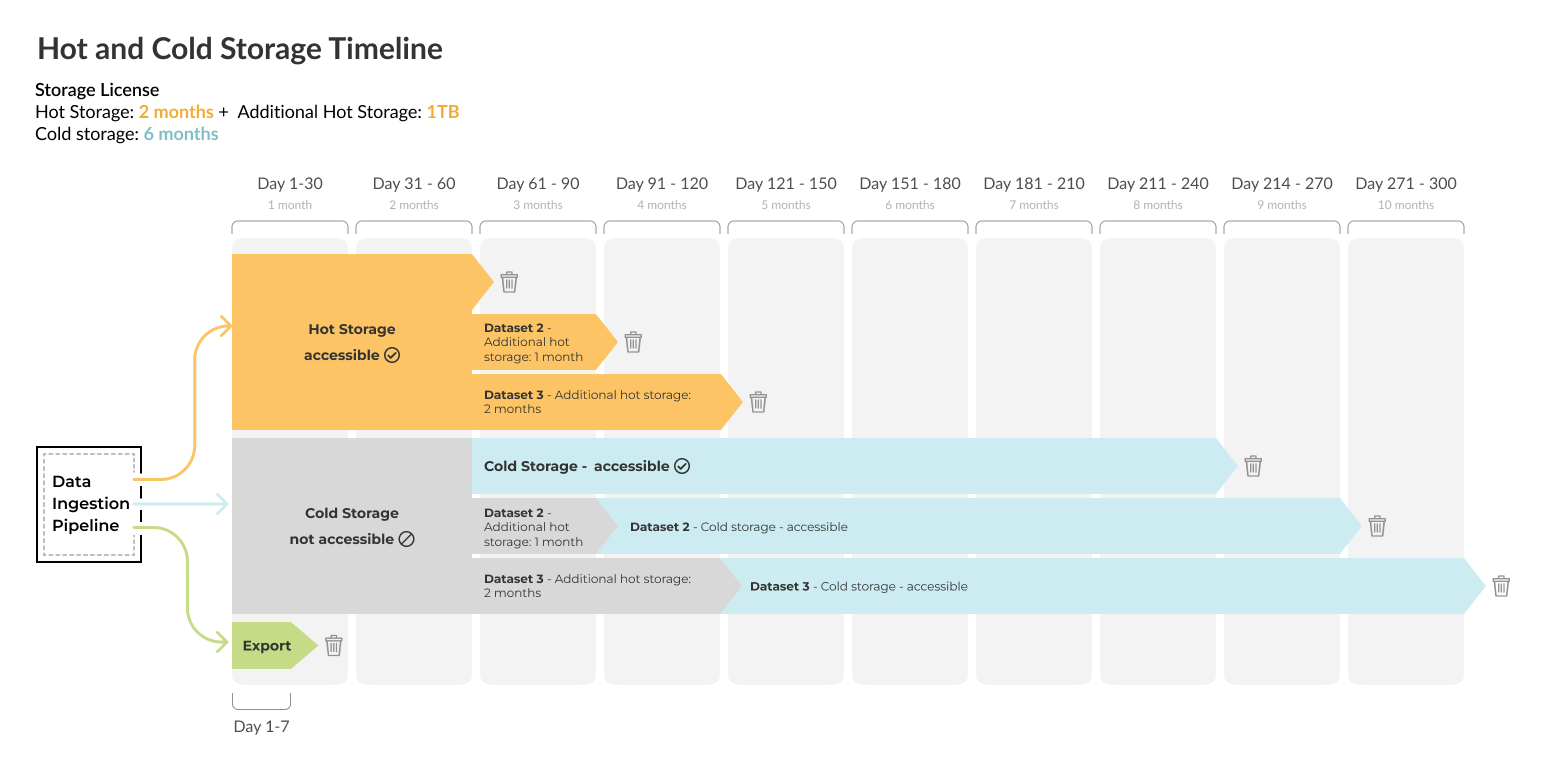 + <details> <summary>Data Ingestion Pipeline</summary> Data enters via a data stream called the Data Ingestion Pipeline, where manipulation, such as normalization, enrichment, and analytics, occurs. Once ready, it is transferred to the following locations based on your licenses: </details> @@ -65,12 +71,10 @@ A regular license does not provide default export capabilities. To optimize your data strategy and prevent data loss, consider the following best practices: * **Synchronize license purchases**: For your cold storage data to align perfectly with your hot storage data, you must purchase your cold storage license at the same time as your regular Cortex XSIAM license. This ensures the Data Ingestion Pipeline begins feeding both streams simultaneously from day one. * **Manage retention proactively**: To ensure no data is lost and that extensions can be retroactively applied to your hot and cold datasets, always make changes to your data retention licenses while the current license is still active. If a license expires or the data retention period passes, the data is purged and cannot be recovered or extended retroactively. </details> {% hint style="info" %} -### Tip - You can view details about your Cortex XSIAM licenses by selecting **Settings** → **Cortex XSIAM License**. {% endhint %} -
▸ ▾ License allocation modified +3 −7
xsiam/learn-about-cortex-xsiam/cortex-xsiam-product-licenses/license-allocationRead it on the Cortex docs portal ↗ Read it here → This file's diff on GitHub ↗
Before After@@ -1,51 +1,47 @@------description: Learn more about how Cortex XSIAM regulates licenses.description: Learn more about how Cortex XSIAM regulates licenses.------# License allocation# License allocationEnforcement of licenses### Enforcement of licensesCortex XSIAM Enterprise and Premium licenses include Cortex XDR agents with Host Insights (HI) and Extended Threat Hunting (XTH) capabilities. When you buy additional agents, these capabilities are automatically extended to the new agents. For Cortex XSIAM NG SIEM, this license does not include agents or HI/XTH capabilities by default. If you buy agents for this tier, you must also buy the HI and XTH add-ons for them.Cortex XSIAM Enterprise and Premium licenses include Cortex XDR agents with Host Insights (HI) and Extended Threat Hunting (XTH) capabilities. When you buy additional agents, these capabilities are automatically extended to new agents. For Cortex XSIAM NG SIEM, this license does not include agents or HI/XTH capabilities by default. If you buy agents for this tier, you must also buy the HI and XTH add-ons for them.In Cortex XSIAM, the Cortex XDR agent protects all your enterprise assets, from user devices to cloud servers. For licensing purposes, these assets are categorized as follows:In Cortex XSIAM, the Cortex XDR agent protects all your enterprise assets, from user devices to cloud servers. For licensing purposes, these assets are categorized as follows:• Endpoints• EndpointsAn endpoint is any physical or virtual device, such as a PC, laptop, or server, protected by an installed Cortex XDR agent. Licensing is calculated on a 1:1 basis, meaning one active device consumes one license.An endpoint is any physical or virtual device, such as a PC, laptop, or server, protected by an installed Cortex XDR agent. Licensing is calculated on a 1:1 basis, meaning one active device consumes one license.• Workloads• WorkloadsA workload represents a compute resource, such as a VM, container, or serverless function in a public cloud. These resources can be secured by agent-based protection (Cortex XDR agent) or agentless methods. Both Cloud Runtime Security and Cloud Posture Security are included in Cortex XSIAM Premium. License consumption is determined by the protection you deploy.A workload represents a compute resource, such as a VM, container, or serverless function in a public cloud. These resources can be secured by agent-based protection (Cortex XDR agent) or agentless methods. Both Cloud Runtime Security and Cloud Posture Security are included in Cortex XSIAM Premium. License consumption is determined by the protection you deploy.When all XDR endpoint and workload licenses are consumed, Cortex XSIAM maintains basic endpoint protection on affected assets. Advanced pro-level detection and response capabilities are not applied. If you exceed workloads or endpoints, XSIAM does not “borrow” from unused endpoints or workloads.When all XDR endpoint and workload licenses are consumed, Cortex XSIAM maintains basic endpoint protection on affected assets. Advanced pro-level detection and response capabilities are not applied. If you exceed workloads or endpoints, XSIAM does not “borrow” from unused endpoints or workloads.When you exceed the permitted number of Cortex XDR endpoints and workloads, Cortex XSIAM displays a notification in the notification area. Cortex XSIAM permits a small grace period over the permitted number, but begins enforcing the number of agents after 14 days. If additional Cortex XDR agents are required, increase your Cortex XDR endpoint/workload license capacity.When you exceed the permitted number of Cortex XDR endpoints and workloads, Cortex XSIAM displays a notification in the notification area. Cortex XSIAM permits a small grace period over the permitted number, but begins enforcing the number of agents after 14 days. If additional Cortex XDR agents are required, increase your Cortex XDR endpoint/workload license capacity.hint infohint info### NoteFor Cortex XSIAM Enterprise Plus licenses, if an endpoint requires a Cortex XDR per Endpoint license, and you’ve exceeded the number of available Cortex XDR per Endpoint licenses, one of your surplus Cloud per Host licenses is automatically consumed as a Cortex XDR per Endpoint license for the endpoint. After utilizing all available XDR per Endpoint and Cloud per Host licenses, Cortex XSIAM maintains basic endpoint protection on affected assets. Advanced pro-level detection and response capabilities are not applied.For Cortex XSIAM Enterprise Plus licenses, if an endpoint requires a Cortex XDR per Endpoint license, and you’ve exceeded the number of available Cortex XDR per Endpoint licenses, one of your surplus Cloud per Host licenses is automatically consumed as a Cortex XDR per Endpoint license for the endpoint. After utilizing all available XDR per Endpoint and Cloud per Host licenses, Cortex XSIAM maintains basic endpoint protection on affected assets. Advanced pro-level detection and response capabilities are not applied.endhintendhintWhen the number of Cloud Posture Workloads exceeds the limit for Cortex XSIAM Premium or any Cortex XSIAM license with the Cloud Posture Security and Cloud Runtime Security add-ons, the excess posture workloads will use available credits from the Cloud Runtime Workloads quota until it is fully used. Spillover occurs only from posture to runtime workloads and does not occur in the reverse direction. Any excess workload usage is displayed as a notification in the notification area.When the number of Cloud Posture Workloads exceeds the limit for Cortex XSIAM Premium or any Cortex XSIAM license with the Cloud Posture Security and Cloud Runtime Security add-ons, the excess posture workloads will use available credits from the Cloud Runtime Workloads quota until it is fully used. Spillover occurs only from posture to runtime workloads and does not occur in the reverse direction. Any excess workload usage is displayed as a notification in the notification area.License revocation### License revocationCortex XSIAM manages licensing for all assets, including user devices, servers, and cloud workloads, which are protected by the Cortex XDR Agent. Each time you install a new Cortex XDR Agent, it registers with Cortex XSIAM to obtain a license from the appropriate pool (either for user endpoints or workloads). For non-persistent VDI (virtual machines that are reset or destroyed after use), the agent registers as soon as a user logs in to the asset.Cortex XSIAM manages licensing for all assets, including user devices, servers, and cloud workloads, which are protected by the Cortex XDR Agent. Each time you install a new Cortex XDR Agent, it registers with Cortex XSIAM to obtain a license from the appropriate pool (either for user endpoints or workloads). For non-persistent VDI (virtual machines that are reset or destroyed after use), the agent registers as soon as a user logs in to the asset.Cortex XSIAM issues licenses until you exhaust the number of licenses available, and enforces a cleanup policy that automatically returns unused licenses to the available pool. The time at which a license returns to the license pool depends on the type of endpoint (or workload):Cortex XSIAM issues licenses until you exhaust the number of licenses available, and enforces a cleanup policy that automatically returns unused licenses to the available pool. The time at which a license returns to the license pool depends on the type of endpoint (or workload):Asset Type│License Return│Agent Removal from Cortex XSIAM Tenant│Agent Removal from Cortex XSIAM DatabaseAsset Type│License Return│Agent Removal from Cortex XSIAM Tenant│Agent Removal from Cortex XSIAM Database| ---------------------------------------------------------- | -------------------------------------------------------------------------------- | -------------------------------------- | ---------------------------------------- || ---------------------------------------------------------- | -------------------------------------------------------------------------------- | -------------------------------------- | ---------------------------------------- |Standard endpoints, mobile devices, server/cloud workloads│After 30 days│After 180 days│After 180 daysStandard endpoints, mobile devices, server/cloud workloads│After 30 days│After 180 days│After 180 days(Non-Persistent) VDI and Temporary Session│- VDI: Immediately after log-off
- Other: After 90 minutes
(Non-Persistent) VDI and Temporary Session│- VDI: Immediately after log-off
- Other: After 90 minutes
After a license is revoked, if the agent connects to Cortex XSIAM, reconnection will succeed as long as the agent has not been deleted from the database; otherwise, the agent is registered as a new asset.After a license is revoked, if the agent connects to Cortex XSIAM, reconnection will succeed as long as the agent has not been deleted from the database; otherwise, the agent is registered as a new asset.If an agent from a deleted asset tries to connect to Cortex XSIAM within the 180-day period (for standard endpoints and workloads), it can resume its connection and maintain its original agent ID. After 180 days, the agent ID and all associated data are permanently deleted from the database. To reconnect an agent after this period, you must use Cytool to reconnect or reinstall the agent on the asset, which will then be assigned a new agent ID and start fresh.If an agent from a deleted asset tries to connect to Cortex XSIAM within the 180-day period (for standard endpoints and workloads), it can resume its connection and maintain its original agent ID. After 180 days, the agent ID and all associated data are permanently deleted from the database. To reconnect an agent after this period, you must use Cytool to reconnect or reinstall the agent on the asset, which will then be assigned a new agent ID and start fresh.hint infohint info### NoteIt can take up to an hour for Cortex XSIAM to display revived assets.It can take up to an hour for Cortex XSIAM to display revived assets.endhintendhintShow markdown source
@@ -1,51 +1,47 @@ --- description: Learn more about how Cortex XSIAM regulates licenses. --- # License allocation -**Enforcement of licenses** +### **Enforcement of licenses** -Cortex XSIAM Enterprise and Premium licenses include Cortex XDR agents with Host Insights (HI) and Extended Threat Hunting (XTH) capabilities. When you buy additional agents, these capabilities are automatically extended to the new agents. For Cortex XSIAM NG SIEM, this license does not include agents or HI/XTH capabilities by default. If you buy agents for this tier, you must also buy the HI and XTH add-ons for them. +Cortex XSIAM Enterprise and Premium licenses include Cortex XDR agents with Host Insights (HI) and Extended Threat Hunting (XTH) capabilities. When you buy additional agents, these capabilities are automatically extended to new agents. For Cortex XSIAM NG SIEM, this license does not include agents or HI/XTH capabilities by default. If you buy agents for this tier, you must also buy the HI and XTH add-ons for them. In Cortex XSIAM, the Cortex XDR agent protects all your enterprise assets, from user devices to cloud servers. For licensing purposes, these assets are categorized as follows: * Endpoints An endpoint is any physical or virtual device, such as a PC, laptop, or server, protected by an installed Cortex XDR agent. Licensing is calculated on a 1:1 basis, meaning one active device consumes one license. * Workloads A workload represents a compute resource, such as a VM, container, or serverless function in a public cloud. These resources can be secured by agent-based protection (Cortex XDR agent) or agentless methods. Both Cloud Runtime Security and Cloud Posture Security are included in Cortex XSIAM Premium. License consumption is determined by the protection you deploy. When all XDR endpoint and workload licenses are consumed, Cortex XSIAM maintains basic endpoint protection on affected assets. Advanced pro-level detection and response capabilities are not applied. If you exceed workloads or endpoints, XSIAM does not “borrow” from unused endpoints or workloads. When you exceed the permitted number of Cortex XDR endpoints and workloads, Cortex XSIAM displays a notification in the notification area. Cortex XSIAM permits a small grace period over the permitted number, but begins enforcing the number of agents after 14 days. If additional Cortex XDR agents are required, increase your Cortex XDR endpoint/workload license capacity. {% hint style="info" %} -### Note - For Cortex XSIAM Enterprise Plus licenses, if an endpoint requires a Cortex XDR per Endpoint license, and you’ve exceeded the number of available Cortex XDR per Endpoint licenses, one of your surplus Cloud per Host licenses is automatically consumed as a Cortex XDR per Endpoint license for the endpoint. After utilizing all available XDR per Endpoint and Cloud per Host licenses, Cortex XSIAM maintains basic endpoint protection on affected assets. Advanced pro-level detection and response capabilities are not applied. {% endhint %} When the number of **Cloud Posture Workloads** exceeds the limit for **Cortex XSIAM Premium** or any **Cortex XSIAM license** with the Cloud Posture Security and Cloud Runtime Security add-ons, the excess posture workloads will use available credits from the **Cloud Runtime Workloads** quota until it is fully used. Spillover occurs only from posture to runtime workloads and does not occur in the reverse direction. Any excess workload usage is displayed as a notification in the notification area. -**License revocation** +### **License revocation** Cortex XSIAM manages licensing for all assets, including user devices, servers, and cloud workloads, which are protected by the Cortex XDR Agent. Each time you install a new Cortex XDR Agent, it registers with Cortex XSIAM to obtain a license from the appropriate pool (either for user endpoints or workloads). For non-persistent VDI (virtual machines that are reset or destroyed after use), the agent registers as soon as a user logs in to the asset. Cortex XSIAM issues licenses until you exhaust the number of licenses available, and enforces a cleanup policy that automatically returns unused licenses to the available pool. The time at which a license returns to the license pool depends on the type of endpoint (or workload): | Asset Type | License Return | Agent Removal from Cortex XSIAM Tenant | Agent Removal from Cortex XSIAM Database | | ---------------------------------------------------------- | -------------------------------------------------------------------------------- | -------------------------------------- | ---------------------------------------- | | Standard endpoints, mobile devices, server/cloud workloads | After 30 days | After 180 days | After 180 days | | (Non-Persistent) VDI and Temporary Session | <ul><li>VDI: Immediately after log-off</li><li>Other: After 90 minutes</li></ul> | After 6 hours | After 7 days | After a license is revoked, if the agent connects to Cortex XSIAM, reconnection will succeed as long as the agent has not been deleted from the database; otherwise, the agent is registered as a new asset. If an agent from a deleted asset tries to connect to Cortex XSIAM within the 180-day period (for standard endpoints and workloads), it can resume its connection and maintain its original agent ID. After 180 days, the agent ID and all associated data are permanently deleted from the database. To reconnect an agent after this period, you must use Cytool to reconnect or reinstall the agent on the asset, which will then be assigned a new agent ID and start fresh. {% hint style="info" %} -### Note - It can take up to an hour for Cortex XSIAM to display revived assets. {% endhint %} -
▸ ▾ In-product support ticket creation modified +38 −15 The six-step support ticket procedure is converted to a stepper, with each embedded note becoming its own hint callout.
xsiam/learn-about-cortex-xsiam/in-product-support-case-creationRead it on the Cortex docs portal ↗ Read it here → This file's diff on GitHub ↗
Before After@@ -4,35 +4,58 @@ description: >-capture your issues and have the ticket handled efficiently.capture your issues and have the ticket handled efficiently.------# In-product support ticket creation# In-product support ticket creationTo simplify the process of creating a support ticket, you can open a support ticket directly in Cortex XSIAM. Opening the ticket in Cortex XSIAM allows all of the relevant context to be included, such as the option to record the console and upload relevant logs. When relevant, Cortex XSIAM will create and send the agent tech support file (TSF) for the endpoint you select. All relevant data about your tenant is logged and included in the support ticket, including license details. Using the Submit Support Ticket wizard makes it easier for you to include all of the necessary details and log files while first submitting your support ticket, thereby enabling the support team to solve it more quickly and easily.To simplify the process of creating a support ticket, you can open a support ticket directly in Cortex XSIAM. Opening the ticket in Cortex XSIAM allows all of the relevant context to be included, such as the option to record the console and upload relevant logs. When relevant, Cortex XSIAM will create and send the agent tech support file (TSF) for the endpoint you select. All relevant data about your tenant is logged and included in the support ticket, including license details. Using the Submit Support Ticket wizard makes it easier for you to include all of the necessary details and log files while first submitting your support ticket, thereby enabling the support team to solve it more quickly and easily.hint infohint info### TIPIf you have the Cortex Agentic Assistant enabled, when you click Help, you have two options: Documentation Portal and Initiate Support Request. If you select Initiate Support Request, the Help Center agent opens to assist with finding relevant documentation, troubleshooting, and creating a support ticket. After your first prompt to the Help Center agent, you can click Submit support ticket above the chat. If you click Submit Support Ticket, you are brought directly to the Submit Support Ticket wizard.If you have the Cortex Agentic Assistant enabled, when you click Help, you have two options: Documentation Portal and Initiate Support Request. If you select Initiate Support Request, the Help Center agent opens to provides assistance with finding relevant documentation, troubleshooting, and creating a support ticket. After your first prompt to the Help Center agent, you can click Submit support ticket from above the chat. If you click Submit Support Ticket, you are brought directly to the Submit Support Ticket wizard.If you do not have the Cortex Agentic Assistant enabled, when you click Help, you have two options: Documentation Portal and Initiate Support Request. If you select Initiate Support Request, you are brought directly to the Submit Support Ticket wizard.If you do not have the Cortex Agentic Assistant enabled, when you click Help, you have two options: Documentation Portal and Initiate Support Request. If you select Initiate Support Request, you are brought directly to the Submit Support Ticket wizard.endhintendhintTo use the embedded support ticket feature, you must have a user account in the Customer Support Portal, and your Cortex XSIAM user must be granted the Help permission in Cortex Gateway.To use the embedded support ticket feature, you must have a user account in the Customer Support Portal, and your Cortex XSIAM user must be granted the Help permission in Cortex Gateway.1. From Cortex XSIAM, select Help → Initiate Support Request.stepper2. In the Submit Support Ticket wizard, enter the requested ticket information. Be precise when indicating the impact of the issue. When an issue is critical, you will be asked to input the most critical information so that support can understand the issue and start addressing it immediately.stepFrom Cortex XSIAM, select Help → Initiate Support Request.endstepstepIn the Submit Support Ticket wizard, enter the requested ticket information. Be precise when indicating the impact of the issue. When an issue is critical, you will be asked to input the most critical information so that support can understand the issue and start addressing it immediately.hint infoWhen opening a support ticket through the Customer Support Portal, you need to manually select Cortex XSIAM as the product. While there may be discrepancies between the categories in this wizard and the Customer Support Portal process, that's because this wizard is designed specifically to focus on options relevant to Cortex XSIAM.endhintendstepstepWhen the issue you are opening a support ticket for is related to the agent, you can select the relevant endpoint. If you select the endpoint, Cortex XSIAM will create and send the TSF for the agent you selected, when possible.<div data-gb-custom-block data-tag="hint" data-style="info" class="hint hint-info"><h3>Note</h3><p>When opening a support ticket through the Customer Support Portal, you need to manually select Cortex XSIAM as the product. While there may be discrepancies between the categories in this wizard and the Customer Support Portal process, that's because this wizard is designed specifically to focus on options relevant to Cortex XSIAM.</p></div>hint info3. When the issue you are opening a support ticket for is related to the agent, you can select the relevant endpoint. If you select the endpoint, Cortex XSIAM will create and send the TSF for the agent you selected, when possible.Selecting an endpoint from the endpoint table and retrieving TSF requires full Retrieve Endpoint Data permissions under Endpoint Administration.endhintendstepstepTo provide more context for your support ticket, you can record the Cortex XSIAM console directly from the support ticket wizard. If you choose to record the console, you can also opt to have the HAR file generated and sent to further assist support in solving the ticket. To record the console, select Record Console. To submit your support ticket without recording the console, select Skip.endstep<div data-gb-custom-block data-tag="hint" data-style="info" class="hint hint-info"><h3>Note</h3><p>Selecting an endpoint from the endpoint table and retrieving TSF requires full <strong>Retrieve Endpoint Data</strong> permissions under <strong>Endpoint Administration</strong>.</p></div>step4. To provide more context for your support ticket, you can record the Cortex XSIAM console directly from the support ticket wizard. If you choose to record the console, you can also opt to have the HAR file generated and sent to further assist support in solving the ticket. To record the console, select Record Console. To submit your support ticket without recording the console, select Skip.If you choose to record the console, your browser may prompt you for permission for Cortex XSIAM to see the contents of the tab. To allow recording, select Allow. You can now recreate the issue in your Cortex XSIAM environment, and all of your actions are recorded. The console recording and HAR file generation only take place within the context of the browser tab that Cortex XSIAM is running in. When you are ready to stop recording, select Stop Sharing.5. If you choose to record the console, your browser may prompt you for permission for Cortex XSIAM to see the contents of the tab. To allow recording, select Allow. You can now recreate the issue in your Cortex XSIAM environment and all of your actions are recorded. The console recording and HAR file generation only take place within the context of the browser tab that Cortex XSIAM is running in. When you are ready to stop recording, select Stop Sharing.If you wish to recreate the recording, you must first delete the existing console recording by clicking the **x** symbol next to the **Console Recording**. Then select **Record Console**.If you wish to recreate the recording, you must first delete the existing console recording by clicking the x symbol next to the Console Recording. Then select Record Console.hint infoConsole recordings cannot exceed 10 minutes. The current recording time is displayed at the top of the window.endhintendstep<div data-gb-custom-block data-tag="hint" data-style="info" class="hint hint-info"><h3>Note</h3><p>Console recordings cannot exceed 10 minutes. The current recording time is displayed at the top of the window.</p></div>step6. To submit the support ticket, click Submit Support Ticket.To submit the support ticket, click Submit Support Ticket.While the ticket attachments are uploading, do not refresh or navigate away from Cortex XSIAM until you get a notification in the Notification Center that uploading is complete. In the meantime, you can close this wizard and continue working in Cortex XSIAM.While the ticket attachments are uploading, do not refresh or navigate away from Cortex XSIAM until you get a notification in the Notification Center that uploading is complete. In the meantime, you can close this wizard and continue working in Cortex XSIAM.Once the support ticket is created successfully, the support ticket number is displayed and you will receive an email notification from Palo Alto Networks Support. You can manage the support ticket and monitor its progress in the Customer Support Portal.Once the support ticket is created successfully, the support ticket number is displayed, and you will receive an email notification from Palo Alto Networks Support. You can manage the support ticket and monitor its progress in the Customer Support Portal.endstependstepperShow markdown source
@@ -4,35 +4,58 @@ description: >- capture your issues and have the ticket handled efficiently. --- # In-product support ticket creation To simplify the process of creating a support ticket, you can open a support ticket directly in Cortex XSIAM. Opening the ticket in Cortex XSIAM allows all of the relevant context to be included, such as the option to record the console and upload relevant logs. When relevant, Cortex XSIAM will create and send the agent tech support file (TSF) for the endpoint you select. All relevant data about your tenant is logged and included in the support ticket, including license details. Using the **Submit Support Ticket** wizard makes it easier for you to include all of the necessary details and log files while first submitting your support ticket, thereby enabling the support team to solve it more quickly and easily. {% hint style="info" %} -### TIP - -If you have the Cortex Agentic Assistant enabled, when you click **Help**, you have two options: **Documentation Portal** and **Initiate Support Request**. If you select **Initiate Support Request,** the **Help Center** agent opens to provides assistance with finding relevant documentation, troubleshooting, and creating a support ticket. After your first prompt to the **Help Center** agent, you can click **Submit support ticket** from above the chat. If you click **Submit Support Ticket**, you are brought directly to the **Submit Support Ticket** wizard. +If you have the Cortex Agentic Assistant enabled, when you click **Help**, you have two options: **Documentation Portal** and **Initiate Support Request**. If you select **Initiate Support Request,** the **Help Center** agent opens to assist with finding relevant documentation, troubleshooting, and creating a support ticket. After your first prompt to the **Help Center** agent, you can click **Submit support ticket** above the chat. If you click **Submit Support Ticket**, you are brought directly to the **Submit Support Ticket** wizard. If you do not have the Cortex Agentic Assistant enabled, when you click **Help**, you have two options: **Documentation Portal** and **Initiate Support Request**. If you select **Initiate Support Request,** you are brought directly to the **Submit Support Ticket** wizard. {% endhint %} To use the embedded support ticket feature, you must have a user account in the Customer Support Portal, and your Cortex XSIAM user must be granted the **Help** permission in Cortex Gateway. -1. From Cortex XSIAM, select **Help** → **Initiate Support Request**. -2. In the **Submit Support Ticket** wizard, enter the requested ticket information. Be precise when indicating the impact of the issue. When an issue is critical, you will be asked to input the most critical information so that support can understand the issue and start addressing it immediately. +{% stepper %} +{% step %} +From Cortex XSIAM, select **Help** → **Initiate Support Request**. +{% endstep %} + +{% step %} +In the **Submit Support Ticket** wizard, enter the requested ticket information. Be precise when indicating the impact of the issue. When an issue is critical, you will be asked to input the most critical information so that support can understand the issue and start addressing it immediately. + +{% hint style="info" %} +When opening a support ticket through the Customer Support Portal, you need to manually select Cortex XSIAM as the product. While there may be discrepancies between the categories in this wizard and the Customer Support Portal process, that's because this wizard is designed specifically to focus on options relevant to Cortex XSIAM. +{% endhint %} +{% endstep %} + +{% step %} +When the issue you are opening a support ticket for is related to the agent, you can select the relevant endpoint. If you select the endpoint, Cortex XSIAM will create and send the TSF for the agent you selected, when possible. - <div data-gb-custom-block data-tag="hint" data-style="info" class="hint hint-info"><h3>Note</h3><p>When opening a support ticket through the Customer Support Portal, you need to manually select Cortex XSIAM as the product. While there may be discrepancies between the categories in this wizard and the Customer Support Portal process, that's because this wizard is designed specifically to focus on options relevant to Cortex XSIAM.</p></div> -3. When the issue you are opening a support ticket for is related to the agent, you can select the relevant endpoint. If you select the endpoint, Cortex XSIAM will create and send the TSF for the agent you selected, when possible. +{% hint style="info" %} +Selecting an endpoint from the endpoint table and retrieving TSF requires full **Retrieve Endpoint Data** permissions under **Endpoint Administration**. +{% endhint %} +{% endstep %} + +{% step %} +To provide more context for your support ticket, you can record the Cortex XSIAM console directly from the support ticket wizard. If you choose to record the console, you can also opt to have the HAR file generated and sent to further assist support in solving the ticket. To record the console, select **Record Console**. To submit your support ticket without recording the console, select **Skip**. +{% endstep %} - <div data-gb-custom-block data-tag="hint" data-style="info" class="hint hint-info"><h3>Note</h3><p>Selecting an endpoint from the endpoint table and retrieving TSF requires full <strong>Retrieve Endpoint Data</strong> permissions under <strong>Endpoint Administration</strong>.</p></div> -4. To provide more context for your support ticket, you can record the Cortex XSIAM console directly from the support ticket wizard. If you choose to record the console, you can also opt to have the HAR file generated and sent to further assist support in solving the ticket. To record the console, select **Record Console**. To submit your support ticket without recording the console, select **Skip**. -5. If you choose to record the console, your browser may prompt you for permission for Cortex XSIAM to see the contents of the tab. To allow recording, select **Allow**. You can now recreate the issue in your Cortex XSIAM environment and all of your actions are recorded. The console recording and HAR file generation only take place within the context of the browser tab that Cortex XSIAM is running in. When you are ready to stop recording, select **Stop Sharing**. +{% step %} +If you choose to record the console, your browser may prompt you for permission for Cortex XSIAM to see the contents of the tab. To allow recording, select **Allow**. You can now recreate the issue in your Cortex XSIAM environment, and all of your actions are recorded. The console recording and HAR file generation only take place within the context of the browser tab that Cortex XSIAM is running in. When you are ready to stop recording, select **Stop Sharing**. - If you wish to recreate the recording, you must first delete the existing console recording by clicking the **x** symbol next to the **Console Recording**. Then select **Record Console**. +If you wish to recreate the recording, you must first delete the existing console recording by clicking the **x** symbol next to the **Console Recording**. Then select **Record Console**. + +{% hint style="info" %} +Console recordings cannot exceed 10 minutes. The current recording time is displayed at the top of the window. +{% endhint %} +{% endstep %} - <div data-gb-custom-block data-tag="hint" data-style="info" class="hint hint-info"><h3>Note</h3><p>Console recordings cannot exceed 10 minutes. The current recording time is displayed at the top of the window.</p></div> -6. To submit the support ticket, click **Submit Support Ticket**. +{% step %} +To submit the support ticket, click **Submit Support Ticket**. - While the ticket attachments are uploading, do not refresh or navigate away from Cortex XSIAM until you get a notification in the Notification Center that uploading is complete. In the meantime, you can close this wizard and continue working in Cortex XSIAM. +While the ticket attachments are uploading, do not refresh or navigate away from Cortex XSIAM until you get a notification in the Notification Center that uploading is complete. In the meantime, you can close this wizard and continue working in Cortex XSIAM. - Once the support ticket is created successfully, the support ticket number is displayed and you will receive an email notification from Palo Alto Networks Support. You can manage the support ticket and monitor its progress in the Customer Support Portal. +Once the support ticket is created successfully, the support ticket number is displayed, and you will receive an email notification from Palo Alto Networks Support. You can manage the support ticket and monitor its progress in the Customer Support Portal. +{% endstep %} +{% endstepper %} -
▸ ▾ Manage API keys modified +12 −6
xsiam/learn-about-cortex-xsiam/manage-api-keysRead it on the Cortex docs portal ↗ Read it here → This file's diff on GitHub ↗
Before After@@ -1,36 +1,42 @@---description: >-Learn to create and manage Cortex XSIAM API keys, roles, expiration, scopes,and credential permissions.---# Manage API keys# Manage API keysAPI keys are used to manage and secure API interactions. An API key is essentially a unique string of alphanumeric characters that acts as a credential, allowing a specific user or application to access and interact with a particular API. When you request data or perform an action through an API call, you must include this API key in the header. Cortex XSIAM then verifies the key's authenticity and, if valid, grants the requested access.API keys are used to manage and secure API interactions. An API key is essentially a unique string of alphanumeric characters that acts as a credential, allowing a specific user or application to access and interact with a particular API. When you request data or perform an action through an API call, you must include this API key in the header. Cortex XSIAM then verifies the key's authenticity and, if valid, grants the requested access.How to create an API keyHow to create an API key1. Select Settings → Configurations → Integrations → API Keys → New Key.1. Select Settings → Configurations → Integrations → API Keys → New Key.2. In the Role tab, perform the following:2. In the Role tab, perform the following:1. Under Security Level, select the type of API Key you want to generate: Advanced or Standard. The Advanced API key hashes the key using a nonce, a random string, and a timestamp to prevent replay attacks. cURL does not support this, but it is suitable for scripts.1. Under Security Level, select the type of API Key you want to generate: Advanced or Standard. The Advanced API key hashes the key using a nonce, a random string, and a timestamp to prevent replay attacks. cURL does not support this, but it is suitable for scripts.2. Under Role, select the desired level of access for this key. You can select from predefined roles or custom roles. Roles are available according to what was defined in either the Cortex Gateway or Cortex XSIAM Access Management. You can view the configuration of the role selected by expanding the sections under Components. For more information, see Assign user roles and groups.2. Under Role, select the desired level of access for this key. You can select from predefined roles or custom roles. Roles are available according to what was defined in either the Cortex Gateway or Cortex XSIAM Access Management. You can view the configuration of the role selected by expanding the sections under Components. For more information, see Assign user roles and groups.<div data-gb-custom-block data-tag="hint" data-style="warning" class="hint hint-warning"><h3>Important</h3><p>Ensure the selected role has the appropriate <strong>Credentials</strong> permission. If you select a role where <strong>Credentials</strong> is set to <strong>None</strong>, such as the predefined CLI Role, any API calls made using this key that attempt to fetch, list, create, or modify stored credentials will return a 403 Forbidden error.</p></div><div data-gb-custom-block data-tag="hint" data-style="warning" class="hint hint-warning"><p>Ensure the selected role has the appropriate <strong>Credentials</strong> permission. If you select a role where <strong>Credentials</strong> is set to <strong>None</strong>, such as the predefined CLI Role, any API calls made using this key that attempt to fetch, list, create, or modify stored credentials will return a 403 Forbidden error.</p></div>3. (Optional) Under Comment, provide a comment that describes the purpose of the API key.3. (Optional) Under Comment, provide a comment that describes the purpose of the API key.4. (Optional) If you want to define a time limit on the API key authentication, select Enable Expiration Date, and select the expiration date and time. You can track the expiration date of each API key in the API Keys page. In addition, Cortex XSIAM displays a API Key Expiration notification in the Notification Center one week and one day before the defined expiration date.4. (Optional) If you want to define a time limit on the API key authentication, select Enable Expiration Date, and select the expiration date and time. You can track the expiration date of each API key in the API Keys page. In addition, Cortex XSIAM displays an API Key Expiration notification in the Notification Center one week and one day before the defined expiration date.3. (Optional) To configure and manage granular scoping for Scope-Based Access Control (SBAC), click the Scope tab, and under Scope Definition, expand the scoping areas that you want to grant the user role access to for this API by clicking the chevron icon (>) beside the scoping area title. The following table explains the options available to configure:3. (Optional) To configure and manage granular scoping for Scope-Based Access Control (SBAC), click the Scope tab, and under Scope Definition, expand the scoping areas that you want to grant the user role access to for this API by clicking the chevron icon (>) beside the scoping area title. The following table explains the options available to configure:<div data-gb-custom-block data-tag="hint" data-style="warning" class="hint hint-warning"><h3>Important</h3><p>Before configuring, ensure that you review <strong>Understand scoping</strong> in the <a href="../onboard-cortex-xsiam/post-deployment/manage-user-roles-and-access-management/manage-user-scope">Manage user scope</a> section.</p></div><div data-gb-custom-block data-tag="hint" data-style="warning" class="hint hint-warning"><p>Before configuring, ensure you review <strong>Understand scoping</strong> in the <a href="../onboard-cortex-xsiam/post-deployment/manage-user-roles-and-access-management/manage-user-scope">Manage user scope</a> section.</p></div><table><thead><tr><th width="194">Scoping Area</th><th>Granular Scoping Configurations</th></tr></thead><tbody><tr><td>Assets</td><td><p>Set the <strong>Scope</strong> by selecting one of the following:</p><ul><li><strong>No assets</strong>: No asset is accessible.</li><li><strong>All assets</strong>: Defines access to all assets.</li><li><strong>Select asset groups</strong>: Defines access to the specific assets associated with the Asset Groups selected, and to view all their related cases, issues, and findings for these specific assets and Asset Groups. Under <strong>Select asset groups</strong>, define the specific asset groups that you want to grant access. Only Asset Groups relevant for scoping are listed, which are asset groups that are using only the asset attributes listed in <a href="../onboard-cortex-xsiam/post-deployment/manage-user-roles-and-access-management/manage-user-scope">Manage user scope</a> (under <strong>Understand scoping</strong> → <strong>Scoping Areas</strong> → <strong>Assets</strong>).</li></ul><p>The scoping of assets also affects the scoping of cases, issues, and findings.</p><div data-gb-custom-block data-tag="hint" data-style="info" class="hint hint-info"><p><strong>Note</strong></p><p>Visibility of Security domain Issues that refer to assets with agents is controlled by the <strong>Endpoints</strong> scoping configuration.</p></div></td></tr><tr><td>Cases and Issues</td><td><p>Set the <strong>Scope</strong> by selecting one of the following:</p><ul><li><strong>No cases and issues</strong>: Defines access to no cases and issues.</li><li><strong>All cases and issues</strong>: Defines access to all cases and issues. Users can view cases or issues referencing assets within their scope. Use the <strong>Assets</strong> section to define which assets are in scope.</li><li><p><strong>Select domains</strong>: Defines access to the domains selected to view their related cases and issues. Under <strong>Select domains</strong>, define the specific domains that you want to grant access.</p><p>Users can only view cases or issues referencing assets and endpoints within their scope. Use the <strong>Assets</strong> section to define which assets are in scope.</p></li></ul><p>When selecting <strong>All cases and issues</strong> or <strong>Select domains</strong>, you can separately configure access to issues and cases that lack an asset reference or where the referenced asset is not in <strong>All Assets</strong> and <strong>All Endpoints</strong> inventories. To provide access, select the <strong>Allow access to cases and issues that are not referencing known assets or endpoints</strong> checkbox. Once selected, you can specifically control which users have access to issues and cases that lack <strong>Affected Assets</strong> (as seen in the issue’s panel) and <strong>Assets</strong> (as seen in the case's panel), or where the listed assets are not part of the Asset or Endpoint inventories. When the assets listed are not part of the inventories, the asset string is typically non-clickable. In some cases, such as for identity-related issues, assets may open a dedicated <strong>User Risk View</strong>, which differs from the standard inventories panels. In the <strong>Issues</strong> and <strong>Cases</strong> tables, such items can be identified by empty values in the following columns: Asset IDs, Target Agent Identifier, and Source Agent Identifier.</p></td></tr><tr><td>Endpoints</td><td><p>Set the <strong>Scope</strong> by selecting one of the following:</p><ul><li><strong>No endpoints</strong>: Defines access to no endpoints with no ability to view their related agent management and enterprise policies.</li><li><strong>All endpoints</strong>: Defines access to all endpoints with the ability to view their related agent management and enterprise policies. This configuration can impact the visibility of related <strong>Security</strong> domain <strong>Cases and Issues</strong>, but will not affect asset visibility.</li><li><strong>Select specific (at least one required)</strong>: Defines specific access to all endpoint groups by selecting <strong>Endpoint Groups</strong> or all endpoint tags by selecting <strong>Endpoint Tags</strong> to view their related agent management and enterprise policies. This configuration can impact the visibility of related <strong>Security</strong> domain <strong>Cases and Issues</strong>, but will not affect asset visibility.</li></ul></td></tr><tr><td>Datasets Rows</td><td><p>Configure a <code>filter</code> to define the specific subset of rows a user is allowed to access in each raw dataset. A raw dataset is every dataset where Palo Alto Networks data is ingested out-of-the-box or third-party data is ingested using a configured dedicated collector, also called a data source. This filter configuration does not impact the visibility of cases and issues.<br></p><p>Follow these steps to configure a <code>filter</code>:</p><p>1. For datasets where no <code>filter</code> is defined, determine how to set the When no filter is defined option as either:</p><ul><li><strong>No rows are accessible</strong> (default): Without a configured <code>filter</code>, no rows are accessible. Users can query the datasets in Cortex Query Language (XQL) as they have access, but the results will be empty.</li><li><strong>All rows are accessible</strong>: Without a configured <code>filter</code>, all rows are accessible. Users can query the datasets in Cortex Query Language (XQL) as they have access, and view all results.</li></ul><div data-gb-custom-block data-tag="hint" data-style="info" class="hint hint-info"><p><strong>Note</strong></p><p>When defining a filter for row-level scoping on raw datasets, queries based on the Cortex Data Model (XDM) are not supported. XDM queries return specific rows only when <strong>All rows are accessible</strong> is selected and no filter is defined in the <strong>Datasets Rows</strong> scoping area. Otherwise, no rows are returned.</p></div><p>2. Define any filters for the applicable datasets listed in the table:</p><ol><li>Scroll down the list of datasets to the dataset you want to apply a <code>filter</code> on, and click the <strong>Edit Scope</strong> icon.</li><li><p>In the <strong>Define what rows are accessible</strong> window, continue to write the query for the <code>filter</code> in the query box (where the syntax is a limited subset of XQL) to limit the data rows for the selected dataset according to the access permissions you want the user to have. The beginning of the query is already defined before the query box, and there is no need to include this in your query.<br><br><strong>Important</strong></p><p>For optimal performance, we recommend using a single field in the <code>filter</code> definition and simple comparison operators.<br></p><p><strong>Supported syntax:</strong></p><p><strong>Fields</strong></p><p>You can define the rest of the <code>filter</code> in the query box, where only the following system fields are supported: <code>_broker_device_id</code>, <code>_broker_device_ip</code>, <code>_broker_device_name</code>, <code>_collector_id</code>, <code>_collector_ip</code>, <code>_collector_name</code>, <code>_collector_type</code>, <code>_device_id</code>, <code>_final_reporting_device_ip</code>, <code>_final_reporting_device_name</code>, <code>_log_type</code>, <code>_product</code>, <code>_scope</code>, <code>_reporting_device_ip</code>, <code>_reporting_device_name</code>, and <code>_vendor</code>.</p><p>For more information on these fields, see the table that describes all the fields in the <code>metrics_source</code> dataset and <code>metrics_view</code> preset in <a href="../configure-cortex-xsiam/cortex-xsiam-data-sources/administration-and-troubleshooting/overview-of-data-ingestion-metrics">Overview of data ingestion metrics</a>. For more information on the <code>_scope</code> field (relevant when <code>_scope</code> is defined in the Parsing Rule), see <a href="../../onboard-cortex-xsiam/post-deployment/manage-user-roles-and-access-management/manage-user-scope#scenarios-related-to-datasets-rows-scoping">Scenario 3: Supported fields don't provide the necessary segmentation</a>.</p><p><strong>Comparison operators</strong></p><p>The following comparison operators are supported:</p><ul><li>Exact matches (<code>=</code>, <code>!=</code>)</li><li>Comparing numerical values (<code>></code>, <code><</code>, <code>>=</code>, <code><=</code>)</li><li>Checking membership in lists (<code>in</code>)</li><li>Querying arrays (<code>array_contains</code>)</li><li>Partial matches (<code>contains</code>, <code>starts_with</code>): Using this operator has additional performance overhead, and we recommend avoiding its use.</li></ul><p><strong>Example</strong></p><p>If you only want a user to be able to access rows in the <code>pan_dds_raw</code> dataset, when the <code>_collector_name</code> is <code>bu2_collector</code> , you'd have to define the <code>filter</code> in the query box as:</p><pre><code>_collector_name = “bu2_collector”<table><thead><tr><th width="194">Scoping Area</th><th>Granular Scoping Configurations</th></tr></thead><tbody><tr><td>Assets</td><td><p>Set the <strong>Scope</strong> by selecting one of the following:</p><ul><li><strong>No assets</strong>: No asset is accessible.</li><li><strong>All assets</strong>: Defines access to all assets.</li><li><strong>Select asset groups</strong>: Defines access to the specific assets associated with the Asset Groups selected, and to view all their related cases, issues, and findings for these specific assets and Asset Groups. Under <strong>Select asset groups</strong>, define the specific asset groups that you want to grant access. Only Asset Groups relevant for scoping are listed, which are asset groups that are using only the asset attributes listed in <a href="../onboard-cortex-xsiam/post-deployment/manage-user-roles-and-access-management/manage-user-scope">Manage user scope</a> (under <strong>Understand scoping</strong> → <strong>Scoping Areas</strong> → <strong>Assets</strong>).</li></ul><p>The scoping of assets also affects the scoping of cases, issues, and findings.</p><div data-gb-custom-block data-tag="hint" data-style="info" class="hint hint-info"><p>Visibility of Security domain Issues that refer to assets with agents is controlled by the <strong>Endpoints</strong> scoping configuration.</p></div></td></tr><tr><td>Cases and Issues</td><td><p>Set the <strong>Scope</strong> by selecting one of the following:</p><ul><li><strong>No cases and issues</strong>: Defines access to no cases and issues.</li><li><strong>All cases and issues</strong>: Defines access to all cases and issues. Users can view cases or issues referencing assets within their scope. Use the <strong>Assets</strong> section to define which assets are in scope.</li><li><p><strong>Select domains</strong>: Defines access to the domains selected to view their related cases and issues. Under <strong>Select domains</strong>, define the specific domains that you want to grant access.</p><p>Users can only view cases or issues referencing assets and endpoints within their scope. Use the <strong>Assets</strong> section to define which assets are in scope.</p></li></ul><p>When selecting <strong>All cases and issues</strong> or <strong>Select domains</strong>, you can separately configure access to issues and cases that lack an asset reference or where the referenced asset is not in <strong>All Assets</strong> and <strong>All Endpoints</strong> inventories. To provide access, select the <strong>Allow access to cases and issues that are not referencing known assets or endpoints</strong> checkbox. Once selected, you can specifically control which users have access to issues and cases that lack <strong>Affected Assets</strong> (as seen in the issue’s panel) and <strong>Assets</strong> (as seen in the case's panel), or where the listed assets are not part of the Asset or Endpoint inventories. When the assets listed are not part of the inventories, the asset string is typically non-clickable. In some cases, such as for identity-related issues, assets may open a dedicated <strong>User Risk View</strong>, which differs from the standard inventories panels. In the <strong>Issues</strong> and <strong>Cases</strong> tables, such items can be identified by empty values in the following columns: Asset IDs, Target Agent Identifier, and Source Agent Identifier.</p></td></tr><tr><td>Endpoints</td><td><p>Set the <strong>Scope</strong> by selecting one of the following:</p><ul><li><strong>No endpoints</strong>: Defines access to no endpoints with no ability to view their related agent management and enterprise policies.</li><li><strong>All endpoints</strong>: Defines access to all endpoints with the ability to view their related agent management and enterprise policies. This configuration can impact the visibility of related <strong>Security</strong> domain <strong>Cases and Issues</strong>, but will not affect asset visibility.</li><li><strong>Select specific (at least one required)</strong>: Defines specific access to all endpoint groups by selecting <strong>Endpoint Groups</strong> or all endpoint tags by selecting <strong>Endpoint Tags</strong> to view their related agent management and enterprise policies. This configuration can impact the visibility of related <strong>Security</strong> domain <strong>Cases and Issues</strong>, but will not affect asset visibility.</li></ul></td></tr><tr><td>Datasets Rows</td><td><p>Configure a <code>filter</code> to define the specific subset of rows a user is allowed to access in each raw dataset. A raw dataset is every dataset where Palo Alto Networks data is ingested out-of-the-box or third-party data is ingested using a configured dedicated collector, also called a data source. This filter configuration does not impact the visibility of cases and issues.<br></p><p>Follow these steps to configure a <code>filter</code>:</p><p>1. For datasets where no <code>filter</code> is defined, determine how to set the When no filter is defined option as either:</p><ul><li><strong>No rows are accessible</strong> (default): Without a configured <code>filter</code>, no rows are accessible. Users can query the datasets in Cortex Query Language (XQL) as they have access, but the results will be empty.</li><li><strong>All rows are accessible</strong>: Without a configured <code>filter</code>, all rows are accessible. Users can query the datasets in Cortex Query Language (XQL) as they have access, and view all results.</li></ul><div data-gb-custom-block data-tag="hint" data-style="info" class="hint hint-info"><p>When defining a filter for row-level scoping on raw datasets, queries based on the Cortex Data Model (XDM) are not supported. XDM queries return specific rows only when <strong>All rows are accessible</strong> is selected, and no filter is defined in the <strong>Datasets Rows</strong> scoping area. Otherwise, no rows are returned.</p></div><p>2. Define any filters for the applicable datasets listed in the table:</p><ol><li>Scroll down the list of datasets to the dataset you want to apply a <code>filter</code> on, and click the <strong>Edit Scope</strong> icon.</li><li><p>In the <strong>Define what rows are accessible</strong> window, continue to write the query for the <code>filter</code> in the query box (where the syntax is a limited subset of XQL) to limit the data rows for the selected dataset according to the access permissions you want the user to have. The beginning of the query is already defined before the query box, and there is no need to include this in your query.<br><br><strong>Important</strong></p><p>For optimal performance, we recommend using a single field in the <code>filter</code> definition and simple comparison operators.<br></p><p><strong>Supported syntax:</strong></p><p><strong>Fields</strong></p><p>You can define the rest of the <code>filter</code> in the query box, where only the following system fields are supported: <code>_broker_device_id</code>, <code>_broker_device_ip</code>, <code>_broker_device_name</code>, <code>_collector_id</code>, <code>_collector_ip</code>, <code>_collector_name</code>, <code>_collector_type</code>, <code>_device_id</code>, <code>_final_reporting_device_ip</code>, <code>_final_reporting_device_name</code>, <code>_log_type</code>, <code>_product</code>, <code>_scope</code>, <code>_reporting_device_ip</code>, <code>_reporting_device_name</code>, and <code>_vendor</code>.</p><p>For more information on these fields, see the table that describes all the fields in the <code>metrics_source</code> dataset and <code>metrics_view</code> preset in <a href="../configure-cortex-xsiam/cortex-xsiam-data-sources/administration-and-troubleshooting/overview-of-data-ingestion-metrics">Overview of data ingestion metrics</a>. For more information on the <code>_scope</code> field (relevant when <code>_scope</code> is defined in the Parsing Rule), see <a href="../../onboard-cortex-xsiam/post-deployment/manage-user-roles-and-access-management/manage-user-scope#scenarios-related-to-datasets-rows-scoping">Scenario 3: Supported fields don't provide the necessary segmentation</a>.</p><p><strong>Comparison operators</strong></p><p>The following comparison operators are supported:</p><ul><li>Exact matches (<code>=</code>, <code>!=</code>)</li><li>Comparing numerical values (<code>></code>, <code><</code>, <code>>=</code>, <code><=</code>)</li><li>Checking membership in lists (<code>in</code>)</li><li>Querying arrays (<code>array_contains</code>)</li><li>Partial matches (<code>contains</code>, <code>starts_with</code>): Using this operator has additional performance overhead, and we recommend avoiding its use.</li></ul><p><strong>Example</strong></p><p>If you only want a user to be able to access rows in the <code>pan_dds_raw</code> dataset, when the <code>_collector_name</code> is <code>bu2_collector</code> , you'd have to define the <code>filter</code> in the query box as:</p><pre><code>_collector_name = “bu2_collector”</code></pre></li><li>(Optional) Set the <strong>Time frame</strong> for the query. The default is <strong>Last 1 day</strong>.</li><li>(Optional) You can preview the query results displayed based on your defined query by clicking Preview. You can edit your query until you're satisfied with the output. By default, the query results are limited to 1000 records.</li><li><p>When you are finished, click Done.</p><p>The Scope field for the dataset that you added the filter on is updated with the query.<br><strong>Example</strong></p><p>In the above example, the Scope field displays <code>_collector_name = “bu2_collector”</code>.</p></li></ol></td></tr></tbody></table></code></pre></li><li>(Optional) Set the <strong>Time frame</strong> for the query. The default is <strong>Last 1 day</strong>.</li><li>(Optional) You can preview the query results displayed based on your defined query by clicking Preview. You can edit your query until you're satisfied with the output. By default, the query results are limited to 1000 records.</li><li><p>When you are finished, click Done.</p><p>The Scope field for the dataset that you added the filter on is updated with the query.<br><strong>Example</strong></p><p>In the above example, the Scope field displays <code>_collector_name = “bu2_collector”</code>.</p></li></ol></td></tr></tbody></table><div data-gb-custom-block data-tag="hint" data-style="info" class="hint hint-info"><h3>Important</h3><p>By default, <strong>Enable Scope Based Access Control</strong> is disabled in Settings → Configurations → General → <strong>Server Settings</strong>, and granular scoping is not enforced. Before enabling SBAC, we recommend that an administrator or a user with <strong>Access Management</strong> permissions first ensure that the users, user groups, and API Keys defined in Cortex XSIAM are granted the required access by assigning the relevant scopes. For more information, see <a href="../onboard-cortex-xsiam/post-deployment/manage-user-roles-and-access-management/manage-user-scope">Manage user scope</a>.</p></div><div data-gb-custom-block data-tag="hint" data-style="info" class="hint hint-info"><p>By default, <strong>Enable Scope Based Access Control</strong> is disabled in Settings → Configurations → General → <strong>Server Settings</strong>, and granular scoping is not enforced. Before enabling SBAC, we recommend that an administrator or a user with <strong>Access Management</strong> permissions first ensure that the users, user groups, and API Keys defined in Cortex XSIAM are granted the required access by assigning the relevant scopes. For more information, see <a href="../onboard-cortex-xsiam/post-deployment/manage-user-roles-and-access-management/manage-user-scope">Manage user scope</a>.</p></div>4. Click Generate to generate the API key.4. Click Generate to generate the API key.5. Copy the generated API key and click Done.5. Copy the generated API key and click Done.<div data-gb-custom-block data-tag="hint" data-style="info" class="hint hint-info"><h3>Important</h3><p>You will not be able to view the API key again after you complete this step. Ensure that you copy the API key before closing the notification.</p></div><div data-gb-custom-block data-tag="hint" data-style="info" class="hint hint-info"><p>You will not be able to view the API key again after you complete this step. Ensure that you copy the API key before closing the notification.</p></div></details></details>Actions available on API KeysActions available on API KeysBelow are some of the main pivot (right-click) options for actions available on each API key listed in the API Keys table. Only tasks that need further explanation are explained below.Below are some of the main pivot (right-click) options for actions available on each API key listed in the API Keys table. Only tasks that need further explanation are explained below.Show markdown source
@@ -1,36 +1,42 @@ +--- +description: >- + Learn to create and manage Cortex XSIAM API keys, roles, expiration, scopes, + and credential permissions. +--- + # Manage API keys API keys are used to manage and secure API interactions. An API key is essentially a unique string of alphanumeric characters that acts as a credential, allowing a specific user or application to access and interact with a particular API. When you request data or perform an action through an API call, you must include this API key in the header. Cortex XSIAM then verifies the key's authenticity and, if valid, grants the requested access. <details> <summary>How to create an API key</summary> 1. Select **Settings** → **Configurations** → **Integrations** → **API Keys** → **New Key**. 2. In the **Role** tab, perform the following: 1. Under **Security Level**, select the type of API Key you want to generate: **Advanced** or **Standard**. The Advanced API key hashes the key using a nonce, a random string, and a timestamp to prevent replay attacks. cURL does not support this, but it is suitable for scripts. 2. Under **Role**, select the desired level of access for this key. You can select from predefined roles or custom roles. Roles are available according to what was defined in either the Cortex Gateway or Cortex XSIAM Access Management. You can view the configuration of the role selected by expanding the sections under **Components**. For more information, see [Assign user roles and groups](../onboard-cortex-xsiam/deployment-steps/set-up-users-and-roles/assign-user-roles-and-groups). - <div data-gb-custom-block data-tag="hint" data-style="warning" class="hint hint-warning"><h3>Important</h3><p>Ensure the selected role has the appropriate <strong>Credentials</strong> permission. If you select a role where <strong>Credentials</strong> is set to <strong>None</strong>, such as the predefined CLI Role, any API calls made using this key that attempt to fetch, list, create, or modify stored credentials will return a 403 Forbidden error.</p></div> + <div data-gb-custom-block data-tag="hint" data-style="warning" class="hint hint-warning"><p>Ensure the selected role has the appropriate <strong>Credentials</strong> permission. If you select a role where <strong>Credentials</strong> is set to <strong>None</strong>, such as the predefined CLI Role, any API calls made using this key that attempt to fetch, list, create, or modify stored credentials will return a 403 Forbidden error.</p></div> 3. (Optional) Under **Comment**, provide a comment that describes the purpose of the API key. - 4. (Optional) If you want to define a time limit on the API key authentication, select **Enable Expiration Date**, and select the expiration date and time. You can track the expiration date of each API key in the **API Keys** page. In addition, Cortex XSIAM displays a API Key Expiration notification in the Notification Center one week and one day before the defined expiration date. + 4. (Optional) If you want to define a time limit on the API key authentication, select **Enable Expiration Date**, and select the expiration date and time. You can track the expiration date of each API key in the **API Keys** page. In addition, Cortex XSIAM displays an API Key Expiration notification in the Notification Center one week and one day before the defined expiration date. 3. (Optional) To configure and manage granular scoping for Scope-Based Access Control (SBAC), click the **Scope** tab, and under **Scope Definition**, expand the scoping areas that you want to grant the user role access to for this API by clicking the chevron icon (**>**) beside the scoping area title. The following table explains the options available to configure: - <div data-gb-custom-block data-tag="hint" data-style="warning" class="hint hint-warning"><h3>Important</h3><p>Before configuring, ensure that you review <strong>Understand scoping</strong> in the <a href="../onboard-cortex-xsiam/post-deployment/manage-user-roles-and-access-management/manage-user-scope">Manage user scope</a> section.</p></div> + <div data-gb-custom-block data-tag="hint" data-style="warning" class="hint hint-warning"><p>Before configuring, ensure you review <strong>Understand scoping</strong> in the <a href="../onboard-cortex-xsiam/post-deployment/manage-user-roles-and-access-management/manage-user-scope">Manage user scope</a> section.</p></div> - <table><thead><tr><th width="194">Scoping Area</th><th>Granular Scoping Configurations</th></tr></thead><tbody><tr><td>Assets</td><td><p>Set the <strong>Scope</strong> by selecting one of the following:</p><ul><li><strong>No assets</strong>: No asset is accessible.</li><li><strong>All assets</strong>: Defines access to all assets.</li><li><strong>Select asset groups</strong>: Defines access to the specific assets associated with the Asset Groups selected, and to view all their related cases, issues, and findings for these specific assets and Asset Groups. Under <strong>Select asset groups</strong>, define the specific asset groups that you want to grant access. Only Asset Groups relevant for scoping are listed, which are asset groups that are using only the asset attributes listed in <a href="../onboard-cortex-xsiam/post-deployment/manage-user-roles-and-access-management/manage-user-scope">Manage user scope</a> (under <strong>Understand scoping</strong> → <strong>Scoping Areas</strong> → <strong>Assets</strong>).</li></ul><p>The scoping of assets also affects the scoping of cases, issues, and findings.</p><div data-gb-custom-block data-tag="hint" data-style="info" class="hint hint-info"><p><strong>Note</strong></p><p>Visibility of Security domain Issues that refer to assets with agents is controlled by the <strong>Endpoints</strong> scoping configuration.</p></div></td></tr><tr><td>Cases and Issues</td><td><p>Set the <strong>Scope</strong> by selecting one of the following:</p><ul><li><strong>No cases and issues</strong>: Defines access to no cases and issues.</li><li><strong>All cases and issues</strong>: Defines access to all cases and issues. Users can view cases or issues referencing assets within their scope. Use the <strong>Assets</strong> section to define which assets are in scope.</li><li><p><strong>Select domains</strong>: Defines access to the domains selected to view their related cases and issues. Under <strong>Select domains</strong>, define the specific domains that you want to grant access.</p><p>Users can only view cases or issues referencing assets and endpoints within their scope. Use the <strong>Assets</strong> section to define which assets are in scope.</p></li></ul><p>When selecting <strong>All cases and issues</strong> or <strong>Select domains</strong>, you can separately configure access to issues and cases that lack an asset reference or where the referenced asset is not in <strong>All Assets</strong> and <strong>All Endpoints</strong> inventories. To provide access, select the <strong>Allow access to cases and issues that are not referencing known assets or endpoints</strong> checkbox. Once selected, you can specifically control which users have access to issues and cases that lack <strong>Affected Assets</strong> (as seen in the issue’s panel) and <strong>Assets</strong> (as seen in the case's panel), or where the listed assets are not part of the Asset or Endpoint inventories. When the assets listed are not part of the inventories, the asset string is typically non-clickable. In some cases, such as for identity-related issues, assets may open a dedicated <strong>User Risk View</strong>, which differs from the standard inventories panels. In the <strong>Issues</strong> and <strong>Cases</strong> tables, such items can be identified by empty values in the following columns: Asset IDs, Target Agent Identifier, and Source Agent Identifier.</p></td></tr><tr><td>Endpoints</td><td><p>Set the <strong>Scope</strong> by selecting one of the following:</p><ul><li><strong>No endpoints</strong>: Defines access to no endpoints with no ability to view their related agent management and enterprise policies.</li><li><strong>All endpoints</strong>: Defines access to all endpoints with the ability to view their related agent management and enterprise policies. This configuration can impact the visibility of related <strong>Security</strong> domain <strong>Cases and Issues</strong>, but will not affect asset visibility.</li><li><strong>Select specific (at least one required)</strong>: Defines specific access to all endpoint groups by selecting <strong>Endpoint Groups</strong> or all endpoint tags by selecting <strong>Endpoint Tags</strong> to view their related agent management and enterprise policies. This configuration can impact the visibility of related <strong>Security</strong> domain <strong>Cases and Issues</strong>, but will not affect asset visibility.</li></ul></td></tr><tr><td>Datasets Rows</td><td><p>Configure a <code>filter</code> to define the specific subset of rows a user is allowed to access in each raw dataset. A raw dataset is every dataset where Palo Alto Networks data is ingested out-of-the-box or third-party data is ingested using a configured dedicated collector, also called a data source. This filter configuration does not impact the visibility of cases and issues.<br></p><p>Follow these steps to configure a <code>filter</code>:</p><p>1. For datasets where no <code>filter</code> is defined, determine how to set the When no filter is defined option as either:</p><ul><li><strong>No rows are accessible</strong> (default): Without a configured <code>filter</code>, no rows are accessible. Users can query the datasets in Cortex Query Language (XQL) as they have access, but the results will be empty.</li><li><strong>All rows are accessible</strong>: Without a configured <code>filter</code>, all rows are accessible. Users can query the datasets in Cortex Query Language (XQL) as they have access, and view all results.</li></ul><div data-gb-custom-block data-tag="hint" data-style="info" class="hint hint-info"><p><strong>Note</strong></p><p>When defining a filter for row-level scoping on raw datasets, queries based on the Cortex Data Model (XDM) are not supported. XDM queries return specific rows only when <strong>All rows are accessible</strong> is selected and no filter is defined in the <strong>Datasets Rows</strong> scoping area. Otherwise, no rows are returned.</p></div><p>2. Define any filters for the applicable datasets listed in the table:</p><ol><li>Scroll down the list of datasets to the dataset you want to apply a <code>filter</code> on, and click the <strong>Edit Scope</strong> icon.</li><li><p>In the <strong>Define what rows are accessible</strong> window, continue to write the query for the <code>filter</code> in the query box (where the syntax is a limited subset of XQL) to limit the data rows for the selected dataset according to the access permissions you want the user to have. The beginning of the query is already defined before the query box, and there is no need to include this in your query.<br><br><strong>Important</strong></p><p>For optimal performance, we recommend using a single field in the <code>filter</code> definition and simple comparison operators.<br></p><p><strong>Supported syntax:</strong></p><p><strong>Fields</strong></p><p>You can define the rest of the <code>filter</code> in the query box, where only the following system fields are supported: <code>_broker_device_id</code>, <code>_broker_device_ip</code>, <code>_broker_device_name</code>, <code>_collector_id</code>, <code>_collector_ip</code>, <code>_collector_name</code>, <code>_collector_type</code>, <code>_device_id</code>, <code>_final_reporting_device_ip</code>, <code>_final_reporting_device_name</code>, <code>_log_type</code>, <code>_product</code>, <code>_scope</code>, <code>_reporting_device_ip</code>, <code>_reporting_device_name</code>, and <code>_vendor</code>.</p><p>For more information on these fields, see the table that describes all the fields in the <code>metrics_source</code> dataset and <code>metrics_view</code> preset in <a href="../configure-cortex-xsiam/cortex-xsiam-data-sources/administration-and-troubleshooting/overview-of-data-ingestion-metrics">Overview of data ingestion metrics</a>. For more information on the <code>_scope</code> field (relevant when <code>_scope</code> is defined in the Parsing Rule), see <a href="../../onboard-cortex-xsiam/post-deployment/manage-user-roles-and-access-management/manage-user-scope#scenarios-related-to-datasets-rows-scoping">Scenario 3: Supported fields don't provide the necessary segmentation</a>.</p><p><strong>Comparison operators</strong></p><p>The following comparison operators are supported:</p><ul><li>Exact matches (<code>=</code>, <code>!=</code>)</li><li>Comparing numerical values (<code>></code>, <code><</code>, <code>>=</code>, <code><=</code>)</li><li>Checking membership in lists (<code>in</code>)</li><li>Querying arrays (<code>array_contains</code>)</li><li>Partial matches (<code>contains</code>, <code>starts_with</code>): Using this operator has additional performance overhead, and we recommend avoiding its use.</li></ul><p><strong>Example</strong></p><p>If you only want a user to be able to access rows in the <code>pan_dds_raw</code> dataset, when the <code>_collector_name</code> is <code>bu2_collector</code> , you'd have to define the <code>filter</code> in the query box as:</p><pre><code>_collector_name = “bu2_collector” + <table><thead><tr><th width="194">Scoping Area</th><th>Granular Scoping Configurations</th></tr></thead><tbody><tr><td>Assets</td><td><p>Set the <strong>Scope</strong> by selecting one of the following:</p><ul><li><strong>No assets</strong>: No asset is accessible.</li><li><strong>All assets</strong>: Defines access to all assets.</li><li><strong>Select asset groups</strong>: Defines access to the specific assets associated with the Asset Groups selected, and to view all their related cases, issues, and findings for these specific assets and Asset Groups. Under <strong>Select asset groups</strong>, define the specific asset groups that you want to grant access. Only Asset Groups relevant for scoping are listed, which are asset groups that are using only the asset attributes listed in <a href="../onboard-cortex-xsiam/post-deployment/manage-user-roles-and-access-management/manage-user-scope">Manage user scope</a> (under <strong>Understand scoping</strong> → <strong>Scoping Areas</strong> → <strong>Assets</strong>).</li></ul><p>The scoping of assets also affects the scoping of cases, issues, and findings.</p><div data-gb-custom-block data-tag="hint" data-style="info" class="hint hint-info"><p>Visibility of Security domain Issues that refer to assets with agents is controlled by the <strong>Endpoints</strong> scoping configuration.</p></div></td></tr><tr><td>Cases and Issues</td><td><p>Set the <strong>Scope</strong> by selecting one of the following:</p><ul><li><strong>No cases and issues</strong>: Defines access to no cases and issues.</li><li><strong>All cases and issues</strong>: Defines access to all cases and issues. Users can view cases or issues referencing assets within their scope. Use the <strong>Assets</strong> section to define which assets are in scope.</li><li><p><strong>Select domains</strong>: Defines access to the domains selected to view their related cases and issues. Under <strong>Select domains</strong>, define the specific domains that you want to grant access.</p><p>Users can only view cases or issues referencing assets and endpoints within their scope. Use the <strong>Assets</strong> section to define which assets are in scope.</p></li></ul><p>When selecting <strong>All cases and issues</strong> or <strong>Select domains</strong>, you can separately configure access to issues and cases that lack an asset reference or where the referenced asset is not in <strong>All Assets</strong> and <strong>All Endpoints</strong> inventories. To provide access, select the <strong>Allow access to cases and issues that are not referencing known assets or endpoints</strong> checkbox. Once selected, you can specifically control which users have access to issues and cases that lack <strong>Affected Assets</strong> (as seen in the issue’s panel) and <strong>Assets</strong> (as seen in the case's panel), or where the listed assets are not part of the Asset or Endpoint inventories. When the assets listed are not part of the inventories, the asset string is typically non-clickable. In some cases, such as for identity-related issues, assets may open a dedicated <strong>User Risk View</strong>, which differs from the standard inventories panels. In the <strong>Issues</strong> and <strong>Cases</strong> tables, such items can be identified by empty values in the following columns: Asset IDs, Target Agent Identifier, and Source Agent Identifier.</p></td></tr><tr><td>Endpoints</td><td><p>Set the <strong>Scope</strong> by selecting one of the following:</p><ul><li><strong>No endpoints</strong>: Defines access to no endpoints with no ability to view their related agent management and enterprise policies.</li><li><strong>All endpoints</strong>: Defines access to all endpoints with the ability to view their related agent management and enterprise policies. This configuration can impact the visibility of related <strong>Security</strong> domain <strong>Cases and Issues</strong>, but will not affect asset visibility.</li><li><strong>Select specific (at least one required)</strong>: Defines specific access to all endpoint groups by selecting <strong>Endpoint Groups</strong> or all endpoint tags by selecting <strong>Endpoint Tags</strong> to view their related agent management and enterprise policies. This configuration can impact the visibility of related <strong>Security</strong> domain <strong>Cases and Issues</strong>, but will not affect asset visibility.</li></ul></td></tr><tr><td>Datasets Rows</td><td><p>Configure a <code>filter</code> to define the specific subset of rows a user is allowed to access in each raw dataset. A raw dataset is every dataset where Palo Alto Networks data is ingested out-of-the-box or third-party data is ingested using a configured dedicated collector, also called a data source. This filter configuration does not impact the visibility of cases and issues.<br></p><p>Follow these steps to configure a <code>filter</code>:</p><p>1. For datasets where no <code>filter</code> is defined, determine how to set the When no filter is defined option as either:</p><ul><li><strong>No rows are accessible</strong> (default): Without a configured <code>filter</code>, no rows are accessible. Users can query the datasets in Cortex Query Language (XQL) as they have access, but the results will be empty.</li><li><strong>All rows are accessible</strong>: Without a configured <code>filter</code>, all rows are accessible. Users can query the datasets in Cortex Query Language (XQL) as they have access, and view all results.</li></ul><div data-gb-custom-block data-tag="hint" data-style="info" class="hint hint-info"><p>When defining a filter for row-level scoping on raw datasets, queries based on the Cortex Data Model (XDM) are not supported. XDM queries return specific rows only when <strong>All rows are accessible</strong> is selected, and no filter is defined in the <strong>Datasets Rows</strong> scoping area. Otherwise, no rows are returned.</p></div><p>2. Define any filters for the applicable datasets listed in the table:</p><ol><li>Scroll down the list of datasets to the dataset you want to apply a <code>filter</code> on, and click the <strong>Edit Scope</strong> icon.</li><li><p>In the <strong>Define what rows are accessible</strong> window, continue to write the query for the <code>filter</code> in the query box (where the syntax is a limited subset of XQL) to limit the data rows for the selected dataset according to the access permissions you want the user to have. The beginning of the query is already defined before the query box, and there is no need to include this in your query.<br><br><strong>Important</strong></p><p>For optimal performance, we recommend using a single field in the <code>filter</code> definition and simple comparison operators.<br></p><p><strong>Supported syntax:</strong></p><p><strong>Fields</strong></p><p>You can define the rest of the <code>filter</code> in the query box, where only the following system fields are supported: <code>_broker_device_id</code>, <code>_broker_device_ip</code>, <code>_broker_device_name</code>, <code>_collector_id</code>, <code>_collector_ip</code>, <code>_collector_name</code>, <code>_collector_type</code>, <code>_device_id</code>, <code>_final_reporting_device_ip</code>, <code>_final_reporting_device_name</code>, <code>_log_type</code>, <code>_product</code>, <code>_scope</code>, <code>_reporting_device_ip</code>, <code>_reporting_device_name</code>, and <code>_vendor</code>.</p><p>For more information on these fields, see the table that describes all the fields in the <code>metrics_source</code> dataset and <code>metrics_view</code> preset in <a href="../configure-cortex-xsiam/cortex-xsiam-data-sources/administration-and-troubleshooting/overview-of-data-ingestion-metrics">Overview of data ingestion metrics</a>. For more information on the <code>_scope</code> field (relevant when <code>_scope</code> is defined in the Parsing Rule), see <a href="../../onboard-cortex-xsiam/post-deployment/manage-user-roles-and-access-management/manage-user-scope#scenarios-related-to-datasets-rows-scoping">Scenario 3: Supported fields don't provide the necessary segmentation</a>.</p><p><strong>Comparison operators</strong></p><p>The following comparison operators are supported:</p><ul><li>Exact matches (<code>=</code>, <code>!=</code>)</li><li>Comparing numerical values (<code>></code>, <code><</code>, <code>>=</code>, <code><=</code>)</li><li>Checking membership in lists (<code>in</code>)</li><li>Querying arrays (<code>array_contains</code>)</li><li>Partial matches (<code>contains</code>, <code>starts_with</code>): Using this operator has additional performance overhead, and we recommend avoiding its use.</li></ul><p><strong>Example</strong></p><p>If you only want a user to be able to access rows in the <code>pan_dds_raw</code> dataset, when the <code>_collector_name</code> is <code>bu2_collector</code> , you'd have to define the <code>filter</code> in the query box as:</p><pre><code>_collector_name = “bu2_collector” </code></pre></li><li>(Optional) Set the <strong>Time frame</strong> for the query. The default is <strong>Last 1 day</strong>.</li><li>(Optional) You can preview the query results displayed based on your defined query by clicking Preview. You can edit your query until you're satisfied with the output. By default, the query results are limited to 1000 records.</li><li><p>When you are finished, click Done.</p><p>The Scope field for the dataset that you added the filter on is updated with the query.<br><strong>Example</strong></p><p>In the above example, the Scope field displays <code>_collector_name = “bu2_collector”</code>.</p></li></ol></td></tr></tbody></table> - <div data-gb-custom-block data-tag="hint" data-style="info" class="hint hint-info"><h3>Important</h3><p>By default, <strong>Enable Scope Based Access Control</strong> is disabled in Settings → Configurations → General → <strong>Server Settings</strong>, and granular scoping is not enforced. Before enabling SBAC, we recommend that an administrator or a user with <strong>Access Management</strong> permissions first ensure that the users, user groups, and API Keys defined in Cortex XSIAM are granted the required access by assigning the relevant scopes. For more information, see <a href="../onboard-cortex-xsiam/post-deployment/manage-user-roles-and-access-management/manage-user-scope">Manage user scope</a>.</p></div> + <div data-gb-custom-block data-tag="hint" data-style="info" class="hint hint-info"><p>By default, <strong>Enable Scope Based Access Control</strong> is disabled in Settings → Configurations → General → <strong>Server Settings</strong>, and granular scoping is not enforced. Before enabling SBAC, we recommend that an administrator or a user with <strong>Access Management</strong> permissions first ensure that the users, user groups, and API Keys defined in Cortex XSIAM are granted the required access by assigning the relevant scopes. For more information, see <a href="../onboard-cortex-xsiam/post-deployment/manage-user-roles-and-access-management/manage-user-scope">Manage user scope</a>.</p></div> 4. Click **Generate** to generate the API key. 5. Copy the generated API key and click **Done**. - <div data-gb-custom-block data-tag="hint" data-style="info" class="hint hint-info"><h3>Important</h3><p>You will not be able to view the API key again after you complete this step. Ensure that you copy the API key before closing the notification.</p></div> + <div data-gb-custom-block data-tag="hint" data-style="info" class="hint hint-info"><p>You will not be able to view the API key again after you complete this step. Ensure that you copy the API key before closing the notification.</p></div> </details> <details> <summary>Actions available on API Keys</summary> Below are some of the main pivot (right-click) options for actions available on each API key listed in the API Keys table. Only tasks that need further explanation are explained below. -
▸ ▾ Supported web browsers modified +4 −0
xsiam/learn-about-cortex-xsiam/supported-web-browsersRead it on the Cortex docs portal ↗ Read it here → This file's diff on GitHub ↗
Before After@@ -1,8 +1,12 @@---description: View the web browsers and minimum browser versions supported for Cortex XSIAM.---# Supported web browsers# Supported web browsersCortex XSIAM supports the following web browsers:Cortex XSIAM supports the following web browsers:Browser│VersionBrowser│Version| -------------- | -------------- || -------------- | -------------- |Chrome│95.x and laterChrome│95.x and laterFirefox│93.x and laterFirefox│93.x and laterShow markdown source
@@ -1,8 +1,12 @@
+---
+description: View the web browsers and minimum browser versions supported for Cortex XSIAM.
+---
+
 # Supported web browsers

 Cortex XSIAM supports the following web browsers:

 | Browser        | Version        |
 | -------------- | -------------- |
 | Chrome         | 95.x and later |
 | Firefox        | 93.x and later |
-
▸ ▾ Use the Cortex XSIAM interface modified +22 −27
xsiam/learn-about-cortex-xsiam/use-the-interfaceRead it on the Cortex docs portal ↗ Read it here → This file's diff on GitHub ↗
Before After@@ -1,37 +1,37 @@------description: Learn more about how to use the Cortex XSIAM interface.description: >-Learn Cortex XSIAM interface navigation, filtering, saved views, resultexports, system tools, and product areas.------# Use the interface# Use the Cortex XSIAM interfaceThe Cortex XSIAM interface provides a centralized workspace for viewing and managing security data across your environment.The Cortex XSIAM interface provides a centralized security operations workspace. Use it to view and manage security data across your environment.Use the navigation menu on the left to move between product areas in the tenant. For a quick overview of each area, see the Navigation cheat sheet below.Use the navigation menu on the left to move between product areas in the tenant. For a quick overview of each area, see the Navigation cheat sheet below.From the interface, you can:From the interface, you can:• Navigate between product areas.• Navigate between product areas.• Chat with an Agentic Assistant agent• Chat with an Agentic Assistant agent• Filter table results to find relevant information.• Filter table results to find relevant information.• Create saved views with commonly used filter configurations.• Create saved views with commonly used filter configurations.• Export table data.• Export table data.• Access in-product help and documentation.• Access in-product help and documentation.hint infohint info### Note• Each SAML login session is valid for 8 hours.• Some menu items only appear if you have the relevant license.• Each SAML login session is valid for 8 hours.• Some menu items only appear if you have the relevant license.endhintendhintFilter page resultsFilter Cortex XSIAM page resultsTo reduce the number of results, you can filter by any heading and value. When you apply a filter, Cortex XSIAM displays the filter criteria above the results table. You can also filter individual columns for specific values using the icon to the right of the column heading.To reduce the number of results, you can filter by any heading and value. When you apply a filter, Cortex XSIAM displays the filter criteria above the results table. You can also filter individual columns for specific values using the icon to the right of the column heading.Some fields also support additional operators such as =, !=, Contains, not Contains, *, !*.Filters are persistent. When you navigate away from the page and return, any filter you added remains active.Some fields also support additional operators such as =, !=, Contains, not Contains, *, !*.Filters are persistent. When you navigate away from the page and return, any filter you added remains active.To build a filter using one or more fields:To build a filter using one or more fields:1. From a Cortex XSIAM page, select filter ( ).
1. From a Cortex XSIAM page, select filter ().
).
1. From a Cortex XSIAM page, select filter ().
@@ -39,27 +39,27 @@ To build a filter using one or more fields:Cortex XSIAM adds the filter criteria above the top of the table.Cortex XSIAM adds the filter criteria above the top of the table.2. For each field you would like to filter by:2. For each field you would like to filter by:1. Select or search the field.1. Select or search the field.2. Select the operator that matches the criteria.2. Select the operator that matches the criteria.Use **=** to include results that match the value you specify, or **!=** to exclude results that match the value.Use **=** to include results that match the value you specify, or **!=** to exclude results that match the value.3. Enter a value to complete the filter criteria.3. Enter a value to complete the filter criteria.<div data-gb-custom-block data-tag="hint" data-style="info" class="hint hint-info"><h3>Note</h3><p>CMD fields have a 128-character limit. Shorten longer query strings to 127 characters and add an asterisk (*).</p></div><div data-gb-custom-block data-tag="hint" data-style="info" class="hint hint-info"><p>CMD fields have a 128-character limit. Shorten longer query strings to 127 characters and add an asterisk (*).</p></div>Alternatively, you can select **Include empty values** to create a filter that excludes or includes results when the field has empty values.Alternatively, you can select **Include empty values** to create a filter that excludes or includes results when the field has empty values.3. To add additional filters, click +AND, within the filter brackets, to display results that must match all specified criteria, or +OR to display results that match any of the criteria.3. To add additional filters, click +AND, within the filter brackets to display results that must match all specified criteria, or +OR to display results that match any of the criteria.4. To see the results, click out of the filter area.4. To see the results, click out of the filter area.</details></details>Save views and filtersSave Cortex XSIAM views and filtersCortex XSIAM allows you to save filter configurations so you can quickly return to commonly used data selections. Depending on the page you are working on, you can save either views or filters:Cortex XSIAM allows you to save filter configurations so you can quickly return to commonly used data selections. Depending on the page you are working on, you can save either views or filters:• Saved views store table configurations, including filters, so you can quickly switch between commonly used table perspectives.• Saved views store table configurations, including filters, so you can quickly switch between commonly used table perspectives.• Saved filters store only the filter criteria, allowing you to quickly apply the same filtering logic again.• Saved filters store only the filter criteria, allowing you to quickly apply the same filtering logic again.These options help you quickly focus on the data most relevant to your workflow.These options help you quickly focus on the data most relevant to your workflow.@@ -82,21 +82,19 @@ Manage views• Use the three-dot Actions menu next to the view name to take the following actions:• Use the three-dot Actions menu next to the view name to take the following actions:• Set the view as the default.• Set the view as the default.• Share or unshare the view.• Share or unshare the view.• Update the view after modifying filters.• Update the view after modifying filters.• Delete the view.• Delete the view.hint infohint info### Note• Deleting a shared view removes it for all users.• You can delete your own saved views.• Deleting a shared view removes it for all users.• To delete views created by other users, you must have the Account administrator or Instance administrator role.• You can delete your own saved views.• To delete views created by other users, you must have the Account administrator or Instance administrator role.endhintendhintSaved filtersSaved filtersSome pages allow you to save filters instead of views, such as the IOC and BIOC pages.Some pages allow you to save filters instead of views, such as the IOC and BIOC pages.Saved filters store filter criteria, allowing you to quickly apply the same filters again. Saved filters help standardize filtering and allow users to quickly apply commonly used search conditions.Saved filters store filter criteria, allowing you to quickly apply the same filters again. Saved filters help standardize filtering and allow users to quickly apply commonly used search conditions.@@ -114,47 +112,45 @@ Create a filterShare or delete a saved filterShare or delete a saved filter1. Open the three-dot Actions menu in the table filter row.1. Open the three-dot Actions menu in the table filter row.2. Select Saved filters.2. Select Saved filters.3. Click the Actions menu next to a filter name and select the relevant action.3. Click the Actions menu next to a filter name and select the relevant action.hint infohint info### Note• Deleting a shared filter removes it for all users.• Deleting a shared filter removes it for all users.• You can delete your own saved filters.• You can delete your own saved filters.• To delete filters created by other users, you must have the Account administrator or Instance administrator role.• To delete filters created by other users, you must have the Account administrator or Instance administrator role.endhintendhint</details></details>Export resultsExport Cortex XSIAM resultsYou can export the page results for most pages in Cortex XSIAM to a tab-separated values (TSV) file.You can export the page results for most pages in Cortex XSIAM to a tab-separated values (TSV) file.1. (Optional) Filter page results to reduce the number of results for export.1. (Optional) Filter page results to reduce the number of results for export.2. Select export to file ( ).
2. Select export to file ().
).
2. Select export to file ().
Cortex XSIAM exports any results matching your applied filters in TSV format. The TSV format requires a tab separator; automatic detection does not work in the case of multi-event exports.Cortex XSIAM exports any results matching your applied filters in TSV format. The TSV format requires a tab separator; automatic detection does not work in the case of multi-event exports.</details></details>System tools and servicesCortex XSIAM system tools and servicesThe following controls appear in the navigation bar and provide access to system tools, help resources, and tenant settings.The following controls appear in the navigation bar and provide access to system tools, help resources, and tenant settings.Cortex Agentic AssistantCortex Agentic AssistantClick 🖼 agentic-assistant.png in the top-right corner to open the assistant.Click in the top-right corner to open the assistant.
The Cortex Agentic Assistant is the autonomous AI capability of Cortex XSIAM. It uses AI agents that plan, reason, and investigate complex threats, such as cloud identity theft or container breaches.The Cortex Agentic Assistant is the autonomous AI capability of Cortex XSIAM. It uses AI agents that plan, reason, and investigate complex threats, such as cloud identity theft or container breaches.NotificationsNotificationsThe Notifications panel displays system alerts and updates generated by Cortex XSIAM.The Notifications panel displays system alerts and updates generated by Cortex XSIAM.Tenant NavigatorTenant Navigator
in the top-right corner to open the assistant.
The Cortex Agentic Assistant is the autonomous AI capability of Cortex XSIAM. It uses AI agents that plan, reason, and investigate complex threats, such as cloud identity theft or container breaches.The Cortex Agentic Assistant is the autonomous AI capability of Cortex XSIAM. It uses AI agents that plan, reason, and investigate complex threats, such as cloud identity theft or container breaches.NotificationsNotificationsThe Notifications panel displays system alerts and updates generated by Cortex XSIAM.The Notifications panel displays system alerts and updates generated by Cortex XSIAM.Tenant NavigatorTenant Navigator@@ -178,35 +174,36 @@ The Managed Threat Hunting service provides 24/7 monitoring by Palo Alto NetworkCortex XSIAM provides in-product help directly within the interface.Cortex XSIAM provides in-product help directly within the interface.Click to open the Help. There are two options:
Click to open the Help. There are two options:
• Documentation Portal• Documentation Portal• Initiate Support Request• Initiate Support RequestIf you have the Cortex Agentic Assistant enabled, when you select Initiate Support Request, the Help Center agent opens to assists with finding relevant documentation, troubleshooting, and creating a support ticket. After your first prompt to the Help Center agent, you can click Submit support ticket from above the chat. If you click Submit Support Ticket, you are brought directly to the Submit Support Ticket wizard.\If you have the Cortex Agentic Assistant enabled, when you select Initiate Support Request, the Help Center agent opens to assist with finding relevant documentation, troubleshooting, and creating a support ticket. After your first prompt to the Help Center agent, you can click Submit Support Ticket above the chat. If you click Submit Support Ticket, you are brought directly to the Submit Support Ticket wizard.\If you do not have Cortex Agentic Assistant enabled, selecting Initiate Support Request brings you directly to the Submit Support Ticket wizard.\If you do not have Cortex Agentic Assistant enabled, selecting Initiate Support Request brings you directly to the Submit Support Ticket wizard.User menuUser menuClick your username to access user and tenant options.Click your username to access user and tenant options.From the user menu, you can:From the user menu, you can:• View tenant information• View tenant information• See What's New• See What's New• Switch between light and dark mode• Switch between light and dark mode• Log out• Log out</details></details>Navigation cheat sheetCortex XSIAM navigation cheat sheetDashboards & ReportsDashboards & ReportsComponent│DescriptionComponent│Description
to open the Help. There are two options:
Click to open the Help. There are two options:
• Documentation Portal• Documentation Portal• Initiate Support Request• Initiate Support RequestIf you have the Cortex Agentic Assistant enabled, when you select Initiate Support Request, the Help Center agent opens to assists with finding relevant documentation, troubleshooting, and creating a support ticket. After your first prompt to the Help Center agent, you can click Submit support ticket from above the chat. If you click Submit Support Ticket, you are brought directly to the Submit Support Ticket wizard.\If you have the Cortex Agentic Assistant enabled, when you select Initiate Support Request, the Help Center agent opens to assist with finding relevant documentation, troubleshooting, and creating a support ticket. After your first prompt to the Help Center agent, you can click Submit Support Ticket above the chat. If you click Submit Support Ticket, you are brought directly to the Submit Support Ticket wizard.\If you do not have Cortex Agentic Assistant enabled, selecting Initiate Support Request brings you directly to the Submit Support Ticket wizard.\If you do not have Cortex Agentic Assistant enabled, selecting Initiate Support Request brings you directly to the Submit Support Ticket wizard.User menuUser menuClick your username to access user and tenant options.Click your username to access user and tenant options.From the user menu, you can:From the user menu, you can:• View tenant information• View tenant information• See What's New• See What's New• Switch between light and dark mode• Switch between light and dark mode• Log out• Log out</details></details>Navigation cheat sheetCortex XSIAM navigation cheat sheetDashboards & ReportsDashboards & ReportsComponent│DescriptionComponent│Description| ----------------- | ----------------------------------------------------------------------------------------------------------------------------------------------------------- || ----------------- | ----------------------------------------------------------------------------------------------------------------------------------------------------------- |Dashboard│Select a dashboard/command center to view your tenant's activities, enabling you to effectively monitor your cases and overall activity in your environmentDashboard│Select a dashboard/command center to view your tenant's activities, enabling you to effectively monitor your cases and overall activity in your environmentReports│View all the reports that Cortex XSIAM have run.Reports│View all the reports that Cortex XSIAM have run.Dashboard Manager│Manage dashboards, including adding dashboards with customized widgets to surface the statistics that matter to you most.Dashboard Manager│Manage dashboards, including adding dashboards with customized widgets to surface the statistics that matter to you most.@@ -324,16 +321,14 @@ Requires Cortex XSIAM Premium or any other XSIAM license with the Cloud RuntimeKubernetes Security│Automatically discovers assets, enforces policies, and scans for vulnerabilities, malware, secrets, and misconfigurations across the environment.This feature is included with a Cloud Runtime Security, Cloud Posture Security, or Cortex XSIAM Premium license.
Kubernetes Security│Automatically discovers assets, enforces policies, and scans for vulnerabilities, malware, secrets, and misconfigurations across the environment.This feature is included with a Cloud Runtime Security, Cloud Posture Security, or Cortex XSIAM Premium license.
Attack Surface│ASM helps you discover and manage your public attack surface, providing visibility into all of your digital assets, including on-prem and cloud. Identify and remediate vulnerabilities, enforce compliance policies, and reduce the risk of cyberattacks. Included in Cortex XSIAM Premium or any other XSIAM license with the Attack Surface Management add-on.Attack Surface│ASM helps you discover and manage your public attack surface, providing visibility into all of your digital assets, including on-prem and cloud. Identify and remediate vulnerabilities, enforce compliance policies, and reduce the risk of cyberattacks. Included in Cortex XSIAM Premium or any other XSIAM license with the Attack Surface Management add-on.Email Security│Provides a scalable detection, investigation, and response layer over cloud-hosted email environments. It connects directly to supported email platforms via secure API integrations to ingest rich message-level and identity-related telemetry. Requires the Email Security add-on.Email Security│Provides a scalable detection, investigation, and response layer over cloud-hosted email environments. It connects directly to supported email platforms via secure API integrations to ingest rich message-level and identity-related telemetry. Requires the Email Security add-on.Exposure Management│A collection of features, capabilities, integrations, and content designed to help defenders holistically assess, consolidate, prioritize, and proactively respond to exposures in their organization. Requires the Exposure Management add-on.Exposure Management│A collection of features, capabilities, integrations, and content designed to help defenders holistically assess, consolidate, prioritize, and proactively respond to exposures in their organization. Requires the Exposure Management add-on.Agentic Assistant HubAgentic Assistant Hubhint infohint info### NoteThis menu item appears if you have enabled the Cortex Agentic Assistant.This menu item appears if you have enabled the Cortex Agentic Assistant.endhintendhintManage agentic agents and actions in the Agentic Assistant Hub.Manage agentic agents and actions in the Agentic Assistant Hub.</details></details>Show markdown source
@@ -1,37 +1,37 @@ --- -description: Learn more about how to use the Cortex XSIAM interface. +description: >- + Learn Cortex XSIAM interface navigation, filtering, saved views, result + exports, system tools, and product areas. --- -# Use the interface +# Use the Cortex XSIAM interface -The Cortex XSIAM interface provides a centralized workspace for viewing and managing security data across your environment. +The Cortex XSIAM interface provides a centralized security operations workspace. Use it to view and manage security data across your environment. Use the navigation menu on the left to move between product areas in the tenant. For a quick overview of each area, see the **Navigation cheat sheet** below. From the interface, you can: * Navigate between product areas. * Chat with an Agentic Assistant agent * Filter table results to find relevant information. * Create saved views with commonly used filter configurations. * Export table data. * Access in-product help and documentation. {% hint style="info" %} -### Note - -* Each SAML login session is valid for 8 hours. -* Some menu items only appear if you have the relevant license. +- Each SAML login session is valid for 8 hours. +- Some menu items only appear if you have the relevant license. {% endhint %} <details> -<summary>Filter page results</summary> +<summary>Filter Cortex XSIAM page results</summary> To reduce the number of results, you can filter by any heading and value. When you apply a filter, Cortex XSIAM displays the filter criteria above the results table. You can also filter individual columns for specific values using the icon to the right of the column heading. Some fields also support additional operators such as =, !=, Contains, not Contains, \*, !\*.Filters are persistent. When you navigate away from the page and return, any filter you added remains active. To build a filter using one or more fields: 1. From a Cortex XSIAM page, select filter (<img src="https://2786854933-files.gitbook.io/~/files/v0/b/gitbook-x-prod.appspot.com/o/spaces%2FAEIjuYE3RXcIfmuQnBbm%2Fuploads%2Fgit-blob-a3eff1c41e4db05b2bd4375bc349b6e526524282%2F3dab14fce079683094a6f5f3328b684c18fb2b68e00d2374edf76b84563d863d.png?alt=media" alt="filter-icon.png" data-size="line">). @@ -39,27 +39,27 @@ To build a filter using one or more fields: Cortex XSIAM adds the filter criteria above the top of the table. 2. For each field you would like to filter by: 1. Select or search the field. 2. Select the operator that matches the criteria. Use **=** to include results that match the value you specify, or **!=** to exclude results that match the value. 3. Enter a value to complete the filter criteria. - <div data-gb-custom-block data-tag="hint" data-style="info" class="hint hint-info"><h3>Note</h3><p>CMD fields have a 128-character limit. Shorten longer query strings to 127 characters and add an asterisk (*).</p></div> + <div data-gb-custom-block data-tag="hint" data-style="info" class="hint hint-info"><p>CMD fields have a 128-character limit. Shorten longer query strings to 127 characters and add an asterisk (*).</p></div> Alternatively, you can select **Include empty values** to create a filter that excludes or includes results when the field has empty values. -3. To add additional filters, click **+AND,** within the filter brackets, to display results that must match all specified criteria, or **+OR** to display results that match any of the criteria. +3. To add additional filters, click **+AND,** within the filter brackets to display results that must match all specified criteria, or **+OR** to display results that match any of the criteria. 4. To see the results, click out of the filter area. </details> <details> -<summary>Save views and filters</summary> +<summary>Save Cortex XSIAM views and filters</summary> Cortex XSIAM allows you to save filter configurations so you can quickly return to commonly used data selections. Depending on the page you are working on, you can save either views or filters: * **Saved views** store table configurations, including filters, so you can quickly switch between commonly used table perspectives. * **Saved filters** store only the filter criteria, allowing you to quickly apply the same filtering logic again. These options help you quickly focus on the data most relevant to your workflow. @@ -82,21 +82,19 @@ Manage views * Use the three-dot **Actions** menu next to the view name to take the following actions: * Set the view as the default. * Share or unshare the view. * Update the view after modifying filters. * Delete the view. {% hint style="info" %} -### Note - -* Deleting a shared view removes it for all users. -* You can delete your own saved views. -* To delete views created by other users, you must have the Account administrator or Instance administrator role. +- Deleting a shared view removes it for all users. +- You can delete your own saved views. +- To delete views created by other users, you must have the Account administrator or Instance administrator role. {% endhint %} **Saved filters** Some pages allow you to save filters instead of views, such as the **IOC** and **BIOC** pages. Saved filters store filter criteria, allowing you to quickly apply the same filters again. Saved filters help standardize filtering and allow users to quickly apply commonly used search conditions. @@ -114,47 +112,45 @@ Create a filter Share or delete a saved filter 1. Open the three-dot **Actions** menu in the table filter row. 2. Select **Saved filters**. 3. Click the **Actions** menu next to a filter name and select the relevant action. {% hint style="info" %} -### Note - * Deleting a shared filter removes it for all users. * You can delete your own saved filters. * To delete filters created by other users, you must have the Account administrator or Instance administrator role. {% endhint %} </details> <details> -<summary>Export results</summary> +<summary>Export Cortex XSIAM results</summary> You can export the page results for most pages in Cortex XSIAM to a tab-separated values (TSV) file. 1. (**Optional**) Filter page results to reduce the number of results for export. 2. Select export to file (<img src="https://2786854933-files.gitbook.io/~/files/v0/b/gitbook-x-prod.appspot.com/o/spaces%2FAEIjuYE3RXcIfmuQnBbm%2Fuploads%2Fgit-blob-2e7796360d71d97770146127e5a5ad1038b20fde%2F6992f55aca13ed26d2bc33ee3b53225ec10150bc0ef4eec957da801fa5c59ece.png?alt=media" alt="export-to-file-icon.png" data-size="line">). Cortex XSIAM exports any results matching your applied filters in TSV format. The TSV format requires a tab separator; automatic detection does not work in the case of multi-event exports. </details> <details> -<summary>System tools and services</summary> +<summary>Cortex XSIAM system tools and services</summary> The following controls appear in the navigation bar and provide access to system tools, help resources, and tenant settings. **Cortex Agentic Assistant** -Click  in the top-right corner to open the assistant. +Click <img src="https://2786854933-files.gitbook.io/~/files/v0/b/gitbook-x-prod.appspot.com/o/spaces%2FAEIjuYE3RXcIfmuQnBbm%2Fuploads%2Fgit-blob-fbf527afd3e824d282bea6ff747d08c2e5856a75%2Feb4f93ad10298e4a1a29a18b9b4c1d4415325cda8066af5f7ec57590d0c20cca.png?alt=media" alt="agentic-assistant.png" data-size="line"> in the top-right corner to open the assistant. The Cortex Agentic Assistant is the autonomous AI capability of Cortex XSIAM. It uses AI agents that plan, reason, and investigate complex threats, such as cloud identity theft or container breaches. **Notifications** The Notifications panel displays system alerts and updates generated by Cortex XSIAM. **Tenant Navigator** @@ -178,35 +174,36 @@ The Managed Threat Hunting service provides 24/7 monitoring by Palo Alto Network Cortex XSIAM provides in-product help directly within the interface. Click <img src="https://2786854933-files.gitbook.io/~/files/v0/b/gitbook-x-prod.appspot.com/o/spaces%2FAEIjuYE3RXcIfmuQnBbm%2Fuploads%2Fgit-blob-ebd100e6504c9bbc9c438b60ecf5c52d421c0c63%2F84045266c4d924c900441db384bb47bc254683014a3042f0b02d60127a09e82c.png?alt=media" alt="in-app-help-center-icon.png" data-size="line"> to open the Help. There are two options: * Documentation Portal * Initiate Support Request -If you have the Cortex Agentic Assistant enabled, when you select **Initiate Support Request,** the **Help Center** agent opens to assists with finding relevant documentation, troubleshooting, and creating a support ticket. After your first prompt to the **Help Center** agent, you can click **Submit support ticket** from above the chat. If you click **Submit Support Ticket**, you are brought directly to the **Submit Support Ticket** wizard.\ -\ -If you do not have Cortex Agentic Assistant enabled, selecting **Initiate Support Request** brings you directly to the **Submit Support Ticket** wizard.\ +If you have the Cortex Agentic Assistant enabled, when you select **Initiate Support Request,** the **Help Center** agent opens to assist with finding relevant documentation, troubleshooting, and creating a support ticket. After your first prompt to the **Help Center** agent, you can click **Submit Support Ticket** above the chat. If you click **Submit Support Ticket**, you are brought directly to the **Submit Support Ticket** wizard. + +If you do not have Cortex Agentic Assistant enabled, selecting **Initiate Support Request** brings you directly to the **Submit Support Ticket** wizard. + **User menu** Click your **username** to access user and tenant options. From the user menu, you can: * View tenant information * See What's New * Switch between light and dark mode * Log out </details> <details> -<summary>Navigation cheat sheet</summary> +<summary>Cortex XSIAM navigation cheat sheet</summary> **Dashboards & Reports** | Component | Description | | ----------------- | ----------------------------------------------------------------------------------------------------------------------------------------------------------- | | Dashboard | Select a dashboard/command center to view your tenant's activities, enabling you to effectively monitor your cases and overall activity in your environment | | Reports | View all the reports that Cortex XSIAM have run. | | Dashboard Manager | Manage dashboards, including adding dashboards with customized widgets to surface the statistics that matter to you most. | @@ -324,16 +321,14 @@ Requires Cortex XSIAM Premium or any other XSIAM license with the Cloud Runtime | Kubernetes Security | <p>Automatically discovers assets, enforces policies, and scans for vulnerabilities, malware, secrets, and misconfigurations across the environment.</p><p>This feature is included with a Cloud Runtime Security, Cloud Posture Security, or Cortex XSIAM Premium license.</p> | | Attack Surface | ASM helps you discover and manage your public attack surface, providing visibility into all of your digital assets, including on-prem and cloud. Identify and remediate vulnerabilities, enforce compliance policies, and reduce the risk of cyberattacks. Included in Cortex XSIAM Premium or any other XSIAM license with the Attack Surface Management add-on. | | Email Security | Provides a scalable detection, investigation, and response layer over cloud-hosted email environments. It connects directly to supported email platforms via secure API integrations to ingest rich message-level and identity-related telemetry. Requires the Email Security add-on. | | Exposure Management | A collection of features, capabilities, integrations, and content designed to help defenders holistically assess, consolidate, prioritize, and proactively respond to exposures in their organization. Requires the Exposure Management add-on. | **Agentic Assistant Hub** {% hint style="info" %} -### Note - This menu item appears if you have enabled the Cortex Agentic Assistant. {% endhint %} Manage agentic agents and actions in the Agentic Assistant Hub. </details> -
▸ ▾ Activate Cortex XSIAM modified +5 −3
xsiam/onboard-cortex-xsiam/deployment-steps/activate-cortex-xsiamRead it on the Cortex docs portal ↗ Read it here → This file's diff on GitHub ↗
Before After@@ -1,10 +1,12 @@------description: Learn how to activate your tenant.description: >-Activate Cortex XSIAM tenants in Cortex Gateway, including prerequisites,encryption, and access configuration.------# Activate Cortex XSIAM# Activate Cortex XSIAMTo activate a tenant, you need to log in to Cortex Gateway, a centralized portal for activating and managing tenants, users, roles, and user groups. After activating the tenant, you can then access the tenant. You must repeat this task for each tenant if you have multiple tenants. The activation process involves accessing Cortex Gateway, activating the tenant, and then accessing the tenant's resources.To activate a tenant, you need to log in to Cortex Gateway, a centralized portal for activating and managing tenants, users, roles, and user groups. After activating the tenant, you can then access the tenant. You must repeat this task for each tenant if you have multiple tenants. The activation process involves accessing Cortex Gateway, activating the tenant, and then accessing the tenant's resources.hint warninghint warning### Prerequisite### Prerequisite@@ -32,26 +34,26 @@ How to activate Cortex XSIAMAfter you sign in, you can view the following:After you sign in, you can view the following:• If you are a CSP Account Admin, you can see tenants allocated to your CSP account and ready for activation. After activation, you cannot move your tenant to a different CSP account.• If you are a CSP Account Admin, you can see tenants allocated to your CSP account and ready for activation. After activation, you cannot move your tenant to a different CSP account.• Tenant details such as license type, number of endpoints, and purchase date.• Tenant details such as license type, number of endpoints, and purchase date.• Tenants that were activated and are now available. If you have more than one Customer Support Portal account, the tenants are displayed according to the Customer Support Portal account name.• Tenants that were activated and are now available. If you have more than one Customer Support Portal account, the tenants are displayed according to the Customer Support Portal account name.3. In the Available for Activation section, use the serial number to locate the tenant that needs activation, and then click Activate.3. In the Available for Activation section, use the serial number to locate the tenant that needs activation, and then click Activate.<div data-gb-custom-block data-tag="hint" data-style="info" class="hint hint-info"><h3>Note</h3><p>When you activate, a production tenant is first activated. After activation, you can set up a development tenant (subject to your license).</p></div><div data-gb-custom-block data-tag="hint" data-style="info" class="hint hint-info"><p>When you activate, a production tenant is activated first. After activation, you can set up a development tenant (subject to your license).</p></div>4. On the Tenant Activation page, define the following:4. On the Tenant Activation page, define the following:Parameter│DescriptionParameter│Description| ----------------- | ------------------------------------------------------------------------------------------------------------------------------------------------------------------------------------------------------------------------------------------------------------------------------------------------------------------------------------------------------------------------------------------------------------------------------------------------------------------------------------------------------------------------------------------------------------------------------------------------------------------------------------------------------------------------------------------------------------------------------------------------------------------------------------------------------------------------------------------------------------------------------------------------------------------------------- || ----------------- | ------------------------------------------------------------------------------------------------------------------------------------------------------------------------------------------------------------------------------------------------------------------------------------------------------------------------------------------------------------------------------------------------------------------------------------------------------------------------------------------------------------------------------------------------------------------------------------------------------------------------------------------------------------------------------------------------------------------------------------------------------------------------------------------------------------------------------------------------------------------------------------------------------------------------------- |Tenant Name│Enter the name of the tenant. Use a unique name across your company account up to 59 characters long.Tenant Name│Enter the name of the tenant. Use a unique name across your company account up to 59 characters long.Region│Geographic location where your tenant will be hosted. For more information about supported regions, see Cortex XSIAM supported regions.Region│Geographic location where your tenant will be hosted. For more information about supported regions, see Cortex XSIAM supported regions.Tenant Subdomain│DNS record associated with your tenant. Enter a name that will be used to access the tenant directly using the full URL:https://<subdomain>xdr.<region>.paloaltonetworks.comTenant Subdomain│DNS record associated with your tenant. Enter a name that will be used to access the tenant directly using the full URL:https://<subdomain>xdr.<region>.paloaltonetworks.comEncryption Method│(Optional) If you want to bring your own keys for encrypting your data, under Advanced, select BYOK and follow the instructions of the wizard as detailed in Encryption Method.
Default encryption (recommended)
All data stored by Cortex XSIAM is encrypted at rest using a dedicated key management system. Cortex XSIAM provides strict key access controls and auditing, and encrypts user data at rest according to AES-256 encryption standards. We recommend using this default system.
BYOK (Bring your own keys)
BYOK (Bring Your Own Keys) enables you to generate your own encryption keys and securely import and manage them via Cortex Gateway to retain greater control over your tenant data and encryption. This requires further setup.
Encryption Method│(Optional) If you want to bring your own keys for encrypting your data, under Advanced, select BYOK and follow the instructions of the wizard as detailed in Encryption Method.
Default encryption (recommended)
All data stored by Cortex XSIAM is encrypted at rest using a dedicated key management system. Cortex XSIAM provides strict key access controls and auditing, and encrypts user data at rest according to AES-256 encryption standards. We recommend using this default system.
BYOK (Bring your own keys)
BYOK (Bring Your Own Keys) enables you to generate your own encryption keys and securely import and manage them via Cortex Gateway to retain greater control over your tenant data and encryption. This requires further setup.
5. Review and agree to the terms and conditions of the Privacy policy, Terms of Use, and EULA , and then Activate your tenant.5. Review and agree to the terms and conditions of the Privacy policy, Terms of Use, and EULA , and then Activate your tenant.<div data-gb-custom-block data-tag="hint" data-style="info" class="hint hint-info"><p>Activation can take about an hour and does not require you to remain on the activation page. Cortex XSIAM sends a notification to your email when the process is complete.</p></div><div data-gb-custom-block data-tag="hint" data-style="info" class="hint hint-info"><p>Activation can take about an hour and does not require you to remain on the activation page. Cortex XSIAM sends a notification to your email when the process is complete.</p></div>6. After activation, from Cortex Gateway, in the Available Tenants, when hovering over the activated tenant, do the following:6. After activation, from the Cortex Gateway, in the Available Tenants, when hovering over the activated tenant, do the following:• Ensure that you can successfully access the tenant by clicking the Cortex XSIAM tenant name (when the tenant is active).• Ensure that you can successfully access the tenant by clicking the Cortex XSIAM tenant name (when the tenant is active).• In the dialog box, view the tenant status, region, serial number, and license details.• In the dialog box, view the tenant status, region, serial number, and license details.<div data-gb-custom-block data-tag="hint" data-style="info" class="hint hint-info"><p>If you want to change your tenant's name, the subdomain, or activate a development tenant (subject to license), on the right-hand side, click the ellipsis.</p><p>You can only change the subdomain once, and it cannot be undone.</p><p>After deleting the subdomain, you can reuse it after 7 days.</p></div><div data-gb-custom-block data-tag="hint" data-style="info" class="hint hint-info"><p>If you want to change your tenant's name, the subdomain, or activate a development tenant (subject to license), on the right-hand side, click the ellipsis.</p><p>You can only change the subdomain once, and it cannot be undone.</p><p>After deleting the subdomain, you can reuse it after 7 days.</p></div>7. Enable and verify access to Cortex XSIAM communication servers, storage buckets, and various resources in your firewall configuration. For more information, see Enable access to required PANW resources.7. Enable and verify access to Cortex XSIAM communication servers, storage buckets, and various resources in your firewall configuration. For more information, see Enable access to required PANW resources.Show markdown source
@@ -1,10 +1,12 @@ --- -description: Learn how to activate your tenant. +description: >- + Activate Cortex XSIAM tenants in Cortex Gateway, including prerequisites, + encryption, and access configuration. --- # Activate Cortex XSIAM To activate a tenant, you need to log in to Cortex Gateway, a centralized portal for activating and managing tenants, users, roles, and user groups. After activating the tenant, you can then access the tenant. You must repeat this task for each tenant if you have multiple tenants. The activation process involves accessing Cortex Gateway, activating the tenant, and then accessing the tenant's resources. {% hint style="warning" %} ### Prerequisite @@ -32,26 +34,26 @@ How to activate Cortex XSIAM After you sign in, you can view the following: * If you are a CSP Account Admin, you can see tenants allocated to your CSP account and ready for activation. After activation, you cannot move your tenant to a different CSP account. * Tenant details such as license type, number of endpoints, and purchase date. * Tenants that were activated and are now available. If you have more than one Customer Support Portal account, the tenants are displayed according to the Customer Support Portal account name. 3. In the **Available for Activation** section, use the serial number to locate the tenant that needs activation, and then click **Activate**. - <div data-gb-custom-block data-tag="hint" data-style="info" class="hint hint-info"><h3>Note</h3><p>When you activate, a production tenant is first activated. After activation, you can set up a development tenant (subject to your license).</p></div> + <div data-gb-custom-block data-tag="hint" data-style="info" class="hint hint-info"><p>When you activate, a production tenant is activated first. After activation, you can set up a development tenant (subject to your license).</p></div> 4. On the **Tenant Activation** page, define the following: | Parameter | Description | | ----------------- | ------------------------------------------------------------------------------------------------------------------------------------------------------------------------------------------------------------------------------------------------------------------------------------------------------------------------------------------------------------------------------------------------------------------------------------------------------------------------------------------------------------------------------------------------------------------------------------------------------------------------------------------------------------------------------------------------------------------------------------------------------------------------------------------------------------------------------------------------------------------------------------------------------------------------------- | | Tenant Name | Enter the name of the tenant. Use a unique name across your company account up to 59 characters long. | | Region | Geographic location where your tenant will be hosted. For more information about supported regions, see [Cortex XSIAM supported regions](activate-cortex-xsiam/cortex-xsiam-supported-regions). | | Tenant Subdomain | <p>DNS record associated with your tenant. Enter a name that will be used to access the tenant directly using the full URL:</p><p><code>https://<subdomain>xdr.<region>.paloaltonetworks.com</code></p> | | Encryption Method | <p>(Optional) If you want to bring your own keys for encrypting your data, under <strong>Advanced</strong>, select <strong>BYOK</strong> and follow the instructions of the wizard as detailed in <strong>Encryption Method</strong>.</p><ul><li><p>Default encryption (recommended)</p><p>All data stored by Cortex XSIAM is encrypted at rest using a dedicated key management system. Cortex XSIAM provides strict key access controls and auditing, and encrypts user data at rest according to AES-256 encryption standards. We recommend using this default system.</p></li><li><p>BYOK (Bring your own keys)</p><p>BYOK (Bring Your Own Keys) enables you to generate your own encryption keys and securely import and manage them via Cortex Gateway to retain greater control over your tenant data and encryption. This requires <a href="activate-cortex-xsiam/bring-your-own-keys">further setup</a>.</p></li></ul> | 5. Review and **agree to the terms and conditions of the Privacy policy, Terms of Use, and EULA** , and then **Activate** your tenant. <div data-gb-custom-block data-tag="hint" data-style="info" class="hint hint-info"><p>Activation can take about an hour and does not require you to remain on the activation page. Cortex XSIAM sends a notification to your email when the process is complete.</p></div> -6. After activation, from Cortex Gateway, in the **Available Tenants**, when hovering over the activated tenant, do the following: +6. After activation, from the Cortex Gateway, in the **Available Tenants**, when hovering over the activated tenant, do the following: * Ensure that you can successfully access the tenant by clicking the Cortex XSIAM tenant name (when the tenant is active). * In the dialog box, view the tenant status, region, serial number, and license details. <div data-gb-custom-block data-tag="hint" data-style="info" class="hint hint-info"><p>If you want to change your tenant's name, the subdomain, or activate a development tenant (subject to license), on the right-hand side, click the ellipsis.</p><p>You can only change the subdomain once, and it cannot be undone.</p><p>After deleting the subdomain, you can reuse it after 7 days.</p></div> 7. Enable and verify access to Cortex XSIAM communication servers, storage buckets, and various resources in your firewall configuration. For more information, see [Enable access to required PANW resources](https://app.gitbook.com/s/FOhYBYLdbwpnbJgr6uaX/cortex-xdr-3.x-documentation/onboard-and-configure-cortex-xdr/deployment-steps/step-1-activate-cortex-xdr/enable-access-to-required-panw-resources). -
▸ ▾ Bring your own keys modified +11 −11 Two "success" callouts merge into one info hint and the key-rotation wording is tidied; the rotation and disable procedures are unchanged.
xsiam/onboard-cortex-xsiam/deployment-steps/activate-cortex-xsiam/bring-your-own-keysRead it on the Cortex docs portal ↗ Read it here → This file's diff on GitHub ↗
Before After@@ -1,8 +1,14 @@---description: >-Set up, import, rotate, and disable Cortex BYOK encryption keys for CortexXSIAM tenant data.---# Bring your own keys# Bring your own keys### What is Cortex BYOK?### What is Cortex BYOK?Cortex self-managed BYOK (bring your own keys) offers a comprehensive data encryption solution, empowering enterprises to assert complete authority over their encryption key management, while ensuring platform reliability, availability, and responsiveness. It enables you to securely import and manage your own encryption keys via Cortex Gateway. This provides you with enhanced control over your tenant data encryption and accessibility, eliminates reliance on default CSP encryption or third-party key management, and enables you to comply with stringent regulatory requirements.Cortex self-managed BYOK (bring your own keys) offers a comprehensive data encryption solution, empowering enterprises to assert complete authority over their encryption key management, while ensuring platform reliability, availability, and responsiveness. It enables you to securely import and manage your own encryption keys via Cortex Gateway. This provides you with enhanced control over your tenant data encryption and accessibility, eliminates reliance on default CSP encryption or third-party key management, and enables you to comply with stringent regulatory requirements.Unlike self-hosted solutions, Cortex BYOK minimizes exposure to external risks, such as downtime, breaches, or operational disruptions, by reducing dependency on external environments, ensuring availability and responsiveness of your Cortex products.Unlike self-hosted solutions, Cortex BYOK minimizes exposure to external risks, such as downtime, breaches, or operational disruptions, by reducing dependency on external environments, ensuring availability and responsiveness of your Cortex products.@@ -44,30 +50,24 @@ Cortex BYOK uses two keys for encrypting your tenant data at rest: one for the D• If you've already started the activation process and paused, locate your tenant in the Available Tenants list in the Cortex gateway, click Set Up Encryption Keys next to your tenant and set up your keys.• If you've already started the activation process and paused, locate your tenant in the Available Tenants list in the Cortex gateway, click Set Up Encryption Keys next to your tenant and set up your keys.</details></details>Rotate encryption keysRotate encryption keysTo rotate your encryption keys, in the Cortex gateway, open the more options menu next to the tenant, select Rotate Encryption Key, and follow the Bring your own keys (BYOK) setup.To rotate your encryption keys, in the Cortex gateway, open the More options menu next to the tenant, select Rotate Encryption Key, and follow the Bring your own keys (BYOK) setup.To resume the process, in the main gateway, open the more menu next to the tenant, select Continue Rotation, and follow the Bring your own keys (BYOK) setup.As long as the rotation hasn't been completed, you can cancel the rotation process from the three dot menu next to the tenant.To resume the process, in the main gateway, open the more options menu next to the tenant, select Continue Rotation, and follow the Bring your own keys (BYOK) setup.hint successAs long as the rotation hasn't been completed, you can cancel the rotation process from the three-dot menu next to the tenant.NOTE:hint infoThe new keys you import will serve as primary encryption keys for newly generated data.The new keys you import will serve as primary encryption keys for newly generated data.endhinthint successNOTE:For BYOK key rotation, you can select your preferred key import method, replacing the previously fixed default RSA_OAEP_3072_SHA256.For BYOK key rotation, you can select your preferred key import method, replacing the previously fixed default RSA_OAEP_3072_SHA256.The new recommended default is RSA_OAEP_3072_SHA256_AES_256. To use the previous default method, select it manually.The new recommended default is RSA_OAEP_3072_SHA256_AES_256. To use the previous default method, select it manually.endhintendhint</details></details>@@ -83,17 +83,17 @@ To disable your encryption keys, in the main gateway, open the three dot menu neTo disable your encryption keys and deactivate a tenant, you must have an Account Admin role.To disable your encryption keys and deactivate a tenant, you must have an Account Admin role.endhintendhinthint warninghint warningCAUTION:CAUTION:Disabling all encryption keys and deactivating the tenant renders the tenant inaccessible and non-operational.Disabling all encryption keys and deactivating the tenant renders the tenant inaccessible and non-operational.Disabling the keys affects the communication with the agents, may prevent the agents from receiving updates to policies, configurations, and crucial information, and may result in loss of data.Disabling the keys affects communication with the agents, may prevent the agents from receiving updates to policies, configurations, and crucial information, and may result in loss of data.To secure your tenant data and to prevent unauthorized access, re-enabling the keys and re-activating the tenant are strictly controlled and require manual intervention by the Cortex XSIAM Customer Success team.To secure your tenant data and to prevent unauthorized access, re-enabling the keys and re-activating the tenant are strictly controlled and require manual intervention by the Cortex XSIAM Customer Success team.endhintendhint</details></details>To import a new encryption key, whether for initial tenant setup or key rotation, use the Bring your own keys (BYOK) setup.To import a new encryption key, whether for initial tenant setup or key rotation, use the Bring your own keys (BYOK) setup.Show markdown source
@@ -1,8 +1,14 @@ +--- +description: >- + Set up, import, rotate, and disable Cortex BYOK encryption keys for Cortex + XSIAM tenant data. +--- + # Bring your own keys ### What is Cortex BYOK? Cortex self-managed BYOK (bring your own keys) offers a comprehensive data encryption solution, empowering enterprises to assert complete authority over their encryption key management, while ensuring platform reliability, availability, and responsiveness. It enables you to securely import and manage your own encryption keys via Cortex Gateway. This provides you with enhanced control over your tenant data encryption and accessibility, eliminates reliance on default CSP encryption or third-party key management, and enables you to comply with stringent regulatory requirements. Unlike self-hosted solutions, Cortex BYOK minimizes exposure to external risks, such as downtime, breaches, or operational disruptions, by reducing dependency on external environments, ensuring availability and responsiveness of your Cortex products. @@ -44,30 +50,24 @@ Cortex BYOK uses two keys for encrypting your tenant data at rest: one for the D * If you've already started the activation process and paused, locate your tenant in the Available Tenants list in the Cortex gateway, click **Set Up Encryption Keys** next to your tenant and set up your keys. </details> <details> <summary>Rotate encryption keys</summary> -To rotate your encryption keys, in the Cortex gateway, open the more options menu next to the tenant, select **Rotate Encryption Key**, and follow the Bring your own keys (BYOK) setup. - -To resume the process, in the main gateway, open the more menu next to the tenant, select **Continue Rotation**, and follow the Bring your own keys (BYOK) setup. +To rotate your encryption keys, in the Cortex gateway, open the More options menu next to the tenant, select **Rotate Encryption Key**, and follow the Bring your own keys (BYOK) setup. -As long as the rotation hasn't been completed, you can cancel the rotation process from the three dot menu next to the tenant. +To resume the process, in the main gateway, open the more options menu next to the tenant, select **Continue Rotation**, and follow the Bring your own keys (BYOK) setup. -{% hint style="success" %} -**NOTE:** +As long as the rotation hasn't been completed, you can cancel the rotation process from the three-dot menu next to the tenant. +{% hint style="info" %} The new keys you import will serve as primary encryption keys for newly generated data. -{% endhint %} - -{% hint style="success" %} -**NOTE:** For BYOK key rotation, you can select your preferred key import method, replacing the previously fixed default RSA\_OAEP\_3072\_SHA256. The new recommended default is RSA\_OAEP\_3072\_SHA256\_AES\_256. To use the previous default method, select it manually. {% endhint %} </details> @@ -83,17 +83,17 @@ To disable your encryption keys, in the main gateway, open the three dot menu ne To disable your encryption keys and deactivate a tenant, you must have an Account Admin role. {% endhint %} {% hint style="warning" %} **CAUTION:** Disabling all encryption keys and deactivating the tenant renders the tenant inaccessible and non-operational. -Disabling the keys affects the communication with the agents, may prevent the agents from receiving updates to policies, configurations, and crucial information, and may result in loss of data. +Disabling the keys affects communication with the agents, may prevent the agents from receiving updates to policies, configurations, and crucial information, and may result in loss of data. To secure your tenant data and to prevent unauthorized access, re-enabling the keys and re-activating the tenant are strictly controlled and require manual intervention by the Cortex XSIAM Customer Success team. {% endhint %} </details> To import a new encryption key, whether for initial tenant setup or key rotation, use the Bring your own keys (BYOK) setup. -
▸ ▾ Cortex XSIAM supported regions and data residency modified +11 −5 Retitled to "supported regions and data residency"; the Americas, EMEA and JPAC country lists are unchanged.
xsiam/onboard-cortex-xsiam/deployment-steps/activate-cortex-xsiam/cortex-xsiam-supported-regionsRead it on the Cortex docs portal ↗ Read it here → This file's diff on GitHub ↗
Before After@@ -1,21 +1,27 @@# Cortex XSIAM supported regions---description: >-View Cortex XSIAM supported hosting regions and data residency locations inAmericas, EMEA, and JPAC.---The following table lists the regions available to host Cortex XSIAM and any associated Cortex services:# Cortex XSIAM supported regions and data residencyAmericasView the supported Cortex XSIAM hosting regions for tenant deployment and data residency. The following tables list regions for Cortex XSIAM and associated Cortex services.### Cortex XSIAM regions in the AmericasCountry│DescriptionCountry│Description| ------------------ | --------------------------------------------------------------------------------------------------------------------------------------------------------------------------------------------------------------------------------------------------------------------------------------------------------------------------------------------------------------------------------------------------------------------------------- || ------------------ | --------------------------------------------------------------------------------------------------------------------------------------------------------------------------------------------------------------------------------------------------------------------------------------------------------------------------------------------------------------------------------------------------------------------------------- |US (United States)│All Cortex XSIAM logs and ingested data remain hosted within the boundaries of the United States.US (United States)│All Cortex XSIAM logs and ingested data remain hosted within the boundaries of the United States.Brazil (BR)│All Cortex XSIAM logs and ingested data remain hosted within the boundaries of Brazil.Brazil (BR)│All Cortex XSIAM logs and ingested data remain hosted within the boundaries of Brazil.Canada (CA)│All Cortex XSIAM logs and ingested data remain hosted within the boundaries of Canada. However, if you have a WildFire Canada cloud subscription, consider the following:
- You cannot send file submissions for bare-metal analysis.
- You will not be protected against macOS-borne zero-day threats. However, you will receive protection against other macOS malware in regular WildFire updates.
Canada (CA)│All Cortex XSIAM logs and ingested data remain hosted within the boundaries of Canada. However, if you have a WildFire Canada cloud subscription, consider the following:
- You cannot send file submissions for bare-metal analysis.
- You will not be protected against macOS-borne zero-day threats. However, you will receive protection against other macOS malware in regular WildFire updates.
EMEA (Europe, the Middle East, Africa)### Cortex XSIAM regions in EMEACountry│DescriptionCountry│Description| ------------------- | -------------------------------------------------------------------------------------------------- || ------------------- | -------------------------------------------------------------------------------------------------- |Finland (FI)│All Cortex XSIAM logs and ingested data remain hosted within the boundaries of Finland.Finland (FI)│All Cortex XSIAM logs and ingested data remain hosted within the boundaries of Finland.France (FA)│All Cortex XSIAM logs and ingested data remain hosted within the boundaries of France.France (FA)│All Cortex XSIAM logs and ingested data remain hosted within the boundaries of France.Germany (DE)│All Cortex XSIAM logs and ingested data remain hosted within the boundaries of Germany.Germany (DE)│All Cortex XSIAM logs and ingested data remain hosted within the boundaries of Germany.Israel (IL)│All Cortex XSIAM logs and ingested data remain hosted within the boundaries of Israel.Israel (IL)│All Cortex XSIAM logs and ingested data remain hosted within the boundaries of Israel.Italy (IT)│All Cortex XSIAM logs and ingested data remain hosted within the boundaries of Italy.Italy (IT)│All Cortex XSIAM logs and ingested data remain hosted within the boundaries of Italy.@@ -23,17 +29,17 @@ The following table lists the regions available to host Cortex XSIAM and any assPoland (PL)│All Cortex XSIAM logs and ingested data remain hosted within the boundaries of Poland.Poland (PL)│All Cortex XSIAM logs and ingested data remain hosted within the boundaries of Poland.Qatar (QT)│All Cortex XSIAM logs and ingested data remain hosted within the boundaries of Qatar.Qatar (QT)│All Cortex XSIAM logs and ingested data remain hosted within the boundaries of Qatar.Saudi Arabia (SA)│All Cortex XSIAM logs and ingested data remain hosted within the boundaries of Saudi Arabia.Saudi Arabia (SA)│All Cortex XSIAM logs and ingested data remain hosted within the boundaries of Saudi Arabia.South Africa (ZA)│All Cortex XSIAM logs and ingested data remain hosted within the boundaries of South Africa.South Africa (ZA)│All Cortex XSIAM logs and ingested data remain hosted within the boundaries of South Africa.Spain (ES)│All Cortex XSIAM logs and ingested data remain hosted within the boundaries of Spain.Spain (ES)│All Cortex XSIAM logs and ingested data remain hosted within the boundaries of Spain.Switzerland (CH)│All Cortex XSIAM logs and ingested data remain hosted within the boundaries of Switzerland.Switzerland (CH)│All Cortex XSIAM logs and ingested data remain hosted within the boundaries of Switzerland.UK (United Kingdom)│All Cortex XSIAM logs and ingested data remain hosted within the boundaries of the United Kingdom.UK (United Kingdom)│All Cortex XSIAM logs and ingested data remain hosted within the boundaries of the United Kingdom.JPAC (Asia-Pacific)### Cortex XSIAM regions in JPACCountry│DescriptionCountry│Description| ---------------- | ------------------------------------------------------------------------------------------- || ---------------- | ------------------------------------------------------------------------------------------- |Australia (AU)│All Cortex XSIAM logs and ingested data remain hosted within the boundaries of Australia.Australia (AU)│All Cortex XSIAM logs and ingested data remain hosted within the boundaries of Australia.Delhi (DL)│All Cortex XSIAM logs and ingested data remain hosted within the boundaries of Delhi.Delhi (DL)│All Cortex XSIAM logs and ingested data remain hosted within the boundaries of Delhi.India (IN)│All Cortex XSIAM logs and ingested data remain hosted within the boundaries of India.India (IN)│All Cortex XSIAM logs and ingested data remain hosted within the boundaries of India.Indonesia (ID)│All Cortex XSIAM logs and ingested data remain hosted within the boundaries of Indonesia.Indonesia (ID)│All Cortex XSIAM logs and ingested data remain hosted within the boundaries of Indonesia.Japan (JP)│All Cortex XSIAM logs and ingested data remain hosted within the boundaries of Japan.Japan (JP)│All Cortex XSIAM logs and ingested data remain hosted within the boundaries of Japan.Show markdown source
@@ -1,21 +1,27 @@
-# Cortex XSIAM supported regions
+---
+description: >-
+  View Cortex XSIAM supported hosting regions and data residency locations in
+  Americas, EMEA, and JPAC.
+---

-The following table lists the regions available to host Cortex XSIAM and any associated Cortex services:
+# Cortex XSIAM supported regions and data residency

-**Americas**
+View the supported Cortex XSIAM hosting regions for tenant deployment and data residency. The following tables list regions for Cortex XSIAM and associated Cortex services.
+
+### Cortex XSIAM regions in the Americas

 | Country            | Description                                                                                                                                                                                                                                                                                                                                                                                                                       |
 | ------------------ | --------------------------------------------------------------------------------------------------------------------------------------------------------------------------------------------------------------------------------------------------------------------------------------------------------------------------------------------------------------------------------------------------------------------------------- |
 | US (United States) | All Cortex XSIAM logs and ingested data remain hosted within the boundaries of the United States.                                                                                                                                                                                                                                                                                                                                 |
 | Brazil (BR)        | All Cortex XSIAM logs and ingested data remain hosted within the boundaries of Brazil.                                                                                                                                                                                                                                                                                                                                            |
 | Canada (CA)        | <p>All Cortex XSIAM logs and ingested data remain hosted within the boundaries of Canada. However, if you have a WildFire Canada cloud subscription, consider the following:</p><ul><li>You cannot send file submissions for bare-metal analysis.</li><li>You will not be protected against macOS-borne zero-day threats. However, you will receive protection against other macOS malware in regular WildFire updates.</li></ul> |

-**EMEA (Europe, the Middle East, Africa)**
+### Cortex XSIAM regions in EMEA

 | Country             | Description                                                                                        |
 | ------------------- | -------------------------------------------------------------------------------------------------- |
 | Finland (FI)        | All Cortex XSIAM logs and ingested data remain hosted within the boundaries of Finland.            |
 | France (FA)         | All Cortex XSIAM logs and ingested data remain hosted within the boundaries of France.             |
 | Germany (DE)        | All Cortex XSIAM logs and ingested data remain hosted within the boundaries of Germany.            |
 | Israel (IL)         | All Cortex XSIAM logs and ingested data remain hosted within the boundaries of Israel.             |
 | Italy (IT)          | All Cortex XSIAM logs and ingested data remain hosted within the boundaries of Italy.              |
@@ -23,17 +29,17 @@ The following table lists the regions available to host Cortex XSIAM and any ass
 | Poland (PL)         | All Cortex XSIAM logs and ingested data remain hosted within the boundaries of Poland.             |
 | Qatar (QT)          | All Cortex XSIAM logs and ingested data remain hosted within the boundaries of Qatar.              |
 | Saudi Arabia (SA)   | All Cortex XSIAM logs and ingested data remain hosted within the boundaries of Saudi Arabia.       |
 | South Africa (ZA)   | All Cortex XSIAM logs and ingested data remain hosted within the boundaries of South Africa.       |
 | Spain (ES)          | All Cortex XSIAM logs and ingested data remain hosted within the boundaries of Spain.              |
 | Switzerland (CH)    | All Cortex XSIAM logs and ingested data remain hosted within the boundaries of Switzerland.        |
 | UK (United Kingdom) | All Cortex XSIAM logs and ingested data remain hosted within the boundaries of the United Kingdom. |

-**JPAC (Asia-Pacific)**
+### Cortex XSIAM regions in JPAC

 | Country          | Description                                                                                 |
 | ---------------- | ------------------------------------------------------------------------------------------- |
 | Australia (AU)   | All Cortex XSIAM logs and ingested data remain hosted within the boundaries of Australia.   |
 | Delhi (DL)       | All Cortex XSIAM logs and ingested data remain hosted within the boundaries of Delhi.       |
 | India (IN)       | All Cortex XSIAM logs and ingested data remain hosted within the boundaries of India.       |
 | Indonesia (ID)   | All Cortex XSIAM logs and ingested data remain hosted within the boundaries of Indonesia.   |
 | Japan (JP)       | All Cortex XSIAM logs and ingested data remain hosted within the boundaries of Japan.       |
-
▸ ▾ Enable access to required PANW resources modified +6 −3
xsiam/onboard-cortex-xsiam/deployment-steps/activate-cortex-xsiam/enable-access-to-required-panw-resourcesRead it on the Cortex docs portal ↗ Read it here → This file's diff on GitHub ↗
Before After@@ -1,8 +1,14 @@---description: >-Configure firewall access to Cortex XSIAM resources using required FQDNs, IPaddresses, ports, and App-IDs.---# Enable access to required PANW resources# Enable access to required PANW resourcesAfter you receive your account details, enable and verify access to Cortex XSIAM communication servers, storage buckets, and other resources in your firewall configuration.After you receive your account details, enable and verify access to Cortex XSIAM communication servers, storage buckets, and other resources in your firewall configuration.Some required IP addresses are registered in the United States. GeoIP databases might not identify their actual usage location. Customer data remains in your deployment region. Data transmission stays restricted to that region.Some required IP addresses are registered in the United States. GeoIP databases might not identify their actual usage location. Customer data remains in your deployment region. Data transmission stays restricted to that region.Before configuring your firewall, review these guidelines:Before configuring your firewall, review these guidelines:@@ -10,17 +16,14 @@ Before configuring your firewall, review these guidelines:• App-ID limitations: A dash (—) indicates there is no App-ID coverage for a specific resource. For these rows, you must configure your firewall to allow access based on the IP address and port.• App-ID limitations: A dash (—) indicates there is no App-ID coverage for a specific resource. For these rows, you must configure your firewall to allow access based on the IP address and port.• Rule direction: Enable access from the Cortex XDR Agent to the tenant (outbound); this traffic does not need to be bidirectional.• Rule direction: Enable access from the Cortex XDR Agent to the tenant (outbound); this traffic does not need to be bidirectional.• Google Cloud Platform (GCP): For resources listing IP ranges in the GCP, go to the official JSON feeds for the specific IP addresses required for your deployment:• Google Cloud Platform (GCP): For resources listing IP ranges in the GCP, go to the official JSON feeds for the specific IP addresses required for your deployment:• Global subnets: https://www.gstatic.com/ipranges/goog.json• Global subnets: https://www.gstatic.com/ipranges/goog.json• Regional ranges: https://www.gstatic.com/ipranges/cloud.json• Regional ranges: https://www.gstatic.com/ipranges/cloud.json• SSL decryption: If you use SSL decryption and experience difficulty connecting the Cortex XDR agent to the server, we recommend that you add the FQDNs required for access to your SSL Decryption Exclusion list in Device → Certificate Management → SSL Decryption Exclusion.• SSL decryption: If you use SSL decryption and experience difficulty connecting the Cortex XDR agent to the server, we recommend that you add the FQDNs required for access to your SSL Decryption Exclusion list in Device → Certificate Management → SSL Decryption Exclusion.hint infohint info### Note<tenant-name>refers to the selected subdomain of your Cortex XSIAM tenant, and<region>is the region in which your tenant is deployed. For more information, see Cortex XSIAM supported regions.<tenant-name>refers to the selected subdomain of your Cortex XSIAM tenant, and<region>is the region in which your tenant is deployed. For more information, see Cortex XSIAM supported regions.endhintendhintThe following tables list required FQDNs, IP addresses, ports, and App-ID coverage for your deployment.The following tables list required FQDNs, IP addresses, ports, and App-ID coverage for your deployment.FQDN IP Addresses and Port App-ID Coverage Egress <tenant-name>.xdr.<region>.paloaltonetworks.comUsed to connect to the Cortex XSIAM tenant.
IP address by region:
- US (United States): 35.244.250.18:443
- EU (Europe): 35.227.237.180:443
- CA (Canada): 34.120.31.199:443
- UK (United Kingdom): 34.120.87.77:443
- JP (Japan): 35.241.28.254:443
- SG (Singapore): 34.117.211.129:443
- AU (Australia): 34.120.229.65:443
- DE (Germany): 34.98.68.183:443
- IN (India): 35.186.207.80:443
- DL (Delhi): 34.8.67.192:443
- CH (Switzerland): 34.111.6.153:443
- PL (Poland): 34.117.240.208:443
- TW (Taiwan): 34.160.28.41:443
- QT (Qatar): 35.190.0.180:443
- FA (France): 34.111.134.57:443
- IL (Israel): 34.111.129.144:443
- SA (Saudi Arabia): 35.244.157.127:443
- ID (Indonesia): 34.111.58.152:443
- ES (Spain): 34.111.188.248:443
- IT (Italy): 34.8.224.70:443
- KR (South Korea): 34.54.5.247:443
- ZA (South Africa): 34.149.165.12:443
- BR (Brazil): 34.96.83.202:443
- FI (Finland):
34.160.63.63:443
cortex-xdrdistributions.traps.paloaltonetworks.comUsed for the first request in registration flow where the agent passes the distribution id and obtains the
ch-<tenant-name>.traps.paloaltonetworks.comof its tenant.- IP address: 35.223.6.69
- Port: 443
traps-management-servicehttps://lrc-<region>.paloaltonetworks.comwss://lrc-<region>.paloaltonetworks.comUsed in live terminal flow.
IP address by region:
- US (United States): 35.190.88.43:443
- EU (Europe): 35.244.251.25:443
- CA (Canada): 35.203.99.74:443
- UK (United Kingdom): 35.242.159.176:443
- JP (Japan): 34.84.201.32:443
- SG (Singapore): 34.87.61.186:443
- AU (Australia): 35.244.66.177:443
- DE (Germany): 34.107.61.141:443
- IN (India): 35.200.146.253:443
- DL (Delhi): 34.131.116.135:443
- CH (Switzerland): 34.65.213.226:443
- PL (Poland): 34.118.62.80:443
- TW (Taiwan): 34.80.34.30:443
- QT (Qatar): 34.18.34.73:443
- FA (France): 34.163.57.57:443
- IL (Israel): 34.165.43.106:443
- SA (Saudi Arabia): 34.166.54.6:443
- ID (Indonesia): 34.101.214.157:443
- ES (Spain): 34.175.18.78:443
- IT (Italy): 34.154.154.5:443
- KR (South Korea): 34.22.66.91:443
- ZA (South Africa): 34.35.56.170:443
- BR (Brazil): 34.151.236.197:443
- FI (Finland):
34.88.31.230:443
cortex-xdrpanw-xdr-installers-prod-us.storage.googleapis.comUsed to download installers for upgrade actions from the server.
This storage bucket is used for all regions.
- IP ranges in GCP
- Port: 443
cortex-xdrpanw-xdr-payloads-prod-us.storage.googleapis.comUsed to download the executable for the live terminal for XDR agents earlier than version 7.1.0.
This storage bucket is used for all regions.
- IP ranges in GCP
- Port: 443
cortex-xdrglobal-content-profiles-policy.storage.googleapis.comUsed to download content updates.
- IP ranges in GCP
- Port: 443
cortex-xdrpanw-xdr-evr-prod-<region>.storage.googleapis.comUsed to download extended verdict request results in scanning.
- IP ranges in GCP
- Port: 443
cortex-xdrhttps://<region>-docker.pkg.devUsed to download the Kubernetes image from the registry for Kubernetes agents installation.
Refer to Regional Docker registry mapping for your specific tenant location and corresponding Docker registry URL.
- IP ranges in GCP
- Port: 443
Regional Docker registry mapping Tenant location GCP region Registry URL UK
Netherlands (EU)
United States (US)
Canada (CA)
South Korea (KR)
Singapore (SG)
Australia (AU)
Japan (JP)
India (IN)
Germany (DE)
France (FR)
Finland (FI)europe-west2
europe-west4
us-central1
northamerica-northeast1
asia-northeast3
asia-southeast1
australia-southeast1
asia-northeast1
asia-south1
europe-west3
europe-west9
europe-north1europe-west2-docker.pkg.dev
europe-west4-docker.pkg.dev
us-central1-docker.pkg.dev
northamerica-northeast1-docker.pkg.dev
asia-northeast3-docker.pkg.dev
asia-southeast1-docker.pkg.dev
australia-southeast1-docker.pkg.dev
asia-northeast1-docker.pkg.dev
asia-south1-docker.pkg.dev
europe-west3-docker.pkg.dev
europe-west9-docker.pkg.dev
dc-<tenant-name>.traps.paloaltonetworks.comUsed for EDR data upload.
IP address by region:
- US (United States): 34.98.77.231:443
- EU (Europe): 34.102.140.103:443
- CA (Canada): 34.96.120.25:443
- UK (United Kingdom): 35.244.133.254:443
- JP (Japan): 34.95.66.187:443
- SG (Singapore): 34.120.142.18:443
- AU (Australia): 34.102.237.151:443
- DE (Germany): 34.107.161.143:443
- IN (India): 34.120.213.187:443
- DL (Delhi): 136.110.132.208:443
- CH (Switzerland): 34.149.180.250:443
- PL (Poland): 35.190.13.237:443
- TW (Taiwan): 34.149.248.76:443
- QT (Qatar): 34.107.129.254:443
- FA (France): 34.36.155.211:443
- IL (Israel): 34.128.157.130:443
- SA (Saudi Arabia): 34.107.213.85:443
- ID (Indonesia): 34.128.156.84:443
- ES (Spain): 34.120.102.147:443
- IT (Italy): 34.8.234.58:443
- KR (South Korea): 34.54.155.245:443
- ZA (South Africa): 35.190.79.68:443
- BR (Brazil): 136.110.146.246:443
- FI (Finland):
136.110.165.34:443
traps-management-servicech-<tenant-name>.traps.paloaltonetworks.comUsed for all other requests between the agent and its tenant server, including heartbeat, uploads, action results, and scan reports.
IP address by region:
- US (United States): 34.98.77.231:443
- EU (Europe): 34.102.140.103:443
- CA (Canada): 34.96.120.25:443
- UK (United Kingdom): 35.244.133.254:443
- JP (Japan): 34.95.66.187:443
- SG (Singapore): 34.120.142.18:443
- AU (Australia): 34.102.237.151:443
- DE (Germany): 34.107.161.143:443
- IN (India): 34.120.213.188:443
- DL (Delhi): 136.110.132.208:443
- CH (Switzerland): 34.149.180.250:443
- PL (Poland): 35.190.13.237:443
- TW (Taiwan): 34.149.248.76:443
- QT (Qatar): 34.107.129.254:443
- FA (France): 34.36.155.211:443
- IL (Israel): 34.128.157.130:443
- SA (Saudi Arabia): 34.107.213.85:443
- ID (Indonesia): 34.128.156.84:443
- ES (Spain): 34.120.102.147:443
- IT (Italy): 34.8.234.58:443
- KR (South Korea): 34.54.155.245:443
- ZA (South Africa): 35.190.79.68:443
- BR (Brazil): 136.110.146.246:443
- FI (Finland):
136.110.165.34:443
traps-management-serviceapi-<tenant-name>.xdr.<region>.paloaltonetworks.comUsed for API requests and responses and to connect to an engine.
IP address by region:
- US (United States): 35.222.81.194:443
- EU (Europe): 34.90.67.58:443
- CA (Canada): 35.203.82.121:443
- UK (United Kingdom): 34.89.56.78:443
- JP (Japan): 34.84.125.129:443
- SG (Singapore): 34.87.83.144:443
- AU (Australia): 35.189.18.208:443
- DE (Germany): 34.107.57.23:443
- IN (India): 35.200.158.164:443
- DL (Delhi): 34.131.165.103:443
- CH (Switzerland): 34.65.248.119:443
- PL (Poland): 34.116.216.55:443
- TW (Taiwan): 35.234.8.249:443
- QT (Qatar): 34.18.46.240:443
- FA (France): 34.155.222.152:443
- IL (Israel): 34.165.156.139:443
- SA (Saudi Arabia): 34.166.58.79:443
- ID (Indonesia): 34.128.115.238:443
- ES (Spain): 34.175.30.176:443
- IT (Italy): 34.154.195.120:443
- KR (South Korea): 34.64.54.175:443
- ZA (South Africa): 34.35.64.191:443
- BR (Brazil): 34.39.136.78:443
- FI (Finland):
35.228.73.215:443
— cc-<tenant-name>.traps.paloaltonetworks.comUsed for get-verdict requests.
For agents on endpoints, you must allow the IP address for the closest region to ensure connectivity. Endpoints use latency-based routing. An agent that belongs to a US tenant, for example, but that is physically located in Singapore, routes to Singapore to get the verdict.
IP address by region:
- US (United States): 35.224.140.142:443
- EU (Europe): 34.90.71.103:443
- CA (Canada): 35.203.35.23:443
- UK (United Kingdom): 34.89.42.214:443
- JP (Japan): 34.84.225.105:443
- SG (Singapore): 35.247.161.94:443
- AU (Australia): 35.201.23.188:443
- DE (Germany): 35.242.201.199:443
- IN (India): 35.244.57.196:443
- DL (Delhi): 34.131.47.126:443
- CH (Switzerland): 34.65.137.215:443
- PL (Poland): 34.116.213.71:443
- TW (Taiwan): 35.229.186.216:443
- QT (Qatar): 34.18.53.229:443
- FA (France): 34.155.110.169:443
- IL (Israel): 34.165.2.110:443
- SA (Saudi Arabia): 34.166.53.160:443
- ID (Indonesia): 34.101.155.198:443
- ES (Spain): 34.175.205.166:443
- IT (Italy): 34.154.230.76:443
- KR (South Korea): 34.64.228.117:443
- ZA (South Africa): 34.35.13.198:443
- BR (Brazil): 34.39.195.104:443
- FI (Finland):
35.228.118.177:443
traps-management-servicexdr-<region>-<project ID>-tim-indicators.storage.googleapis.comUsed to download the IOC indicators from the tenant.
IP address by region:
- US (United States): 35.224.140.142:443
- EU (Europe): 34.90.71.103:443
- CA (Canada): 35.203.35.23:443
- UK (United Kingdom): 34.89.42.214:443
- JP (Japan): 34.84.225.105:443
- SG (Singapore): 35.247.161.94:443
- AU (Australia): 35.201.23.188:443
- DE (Germany): 35.242.201.199:443
- IN (India): 35.244.57.196:443
- DL (Delhi): 34.131.47.126:443
- CH (Switzerland): 34.65.137.215:443
- PL (Poland): 34.116.213.71:443
- TW (Taiwan): 35.229.186.216:443
- QT (Qatar): 34.18.53.229:443
- FA (France): 34.155.110.169:443
- IL (Israel): 34.165.2.110:443
- SA (Saudi Arabia): 34.166.53.160:443
- ID (Indonesia): 34.101.155.198:443
- ES (Spain): 34.175.205.166:443
- IT (Italy): 34.154.230.76:443
- KR (South Korea): 34.64.228.117:443
- ZA (South Africa): 34.35.13.198:443
- BR (Brazil): 34.39.195.104:443
- FI (Finland):
35.228.118.177:443
cortex-xdrBroker VM Resources
Required for deployments that use Broker VM features
xdr-ova-installers-prod-us.storage.googleapis.com
Used to download Broker VM images from the server.
This storage bucket is used for all regions.
- IP ranges in GCP
- Port: 443
cortex-xdrbr-<tenant-name>.xdr.<region>.paloaltonetworks.comIP address by region:
- US (United States): 104.155.131.72:443
- EU (Europe): 34.91.128.226:443
- CA (Canada): 34.95.8.232:443
- UK (United Kingdom): 35.197.219.110:443
- JP (Japan):34.85.74.43:443
- SG (Singapore): 34.87.167.125:443
- AU (Australia): 35.244.93.0:443
- DE (Germany): 35.198.112.13:443
- IN (India): 35.200.234.99:443
- DL (Delhi): 34.131.131.141:443
- CH (Switzerland): 34.65.51.103:443
- PL (Poland): 34.116.176.97:443
- TW (Taiwan): 34.80.230.166:443
- QT (Qatar): 34.18.37.73:443
- FA (France): 34.155.90.61:443
- IL (Israel): 34.165.24.222:443
- SA (Saudi Arabia): 34.166.55.153:443
- ID (Indonesia): 34.101.101.170:443
- ES (Spain): 34.175.182.55:443
- IT (Italy): 34.154.168.139:443
- KR (South Korea): 34.64.46.249:443
- ZA (South Africa): 34.35.45.251:443
- BR (Brazil): 35.198.38.182:443
- FI (Finland):
34.88.26.246:443
— distributions.traps.paloaltonetworks.com- IP address: 35.223.6.69
- Port: 443
traps-management-servicetime.google.compool.ntp.org
UDP port: 123 — App Login and Authentication identity.paloaltonetworks.com
(SSO)
- IP address: 34.120.119.85
- Port: 443
— login.paloaltonetworks.com
(SSO)
- IP address: 34.102.139.110
- Port: 443
— In-App Help Center and Notifications data.pendo.io Port: 443 — pendo-static-5664029141630976.storage.googleapis.com Port: 443 — Email Notifications — IP address for all regions: 159.183.150.248 — Ingress
These IPs are used for communication between Cortex XSIAM and your resources. Use them when sending data out from your tenant.
FI (Finland):
- 34.88.97.182
- 34.88.189.1
US (United States)
- 34.132.108.184
- 34.69.63.16
EU (Europe)
- 34.147.107.51
- 34.91.26.125
CA (Canada)
- 35.203.108.13
- 35.203.101.162
UK (United Kingdom)
- 35.242.180.163
- 34.105.173.229
JP (Japan)
- 35.200.3.131
- 34.146.181.233
SG (Singapore)
- 35.240.243.57
- 34.126.183.208
AU (Australia)
- 34.151.83.236
- 34.116.67.90
DE (Germany)
- 35.234.118.195
- 34.89.183.45
IN (India)
- 35.200.175.78
- 34.93.9.198
CH (Switzerland)
- 34.65.108.153
- 34.65.155.169
PL (Poland)
- 34.118.48.171
- 34.116.202.235
TW (Taiwan)
- 34.80.133.68
- 35.234.18.10
QT (Qatar)
- 34.18.34.118
- 34.18.39.155
FA (France)
- 34.155.5.117
- 34.155.41.247
IL (Israel)
- 34.165.33.165
- 34.165.27.131
SA (Saudi Arabia)
- 34.166.61.81
- 34.166.58.213
ID (Indonesia)
- 34.128.126.138
- 34.128.82.158
ES (Spain)
- 34.175.46.46
- 34.175.80.182
IT (Italy)
- 34.154.23.156
- 34.154.186.12
KR (South Korea)
- 34.64.93.168
- 34.64.237.45
ZA (South Africa):
- 34.35.42.196
- 34.35.79.219
cortex-xdrOutbound IPs for engines IP addresses by region
FI (Finland)
- 35.228.175.228
- 35.228.44.44
US (United States)
- 35.225.156.101
- 34.69.88.119
EU (Europe)
- 34.147.67.188
- 34.90.16.31
CA (Canada)
- 35.203.57.162
- 35.203.90.79
UK (United Kingdom)
- 34.142.3.42
- 34.142.44.136
JP (Japan)
- 34.146.60.215
- 34.84.93.160
SG (Singapore)
- 35.240.144.192
- 35.240.255.15
AU (Australia)
- 35.244.73.76
- 35.201.22.63
DE (Germany)
- 34.107.83.197
- 34.159.53.97
IN (India)
- 35.244.5.205
- 34.93.118.113
DL (Delhi)
- 34.131.207.151
- 34.126.212.40
CH (Switzerland)
- 34.65.222.25
- 34.65.233.60
PL (Poland)
- 34.118.92.214
- 34.116.223.119
TW (Taiwan)
- 104.199.223.229
- 34.81.38.132
QT (Qatar)
- 34.18.39.0
- 34.18.32.96
FA (France)
- 34.155.197.131
- 34.155.5.100
IL (Israel)
- 34.165.46.47
- 34.165.17.246
SA (Saudi Arabia)
- 34.166.58.243
- 34.166.54.238
ID (Indonesia)
- 34.101.125.66
- 34.101.218.184
ES (Spain)
- 34.175.255.99
- 34.175.230.35
IT (Italy)
- 34.154.173.134
- 34.154.229.60
KR (South Korea)
- 34.64.189.205
- 34.64.45.118
ZA (South Africa)
- 34.35.70.193
- 34.35.80.189
BR (Brazil)
- 35.199.96.109
- 34.39.161.254
— Collect third-party data from your SaaS and Cloud resources — IP address by region.
FI (Finland)
- 35.228.192.167
- 34.88.193.126
US (United States)
- 34.66.69.154
- 35.202.21.123
AU (Australia)
- 35.197.181.108
- 35.197.175.44
CA (Canada)
- 34.95.33.72
- 34.95.62.136
SG (Singapore)
- 35.247.148.38
- 35.247.173.40
JP (Japan)
- 34.85.68.167
- 34.84.99.239
IN (India)
- 34.93.3.196
- 34.93.175.218
DL (Delhi)
- 34.131.111.87
- 34.131.101.138
DE (Germany)
- 34.89.197.46
- 34.107.3.224
UK (United Kingdom)
- 34.105.227.146
- 34.105.137.22
EU (Europe)
- 34.90.70.107
- 35.204.129.196
CH (Switzerland)
- 34.65.225.124
- 34.65.89.6
PL (Poland)
- 34.118.71.237
- 34.118.124.130
TW (Taiwan)
- 35.201.142.86
- 35.189.176.163
QT (Qatar)
- 34.18.44.71
- 34.18.30.132
FA (France)
- 34.163.125.167
- 34.163.155.105
IL (Israel)
- 34.165.131.171
- 34.165.120.206
SA (Saudi Arabia)
- 34.166.59.20
- 34.166.53.242
ID (Indonesia)
- 34.101.158.32
- 34.101.79.159
ES (Spain)
- 34.175.27.251
- 34.175.198.50
IT (Italy)
- 34.154.208.247
- 34.154.243.11
KR (South Korea)
- 34.64.107.163
- 34.64.84.25
ZA (South Africa):
- 34.35.69.156
- 34.35.60.86
BR (Brazil)
- 34.39.177.125
- 34.39.140.36
cortex-xdrLog Forwarding to a Syslog Receiver See Integrate a syslog receiver. FQDN IP Addresses and Port App-ID Coverage Egress <tenant-name>.xdr.<region>.paloaltonetworks.comUsed to connect to the Cortex XSIAM tenant.
IP address by region:
- US (United States): 35.244.250.18:443
- EU (Europe): 35.227.237.180:443
- CA (Canada): 34.120.31.199:443
- UK (United Kingdom): 34.120.87.77:443
- JP (Japan): 35.241.28.254:443
- SG (Singapore): 34.117.211.129:443
- AU (Australia): 34.120.229.65:443
- DE (Germany): 34.98.68.183:443
- IN (India): 35.186.207.80:443
- DL (Delhi): 34.8.67.192:443
- CH (Switzerland): 34.111.6.153:443
- PL (Poland): 34.117.240.208:443
- TW (Taiwan): 34.160.28.41:443
- QT (Qatar): 35.190.0.180:443
- FA (France): 34.111.134.57:443
- IL (Israel): 34.111.129.144:443
- SA (Saudi Arabia): 35.244.157.127:443
- ID (Indonesia): 34.111.58.152:443
- ES (Spain): 34.111.188.248:443
- IT (Italy): 34.8.224.70:443
- KR (South Korea): 34.54.5.247:443
- ZA (South Africa): 34.149.165.12:443
- BR (Brazil): 34.96.83.202:443
- FI (Finland):
34.160.63.63:443
cortex-xdrdistributions.traps.paloaltonetworks.comUsed for the first request in registration flow where the agent passes the distribution id and obtains the
ch-<tenant-name>.traps.paloaltonetworks.comof its tenant.- IP address: 35.223.6.69
- Port: 443
traps-management-servicehttps://lrc-<region>.paloaltonetworks.comwss://lrc-<region>.paloaltonetworks.comUsed in live terminal flow.
IP address by region:
- US (United States): 35.190.88.43:443
- EU (Europe): 35.244.251.25:443
- CA (Canada): 35.203.99.74:443
- UK (United Kingdom): 35.242.159.176:443
- JP (Japan): 34.84.201.32:443
- SG (Singapore): 34.87.61.186:443
- AU (Australia): 35.244.66.177:443
- DE (Germany): 34.107.61.141:443
- IN (India): 35.200.146.253:443
- DL (Delhi): 34.131.116.135:443
- CH (Switzerland): 34.65.213.226:443
- PL (Poland): 34.118.62.80:443
- TW (Taiwan): 34.80.34.30:443
- QT (Qatar): 34.18.34.73:443
- FA (France): 34.163.57.57:443
- IL (Israel): 34.165.43.106:443
- SA (Saudi Arabia): 34.166.54.6:443
- ID (Indonesia): 34.101.214.157:443
- ES (Spain): 34.175.18.78:443
- IT (Italy): 34.154.154.5:443
- KR (South Korea): 34.22.66.91:443
- ZA (South Africa): 34.35.56.170:443
- BR (Brazil): 34.151.236.197:443
- FI (Finland):
34.88.31.230:443
cortex-xdrpanw-xdr-installers-prod-us.storage.googleapis.comUsed to download installers for upgrade actions from the server.
This storage bucket is used for all regions.
- IP ranges in GCP
- Port: 443
cortex-xdrpanw-xdr-payloads-prod-us.storage.googleapis.comUsed to download the executable for the live terminal for XDR agents earlier than version 7.1.0.
This storage bucket is used for all regions.
- IP ranges in GCP
- Port: 443
cortex-xdrglobal-content-profiles-policy.storage.googleapis.comUsed to download content updates.
- IP ranges in GCP
- Port: 443
cortex-xdrpanw-xdr-evr-prod-<region>.storage.googleapis.comUsed to download extended verdict request results in scanning.
- IP ranges in GCP
- Port: 443
cortex-xdrhttps://<region>-docker.pkg.devUsed to download the Kubernetes image from the registry for Kubernetes agents installation.
Refer to Regional Docker registry mapping for your specific tenant location and corresponding Docker registry URL.
- IP ranges in GCP
- Port: 443
Regional Docker registry mapping Tenant location GCP region Registry URL UK
Netherlands (EU)
United States (US)
Canada (CA)
South Korea (KR)
Singapore (SG)
Australia (AU)
Japan (JP)
India (IN)
Germany (DE)
France (FR)
Finland (FI)europe-west2
europe-west4
us-central1
northamerica-northeast1
asia-northeast3
asia-southeast1
australia-southeast1
asia-northeast1
asia-south1
europe-west3
europe-west9
europe-north1europe-west2-docker.pkg.dev
europe-west4-docker.pkg.dev
us-central1-docker.pkg.dev
northamerica-northeast1-docker.pkg.dev
asia-northeast3-docker.pkg.dev
asia-southeast1-docker.pkg.dev
australia-southeast1-docker.pkg.dev
asia-northeast1-docker.pkg.dev
asia-south1-docker.pkg.dev
europe-west3-docker.pkg.dev
europe-west9-docker.pkg.dev
dc-<tenant-name>.traps.paloaltonetworks.comUsed for EDR data upload.
IP address by region:
- US (United States): 34.98.77.231:443
- EU (Europe): 34.102.140.103:443
- CA (Canada): 34.96.120.25:443
- UK (United Kingdom): 35.244.133.254:443
- JP (Japan): 34.95.66.187:443
- SG (Singapore): 34.120.142.18:443
- AU (Australia): 34.102.237.151:443
- DE (Germany): 34.107.161.143:443
- IN (India): 34.120.213.187:443
- DL (Delhi): 136.110.132.208:443
- CH (Switzerland): 34.149.180.250:443
- PL (Poland): 35.190.13.237:443
- TW (Taiwan): 34.149.248.76:443
- QT (Qatar): 34.107.129.254:443
- FA (France): 34.36.155.211:443
- IL (Israel): 34.128.157.130:443
- SA (Saudi Arabia): 34.107.213.85:443
- ID (Indonesia): 34.128.156.84:443
- ES (Spain): 34.120.102.147:443
- IT (Italy): 34.8.234.58:443
- KR (South Korea): 34.54.155.245:443
- ZA (South Africa): 35.190.79.68:443
- BR (Brazil): 136.110.146.246:443
- FI (Finland):
136.110.165.34:443
traps-management-servicech-<tenant-name>.traps.paloaltonetworks.comUsed for all other requests between the agent and its tenant server, including heartbeat, uploads, action results, and scan reports.
IP address by region:
- US (United States): 34.98.77.231:443
- EU (Europe): 34.102.140.103:443
- CA (Canada): 34.96.120.25:443
- UK (United Kingdom): 35.244.133.254:443
- JP (Japan): 34.95.66.187:443
- SG (Singapore): 34.120.142.18:443
- AU (Australia): 34.102.237.151:443
- DE (Germany): 34.107.161.143:443
- IN (India): 34.120.213.188:443
- DL (Delhi): 136.110.132.208:443
- CH (Switzerland): 34.149.180.250:443
- PL (Poland): 35.190.13.237:443
- TW (Taiwan): 34.149.248.76:443
- QT (Qatar): 34.107.129.254:443
- FA (France): 34.36.155.211:443
- IL (Israel): 34.128.157.130:443
- SA (Saudi Arabia): 34.107.213.85:443
- ID (Indonesia): 34.128.156.84:443
- ES (Spain): 34.120.102.147:443
- IT (Italy): 34.8.234.58:443
- KR (South Korea): 34.54.155.245:443
- ZA (South Africa): 35.190.79.68:443
- BR (Brazil): 136.110.146.246:443
- FI (Finland):
136.110.165.34:443
traps-management-serviceapi-<tenant-name>.xdr.<region>.paloaltonetworks.comUsed for API requests and responses and to connect to an engine.
IP address by region:
- US (United States): 35.222.81.194:443
- EU (Europe): 34.90.67.58:443
- CA (Canada): 35.203.82.121:443
- UK (United Kingdom): 34.89.56.78:443
- JP (Japan): 34.84.125.129:443
- SG (Singapore): 34.87.83.144:443
- AU (Australia): 35.189.18.208:443
- DE (Germany): 34.107.57.23:443
- IN (India): 35.200.158.164:443
- DL (Delhi): 34.131.165.103:443
- CH (Switzerland): 34.65.248.119:443
- PL (Poland): 34.116.216.55:443
- TW (Taiwan): 35.234.8.249:443
- QT (Qatar): 34.18.46.240:443
- FA (France): 34.155.222.152:443
- IL (Israel): 34.165.156.139:443
- SA (Saudi Arabia): 34.166.58.79:443
- ID (Indonesia): 34.128.115.238:443
- ES (Spain): 34.175.30.176:443
- IT (Italy): 34.154.195.120:443
- KR (South Korea): 34.64.54.175:443
- ZA (South Africa): 34.35.64.191:443
- BR (Brazil): 34.39.136.78:443
- FI (Finland):
35.228.73.215:443
— cc-<tenant-name>.traps.paloaltonetworks.comUsed for get-verdict requests.
For agents on endpoints, you must allow the IP address for the closest region to ensure connectivity. Endpoints use latency-based routing. An agent that belongs to a US tenant, for example, but that is physically located in Singapore, routes to Singapore to get the verdict.
IP address by region:
- US (United States): 35.224.140.142:443
- EU (Europe): 34.90.71.103:443
- CA (Canada): 35.203.35.23:443
- UK (United Kingdom): 34.89.42.214:443
- JP (Japan): 34.84.225.105:443
- SG (Singapore): 35.247.161.94:443
- AU (Australia): 35.201.23.188:443
- DE (Germany): 35.242.201.199:443
- IN (India): 35.244.57.196:443
- DL (Delhi): 34.131.47.126:443
- CH (Switzerland): 34.65.137.215:443
- PL (Poland): 34.116.213.71:443
- TW (Taiwan): 35.229.186.216:443
- QT (Qatar): 34.18.53.229:443
- FA (France): 34.155.110.169:443
- IL (Israel): 34.165.2.110:443
- SA (Saudi Arabia): 34.166.53.160:443
- ID (Indonesia): 34.101.155.198:443
- ES (Spain): 34.175.205.166:443
- IT (Italy): 34.154.230.76:443
- KR (South Korea): 34.64.228.117:443
- ZA (South Africa): 34.35.13.198:443
- BR (Brazil): 34.39.195.104:443
- FI (Finland):
35.228.118.177:443
traps-management-servicexdr-<region>-<project ID>-tim-indicators.storage.googleapis.comUsed to download the IOC indicators from the tenant.
IP address by region:
- US (United States): 35.224.140.142:443
- EU (Europe): 34.90.71.103:443
- CA (Canada): 35.203.35.23:443
- UK (United Kingdom): 34.89.42.214:443
- JP (Japan): 34.84.225.105:443
- SG (Singapore): 35.247.161.94:443
- AU (Australia): 35.201.23.188:443
- DE (Germany): 35.242.201.199:443
- IN (India): 35.244.57.196:443
- DL (Delhi): 34.131.47.126:443
- CH (Switzerland): 34.65.137.215:443
- PL (Poland): 34.116.213.71:443
- TW (Taiwan): 35.229.186.216:443
- QT (Qatar): 34.18.53.229:443
- FA (France): 34.155.110.169:443
- IL (Israel): 34.165.2.110:443
- SA (Saudi Arabia): 34.166.53.160:443
- ID (Indonesia): 34.101.155.198:443
- ES (Spain): 34.175.205.166:443
- IT (Italy): 34.154.230.76:443
- KR (South Korea): 34.64.228.117:443
- ZA (South Africa): 34.35.13.198:443
- BR (Brazil): 34.39.195.104:443
- FI (Finland):
35.228.118.177:443
cortex-xdrBroker VM Resources
Required for deployments that use Broker VM features
xdr-ova-installers-prod-us.storage.googleapis.com
Used to download Broker VM images from the server.
This storage bucket is used for all regions.
- IP ranges in GCP
- Port: 443
cortex-xdrbr-<tenant-name>.xdr.<region>.paloaltonetworks.comIP address by region:
- US (United States): 104.155.131.72:443
- EU (Europe): 34.91.128.226:443
- CA (Canada): 34.95.8.232:443
- UK (United Kingdom): 35.197.219.110:443
- JP (Japan):34.85.74.43:443
- SG (Singapore): 34.87.167.125:443
- AU (Australia): 35.244.93.0:443
- DE (Germany): 35.198.112.13:443
- IN (India): 35.200.234.99:443
- DL (Delhi): 34.131.131.141:443
- CH (Switzerland): 34.65.51.103:443
- PL (Poland): 34.116.176.97:443
- TW (Taiwan): 34.80.230.166:443
- QT (Qatar): 34.18.37.73:443
- FA (France): 34.155.90.61:443
- IL (Israel): 34.165.24.222:443
- SA (Saudi Arabia): 34.166.55.153:443
- ID (Indonesia): 34.101.101.170:443
- ES (Spain): 34.175.182.55:443
- IT (Italy): 34.154.168.139:443
- KR (South Korea): 34.64.46.249:443
- ZA (South Africa): 34.35.45.251:443
- BR (Brazil): 35.198.38.182:443
- FI (Finland):
34.88.26.246:443
— distributions.traps.paloaltonetworks.com- IP address: 35.223.6.69
- Port: 443
traps-management-servicetime.google.compool.ntp.org
UDP port: 123 — App Login and Authentication identity.paloaltonetworks.com
(SSO)
- IP address: 34.120.119.85
- Port: 443
— login.paloaltonetworks.com
(SSO)
- IP address: 34.102.139.110
- Port: 443
— In-App Help Center and Notifications data.pendo.io Port: 443 — pendo-static-5664029141630976.storage.googleapis.com Port: 443 — Email Notifications — IP address for all regions: 159.183.150.248 — Ingress
These IPs are used for communication between Cortex XSIAM and your resources. Use them when sending data out from your tenant.
FI (Finland):
- 34.88.97.182
- 34.88.189.1
US (United States)
- 34.132.108.184
- 34.69.63.16
EU (Europe)
- 34.147.107.51
- 34.91.26.125
CA (Canada)
- 35.203.108.13
- 35.203.101.162
UK (United Kingdom)
- 35.242.180.163
- 34.105.173.229
JP (Japan)
- 35.200.3.131
- 34.146.181.233
SG (Singapore)
- 35.240.243.57
- 34.126.183.208
AU (Australia)
- 34.151.83.236
- 34.116.67.90
DE (Germany)
- 35.234.118.195
- 34.89.183.45
IN (India)
- 35.200.175.78
- 34.93.9.198
CH (Switzerland)
- 34.65.108.153
- 34.65.155.169
PL (Poland)
- 34.118.48.171
- 34.116.202.235
TW (Taiwan)
- 34.80.133.68
- 35.234.18.10
QT (Qatar)
- 34.18.34.118
- 34.18.39.155
FA (France)
- 34.155.5.117
- 34.155.41.247
IL (Israel)
- 34.165.33.165
- 34.165.27.131
SA (Saudi Arabia)
- 34.166.61.81
- 34.166.58.213
ID (Indonesia)
- 34.128.126.138
- 34.128.82.158
ES (Spain)
- 34.175.46.46
- 34.175.80.182
IT (Italy)
- 34.154.23.156
- 34.154.186.12
KR (South Korea)
- 34.64.93.168
- 34.64.237.45
ZA (South Africa):
- 34.35.42.196
- 34.35.79.219
cortex-xdrOutbound IPs for engines IP addresses by region
FI (Finland)
- 35.228.175.228
- 35.228.44.44
US (United States)
- 35.225.156.101
- 34.69.88.119
EU (Europe)
- 34.147.67.188
- 34.90.16.31
CA (Canada)
- 35.203.57.162
- 35.203.90.79
UK (United Kingdom)
- 34.142.3.42
- 34.142.44.136
JP (Japan)
- 34.146.60.215
- 34.84.93.160
SG (Singapore)
- 35.240.144.192
- 35.240.255.15
AU (Australia)
- 35.244.73.76
- 35.201.22.63
DE (Germany)
- 34.107.83.197
- 34.159.53.97
IN (India)
- 35.244.5.205
- 34.93.118.113
DL (Delhi)
- 34.131.207.151
- 34.126.212.40
CH (Switzerland)
- 34.65.222.25
- 34.65.233.60
PL (Poland)
- 34.118.92.214
- 34.116.223.119
TW (Taiwan)
- 104.199.223.229
- 34.81.38.132
QT (Qatar)
- 34.18.39.0
- 34.18.32.96
FA (France)
- 34.155.197.131
- 34.155.5.100
IL (Israel)
- 34.165.46.47
- 34.165.17.246
SA (Saudi Arabia)
- 34.166.58.243
- 34.166.54.238
ID (Indonesia)
- 34.101.125.66
- 34.101.218.184
ES (Spain)
- 34.175.255.99
- 34.175.230.35
IT (Italy)
- 34.154.173.134
- 34.154.229.60
KR (South Korea)
- 34.64.189.205
- 34.64.45.118
ZA (South Africa)
- 34.35.70.193
- 34.35.80.189
BR (Brazil)
- 35.199.96.109
- 34.39.161.254
— Collect third-party data from your SaaS and Cloud resources — IP address by region.
FI (Finland)
- 35.228.192.167
- 34.88.193.126
US (United States)
- 34.66.69.154
- 35.202.21.123
AU (Australia)
- 35.197.181.108
- 35.197.175.44
CA (Canada)
- 34.95.33.72
- 34.95.62.136
SG (Singapore)
- 35.247.148.38
- 35.247.173.40
JP (Japan)
- 34.85.68.167
- 34.84.99.239
IN (India)
- 34.93.3.196
- 34.93.175.218
DL (Delhi)
- 34.131.111.87
- 34.131.101.138
DE (Germany)
- 34.89.197.46
- 34.107.3.224
UK (United Kingdom)
- 34.105.227.146
- 34.105.137.22
EU (Europe)
- 34.90.70.107
- 35.204.129.196
CH (Switzerland)
- 34.65.225.124
- 34.65.89.6
PL (Poland)
- 34.118.71.237
- 34.118.124.130
TW (Taiwan)
- 35.201.142.86
- 35.189.176.163
QT (Qatar)
- 34.18.44.71
- 34.18.30.132
FA (France)
- 34.163.125.167
- 34.163.155.105
IL (Israel)
- 34.165.131.171
- 34.165.120.206
SA (Saudi Arabia)
- 34.166.59.20
- 34.166.53.242
ID (Indonesia)
- 34.101.158.32
- 34.101.79.159
ES (Spain)
- 34.175.27.251
- 34.175.198.50
IT (Italy)
- 34.154.208.247
- 34.154.243.11
KR (South Korea)
- 34.64.107.163
- 34.64.84.25
ZA (South Africa):
- 34.35.69.156
- 34.35.60.86
BR (Brazil)
- 34.39.177.125
- 34.39.140.36
cortex-xdrLog Forwarding to a Syslog Receiver See Integrate a syslog receiver. Show markdown source
@@ -1,8 +1,14 @@ +--- +description: >- + Configure firewall access to Cortex XSIAM resources using required FQDNs, IP + addresses, ports, and App-IDs. +--- + # Enable access to required PANW resources After you receive your account details, enable and verify access to Cortex XSIAM communication servers, storage buckets, and other resources in your firewall configuration. Some required IP addresses are registered in the United States. GeoIP databases might not identify their actual usage location. Customer data remains in your deployment region. Data transmission stays restricted to that region. Before configuring your firewall, review these guidelines: @@ -10,17 +16,14 @@ Before configuring your firewall, review these guidelines: * App-ID limitations: A dash (—) indicates there is no App-ID coverage for a specific resource. For these rows, you must configure your firewall to allow access based on the IP address and port. * Rule direction: Enable access from the Cortex XDR Agent to the tenant (outbound); this traffic does not need to be bidirectional. * Google Cloud Platform (GCP): For resources listing IP ranges in the GCP, go to the official JSON feeds for the specific IP addresses required for your deployment: * Global subnets: [https://www.gstatic.com/ipranges/goog.json](https://www.gstatic.com/ipranges/goog.json) * Regional ranges: [https://www.gstatic.com/ipranges/cloud.json](https://www.gstatic.com/ipranges/cloud.json) * SSL decryption: If you use SSL decryption and experience difficulty connecting the Cortex XDR agent to the server, we recommend that you add the FQDNs required for access to your SSL Decryption Exclusion list in Device → Certificate Management → **SSL Decryption Exclusion**. {% hint style="info" %} -### Note - _**`<tenant-name>`**_ refers to the selected subdomain of your Cortex XSIAM tenant, and _**`<region>`**_ is the region in which your tenant is deployed. For more information, see [Cortex XSIAM supported regions](cortex-xsiam-supported-regions). {% endhint %} The following tables list required FQDNs, IP addresses, ports, and App-ID coverage for your deployment. <table><thead><tr><th>FQDN</th><th width="265">IP Addresses and Port</th><th>App-ID Coverage</th></tr></thead><tbody><tr><td><strong>Egress</strong></td><td></td><td></td></tr><tr><td><p><em><strong><code><tenant-name></code></strong></em><strong><code>.xdr.</code></strong><em><strong><code><region></code></strong></em><strong><code>.paloaltonetworks.com</code></strong></p><p>Used to connect to the Cortex XSIAM tenant.</p></td><td><p>IP address by region:</p><ul><li>US (United States): 35.244.250.18:443</li><li>EU (Europe): 35.227.237.180:443</li><li>CA (Canada): 34.120.31.199:443</li><li>UK (United Kingdom): 34.120.87.77:443</li><li>JP (Japan): 35.241.28.254:443</li><li>SG (Singapore): 34.117.211.129:443</li><li>AU (Australia): 34.120.229.65:443</li><li>DE (Germany): 34.98.68.183:443</li><li>IN (India): 35.186.207.80:443</li><li>DL (Delhi): 34.8.67.192:443</li><li>CH (Switzerland): 34.111.6.153:443</li><li>PL (Poland): 34.117.240.208:443</li><li>TW (Taiwan): 34.160.28.41:443</li><li>QT (Qatar): 35.190.0.180:443</li><li>FA (France): 34.111.134.57:443</li><li>IL (Israel): 34.111.129.144:443</li><li>SA (Saudi Arabia): 35.244.157.127:443</li><li>ID (Indonesia): 34.111.58.152:443</li><li>ES (Spain): 34.111.188.248:443</li><li>IT (Italy): 34.8.224.70:443</li><li>KR (South Korea): 34.54.5.247:443</li><li>ZA (South Africa): 34.149.165.12:443</li><li>BR (Brazil): 34.96.83.202:443</li><li>FI (Finland):<br>34.160.63.63:443</li></ul></td><td><strong><code>cortex-xdr</code></strong></td></tr><tr><td><p><strong><code>distributions.traps.paloaltonetworks.com</code></strong></p><p>Used for the first request in registration flow where the agent passes the distribution id and obtains the <strong><code>ch-</code></strong><em><strong><code><tenant-name></code></strong></em><strong><code>.traps.paloaltonetworks.com</code></strong> of its tenant.</p></td><td><ul><li>IP address: 35.223.6.69</li><li>Port: 443</li></ul></td><td><strong><code>traps-management-service</code></strong></td></tr><tr><td><p><strong><code>https://lrc-</code></strong><em><strong><code><region></code></strong></em><strong><code>.paloaltonetworks.com</code></strong></p><p><strong><code>wss://lrc-</code></strong><em><strong><code><region></code></strong></em><strong><code>.paloaltonetworks.com</code></strong></p><p>Used in live terminal flow.</p></td><td><p>IP address by region:</p><ul><li>US (United States): 35.190.88.43:443</li><li>EU (Europe): 35.244.251.25:443</li><li>CA (Canada): 35.203.99.74:443</li><li>UK (United Kingdom): 35.242.159.176:443</li><li>JP (Japan): 34.84.201.32:443</li><li>SG (Singapore): 34.87.61.186:443</li><li>AU (Australia): 35.244.66.177:443</li><li>DE (Germany): 34.107.61.141:443</li><li>IN (India): 35.200.146.253:443</li><li>DL (Delhi): 34.131.116.135:443</li><li>CH (Switzerland): 34.65.213.226:443</li><li>PL (Poland): 34.118.62.80:443</li><li>TW (Taiwan): 34.80.34.30:443</li><li>QT (Qatar): 34.18.34.73:443</li><li>FA (France): 34.163.57.57:443</li><li>IL (Israel): 34.165.43.106:443</li><li>SA (Saudi Arabia): 34.166.54.6:443</li><li>ID (Indonesia): 34.101.214.157:443</li><li>ES (Spain): 34.175.18.78:443</li><li>IT (Italy): 34.154.154.5:443</li><li>KR (South Korea): 34.22.66.91:443</li><li>ZA (South Africa): 34.35.56.170:443</li><li>BR (Brazil): 34.151.236.197:443</li><li>FI (Finland):<br>34.88.31.230:443</li></ul></td><td><strong><code>cortex-xdr</code></strong></td></tr><tr><td><p><strong><code>panw-xdr-installers-prod-us.storage.googleapis.com</code></strong></p><p>Used to download installers for upgrade actions from the server.</p><p>This storage bucket is used for all regions.</p></td><td><ul><li>IP ranges in GCP</li><li>Port: 443</li></ul></td><td><strong><code>cortex-xdr</code></strong></td></tr><tr><td><p><strong><code>panw-xdr-payloads-prod-us.storage.googleapis.com</code></strong></p><p>Used to download the executable for the live terminal for XDR agents earlier than version 7.1.0.</p><p>This storage bucket is used for all regions.</p></td><td><ul><li>IP ranges in GCP</li><li>Port: 443</li></ul></td><td><strong><code>cortex-xdr</code></strong></td></tr><tr><td><p><strong><code>global-content-profiles-policy.storage.googleapis.com</code></strong></p><p>Used to download content updates.</p></td><td><ul><li>IP ranges in GCP</li><li>Port: 443</li></ul></td><td><strong><code>cortex-xdr</code></strong></td></tr><tr><td><p><strong><code>panw-xdr-evr-prod-</code></strong><em><strong><code><region></code></strong></em><strong><code>.storage.googleapis.com</code></strong></p><p>Used to download extended verdict request results in scanning.</p></td><td><ul><li>IP ranges in GCP</li><li>Port: 443</li></ul></td><td><strong><code>cortex-xdr</code></strong></td></tr><tr><td><p><strong><code>https://</code></strong><em><strong><code><region></code></strong></em><strong><code>-docker.pkg.dev</code></strong></p><p>Used to download the Kubernetes image from the registry for Kubernetes agents installation.</p><p>Refer to <strong>Regional Docker registry mapping</strong> for your specific tenant location and corresponding Docker registry URL.</p></td><td><ul><li>IP ranges in GCP</li><li>Port: 443</li></ul></td><td></td></tr><tr><td><strong>Regional Docker registry mapping</strong></td><td></td><td></td></tr><tr><td><strong>Tenant location</strong></td><td><strong>GCP region</strong></td><td><strong>Registry URL</strong></td></tr><tr><td><p>UK</p><p>Netherlands (EU)</p><p>United States (US)</p><p>Canada (CA)</p><p>South Korea (KR)</p><p>Singapore (SG)</p><p>Australia (AU)</p><p>Japan (JP)</p><p>India (IN)</p><p>Germany (DE)</p><p>France (FR)<br>Finland (FI)</p></td><td><p>europe-west2</p><p>europe-west4</p><p>us-central1</p><p>northamerica-northeast1</p><p>asia-northeast3</p><p>asia-southeast1</p><p>australia-southeast1</p><p>asia-northeast1</p><p>asia-south1</p><p>europe-west3</p><p>europe-west9<br>europe-north1</p></td><td><p>europe-west2-docker.pkg.dev</p><p>europe-west4-docker.pkg.dev</p><p>us-central1-docker.pkg.dev</p><p>northamerica-northeast1-docker.pkg.dev</p><p>asia-northeast3-docker.pkg.dev</p><p>asia-southeast1-docker.pkg.dev</p><p>australia-southeast1-docker.pkg.dev</p><p>asia-northeast1-docker.pkg.dev</p><p>asia-south1-docker.pkg.dev</p><p>europe-west3-docker.pkg.dev</p><p>europe-west9-docker.pkg.dev</p></td></tr><tr><td><p><strong><code>dc-</code></strong><em><strong><code><tenant-name></code></strong></em><strong><code>.traps.paloaltonetworks.com</code></strong></p><p>Used for EDR data upload.</p></td><td><p>IP address by region:</p><ul><li>US (United States): 34.98.77.231:443</li><li>EU (Europe): 34.102.140.103:443</li><li>CA (Canada): 34.96.120.25:443</li><li>UK (United Kingdom): 35.244.133.254:443</li><li>JP (Japan): 34.95.66.187:443</li><li>SG (Singapore): 34.120.142.18:443</li><li>AU (Australia): 34.102.237.151:443</li><li>DE (Germany): 34.107.161.143:443</li><li>IN (India): 34.120.213.187:443</li><li>DL (Delhi): 136.110.132.208:443</li><li>CH (Switzerland): 34.149.180.250:443</li><li>PL (Poland): 35.190.13.237:443</li><li>TW (Taiwan): 34.149.248.76:443</li><li>QT (Qatar): 34.107.129.254:443</li><li>FA (France): 34.36.155.211:443</li><li>IL (Israel): 34.128.157.130:443</li><li>SA (Saudi Arabia): 34.107.213.85:443</li><li>ID (Indonesia): 34.128.156.84:443</li><li>ES (Spain): 34.120.102.147:443</li><li>IT (Italy): 34.8.234.58:443</li><li>KR (South Korea): 34.54.155.245:443</li><li>ZA (South Africa): 35.190.79.68:443</li><li>BR (Brazil): 136.110.146.246:443</li><li>FI (Finland):<br>136.110.165.34:443</li></ul></td><td><strong><code>traps-management-service</code></strong></td></tr><tr><td><p><strong><code>ch-</code></strong><em><strong><code><tenant-name></code></strong></em><strong><code>.traps.paloaltonetworks.com</code></strong></p><p>Used for all other requests between the agent and its tenant server, including heartbeat, uploads, action results, and scan reports.</p></td><td><p>IP address by region:</p><ul><li>US (United States): 34.98.77.231:443</li><li>EU (Europe): 34.102.140.103:443</li><li>CA (Canada): 34.96.120.25:443</li><li>UK (United Kingdom): 35.244.133.254:443</li><li>JP (Japan): 34.95.66.187:443</li><li>SG (Singapore): 34.120.142.18:443</li><li>AU (Australia): 34.102.237.151:443</li><li>DE (Germany): 34.107.161.143:443</li><li>IN (India): 34.120.213.188:443</li><li>DL (Delhi): 136.110.132.208:443</li><li>CH (Switzerland): 34.149.180.250:443</li><li>PL (Poland): 35.190.13.237:443</li><li>TW (Taiwan): 34.149.248.76:443</li><li>QT (Qatar): 34.107.129.254:443</li><li>FA (France): 34.36.155.211:443</li><li>IL (Israel): 34.128.157.130:443</li><li>SA (Saudi Arabia): 34.107.213.85:443</li><li>ID (Indonesia): 34.128.156.84:443</li><li>ES (Spain): 34.120.102.147:443</li><li>IT (Italy): 34.8.234.58:443</li><li>KR (South Korea): 34.54.155.245:443</li><li>ZA (South Africa): 35.190.79.68:443</li><li>BR (Brazil): 136.110.146.246:443</li><li>FI (Finland):<br>136.110.165.34:443</li></ul></td><td><strong><code>traps-management-service</code></strong></td></tr><tr><td><p><strong><code>api-</code></strong><em><strong><code><tenant-name>.xdr.<region></code></strong></em><strong><code>.paloaltonetworks.com</code></strong></p><p>Used for API requests and responses and to connect to an engine.</p></td><td><p>IP address by region:</p><ul><li>US (United States): 35.222.81.194:443</li><li>EU (Europe): 34.90.67.58:443</li><li>CA (Canada): 35.203.82.121:443</li><li>UK (United Kingdom): 34.89.56.78:443</li><li>JP (Japan): 34.84.125.129:443</li><li>SG (Singapore): 34.87.83.144:443</li><li>AU (Australia): 35.189.18.208:443</li><li>DE (Germany): 34.107.57.23:443</li><li>IN (India): 35.200.158.164:443</li><li>DL (Delhi): 34.131.165.103:443</li><li>CH (Switzerland): 34.65.248.119:443</li><li>PL (Poland): 34.116.216.55:443</li><li>TW (Taiwan): 35.234.8.249:443</li><li>QT (Qatar): 34.18.46.240:443</li><li>FA (France): 34.155.222.152:443</li><li>IL (Israel): 34.165.156.139:443</li><li>SA (Saudi Arabia): 34.166.58.79:443</li><li>ID (Indonesia): 34.128.115.238:443</li><li>ES (Spain): 34.175.30.176:443</li><li>IT (Italy): 34.154.195.120:443</li><li>KR (South Korea): 34.64.54.175:443</li><li>ZA (South Africa): 34.35.64.191:443</li><li>BR (Brazil): 34.39.136.78:443</li><li>FI (Finland):<br>35.228.73.215:443</li></ul></td><td>—</td></tr><tr><td><p><strong><code>cc-</code></strong><em><strong><code><tenant-name></code></strong></em><strong><code>.traps.paloaltonetworks.com</code></strong></p><p>Used for get-verdict requests.</p><p>For agents on endpoints, you must allow the IP address for the closest region to ensure connectivity. Endpoints use latency-based routing. An agent that belongs to a US tenant, for example, but that is physically located in Singapore, routes to Singapore to get the verdict.</p></td><td><p>IP address by region:</p><ul><li>US (United States): 35.224.140.142:443</li><li>EU (Europe): 34.90.71.103:443</li><li>CA (Canada): 35.203.35.23:443</li><li>UK (United Kingdom): 34.89.42.214:443</li><li>JP (Japan): 34.84.225.105:443</li><li>SG (Singapore): 35.247.161.94:443</li><li>AU (Australia): 35.201.23.188:443</li><li>DE (Germany): 35.242.201.199:443</li><li>IN (India): 35.244.57.196:443</li><li>DL (Delhi): 34.131.47.126:443</li><li>CH (Switzerland): 34.65.137.215:443</li><li>PL (Poland): 34.116.213.71:443</li><li>TW (Taiwan): 35.229.186.216:443</li><li>QT (Qatar): 34.18.53.229:443</li><li>FA (France): 34.155.110.169:443</li><li>IL (Israel): 34.165.2.110:443</li><li>SA (Saudi Arabia): 34.166.53.160:443</li><li>ID (Indonesia): 34.101.155.198:443</li><li>ES (Spain): 34.175.205.166:443</li><li>IT (Italy): 34.154.230.76:443</li><li>KR (South Korea): 34.64.228.117:443</li><li>ZA (South Africa): 34.35.13.198:443</li><li>BR (Brazil): 34.39.195.104:443</li><li>FI (Finland):<br>35.228.118.177:443</li></ul></td><td><strong><code>traps-management-service</code></strong></td></tr><tr><td><p><code>xdr-<region>-<project ID>-tim-indicators.storage.googleapis.com</code></p><p>Used to download the IOC indicators from the tenant.</p></td><td><p>IP address by region:</p><ul><li>US (United States): 35.224.140.142:443</li><li>EU (Europe): 34.90.71.103:443</li><li>CA (Canada): 35.203.35.23:443</li><li>UK (United Kingdom): 34.89.42.214:443</li><li>JP (Japan): 34.84.225.105:443</li><li>SG (Singapore): 35.247.161.94:443</li><li>AU (Australia): 35.201.23.188:443</li><li>DE (Germany): 35.242.201.199:443</li><li>IN (India): 35.244.57.196:443</li><li>DL (Delhi): 34.131.47.126:443</li><li>CH (Switzerland): 34.65.137.215:443</li><li>PL (Poland): 34.116.213.71:443</li><li>TW (Taiwan): 35.229.186.216:443</li><li>QT (Qatar): 34.18.53.229:443</li><li>FA (France): 34.155.110.169:443</li><li>IL (Israel): 34.165.2.110:443</li><li>SA (Saudi Arabia): 34.166.53.160:443</li><li>ID (Indonesia): 34.101.155.198:443</li><li>ES (Spain): 34.175.205.166:443</li><li>IT (Italy): 34.154.230.76:443</li><li>KR (South Korea): 34.64.228.117:443</li><li>ZA (South Africa): 34.35.13.198:443</li><li>BR (Brazil): 34.39.195.104:443</li><li>FI (Finland):<br>35.228.118.177:443</li></ul></td><td><code>cortex-xdr</code></td></tr><tr><td><p><strong>Broker VM Resources</strong></p><p>Required for deployments that use Broker VM features</p></td><td></td><td></td></tr><tr><td><p><a href="http://xdr-ova-installers-prod-us.storage.googleapis.com/">xdr-ova-installers-prod-us.storage.googleapis.com</a></p><p>Used to download Broker VM images from the server.</p><p>This storage bucket is used for all regions.</p></td><td><ul><li>IP ranges in GCP</li><li>Port: 443</li></ul></td><td><strong><code>cortex-xdr</code></strong></td></tr><tr><td><strong><code>br-</code></strong><em><strong><code><tenant-name>.xdr.<region></code></strong></em><strong><code>.paloaltonetworks.com</code></strong></td><td><p>IP address by region:</p><ul><li>US (United States): 104.155.131.72:443</li><li>EU (Europe): 34.91.128.226:443</li><li>CA (Canada): 34.95.8.232:443</li><li>UK (United Kingdom): 35.197.219.110:443</li><li>JP (Japan):34.85.74.43:443</li><li>SG (Singapore): 34.87.167.125:443</li><li>AU (Australia): 35.244.93.0:443</li><li>DE (Germany): 35.198.112.13:443</li><li>IN (India): 35.200.234.99:443</li><li>DL (Delhi): 34.131.131.141:443</li><li>CH (Switzerland): 34.65.51.103:443</li><li>PL (Poland): 34.116.176.97:443</li><li>TW (Taiwan): 34.80.230.166:443</li><li>QT (Qatar): 34.18.37.73:443</li><li>FA (France): 34.155.90.61:443</li><li>IL (Israel): 34.165.24.222:443</li><li>SA (Saudi Arabia): 34.166.55.153:443</li><li>ID (Indonesia): 34.101.101.170:443</li><li>ES (Spain): 34.175.182.55:443</li><li>IT (Italy): 34.154.168.139:443</li><li>KR (South Korea): 34.64.46.249:443</li><li>ZA (South Africa): 34.35.45.251:443</li><li>BR (Brazil): 35.198.38.182:443</li><li>FI (Finland):<br>34.88.26.246:443</li></ul></td><td>—</td></tr><tr><td><strong><code>distributions.traps.paloaltonetworks.com</code></strong></td><td><ul><li>IP address: 35.223.6.69</li><li>Port: 443</li></ul></td><td><strong><code>traps-management-service</code></strong></td></tr><tr><td><ul><li><strong><code>time.google.com</code></strong></li><li><strong><code>pool.ntp.org</code></strong></li></ul></td><td>UDP port: 123</td><td>—</td></tr><tr><td><strong>App Login and Authentication</strong></td><td></td><td></td></tr><tr><td><p>identity.paloaltonetworks.com</p><p>(SSO)</p></td><td><ul><li>IP address: 34.120.119.85</li><li>Port: 443</li></ul></td><td>—</td></tr><tr><td><p>login.paloaltonetworks.com</p><p>(SSO)</p></td><td><ul><li>IP address: 34.102.139.110</li><li>Port: 443</li></ul></td><td>—</td></tr><tr><td><strong>In-App Help Center and Notifications</strong></td><td></td><td></td></tr><tr><td>data.pendo.io</td><td>Port: 443</td><td>—</td></tr><tr><td>pendo-static-5664029141630976.storage.googleapis.com</td><td>Port: 443</td><td>—</td></tr><tr><td><strong>Email Notifications</strong></td><td></td><td></td></tr><tr><td>—</td><td>IP address for all regions: 159.183.150.248</td><td>—</td></tr><tr><td><p><strong>Ingress</strong></p><p>These IPs are used for communication between Cortex XSIAM and your resources. Use them when sending data out from your tenant.</p></td><td></td><td></td></tr><tr><td></td><td><ul><li><p>FI (Finland):</p><ul><li>34.88.97.182</li><li>34.88.189.1</li></ul></li><li><p>US (United States)</p><ul><li>34.132.108.184</li><li>34.69.63.16</li></ul></li><li><p>EU (Europe)</p><ul><li>34.147.107.51</li><li>34.91.26.125</li></ul></li><li><p>CA (Canada)</p><ul><li>35.203.108.13</li><li>35.203.101.162</li></ul></li><li><p>UK (United Kingdom)</p><ul><li>35.242.180.163</li><li>34.105.173.229</li></ul></li><li><p>JP (Japan)</p><ul><li>35.200.3.131</li><li>34.146.181.233</li></ul></li><li><p>SG (Singapore)</p><ul><li>35.240.243.57</li><li>34.126.183.208</li></ul></li><li><p>AU (Australia)</p><ul><li>34.151.83.236</li><li>34.116.67.90</li></ul></li><li><p>DE (Germany)</p><ul><li>35.234.118.195</li><li>34.89.183.45</li></ul></li><li><p>IN (India)</p><ul><li>35.200.175.78</li><li>34.93.9.198</li></ul></li><li><p>CH (Switzerland)</p><ul><li>34.65.108.153</li><li>34.65.155.169</li></ul></li><li><p>PL (Poland)</p><ul><li>34.118.48.171</li><li>34.116.202.235</li></ul></li><li><p>TW (Taiwan)</p><ul><li>34.80.133.68</li><li>35.234.18.10</li></ul></li><li><p>QT (Qatar)</p><ul><li>34.18.34.118</li><li>34.18.39.155</li></ul></li><li><p>FA (France)</p><ul><li>34.155.5.117</li><li>34.155.41.247</li></ul></li><li><p>IL (Israel)</p><ul><li>34.165.33.165</li><li>34.165.27.131</li></ul></li><li><p>SA (Saudi Arabia)</p><ul><li>34.166.61.81</li><li>34.166.58.213</li></ul></li><li><p>ID (Indonesia)</p><ul><li>34.128.126.138</li><li>34.128.82.158</li></ul></li><li><p>ES (Spain)</p><ul><li>34.175.46.46</li><li>34.175.80.182</li></ul></li><li><p>IT (Italy)</p><ul><li>34.154.23.156</li><li>34.154.186.12</li></ul></li><li><p>KR (South Korea)</p><ul><li>34.64.93.168</li><li>34.64.237.45</li></ul></li><li><p>ZA (South Africa):</p><ul><li>34.35.42.196</li><li>34.35.79.219</li></ul></li></ul></td><td><strong><code>cortex-xdr</code></strong></td></tr><tr><td><strong>Outbound IPs for engines</strong></td><td></td><td></td></tr><tr><td></td><td><p>IP addresses by region</p><ul><li><p>FI (Finland)</p><ul><li>35.228.175.228</li><li>35.228.44.44</li></ul></li><li><p>US (United States)</p><ul><li>35.225.156.101</li><li>34.69.88.119</li></ul></li><li><p>EU (Europe)</p><ul><li>34.147.67.188</li><li>34.90.16.31</li></ul></li><li><p>CA (Canada)</p><ul><li>35.203.57.162</li><li>35.203.90.79</li></ul></li><li><p>UK (United Kingdom)</p><ul><li>34.142.3.42</li><li>34.142.44.136</li></ul></li><li><p>JP (Japan)</p><ul><li>34.146.60.215</li><li>34.84.93.160</li></ul></li><li><p>SG (Singapore)</p><ul><li>35.240.144.192</li><li>35.240.255.15</li></ul></li><li><p>AU (Australia)</p><ul><li>35.244.73.76</li><li>35.201.22.63</li></ul></li><li><p>DE (Germany)</p><ul><li>34.107.83.197</li><li>34.159.53.97</li></ul></li><li><p>IN (India)</p><ul><li>35.244.5.205</li><li>34.93.118.113</li></ul></li><li><p>DL (Delhi)</p><ul><li>34.131.207.151</li><li>34.126.212.40</li></ul></li><li><p>CH (Switzerland)</p><ul><li>34.65.222.25</li><li>34.65.233.60</li></ul></li><li><p>PL (Poland)</p><ul><li>34.118.92.214</li><li>34.116.223.119</li></ul></li><li><p>TW (Taiwan)</p><ul><li>104.199.223.229</li><li>34.81.38.132</li></ul></li><li><p>QT (Qatar)</p><ul><li>34.18.39.0</li><li>34.18.32.96</li></ul></li><li><p>FA (France)</p><ul><li>34.155.197.131</li><li>34.155.5.100</li></ul></li><li><p>IL (Israel)</p><ul><li>34.165.46.47</li><li>34.165.17.246</li></ul></li><li><p>SA (Saudi Arabia)</p><ul><li>34.166.58.243</li><li>34.166.54.238</li></ul></li><li><p>ID (Indonesia)</p><ul><li>34.101.125.66</li><li>34.101.218.184</li></ul></li><li><p>ES (Spain)</p><ul><li>34.175.255.99</li><li>34.175.230.35</li></ul></li><li><p>IT (Italy)</p><ul><li>34.154.173.134</li><li>34.154.229.60</li></ul></li><li><p>KR (South Korea)</p><ul><li>34.64.189.205</li><li>34.64.45.118</li></ul></li><li><p>ZA (South Africa)</p><ul><li>34.35.70.193</li><li>34.35.80.189</li></ul></li><li><p>BR (Brazil)</p><ul><li>35.199.96.109</li><li>34.39.161.254</li></ul></li></ul></td><td>—</td></tr><tr><td><strong>Collect third-party data from your SaaS and Cloud resources</strong></td><td></td><td></td></tr><tr><td>—</td><td><p>IP address by region.</p><ul><li><p>FI (Finland)</p><ul><li>35.228.192.167</li><li>34.88.193.126</li></ul></li><li><p>US (United States)</p><ul><li>34.66.69.154</li><li>35.202.21.123</li></ul></li><li><p>AU (Australia)</p><ul><li>35.197.181.108</li><li>35.197.175.44</li></ul></li><li><p>CA (Canada)</p><ul><li>34.95.33.72</li><li>34.95.62.136</li></ul></li><li><p>SG (Singapore)</p><ul><li>35.247.148.38</li><li>35.247.173.40</li></ul></li><li><p>JP (Japan)</p><ul><li>34.85.68.167</li><li>34.84.99.239</li></ul></li><li><p>IN (India)</p><ul><li>34.93.3.196</li><li>34.93.175.218</li></ul></li><li><p>DL (Delhi)</p><ul><li>34.131.111.87</li><li>34.131.101.138</li></ul></li><li><p>DE (Germany)</p><ul><li>34.89.197.46</li><li>34.107.3.224</li></ul></li><li><p>UK (United Kingdom)</p><ul><li>34.105.227.146</li><li>34.105.137.22</li></ul></li><li><p>EU (Europe)</p><ul><li>34.90.70.107</li><li>35.204.129.196</li></ul></li><li><p>CH (Switzerland)</p><ul><li>34.65.225.124</li><li>34.65.89.6</li></ul></li><li><p>PL (Poland)</p><ul><li>34.118.71.237</li><li>34.118.124.130</li></ul></li><li><p>TW (Taiwan)</p><ul><li>35.201.142.86</li><li>35.189.176.163</li></ul></li><li><p>QT (Qatar)</p><ul><li>34.18.44.71</li><li>34.18.30.132</li></ul></li><li><p>FA (France)</p><ul><li>34.163.125.167</li><li>34.163.155.105</li></ul></li><li><p>IL (Israel)</p><ul><li>34.165.131.171</li><li>34.165.120.206</li></ul></li><li><p>SA (Saudi Arabia)</p><ul><li>34.166.59.20</li><li>34.166.53.242</li></ul></li><li><p>ID (Indonesia)</p><ul><li>34.101.158.32</li><li>34.101.79.159</li></ul></li><li><p>ES (Spain)</p><ul><li>34.175.27.251</li><li>34.175.198.50</li></ul></li><li><p>IT (Italy)</p><ul><li>34.154.208.247</li><li>34.154.243.11</li></ul></li><li><p>KR (South Korea)</p><ul><li>34.64.107.163</li><li>34.64.84.25</li></ul></li><li><p>ZA (South Africa):</p><ul><li>34.35.69.156</li><li>34.35.60.86</li></ul></li><li><p>BR (Brazil)</p><ul><li>34.39.177.125</li><li>34.39.140.36</li></ul></li></ul></td><td><strong><code>cortex-xdr</code></strong></td></tr><tr><td><strong>Log Forwarding to a Syslog Receiver</strong></td><td></td><td></td></tr><tr><td>See <a href="../../post-deployment/data-and-log-forwarding/forward-logs-and-data-from-cortex-xsiam-to-external-services/configure-external-applications-for-forwarding/integrate-a-syslog-receiver">Integrate a syslog receiver</a>.</td><td></td><td></td></tr></tbody></table> - -
▸ ▾ Cortex XSIAM engine outbound IP addresses modified +11 −5 Retitled to "Cortex XSIAM engine outbound IP addresses"; the regional IP lists are unchanged.
xsiam/onboard-cortex-xsiam/deployment-steps/activate-cortex-xsiam/enable-access-to-required-panw-resources/engine-ip-addresses-outboundRead it on the Cortex docs portal ↗ Read it here → This file's diff on GitHub ↗
Before After@@ -1,22 +1,28 @@# Engine IP addresses (outbound)---description: >-Configure firewall allowlists for Cortex XSIAM engine outbound IP addresses bydeployment region.---These are specific regional IP addresses used for engines. If your automation playbooks or scripts need to access On-prem resources (for example, querying Active Directory, connecting to an internal GitLab instance), the traffic will originate from these IPs. Engine outbound refers to the traffic originating from these engines and directed toward your network.# Cortex XSIAM engine outbound IP addressesUse these Cortex XSIAM engine outbound IP addresses to configure firewall allowlists by deployment region. Automation playbooks and scripts use these IPs to access on-premises resources, such as Active Directory or internal GitLab.APP-ID: NoneAPP-ID: NoneAmericas### Cortex XSIAM engine IP addresses in the AmericasRegion│IP AddressesRegion│IP Addresses| ------------------ | ---------------------------- || ------------------ | ---------------------------- |United States (US)│35.225.156.101, 34.69.88.119United States (US)│35.225.156.101, 34.69.88.119Canada (CA)│35.203.57.162, 35.203.90.79Canada (CA)│35.203.57.162, 35.203.90.79EMEA (Europe, Middle East, Africa)### Cortex XSIAM engine IP addresses in EMEARegion│IP AddressesRegion│IP Addresses| ------------------------------------- | ----------------------------- || ------------------------------------- | ----------------------------- |France (FA)│34.155.197.131, 34.155.5.100France (FA)│34.155.197.131, 34.155.5.100Germany (DE)│34.107.83.197, 34.159.53.97Germany (DE)│34.107.83.197, 34.159.53.97Israel (IL)│34.165.46.47, 34.165.17.246Israel (IL)│34.165.46.47, 34.165.17.246Italy (IT)│34.154.173.134, 34.154.229.60Italy (IT)│34.154.173.134, 34.154.229.60Netherlands/Europe (EU)
│34.147.67.188, 34.90.16.31Netherlands/Europe (EU)
│34.147.67.188, 34.90.16.31@@ -24,17 +30,17 @@ APP-ID: NoneQatar (QT)│34.18.39.0, 34.18.32.96Qatar (QT)│34.18.39.0, 34.18.32.96Saudi Arabia (SA)│34.166.58.243, 34.166.54.238Saudi Arabia (SA)│34.166.58.243, 34.166.54.238South Africa (ZA)│34.35.70.193, 34.35.80.189South Africa (ZA)│34.35.70.193, 34.35.80.189Spain (ES)│34.175.255.99, 34.175.230.35Spain (ES)│34.175.255.99, 34.175.230.35Switzerland (CH)│34.65.222.25, 34.65.233.60Switzerland (CH)│34.65.222.25, 34.65.233.60United Kingdom (UK)│34.142.3.42, 34.142.44.136United Kingdom (UK)│34.142.3.42, 34.142.44.136Finland (FI)│35.228.175.228, 35.228.44.44Finland (FI)│35.228.175.228, 35.228.44.44JPAC (Asia-Pacific)### Cortex XSIAM engine IP addresses in JPACRegion│IP AddressesRegion│IP Addresses| ---------------- | ----------------------------- || ---------------- | ----------------------------- |Australia (AU)│35.244.73.76, 35.201.22.63Australia (AU)│35.244.73.76, 35.201.22.63India (IN)│35.244.5.205, 34.93.118.113India (IN)│35.244.5.205, 34.93.118.113Indonesia (ID)│34.101.125.66, 34.101.218.184Indonesia (ID)│34.101.125.66, 34.101.218.184Japan (JP)│34.146.60.215, 34.84.93.160Japan (JP)│34.146.60.215, 34.84.93.160Singapore (SG)│35.240.144.192, 35.240.255.15Singapore (SG)│35.240.144.192, 35.240.255.15Show markdown source
@@ -1,22 +1,28 @@
-# Engine IP addresses (outbound)
+---
+description: >-
+  Configure firewall allowlists for Cortex XSIAM engine outbound IP addresses by
+  deployment region.
+---

-These are specific regional IP addresses used for engines. If your automation playbooks or scripts need to access On-prem resources (for example, querying Active Directory, connecting to an internal GitLab instance), the traffic will originate from these IPs. Engine outbound refers to the traffic originating from these engines and directed toward your network.
+# Cortex XSIAM engine outbound IP addresses
+
+Use these Cortex XSIAM engine outbound IP addresses to configure firewall allowlists by deployment region. Automation playbooks and scripts use these IPs to access on-premises resources, such as Active Directory or internal GitLab.

 APP-ID: None

-**Americas**
+### Cortex XSIAM engine IP addresses in the Americas

 | Region             | IP Addresses                 |
 | ------------------ | ---------------------------- |
 | United States (US) | 35.225.156.101, 34.69.88.119 |
 | Canada (CA)        | 35.203.57.162, 35.203.90.79  |

-**EMEA (Europe, Middle East, Africa)**
+### Cortex XSIAM engine IP addresses in EMEA

 | Region                                | IP Addresses                  |
 | ------------------------------------- | ----------------------------- |
 | France (FA)                           | 34.155.197.131, 34.155.5.100  |
 | Germany (DE)                          | 34.107.83.197, 34.159.53.97   |
 | Israel (IL)                           | 34.165.46.47, 34.165.17.246   |
 | Italy (IT)                            | 34.154.173.134, 34.154.229.60 |
 | <p>Netherlands/</p><p>Europe (EU)</p> | 34.147.67.188, 34.90.16.31    |
@@ -24,17 +30,17 @@ APP-ID: None
 | Qatar (QT)                            | 34.18.39.0, 34.18.32.96       |
 | Saudi Arabia (SA)                     | 34.166.58.243, 34.166.54.238  |
 | South Africa (ZA)                     | 34.35.70.193, 34.35.80.189    |
 | Spain (ES)                            | 34.175.255.99, 34.175.230.35  |
 | Switzerland (CH)                      | 34.65.222.25, 34.65.233.60    |
 | United Kingdom (UK)                   | 34.142.3.42, 34.142.44.136    |
 | Finland (FI)                          | 35.228.175.228, 35.228.44.44  |

-**JPAC (Asia-Pacific)**
+### Cortex XSIAM engine IP addresses in JPAC

 | Region           | IP Addresses                  |
 | ---------------- | ----------------------------- |
 | Australia (AU)   | 35.244.73.76, 35.201.22.63    |
 | India (IN)       | 35.244.5.205, 34.93.118.113   |
 | Indonesia (ID)   | 34.101.125.66, 34.101.218.184 |
 | Japan (JP)       | 34.146.60.215, 34.84.93.160   |
 | Singapore (SG)   | 35.240.144.192, 35.240.255.15 |
-
▸ ▾ FedRAMP and US federal Cortex XSIAM required resources modified +15 −9
xsiam/onboard-cortex-xsiam/deployment-steps/activate-cortex-xsiam/enable-access-to-required-panw-resources/fedramp-and-the-us-federal-government-required-resourcesRead it on the Cortex docs portal ↗ Read it here → This file's diff on GitHub ↗
Before After@@ -1,72 +1,78 @@# FedRamp and the US Federal Government required resources---description: >-Configure required Cortex XSIAM network resources for FedRAMP and US federalgovernment deployments.---The following table lists the required resources for the federal government of the United States, including FQDNs, IP addresses, ports, and App-ID coverage for your deployment:# FedRAMP and US federal Cortex XSIAM required resourcesEgress and engine resourcesConfigure firewall access for FedRAMP and US federal government Cortex XSIAM deployments. The following tables list required FQDNs, IP addresses, ports, and App-ID coverage.### Cortex XSIAM egress and engine resourcesAll ports are 443 unless otherwise specified.All ports are 443 unless otherwise specified.Source│Compliance Level│IP AddressesSource│Compliance Level│IP Addresses| ------------------------ | ------------------------------------ | ------------------------------------ || ------------------------ | ------------------------------------ | ------------------------------------ |Egress│FedRAMP Moderate│34.122.220.113, 35.223.83.172Egress│FedRAMP Moderate│34.122.220.113, 35.223.83.172FedRAMP High│34.136.155.252, 34.133.46.50│FedRAMP High│34.136.155.252, 34.133.46.50│Outbound IPs for Engines│FedRAMP Moderate│34.123.127.174:443, 34.71.135.18:443Outbound IPs for Engines│FedRAMP Moderate│34.123.127.174:443, 34.71.135.18:443FedRAMP High│34.123.153.175:443, 35.223.253.2:443│FedRAMP High│34.123.153.175:443, 35.223.253.2:443│Core Cortex XSIAM communication### Core Cortex XSIAM communication resourcesThese resources handle agent registration, heartbeats, data uploads, and API connections. All ports are 443 unless specified otherwise.These resources handle agent registration, heartbeats, data uploads, and API connections. All ports are 443 unless specified otherwise.Resource/Function│FQDN│IP Address & Port│App-IDResource/Function│FQDN│IP Address & Port│App-ID| ------------------------------------------------------------------------------------------------------------------------------------------------------------------------------------------------------------ | ---------------------------------------------------- | ----------------- | -------------------------- || ------------------------------------------------------------------------------------------------------------------------------------------------------------------------------------------------------------ | ---------------------------------------------------- | ----------------- | -------------------------- |Initial registrationUsed for the first request in registration flow where the agent passes the distribution ID and obtains thech-<tenant-name>.traps.paloaltonetworks.comof its tenant│distributions-prod-fed.traps.paloaltonetworks.com│104.198.132.24│traps-management-serviceInitial registrationUsed for the first request in registration flow where the agent passes the distribution ID and obtains thech-<tenant-name>.traps.paloaltonetworks.comof its tenant│distributions-prod-fed.traps.paloaltonetworks.com│104.198.132.24│traps-management-serviceAgent heartbeat and data uploadUsed for all other requests between the agent and its tenant server, including heartbeat, uploads, action results, and scan reports.│ch-<tenant-name>.traps.paloaltonetworks.com│130.211.195.231│traps-management-serviceAgent heartbeat and data uploadUsed for all other requests between the agent and its tenant server, including heartbeat, uploads, action results, and scan reports.│ch-<tenant-name>.traps.paloaltonetworks.com│130.211.195.231│traps-management-serviceEDR data uploadUsed for EDR data upload.│dc-<tenant-name>.traps.paloaltonetworks.com│130.211.195.231│traps-management-serviceEDR data uploadUsed for EDR data upload.│dc-<tenant-name>.traps.paloaltonetworks.com│130.211.195.231│traps-management-serviceAPI gatewayUsed for API requests and responses.│api-<tenant-name>.xdr.federal.paloaltonetworks.com│130.211.195.231│N/aAPI gatewayUsed for API requests and responses.│api-<tenant-name>.xdr.federal.paloaltonetworks.com│130.211.195.231│N/aVerdict requestsUsed for get-verdict requests.│cc-<tenant-name>.traps.paloaltonetworks.com│35.222.50.74│traps-management-serviceVerdict requestsUsed for get-verdict requests.│cc-<tenant-name>.traps.paloaltonetworks.com│35.222.50.74│traps-management-serviceLive terminalUsed in live terminal flow.│wss://lrc-fed.paloaltonetworks.com│35.188.188.91│cortex-xdrLive terminalUsed in live terminal flow.│wss://lrc-fed.paloaltonetworks.com│35.188.188.91│cortex-xdrApp proxy│app-proxy.federal.paloaltonetworks.com│35.186.217.42│N/aApp proxy│app-proxy.federal.paloaltonetworks.com│35.186.217.42│N/aContent updates and storage (GCP)### Cortex XSIAM content updates and GCP storageThese resources are hosted on Google Cloud Platform. All ports are 443 unless otherwise specified.These resources are hosted on Google Cloud Platform. All ports are 443 unless otherwise specified.Resource/function│FQDN│IP Addresses│Resource/function│FQDN│IP Addresses│| ---------------------------------------------------------------------------------------------------------------------- | --------------------------------------------------------------- | ---------------- | ------------ || ---------------------------------------------------------------------------------------------------------------------- | --------------------------------------------------------------- | ---------------- | ------------ |
│FQDN│IP Addresses│App-ID
│FQDN│IP Addresses│App-IDInstallersUsed to download installers for upgrade actions from the server.│panw-xdr-installers-prod-fr.storage.googleapis.com│IP ranges in GCP│cortex-xdrInstallersUsed to download installers for upgrade actions from the server.│panw-xdr-installers-prod-fr.storage.googleapis.com│IP ranges in GCP│cortex-xdrLegacy payloadsUsed to download the executable for the live terminal for Cortex XDR agents earlier than version 7.1.0.│panw-xdr-payloads-prod-fr.storage.googleapis.com│IP ranges in GCP│cortex-xdrLegacy payloadsUsed to download the executable for the live terminal for Cortex XDR agents earlier than version 7.1.0.│panw-xdr-payloads-prod-fr.storage.googleapis.com│IP ranges in GCP│cortex-xdrContent updatesUsed to download content updates.│global-content-profiles-policy-prod-fr.storage.googleapis.com│IP ranges in GCP│cortex-xdrContent updatesUsed to download content updates.│global-content-profiles-policy-prod-fr.storage.googleapis.com│IP ranges in GCP│cortex-xdrScanning verdictsUsed to download extended verdict request results in scanning.│panw-xdr-evr-prod-fr.storage.googleapis.com│IP ranges in GCP│cortex-xdrScanning verdictsUsed to download extended verdict request results in scanning.│panw-xdr-evr-prod-fr.storage.googleapis.com│IP ranges in GCP│cortex-xdrBroker VM resources### Cortex XSIAM Broker VM resourcesRequired only for deployments utilizing Broker VM features. All ports are 443, unless otherwise stated.Required only for deployments utilizing Broker VM features. All ports are 443, unless otherwise stated.Resource/Function│FQDN│IP Addresses│App-IDResource/Function│FQDN│IP Addresses│App-ID| --------------------------------------------------------------------------------------------------------------------------------------- | --------------------------------------------------- | -------------- | :------------------------: || --------------------------------------------------------------------------------------------------------------------------------------- | --------------------------------------------------- | -------------- | :------------------------: |Broker connection│br-<tenant-name>.xdr.federal.paloaltonetworks.com│34.71.185.11│N/aBroker connection│br-<tenant-name>.xdr.federal.paloaltonetworks.com│34.71.185.11│N/aRegistrationUsed for the first request in the registration flow, for Broker VMs to obtain their specific connection URLs.
│distributions-prod-fed.traps.paloaltonetworks.com│104.198.132.24│traps-management-serviceRegistrationUsed for the first request in the registration flow, for Broker VMs to obtain their specific connection URLs.
│distributions-prod-fed.traps.paloaltonetworks.com│104.198.132.24│traps-management-serviceXSIAM gatewayBroker VM 3.0 and above
│xsiam-gateway│N/a│N/aXSIAM gatewayBroker VM 3.0 and above
│xsiam-gateway│N/a│N/aTime sync (NTP)Used by the Broker VM to ensure accurate timestamping for forwarded logs.
│N/a│UDP port 123│N/aTime sync (NTP)Used by the Broker VM to ensure accurate timestamping for forwarded logs.
│N/a│UDP port 123│N/aAuthentication (SSO)### Cortex XSIAM authentication and SSORequired for administrator login and Single Sign-On. All ports are 443 unless specifiedRequired for administrator login and Single Sign-On. All ports are 443 unless specifiedResource│FQDN│IP Addresses and Port│App-IDResource│FQDN│IP Addresses and Port│App-ID| ---------------- | ------------------------------- | --------------------- | :----: || ---------------- | ------------------------------- | --------------------- | :----: |Identity service│identity.paloaltonetworks.com│34.107.215.35│N/aIdentity service│identity.paloaltonetworks.com│34.107.215.35│N/aLogin service│login.paloaltonetworks.com│34.107.190.184│N/aLogin service│login.paloaltonetworks.com│34.107.190.184│N/aIngress: Third-party data collection### Cortex XSIAM ingress for third-party data collectionAllow traffic from these IPs to your network when collecting data from SaaS and Cloud resources.Allow traffic from these IPs to your network when collecting data from SaaS and Cloud resources.IP Addresses│App-IDIP Addresses│App-ID| ---------------------------------------------------- | ------------ || ---------------------------------------------------- | ------------ |- 34.68.217.16
- 34.69.175.202
cortex-xdr- 34.68.217.16
- 34.69.175.202
cortex-xdrLog forwarding to a syslog receiver### Cortex XSIAM log forwarding to a syslog receiverIf you want to send logs to a syslog receiver, you need to enable access to Cortex XSIAM IP addresses for your region in your firewall. For more information, see Integrate a syslog receiver.If you want to send logs to a syslog receiver, you need to enable access to Cortex XSIAM IP addresses for your region in your firewall. For more information, see Integrate a syslog receiver.Show markdown source
@@ -1,72 +1,78 @@ -# FedRamp and the US Federal Government required resources +--- +description: >- + Configure required Cortex XSIAM network resources for FedRAMP and US federal + government deployments. +--- -The following table lists the required resources for the federal government of the United States, including FQDNs, IP addresses, ports, and App-ID coverage for your deployment: +# FedRAMP and US federal Cortex XSIAM required resources -**Egress and engine resources** +Configure firewall access for FedRAMP and US federal government Cortex XSIAM deployments. The following tables list required FQDNs, IP addresses, ports, and App-ID coverage. + +### Cortex XSIAM egress and engine resources All ports are 443 unless otherwise specified. | Source | Compliance Level | IP Addresses | | ------------------------ | ------------------------------------ | ------------------------------------ | | Egress | FedRAMP Moderate | 34.122.220.113, 35.223.83.172 | | FedRAMP High | 34.136.155.252, 34.133.46.50 | | | Outbound IPs for Engines | FedRAMP Moderate | 34.123.127.174:443, 34.71.135.18:443 | | FedRAMP High | 34.123.153.175:443, 35.223.253.2:443 | | -**Core Cortex XSIAM communication** +### Core Cortex XSIAM communication resources These resources handle agent registration, heartbeats, data uploads, and API connections. All ports are 443 unless specified otherwise. | Resource/Function | FQDN | IP Address & Port | App-ID | | ------------------------------------------------------------------------------------------------------------------------------------------------------------------------------------------------------------ | ---------------------------------------------------- | ----------------- | -------------------------- | | Initial registrationUsed for the first request in registration flow where the agent passes the distribution ID and obtains the **`ch-`**_**`<tenant-name>`**_**`.traps.paloaltonetworks.com`** of its tenant | `distributions-prod-fed.traps.paloaltonetworks.com` | 104.198.132.24 | `traps-management-service` | | Agent heartbeat and data uploadUsed for all other requests between the agent and its tenant server, including heartbeat, uploads, action results, and scan reports. | `ch-<tenant-name>.traps.paloaltonetworks.com` | 130.211.195.231 | `traps-management-service` | | EDR data uploadUsed for EDR data upload. | `dc-<tenant-name>.traps.paloaltonetworks.com` | 130.211.195.231 | `traps-management-service` | | API gatewayUsed for API requests and responses. | `api-<tenant-name>.xdr.federal.paloaltonetworks.com` | 130.211.195.231 | N/a | | Verdict requestsUsed for get-verdict requests. | `cc-<tenant-name>.traps.paloaltonetworks.com` | 35.222.50.74 | `traps-management-service` | | Live terminalUsed in live terminal flow. | `wss://lrc-fed.paloaltonetworks.com` | 35.188.188.91 | `cortex-xdr` | | App proxy | `app-proxy.federal.paloaltonetworks.com` | 35.186.217.42 | N/a | -**Content updates and storage (GCP)** +### Cortex XSIAM content updates and GCP storage These resources are hosted on Google Cloud Platform. All ports are 443 unless otherwise specified. | Resource/function | FQDN | IP Addresses | | | ---------------------------------------------------------------------------------------------------------------------- | --------------------------------------------------------------- | ---------------- | ------------ | | <p><br></p> | FQDN | IP Addresses | App-ID | | InstallersUsed to download installers for upgrade actions from the server. | `panw-xdr-installers-prod-fr.storage.googleapis.com` | IP ranges in GCP | `cortex-xdr` | | Legacy payloadsUsed to download the executable for the live terminal for Cortex XDR agents earlier than version 7.1.0. | `panw-xdr-payloads-prod-fr.storage.googleapis.com` | IP ranges in GCP | `cortex-xdr` | | Content updatesUsed to download content updates. | `global-content-profiles-policy-prod-fr.storage.googleapis.com` | IP ranges in GCP | `cortex-xdr` | | Scanning verdictsUsed to download extended verdict request results in scanning. | `panw-xdr-evr-prod-fr.storage.googleapis.com` | IP ranges in GCP | `cortex-xdr` | -**Broker VM resources** +### Cortex XSIAM Broker VM resources Required only for deployments utilizing Broker VM features. All ports are 443, unless otherwise stated. | Resource/Function | FQDN | IP Addresses | App-ID | | --------------------------------------------------------------------------------------------------------------------------------------- | --------------------------------------------------- | -------------- | :------------------------: | | Broker connection | `br-<tenant-name>.xdr.federal.paloaltonetworks.com` | 34.71.185.11 | N/a | | <p>Registration</p><p>Used for the first request in the registration flow, for Broker VMs to obtain their specific connection URLs.</p> | `distributions-prod-fed.traps.paloaltonetworks.com` | 104.198.132.24 | `traps-management-service` | | <p>XSIAM gateway</p><p>Broker VM 3.0 and above</p> | `xsiam-gateway` | N/a | N/a | | <p>Time sync (NTP)</p><p>Used by the Broker VM to ensure accurate timestamping for forwarded logs.</p> | N/a | UDP port 123 | N/a | -**Authentication (SSO)** +### Cortex XSIAM authentication and SSO Required for administrator login and Single Sign-On. All ports are 443 unless specified | Resource | FQDN | IP Addresses and Port | App-ID | | ---------------- | ------------------------------- | --------------------- | :----: | | Identity service | `identity.paloaltonetworks.com` | 34.107.215.35 | N/a | | Login service | `login.paloaltonetworks.com` | 34.107.190.184 | N/a | -**Ingress: Third-party data collection** +### Cortex XSIAM ingress for third-party data collection Allow traffic from these IPs to your network when collecting data from SaaS and Cloud resources. | IP Addresses | App-ID | | ---------------------------------------------------- | ------------ | | <ul><li>34.68.217.16</li><li>34.69.175.202</li></ul> | `cortex-xdr` | -**Log forwarding to a syslog receiver** +### Cortex XSIAM log forwarding to a syslog receiver If you want to send logs to a syslog receiver, you need to enable access to Cortex XSIAM IP addresses for your region in your firewall. For more information, see [Integrate a syslog receiver](../../../post-deployment/data-and-log-forwarding/forward-logs-and-data-from-cortex-xsiam-to-external-services/configure-external-applications-for-forwarding/integrate-a-syslog-receiver).
-
▸ ▾ Cortex XSIAM inbound source IP addresses modified +12 −6 Retitled to "Cortex XSIAM inbound source IP addresses"; the infrastructure and data-collection IP tables are unchanged.
xsiam/onboard-cortex-xsiam/deployment-steps/activate-cortex-xsiam/enable-access-to-required-panw-resources/inbound-source-resourcesRead it on the Cortex docs portal ↗ Read it here → This file's diff on GitHub ↗
Before After@@ -1,28 +1,34 @@# Inbound source resources---description: >-Configure firewall allowlists for Cortex XSIAM inbound source IP addresses bydeployment region.---Allow these IPs to connect inbound to your network. These are required for communication with your resources (Broker VM, Syslog) and for collecting data from your SaaS/Cloud environments.# Cortex XSIAM inbound source IP addressesUse these Cortex XSIAM inbound source IP addresses to configure firewall allowlists by deployment region. They support inbound communication with Broker VM and syslog resources, plus data collection from SaaS and cloud environments.Configure your firewall (and relevant receivers) to allow inbound traffic from these Source IPs.Configure your firewall (and relevant receivers) to allow inbound traffic from these Source IPs.Service definitions### Cortex XSIAM inbound service definitions• Infrastructure: Communication to your on-premise resources (for example, Broker VM, Syslog)• Infrastructure: Communication to your on-premise resources (for example, Broker VM, Syslog)• Data collection: Traffic from Cortex XSIAM to your network to collect data.• Data collection: Traffic from Cortex XSIAM to your network to collect data.• App-ID:cortex-xdr• App-ID:cortex-xdrAmericas### Cortex XSIAM inbound IP addresses in the AmericasRegion│Infrastructure IP Addresses (allow inbound)│Data Collection IP Addresses (allow inbound)Region│Infrastructure IP Addresses (allow inbound)│Data Collection IP Addresses (allow inbound)| ------------------ | ------------------------------------------- | -------------------------------------------- || ------------------ | ------------------------------------------- | -------------------------------------------- |United States (US)│34.132.108.184, 34.69.63.16│34.66.69.154, 35.202.21.123United States (US)│34.132.108.184, 34.69.63.16│34.66.69.154, 35.202.21.123Canada (CA)│35.203.108.13, 35.203.101.162│34.95.33.72, 34.95.62.136Canada (CA)│35.203.108.13, 35.203.101.162│34.95.33.72, 34.95.62.136EMEA (Europe, Middle East, Africa)### Cortex XSIAM inbound IP addresses in EMEARegion│Infrastructure IP Addresses (allow inbound)│Data Collection IP Addresses (allow inbound)Region│Infrastructure IP Addresses (allow inbound)│Data Collection IP Addresses (allow inbound)| ------------------------------------- | ------------------------------------------- | -------------------------------------------- || ------------------------------------- | ------------------------------------------- | -------------------------------------------- |France (FA)│34.155.5.117, 34.155.41.247│34.163.125.167, 34.163.155.105France (FA)│34.155.5.117, 34.155.41.247│34.163.125.167, 34.163.155.105Germany (DE)│35.234.118.195, 34.89.183.45│34.89.197.46, 34.107.3.224Germany (DE)│35.234.118.195, 34.89.183.45│34.89.197.46, 34.107.3.224Israel (IL)│34.165.33.165, 34.165.27.131│34.165.131.171, 34.165.120.206Israel (IL)│34.165.33.165, 34.165.27.131│34.165.131.171, 34.165.120.206Italy (IT)│34.154.23.156, 34.154.186.12│34.154.208.247, 34.154.243.11Italy (IT)│34.154.23.156, 34.154.186.12│34.154.208.247, 34.154.243.11Netherlands/Europe (EU)
│34.147.107.51, 34.91.26.125│34.90.70.107, 35.204.129.196Netherlands/Europe (EU)
│34.147.107.51, 34.91.26.125│34.90.70.107, 35.204.129.196@@ -30,17 +36,17 @@ Service definitionsQatar (QT)│34.18.34.118, 34.18.39.155│34.18.44.71, 34.18.30.132Qatar (QT)│34.18.34.118, 34.18.39.155│34.18.44.71, 34.18.30.132Saudi Arabia (SA)│34.166.61.81, 34.166.58.213│34.166.59.20, 34.166.53.242Saudi Arabia (SA)│34.166.61.81, 34.166.58.213│34.166.59.20, 34.166.53.242South Africa (ZA)│34.35.42.196, 34.35.79.219│34.35.69.156, 34.35.60.86South Africa (ZA)│34.35.42.196, 34.35.79.219│34.35.69.156, 34.35.60.86Spain (ES)│34.175.46.46, 34.175.80.182│34.175.27.251, 34.175.198.50Spain (ES)│34.175.46.46, 34.175.80.182│34.175.27.251, 34.175.198.50Switzerland (CH)│34.65.108.153, 34.65.155.169│34.65.225.124, 34.65.89.6Switzerland (CH)│34.65.108.153, 34.65.155.169│34.65.225.124, 34.65.89.6United Kingdom (UK)│35.242.180.163, 34.105.173.229│34.105.227.146, 34.105.137.22United Kingdom (UK)│35.242.180.163, 34.105.173.229│34.105.227.146, 34.105.137.22Finland (F)│34.88.97.182, 34.88.189.1│35.228.192.167, 34.88.193.126Finland (F)│34.88.97.182, 34.88.189.1│35.228.192.167, 34.88.193.126JPAC (Asia-Pacific)### Cortex XSIAM inbound IP addresses in JPACRegion│Infrastructure IP Addresses (allow inbound)│Data Collection IP Addresses (allow inbound)Region│Infrastructure IP Addresses (allow inbound)│Data Collection IP Addresses (allow inbound)| ---------------- | ------------------------------------------- | -------------------------------------------- || ---------------- | ------------------------------------------- | -------------------------------------------- |Australia (AU)│34.151.83.236, 34.116.67.90│35.197.181.108, 35.197.175.44Australia (AU)│34.151.83.236, 34.116.67.90│35.197.181.108, 35.197.175.44India (IN)│35.200.175.78, 34.93.9.198│34.93.3.196, 34.93.175.218India (IN)│35.200.175.78, 34.93.9.198│34.93.3.196, 34.93.175.218Indonesia (ID)│34.128.126.138, 34.128.82.158│34.101.158.32, 34.101.79.159Indonesia (ID)│34.128.126.138, 34.128.82.158│34.101.158.32, 34.101.79.159Japan (JP)│35.200.3.131, 34.146.181.233│34.85.68.167, 34.84.99.239Japan (JP)│35.200.3.131, 34.146.181.233│34.85.68.167, 34.84.99.239Singapore (SG)│35.240.243.57, 34.126.183.208│35.247.148.38, 35.247.173.40Singapore (SG)│35.240.243.57, 34.126.183.208│35.247.148.38, 35.247.173.40Show markdown source
@@ -1,28 +1,34 @@
-# Inbound source resources
+---
+description: >-
+  Configure firewall allowlists for Cortex XSIAM inbound source IP addresses by
+  deployment region.
+---

-Allow these IPs to connect inbound to your network. These are required for communication with your resources (Broker VM, Syslog) and for collecting data from your SaaS/Cloud environments.
+# Cortex XSIAM inbound source IP addresses
+
+Use these Cortex XSIAM inbound source IP addresses to configure firewall allowlists by deployment region. They support inbound communication with Broker VM and syslog resources, plus data collection from SaaS and cloud environments.

 Configure your firewall (and relevant receivers) to allow inbound traffic from these Source IPs.

-Service definitions
+### Cortex XSIAM inbound service definitions

 * Infrastructure: Communication to your on-premise resources (for example, Broker VM, Syslog)
 * Data collection: Traffic from Cortex XSIAM to your network to collect data.
 * App-ID: `cortex-xdr`

-**Americas**
+### Cortex XSIAM inbound IP addresses in the Americas

 | Region             | Infrastructure IP Addresses (allow inbound) | Data Collection IP Addresses (allow inbound) |
 | ------------------ | ------------------------------------------- | -------------------------------------------- |
 | United States (US) | 34.132.108.184, 34.69.63.16                 | 34.66.69.154, 35.202.21.123                  |
 | Canada (CA)        | 35.203.108.13, 35.203.101.162               | 34.95.33.72, 34.95.62.136                    |

-**EMEA (Europe, Middle East, Africa)**
+### Cortex XSIAM inbound IP addresses in EMEA

 | Region                                | Infrastructure IP Addresses (allow inbound) | Data Collection IP Addresses (allow inbound) |
 | ------------------------------------- | ------------------------------------------- | -------------------------------------------- |
 | France (FA)                           | 34.155.5.117, 34.155.41.247                 | 34.163.125.167, 34.163.155.105               |
 | Germany (DE)                          | 35.234.118.195, 34.89.183.45                | 34.89.197.46, 34.107.3.224                   |
 | Israel (IL)                           | 34.165.33.165, 34.165.27.131                | 34.165.131.171, 34.165.120.206               |
 | Italy (IT)                            | 34.154.23.156, 34.154.186.12                | 34.154.208.247, 34.154.243.11                |
 | <p>Netherlands/</p><p>Europe (EU)</p> | 34.147.107.51, 34.91.26.125                 | 34.90.70.107, 35.204.129.196                 |
@@ -30,17 +36,17 @@ Service definitions
 | Qatar (QT)                            | 34.18.34.118, 34.18.39.155                  | 34.18.44.71, 34.18.30.132                    |
 | Saudi Arabia (SA)                     | 34.166.61.81, 34.166.58.213                 | 34.166.59.20, 34.166.53.242                  |
 | South Africa (ZA)                     | 34.35.42.196, 34.35.79.219                  | 34.35.69.156, 34.35.60.86                    |
 | Spain (ES)                            | 34.175.46.46, 34.175.80.182                 | 34.175.27.251, 34.175.198.50                 |
 | Switzerland (CH)                      | 34.65.108.153, 34.65.155.169                | 34.65.225.124, 34.65.89.6                    |
 | United Kingdom (UK)                   | 35.242.180.163, 34.105.173.229              | 34.105.227.146, 34.105.137.22                |
 | Finland (F)                           | 34.88.97.182, 34.88.189.1                   | 35.228.192.167, 34.88.193.126                |

-**JPAC (Asia-Pacific)**
+### Cortex XSIAM inbound IP addresses in JPAC

 | Region           | Infrastructure IP Addresses (allow inbound) | Data Collection IP Addresses (allow inbound) |
 | ---------------- | ------------------------------------------- | -------------------------------------------- |
 | Australia (AU)   | 34.151.83.236, 34.116.67.90                 | 35.197.181.108, 35.197.175.44                |
 | India (IN)       | 35.200.175.78, 34.93.9.198                  | 34.93.3.196, 34.93.175.218                   |
 | Indonesia (ID)   | 34.128.126.138, 34.128.82.158               | 34.101.158.32, 34.101.79.159                 |
 | Japan (JP)       | 35.200.3.131, 34.146.181.233                | 34.85.68.167, 34.84.99.239                   |
 | Singapore (SG)   | 35.240.243.57, 34.126.183.208               | 35.247.148.38, 35.247.173.40                 |
-
▸ ▾ Cortex XSIAM regional egress resources modified +12 −6 Section labels become headings and the intro is rewritten; every FQDN, IP address and App-ID in the regional tables is unchanged.
xsiam/onboard-cortex-xsiam/deployment-steps/activate-cortex-xsiam/enable-access-to-required-panw-resources/regional-egress-resourcesRead it on the Cortex docs portal ↗ Read it here → This file's diff on GitHub ↗
Before After@@ -1,25 +1,31 @@# Regional egress resources---description: >-Configure Cortex XSIAM firewall egress access with regional FQDNs, IPaddresses, ports, and App-IDs.---These are the core resources specific to your selected deployment region (for example, US, EU, JP). They handle the primary communication between your agents and your specific tenant (API, Heartbeats, Live Terminal, and EDR data uploads).# Cortex XSIAM regional egress resourcesUse these Cortex XSIAM regional egress resources to configure firewall allowlists for your deployment region. They support agent-to-tenant communication for API access, heartbeats, Live Terminal, and EDR data uploads.The following table describes the service definition, FQDNs, and App-ID coverage for your deployment. Unless specified, all ports are 443 (TCP). Select your region and allow outbound traffic to the corresponding FQDNs and IPs.The following table describes the service definition, FQDNs, and App-ID coverage for your deployment. Unless specified, all ports are 443 (TCP). Select your region and allow outbound traffic to the corresponding FQDNs and IPs.Service definitions and regions### Cortex XSIAM egress service definitionsService Definition FQDN APP-ID Egress tenant
Connects to the Cortex XSIAM tenant.
<tenant-name>.xdr.<region>.paloaltonetworks.comcortex-xdrLive Terminal
Used in live terminal flow for real-time shell sessions
https://lrc-<region>.paloaltonetworks.comwss://lrc-<region>.paloaltonetworks.comcortex-xdrEndpoint Detection and Response (EDR)
Used for EDR data upload. Includes telemetry logs, process executions, and security events that the Cortex XDR agent captures and sends to the cloud for analysis
dc-<tenant-name>.traps.paloaltonetworks.comtraps-management-serviceHeartbeat
Used for all other requests between the XDR agent and the tenant, including heartbeat, uploads, action results, and scan reports.
ch-<tenant-name>.traps.paloaltonetworks.comtraps-management-serviceAPI Access
Used for API requests and responses and to connect to an engine.
api-<tenant-name>.xdr.<region>.paloaltonetworks.comN/a Indicator
Used to download the IOC indicators from the tenant. Downloading lists of bad IPs, domains, or hashes to block locally.
xdr-<region>-<project ID>-tim-indicators.storage.googleapis.comtraps-management-serviceVerdict requests
Used for get-verdict requests. For example, checking if a specific file hash is known to be malware.
cc-<tenant-name>.traps.paloaltonetworks.comtraps-management-serviceBroker VM
Connection for the Broker VM
br-<tenant-name>.xdr.<region>.paloaltonetworks.comN/a Service Definition FQDN APP-ID Egress tenant
Connects to the Cortex XSIAM tenant.
<tenant-name>.xdr.<region>.paloaltonetworks.comcortex-xdrLive Terminal
Used in live terminal flow for real-time shell sessions
https://lrc-<region>.paloaltonetworks.comwss://lrc-<region>.paloaltonetworks.comcortex-xdrEndpoint Detection and Response (EDR)
Used for EDR data upload. Includes telemetry logs, process executions, and security events that the Cortex XDR agent captures and sends to the cloud for analysis
dc-<tenant-name>.traps.paloaltonetworks.comtraps-management-serviceHeartbeat
Used for all other requests between the XDR agent and the tenant, including heartbeat, uploads, action results, and scan reports.
ch-<tenant-name>.traps.paloaltonetworks.comtraps-management-serviceAPI Access
Used for API requests and responses and to connect to an engine.
api-<tenant-name>.xdr.<region>.paloaltonetworks.comN/a Indicator
Used to download the IOC indicators from the tenant. Downloading lists of bad IPs, domains, or hashes to block locally.
xdr-<region>-<project ID>-tim-indicators.storage.googleapis.comtraps-management-serviceVerdict requests
Used for get-verdict requests. For example, checking if a specific file hash is known to be malware.
cc-<tenant-name>.traps.paloaltonetworks.comtraps-management-serviceBroker VM
Connection for the Broker VM
br-<tenant-name>.xdr.<region>.paloaltonetworks.comN/a The following tables list the required resources by region. Unless specified, all ports are 443 (TCP).The following tables list the required resources by region. Unless specified, all ports are 443 (TCP).Americas### Cortex XSIAM egress IP addresses in the AmericasRegion Egress (tenant) Live Terminal EDR & Heartbeat API Access Indicator & Verdict requests Broker VM United States (US) 35.244.250.18 35.190.88.43 34.98.77.231 35.222.81.194 35.224.140.142 104.155.131.72 Brazil (BR) 34.96.83.202 34.151.236.197 136.110.146.246 34.39.136.78 34.39.195.104 35.198.38.182 Canada (CA) 34.120.31.199 35.203.99.74 34.96.120.25 35.203.82.121 35.203.35.23 34.95.8.232 Region Egress (tenant) Live Terminal EDR & Heartbeat API Access Indicator & Verdict requests Broker VM United States (US) 35.244.250.18 35.190.88.43 34.98.77.231 35.222.81.194 35.224.140.142 104.155.131.72 Brazil (BR) 34.96.83.202 34.151.236.197 136.110.146.246 34.39.136.78 34.39.195.104 35.198.38.182 Canada (CA) 34.120.31.199 35.203.99.74 34.96.120.25 35.203.82.121 35.203.35.23 34.95.8.232 EMEA (Europe, Middle East, Africa)### Cortex XSIAM egress IP addresses in EMEARegion│Egress (tenant)│Live Terminal│EDR & Heartbeat│API Access│Indicator & Verdict request│Broker VMRegion│Egress (tenant)│Live Terminal│EDR & Heartbeat│API Access│Indicator & Verdict request│Broker VM| ------------------------------------- | --------------- | -------------- | --------------- | -------------- | --------------------------- | -------------- || ------------------------------------- | --------------- | -------------- | --------------- | -------------- | --------------------------- | -------------- |France (FA)│34.111.134.57│34.163.57.57│34.36.155.211│34.155.222.152│34.155.110.169│34.155.90.61France (FA)│34.111.134.57│34.163.57.57│34.36.155.211│34.155.222.152│34.155.110.169│34.155.90.61Germany (DE)│34.98.68.183│34.107.61.141│34.107.161.143│34.107.57.23│35.242.201.199│35.198.112.13Germany (DE)│34.98.68.183│34.107.61.141│34.107.161.143│34.107.57.23│35.242.201.199│35.198.112.13Israel (IL)│34.111.129.144│34.165.43.106│34.128.157.130│34.165.156.139│34.165.2.110│34.165.24.222Israel (IL)│34.111.129.144│34.165.43.106│34.128.157.130│34.165.156.139│34.165.2.110│34.165.24.222Italy (IT)│34.8.224.70│34.154.154.5│34.8.234.58│34.154.195.120│34.154.230.76│34.154.168.139Italy (IT)│34.8.224.70│34.154.154.5│34.8.234.58│34.154.195.120│34.154.230.76│34.154.168.139Netherlands/Europe (EU)
│35.227.237.180│35.244.251.25│34.102.140.103│34.90.67.58│34.90.71.103│34.91.128.226Netherlands/Europe (EU)
│35.227.237.180│35.244.251.25│34.102.140.103│34.90.67.58│34.90.71.103│34.91.128.226@@ -27,11 +33,11 @@ The following tables list the required resources by region. Unless specified, alQatar (QT)│35.190.0.180│34.18.34.73│34.107.129.254│34.18.46.240│34.18.53.229│34.18.37.73Qatar (QT)│35.190.0.180│34.18.34.73│34.107.129.254│34.18.46.240│34.18.53.229│34.18.37.73Saudi Arabia (SA)│35.244.157.127│34.166.54.6│34.107.213.85│34.166.58.79│34.166.53.160│34.166.55.153Saudi Arabia (SA)│35.244.157.127│34.166.54.6│34.107.213.85│34.166.58.79│34.166.53.160│34.166.55.153South Africa (ZA)│34.149.165.12│34.35.56.170│35.190.79.68│34.35.64.191│34.35.13.198│34.35.45.251South Africa (ZA)│34.149.165.12│34.35.56.170│35.190.79.68│34.35.64.191│34.35.13.198│34.35.45.251Spain (ES)│34.111.188.248│34.175.18.78│34.120.102.147│34.175.30.176│34.175.205.166│34.175.182.55Spain (ES)│34.111.188.248│34.175.18.78│34.120.102.147│34.175.30.176│34.175.205.166│34.175.182.55Switzerland (CH)│34.111.6.153│34.65.213.226│34.149.180.250│34.65.248.119│34.65.137.215│34.65.51.103Switzerland (CH)│34.111.6.153│34.65.213.226│34.149.180.250│34.65.248.119│34.65.137.215│34.65.51.103United Kingdom (UK)│34.120.87.77│35.242.159.176│35.244.133.254│34.89.56.78│34.89.42.214│35.197.219.110United Kingdom (UK)│34.120.87.77│35.242.159.176│35.244.133.254│34.89.56.78│34.89.42.214│35.197.219.110Finland (FI)│34.160.63.63│34.88.31.230│136.110.165.34│35.228.73.215│35.228.118.177│Finland (FI)│34.160.63.63│34.88.31.230│136.110.165.34│35.228.73.215│35.228.118.177│JPAC (Asia-Pacific)### Cortex XSIAM egress IP addresses in JPACRegion Egress (tenant) Live Terminal EDR & Heartbeat API Access Indicator & Verdict Requests Broker VM Australia (AU) 34.120.229.65 35.244.66.177 34.102.237.151 35.189.18.208 35.201.23.188 35.244.93.0 Delhi (DL) 34.8.67.192 34.131.116.135 136.110.132.208 34.131.165.103 34.131.47.126 34.131.131.141 India (IN) 35.186.207.80 35.200.146.253 34.120.213.187 35.200.158.164 35.244.57.196 35.200.234.99 Indonesia (ID) 34.111.58.152 34.101.214.157 34.128.156.84 34.128.115.238 34.101.155.198 34.101.101.170 Japan (JP) 35.241.28.254 34.84.201.32 34.95.66.187 34.84.125.129 34.84.225.105 34.85.74.43 Singapore (SG) 34.117.211.129 34.87.61.186 34.120.142.18 34.87.83.144 35.247.161.94 34.87.167.125 South Korea (KR) 34.54.5.247 34.22.66.91 34.54.155.245 34.64.54.175 34.64.228.117 34.64.46.249 Taiwan (TW) 34.160.28.41 34.80.34.30 34.149.248.76 35.234.8.249 35.229.186.216 34.80.230.166 Region Egress (tenant) Live Terminal EDR & Heartbeat API Access Indicator & Verdict Requests Broker VM Australia (AU) 34.120.229.65 35.244.66.177 34.102.237.151 35.189.18.208 35.201.23.188 35.244.93.0 Delhi (DL) 34.8.67.192 34.131.116.135 136.110.132.208 34.131.165.103 34.131.47.126 34.131.131.141 India (IN) 35.186.207.80 35.200.146.253 34.120.213.187 35.200.158.164 35.244.57.196 35.200.234.99 Indonesia (ID) 34.111.58.152 34.101.214.157 34.128.156.84 34.128.115.238 34.101.155.198 34.101.101.170 Japan (JP) 35.241.28.254 34.84.201.32 34.95.66.187 34.84.125.129 34.84.225.105 34.85.74.43 Singapore (SG) 34.117.211.129 34.87.61.186 34.120.142.18 34.87.83.144 35.247.161.94 34.87.167.125 South Korea (KR) 34.54.5.247 34.22.66.91 34.54.155.245 34.64.54.175 34.64.228.117 34.64.46.249 Taiwan (TW) 34.160.28.41 34.80.34.30 34.149.248.76 35.234.8.249 35.229.186.216 34.80.230.166 Show markdown source
@@ -1,25 +1,31 @@ -# Regional egress resources +--- +description: >- + Configure Cortex XSIAM firewall egress access with regional FQDNs, IP + addresses, ports, and App-IDs. +--- -These are the core resources specific to your selected deployment region (for example, US, EU, JP). They handle the primary communication between your agents and your specific tenant (API, Heartbeats, Live Terminal, and EDR data uploads). +# Cortex XSIAM regional egress resources + +Use these Cortex XSIAM regional egress resources to configure firewall allowlists for your deployment region. They support agent-to-tenant communication for API access, heartbeats, Live Terminal, and EDR data uploads. The following table describes the service definition, FQDNs, and App-ID coverage for your deployment. Unless specified, all ports are 443 (TCP). Select your region and allow outbound traffic to the corresponding FQDNs and IPs. -**Service definitions and regions** +### Cortex XSIAM egress service definitions <table><thead><tr><th>Service Definition</th><th width="295">FQDN</th><th>APP-ID</th></tr></thead><tbody><tr><td><p>Egress tenant</p><p>Connects to the Cortex XSIAM tenant.</p></td><td><code><tenant-name>.xdr.<region>.paloaltonetworks.com</code></td><td><code>cortex-xdr</code></td></tr><tr><td><p>Live Terminal</p><p>Used in live terminal flow for real-time shell sessions</p></td><td><p><code>https://lrc-<region>.paloaltonetworks.com</code></p><p><code>wss://lrc-<region>.paloaltonetworks.com</code></p></td><td><code>cortex-xdr</code></td></tr><tr><td><p>Endpoint Detection and Response (EDR)</p><p>Used for EDR data upload. Includes telemetry logs, process executions, and security events that the Cortex XDR agent captures and sends to the cloud for analysis</p></td><td><code>dc-<tenant-name>.traps.paloaltonetworks.com</code></td><td><code>traps-management-service</code></td></tr><tr><td><p>Heartbeat</p><p>Used for all other requests between the XDR agent and the tenant, including heartbeat, uploads, action results, and scan reports.</p></td><td><code>ch-<tenant-name>.traps.paloaltonetworks.com</code></td><td><code>traps-management-service</code></td></tr><tr><td><p>API Access</p><p>Used for API requests and responses and to connect to an engine.</p></td><td><code>api-<tenant-name>.xdr.<region>.paloaltonetworks.com</code></td><td>N/a</td></tr><tr><td><p>Indicator</p><p>Used to download the IOC indicators from the tenant. Downloading lists of bad IPs, domains, or hashes to block locally.</p></td><td><code>xdr-<region>-<project ID>-tim-indicators.storage.googleapis.com</code></td><td><code>traps-management-service</code></td></tr><tr><td><p>Verdict requests</p><p>Used for get-verdict requests. For example, checking if a specific file hash is known to be malware.</p></td><td><code>cc-<tenant-name>.traps.paloaltonetworks.com</code></td><td><code>traps-management-service</code></td></tr><tr><td><p>Broker VM</p><p>Connection for the Broker VM</p></td><td><code>br-<tenant-name></code><em><code>.xdr.</code></em><code><region>.paloaltonetworks.com</code></td><td>N/a</td></tr></tbody></table> The following tables list the required resources by region. Unless specified, all ports are 443 (TCP). -**Americas** +### Cortex XSIAM egress IP addresses in the Americas <table><thead><tr><th>Region</th><th>Egress (tenant)</th><th width="146">Live Terminal</th><th>EDR & Heartbeat</th><th>API Access</th><th>Indicator & Verdict requests</th><th>Broker VM</th></tr></thead><tbody><tr><td>United States (US)</td><td>35.244.250.18</td><td>35.190.88.43</td><td>34.98.77.231</td><td>35.222.81.194</td><td>35.224.140.142</td><td>104.155.131.72</td></tr><tr><td>Brazil (BR)</td><td>34.96.83.202</td><td>34.151.236.197</td><td>136.110.146.246</td><td>34.39.136.78</td><td>34.39.195.104</td><td>35.198.38.182</td></tr><tr><td>Canada (CA)</td><td>34.120.31.199</td><td>35.203.99.74</td><td>34.96.120.25</td><td>35.203.82.121</td><td>35.203.35.23</td><td>34.95.8.232</td></tr></tbody></table> -**EMEA (Europe, Middle East, Africa)** +### Cortex XSIAM egress IP addresses in EMEA | Region | Egress (tenant) | Live Terminal | EDR & Heartbeat | API Access | Indicator & Verdict request | Broker VM | | ------------------------------------- | --------------- | -------------- | --------------- | -------------- | --------------------------- | -------------- | | France (FA) | 34.111.134.57 | 34.163.57.57 | 34.36.155.211 | 34.155.222.152 | 34.155.110.169 | 34.155.90.61 | | Germany (DE) | 34.98.68.183 | 34.107.61.141 | 34.107.161.143 | 34.107.57.23 | 35.242.201.199 | 35.198.112.13 | | Israel (IL) | 34.111.129.144 | 34.165.43.106 | 34.128.157.130 | 34.165.156.139 | 34.165.2.110 | 34.165.24.222 | | Italy (IT) | 34.8.224.70 | 34.154.154.5 | 34.8.234.58 | 34.154.195.120 | 34.154.230.76 | 34.154.168.139 | | <p>Netherlands/</p><p>Europe (EU)</p> | 35.227.237.180 | 35.244.251.25 | 34.102.140.103 | 34.90.67.58 | 34.90.71.103 | 34.91.128.226 | @@ -27,11 +33,11 @@ The following tables list the required resources by region. Unless specified, al | Qatar (QT) | 35.190.0.180 | 34.18.34.73 | 34.107.129.254 | 34.18.46.240 | 34.18.53.229 | 34.18.37.73 | | Saudi Arabia (SA) | 35.244.157.127 | 34.166.54.6 | 34.107.213.85 | 34.166.58.79 | 34.166.53.160 | 34.166.55.153 | | South Africa (ZA) | 34.149.165.12 | 34.35.56.170 | 35.190.79.68 | 34.35.64.191 | 34.35.13.198 | 34.35.45.251 | | Spain (ES) | 34.111.188.248 | 34.175.18.78 | 34.120.102.147 | 34.175.30.176 | 34.175.205.166 | 34.175.182.55 | | Switzerland (CH) | 34.111.6.153 | 34.65.213.226 | 34.149.180.250 | 34.65.248.119 | 34.65.137.215 | 34.65.51.103 | | United Kingdom (UK) | 34.120.87.77 | 35.242.159.176 | 35.244.133.254 | 34.89.56.78 | 34.89.42.214 | 35.197.219.110 | | Finland (FI) | 34.160.63.63 | 34.88.31.230 | 136.110.165.34 | 35.228.73.215 | 35.228.118.177 | | -**JPAC (Asia-Pacific)** +### Cortex XSIAM egress IP addresses in JPAC <table><thead><tr><th>Region</th><th>Egress (tenant)</th><th>Live Terminal</th><th width="143">EDR & Heartbeat</th><th>API Access</th><th>Indicator & Verdict Requests</th><th>Broker VM</th></tr></thead><tbody><tr><td>Australia (AU)</td><td>34.120.229.65</td><td>35.244.66.177</td><td>34.102.237.151</td><td>35.189.18.208</td><td>35.201.23.188</td><td>35.244.93.0</td></tr><tr><td>Delhi (DL)</td><td>34.8.67.192</td><td>34.131.116.135</td><td>136.110.132.208</td><td>34.131.165.103</td><td>34.131.47.126</td><td>34.131.131.141</td></tr><tr><td>India (IN)</td><td>35.186.207.80</td><td>35.200.146.253</td><td>34.120.213.187</td><td>35.200.158.164</td><td>35.244.57.196</td><td>35.200.234.99</td></tr><tr><td>Indonesia (ID)</td><td>34.111.58.152</td><td>34.101.214.157</td><td>34.128.156.84</td><td>34.128.115.238</td><td>34.101.155.198</td><td>34.101.101.170</td></tr><tr><td>Japan (JP)</td><td>35.241.28.254</td><td>34.84.201.32</td><td>34.95.66.187</td><td>34.84.125.129</td><td>34.84.225.105</td><td>34.85.74.43</td></tr><tr><td>Singapore (SG)</td><td>34.117.211.129</td><td>34.87.61.186</td><td>34.120.142.18</td><td>34.87.83.144</td><td>35.247.161.94</td><td>34.87.167.125</td></tr><tr><td>South Korea (KR)</td><td>34.54.5.247</td><td>34.22.66.91</td><td>34.54.155.245</td><td>34.64.54.175</td><td>34.64.228.117</td><td>34.64.46.249</td></tr><tr><td>Taiwan (TW)</td><td>34.160.28.41</td><td>34.80.34.30</td><td>34.149.248.76</td><td>35.234.8.249</td><td>35.229.186.216</td><td>34.80.230.166</td></tr></tbody></table>
-
▸ ▾ Configure content modified +2 −2
xsiam/onboard-cortex-xsiam/deployment-steps/configure-contentRead it on the Cortex docs portal ↗ Read it here → This file's diff on GitHub ↗
Before After@@ -1,12 +1,12 @@------description: >-description: >-Learn how to configure data ingestion from a variety of Palo Alto Networks andConfigure Cortex XSIAM data sources with standard collectors, Broker VMthird-party sources.applets, XDR Collectors, CSP onboarding, and content packs.------# Configure content# Configure contentCortex XSIAM enables you to collect data across a vast and varied enterprise landscape. This necessitates distinct data source types designed for different environments and needs:Cortex XSIAM enables you to collect data across a vast and varied enterprise landscape. This necessitates distinct data source types designed for different environments and needs:• Standard data collectors (API/Built-in): These are built-in functionalities primarily focused on ingesting raw logs and security events for core security analysis, parsing, and normalization. They often involve direct API connections, such as Okta and CrowdStrike, or file collection tools, such as Amazon S3.• Standard data collectors (API/Built-in): These are built-in functionalities primarily focused on ingesting raw logs and security events for core security analysis, parsing, and normalization. They often involve direct API connections, such as Okta and CrowdStrike, or file collection tools, such as Amazon S3.• Broker VM data collector applets: These are modular applications installed on a local Broker VM virtual appliance, designed for on-premise data collection needs like the Syslog Collector or Database Collector.• Broker VM data collector applets: These are modular applications installed on a local Broker VM virtual appliance, designed for on-premise data collection needs like the Syslog Collector or Database Collector.Show markdown source
@@ -1,12 +1,12 @@
 ---
 description: >-
-  Learn how to configure data ingestion from a variety of Palo Alto Networks and
-  third-party sources.
+  Configure Cortex XSIAM data sources with standard collectors, Broker VM
+  applets, XDR Collectors, CSP onboarding, and content packs.
 ---

 # Configure content

 Cortex XSIAM enables you to collect data across a vast and varied enterprise landscape. This necessitates distinct data source types designed for different environments and needs:

 * **Standard data collectors (API/Built-in)**: These are built-in functionalities primarily focused on ingesting raw logs and security events for core security analysis, parsing, and normalization. They often involve direct API connections, such as Okta and CrowdStrike, or file collection tools, such as Amazon S3.
 * **Broker VM data collector applets**: These are modular applications installed on a local Broker VM virtual appliance, designed for on-premise data collection needs like the Syslog Collector or Database Collector.
-
▸ ▾ Configure Cortex XSIAM network parameters modified +11 −5
xsiam/onboard-cortex-xsiam/deployment-steps/cortex-xsiam-analytics/configure-cortex-xsiam-network-parametersRead it on the Cortex docs portal ↗ Read it here → This file's diff on GitHub ↗
Before After@@ -1,25 +1,31 @@---description: >-Configure Cortex XSIAM internal IP address ranges and domain suffixes fornetwork asset identification, tracking, and analysis.---# Configure Cortex XSIAM network parameters# Configure Cortex XSIAM network parametersDefine your internal IP address ranges and domain names to enable Cortex XSIAM to identify, track, and analyze network assets.Define your internal IP address ranges and domain names to enable Cortex XSIAM to identify, track, and analyze network assets.Define internal IP address rangesDefine internal IP address rangesThe IP Address Ranges page displays the address ranges that Cortex XSIAM Analytics monitors. Addresses are pre-populated with the default IPv4 and IPv6 address spaces. The names you define appears when investigating the network-related events in Cortex XSIAM.The IP Address Ranges page displays the address ranges that Cortex XSIAM Analytics monitors. Addresses are pre-populated with the default IPv4 and IPv6 address spaces. The names you define appears when investigating the network-related events in Cortex XSIAM.You can add a new IP address range manually or upload IP address ranges from a CSV file.You can add a new IP address range manually or upload IP address ranges from a CSV file.How to define internal IP address rangesHow to define internal IP address ranges1. Select Inventory → Assets → Network Configuration → Internal IP Address Ranges.1. Select Inventory → Assets → Network Configuration → Internal IP Address Ranges.2. Do one of the following:2. Do one of the following:To│Do thisTo│Do this| ---------------------------------------- | ------------------------------------------------------------------------------------------------------------------------------------------------------------------------------------------------------------------------------------------------------------------------------------------------------------------------------------------------------------------------------------------------------------------------------------------------------------------------------------------------------------------------------------------------------------------------------------------------------------------------------------------------------------------------------------------------------------------------------------------------------------------------------------------------------------------------------------------------------------------------------------------------------------------------------------------------------------------------------ || ---------------------------------------- | -------------------------------------------------------------------------------------------------------------------------------------------------------------------------------------------------------------------------------------------------------------------------------------------------------------------------------------------------------------------------------------------------------------------------------------------------------------------------------------------------------------------------------------------------------------------------------------------------------------------------------------------------------------------------------------------------------------------------------------------------------------------------------------------------------------------------------------------------------------------------------------------------------------------------------------------------- |Add a new IP address manually│1. Click Add New Range → Create New, and then enter the IP address name and IP address range or CIDR values.By default, Cortex XSIAM creates Private Network ranges that specify reserved industry-approved ranges. Private Network ranges are marked with a
 icon and you can only edit the name.
Note
You can add a range that is fully contained in an existing range, however, you cannot add a new range that partially intersects with another range.
2. Click Save.
Add a new IP address manually│1. Click Add New Range → Create New, and then enter the IP address name and IP address range or CIDR values.By default, Cortex XSIAM creates Private Network ranges that specify reserved industry-approved ranges. Private Network ranges are marked with a
icon and you can only edit the name.You can add a range that is fully contained in an existing range; however, you cannot add a new range that partially intersects with another range.
2. Click Save.
Upload IP address ranges from a CSV file│1. Select Inventory+Assets → Network Configuration → IP Address Ranges.2. Click Add New Range → Upload from File.
3. Locate the CSV file you want to upload, and then click Add.
Upload IP address ranges from a CSV file│1. Select Inventory+Assets → Network Configuration → IP Address Ranges.2. Click Add New Range → Upload from File.
3. Locate the CSV file you want to upload, and then click Add.
Define internal domain namesDefine internal domain names1. Select Inventory → Assets → Network Configuration → Internal Domain Suffixes.1. Select Inventory → Assets → Network Configuration → Internal Domain Suffixes.2. Type the domain suffix you want to include as part of your internal network, for example,acme.com.2. Type the domain suffix you want to include as part of your internal network, for example,acme.com.3. Select 🖼 network-mapper-enter.png to add the suffix to the Domains List.3. Select to add the suffix to the Domains List.
Show markdown source
@@ -1,25 +1,31 @@ +--- +description: >- + Configure Cortex XSIAM internal IP address ranges and domain suffixes for + network asset identification, tracking, and analysis. +--- + # Configure Cortex XSIAM network parameters Define your internal IP address ranges and domain names to enable Cortex XSIAM to identify, track, and analyze network assets. **Define internal IP address ranges** The **IP Address Ranges** page displays the address ranges that Cortex XSIAM Analytics monitors. Addresses are pre-populated with the default IPv4 and IPv6 address spaces. The names you define appears when investigating the network-related events in Cortex XSIAM. You can add a new IP address range manually or upload IP address ranges from a CSV file. How to define internal IP address ranges 1. Select **Inventory** → **Assets** → **Network Configuration** → **Internal IP Address Ranges**. 2. Do one of the following: - | To | Do this | - | ---------------------------------------- | ------------------------------------------------------------------------------------------------------------------------------------------------------------------------------------------------------------------------------------------------------------------------------------------------------------------------------------------------------------------------------------------------------------------------------------------------------------------------------------------------------------------------------------------------------------------------------------------------------------------------------------------------------------------------------------------------------------------------------------------------------------------------------------------------------------------------------------------------------------------------------------------------------------------------------------------------------------------------------ | - | Add a new IP address manually | <p>1. Click <strong>Add New Range</strong> → <strong>Create New</strong>, and then enter the IP address name and IP address range or CIDR values.</p><p>By default, Cortex XSIAM creates Private Network ranges that specify reserved industry-approved ranges. Private Network ranges are marked with a <img src="https://2786854933-files.gitbook.io/~/files/v0/b/gitbook-x-prod.appspot.com/o/spaces%2FAEIjuYE3RXcIfmuQnBbm%2Fuploads%2Fgit-blob-da1d840ca3ccc40031c4561541d19beb5dacd92d%2F012622f745a55c097aae60a69a1b493c39fdc7b54e93764ab6f787c6189e0855.png?alt=media" alt="assets-private-network.png"> icon and you can only edit the name.</p><div data-gb-custom-block data-tag="hint" data-style="info" class="hint hint-info"><p><strong>Note</strong></p><p>You can add a range that is fully contained in an existing range, however, you cannot add a new range that partially intersects with another range.</p></div><p>2. Click <strong>Save</strong>.</p> | - | Upload IP address ranges from a CSV file | <p>1. Select <strong>Inventory</strong>+Assets → Network Configuration → <strong>IP Address Ranges</strong>.</p><p>2. Click <strong>Add New Range</strong> → <strong>Upload from File</strong>.</p><p>3. Locate the CSV file you want to upload, and then click <strong>Add</strong>.</p> | + | To | Do this | + | ---------------------------------------- | -------------------------------------------------------------------------------------------------------------------------------------------------------------------------------------------------------------------------------------------------------------------------------------------------------------------------------------------------------------------------------------------------------------------------------------------------------------------------------------------------------------------------------------------------------------------------------------------------------------------------------------------------------------------------------------------------------------------------------------------------------------------------------------------------------------------------------------------------------------------------------------------------------------------------------------------------- | + | Add a new IP address manually | <p>1. Click <strong>Add New Range</strong> → <strong>Create New</strong>, and then enter the IP address name and IP address range or CIDR values.</p><p>By default, Cortex XSIAM creates Private Network ranges that specify reserved industry-approved ranges. Private Network ranges are marked with a <img src="https://2786854933-files.gitbook.io/~/files/v0/b/gitbook-x-prod.appspot.com/o/spaces%2FAEIjuYE3RXcIfmuQnBbm%2Fuploads%2Fgit-blob-da1d840ca3ccc40031c4561541d19beb5dacd92d%2F012622f745a55c097aae60a69a1b493c39fdc7b54e93764ab6f787c6189e0855.png?alt=media" alt="assets-private-network.png"> icon and you can only edit the name.</p><div data-gb-custom-block data-tag="hint" data-style="info" class="hint hint-info"><p>You can add a range that is fully contained in an existing range; however, you cannot add a new range that partially intersects with another range.</p></div><p>2. Click <strong>Save</strong>.</p> | + | Upload IP address ranges from a CSV file | <p>1. Select <strong>Inventory</strong>+Assets → Network Configuration → <strong>IP Address Ranges</strong>.</p><p>2. Click <strong>Add New Range</strong> → <strong>Upload from File</strong>.</p><p>3. Locate the CSV file you want to upload, and then click <strong>Add</strong>.</p> | **Define internal domain names** 1. Select **Inventory** → **Assets** → **Network Configuration** → **Internal Domain Suffixes**. 2. Type the domain suffix you want to include as part of your internal network, for example, **`acme.com`**. -3. Select  to add the suffix to the **Domains List**. +3. Select <img src="https://2786854933-files.gitbook.io/~/files/v0/b/gitbook-x-prod.appspot.com/o/spaces%2FAEIjuYE3RXcIfmuQnBbm%2Fuploads%2Fgit-blob-1bae499399c7e33bf961f3e38fede70604d4d5d8%2F74e0fe79ef021bc9355f21d7aa7eba932faf3c58e9b1fc3b82819f379ef4fc6e.png?alt=media" alt="network-mapper-enter.png" data-size="line"> to add the suffix to the **Domains List**.
-
▸ ▾ Enable the Analytics Engine and Identity Analytics modified +6 −0
xsiam/onboard-cortex-xsiam/deployment-steps/cortex-xsiam-analytics/enable-the-analytics-engine-and-identity-analyticsRead it on the Cortex docs portal ↗ Read it here → This file's diff on GitHub ↗
Before After@@ -1,8 +1,14 @@---description: >-Enable Cortex XSIAM Analytics Engine and Identity Analytics to baselineactivity and detect anomalous endpoint and user behavior.---# Enable the Analytics Engine and Identity Analytics# Enable the Analytics Engine and Identity AnalyticsCortex XSIAM - Analytics includes the following:Cortex XSIAM - Analytics includes the following:• Cortex XSIAM Analytics Engine: Analyzes your endpoint data to develop a baseline and raise Analytics and Analytics BIOC alerts when anomalies and malicious behaviors are detected.• Cortex XSIAM Analytics Engine: Analyzes your endpoint data to develop a baseline and raise Analytics and Analytics BIOC alerts when anomalies and malicious behaviors are detected.• Identity Analytics: Allows the Cortex XSIAM Analytics engine to aggregate and display user profile details, activities, and alerts related to a user-based Analytics type alert and Analytics BIOC rule during an investigation.• Identity Analytics: Allows the Cortex XSIAM Analytics engine to aggregate and display user profile details, activities, and alerts related to a user-based Analytics type alert and Analytics BIOC rule during an investigation.hint warninghint warningShow markdown source
@@ -1,8 +1,14 @@ +--- +description: >- + Enable Cortex XSIAM Analytics Engine and Identity Analytics to baseline + activity and detect anomalous endpoint and user behavior. +--- + # Enable the Analytics Engine and Identity Analytics Cortex XSIAM - Analytics includes the following: * **Cortex XSIAM Analytics Engine:** Analyzes your endpoint data to develop a baseline and raise Analytics and Analytics BIOC alerts when anomalies and malicious behaviors are detected. * **Identity Analytics:** Allows the Cortex XSIAM Analytics engine to aggregate and display user profile details, activities, and alerts related to a user-based Analytics type alert and Analytics BIOC rule during an investigation. {% hint style="warning" %} -
▸ ▾ Cortex XSIAM onboarding checklist modified +14 −14
xsiam/onboard-cortex-xsiam/deployment-steps/cortex-xsiam-onboarding-checklistRead it on the Cortex docs portal ↗ Read it here → This file's diff on GitHub ↗
Before After@@ -1,28 +1,28 @@------description: Review the steps to deploy and onboard Cortex XSIAM.description: >-Cortex XSIAM onboarding checklist for activation, data source configuration,XDR agent deployment, and analytics setup.------# Cortex XSIAM onboarding checklist# Cortex XSIAM onboarding checklistReview the plan and prepare considerations, and then use the onboarding checklist to successfully deploy and onboard Cortex XSIAM.Use this Cortex XSIAM onboarding checklist to plan, deploy, and configure your security operations environment. Complete activation, data source configuration, Cortex XDR agent deployment, and analytics setup.🖼 fast-track-onboard.png🖼 imagehint info### Notehint warningThis checklist does not include any specific Cloud Security requirements. If you have a Cortex XSIAM Premium license or another XSIAM license with Cloud Posture Security/Runtime, you should also onboard Cloud Posture Security and Runtime during or after completing this stage. For more information about Cloud Security onboarding, see Cloud service provider (CSP) onboarding.This checklist does not include any specific Cloud Security requirements. If you have a Cortex XSIAM Premium license or another XSIAM license with Cloud Posture Security/Runtime, you should also onboard Cloud Posture Security and Runtime during or after completing this stage. For more information about Cloud Security onboarding, see Cloud service provider (CSP) onboarding.endhintendhintDeployment checklist### Cortex XSIAM deployment checklistThis phase sets up the infrastructure and data pipelines.This deployment phase sets up Cortex XSIAM infrastructure, data pipelines, endpoint protection, and security analytics.Step│Details│See MoreStep│Details│See More| ------------------------------------------ | -------------------------------------------------------------------------------------------------------------------------------------------------------------------------------------------------------------------------------------------------------------------------------------------------------------------------------------------------------------------------------------------------------------------------------------------------------------------------------------------------------------------------------------------------------------------------------------------------------------------------------------------------------------------------------------------------------------------------------------------------------------------------------------------------------------------------------------------------------------------------------------------------------------------------------------------------------------------------------------------------------------------------------------------------------------------------------------------------------------------------------------------------------------------------------------------------------------------------------------------------------------------------------------------------------------------------------------------------------------------------------------------------------------------------------------------------------------------------------------------------------------------------------------------------------------------------------------------------------------------------------------------------------------------------------------------------------------------------------------------------------------------------------------------------------------------------------------------------------------------------------------------------------------------------- | ------------------------------------------------------------------------------------------------------------------------------------------------------------------------------------------------------------------------------------------------------------------------------------------------------------------------------------------------------------------------------------------------------------------------------------------------------------------------------------------------------------------------------------------------------------------------------------------------------------------------------------------------------------------------------------------------------------------ || ------------------------------------------ | ------------------------------------------------------------------------------------------------------------------------------------------------------------------------------------------------------------------------------------------------------------------------------------------------------------------------------------------------------------------------------------------------------------------------------------------------------------------------------------------------------------------------------------------------------------------------------------------------------------------------------------------------------------------------------------------------------------------------------------------------------------------------------------------------------------------------------------------------------------------------------------------------------------------------------------------------------------------------------------------------------------------------------------------------------------------------------------------------------------------------------------------------------------------------------------------------------------------------------------------------------------------------------------------------------------------------------------------------------------------------------------------------------------------------------------------------------------------------------------------------------------------------------------------------------------------------------------------------------------------------------------------------------------------------------------------------------------------------------------------------------------------------------------------------------------------------------------------------------------------ | ------------------------------------------------------------------------------------------------------------------------------------------------------------------------------------------------------------------------------------------------------------------------------------------------------------------------------------------------------------------------------------------------------------------------------------------------------------------------------------------------------------------------------------------------------------------------------------------------------------------------------------------------------------------------------------------------------------------ |- Activation and initial setup
✓ Enable access to required PANW resources and set up encryption keys (BYOK), if required.
✓ Assign initial administrator and analyst-type user roles (Responder/Investigator), create user groups, and assign roles to those groups (recommended) to a limited number of users initially. You can update this later.
✓ Set up access through the Customer Support Portal or SAML single sign-on.
│Activate Cortex XSIAM
Enable access to required PANW resources
Set up users and roles
Set up authentication- Activation and initial setup
✅ Enable access to required PANW resources and set up encryption keys (BYOK), if required.
✅ Assign initial administrator and analyst-type user roles (Responder/Investigator), create user groups, and assign roles to those groups (recommended) to a limited number of users initially. You can update this later.
✅ Set up access through the Customer Support Portal or SAML single sign-on.
│Activate Cortex XSIAM
Enable access to required PANW resources
Set up users and roles
Set up authentication- Configure content
Use the Data Sources Onboarding wizard to configure the following:
✓ Priority content:
- Configure network security data, such as Palo Alto Networks Next-Generation Firewalls, and network devices.
- Configure identity and user data. Install the Cloud Identity Engine (optional and highly recommended), which provides the necessary Active Directory or Microsoft Entra ID/Okta context (user names, group membership, computer names) to map a raw event (for example, an IP address) to a user or asset.
✓ Highly recommended content:
- Connect cloud audit logs for the most critical providers, such as AWS CloudTrail, Azure Activity Logs, and Google Cloud Audit Logs, directly to Cortex XSIAM.
- Configure/enable a key Threat Intelligence feed, such as the Unit 42 Intelligence feed, to enrich incoming issues. This ensures that as soon as a log/alert hits the Data Lake, it has the latest malicious context.
- Configure content
Use the Data Sources Onboarding wizard to configure the following:
✅ Priority content:
- Configure network security data, such as Palo Alto Networks Next-Generation Firewalls, and network devices.
- Configure identity and user data. Install the Cloud Identity Engine (optional and highly recommended), which provides the necessary Active Directory or Microsoft Entra ID/Okta context (user names, group membership, computer names) to map a raw event (for example, an IP address) to a user or asset.
✅ Highly recommended content:
- Connect cloud audit logs for the most critical providers, such as AWS CloudTrail, Azure Activity Logs, and Google Cloud Audit Logs, directly to Cortex XSIAM.
- Configure/enable a key Threat Intelligence feed, such as the Unit 42 Intelligence feed, to enrich incoming issues. This ensures that as soon as a log/alert hits the Data Lake, it has the latest malicious context.
- Deploy the XDR agent
✓ After testing expected agent behavior and performance, review and select default endpoint security profiles (Exploit, Malware, Restrictions, Agent Settings, Exceptions) to begin protecting your endpoints from threats immediately. Once endpoints are deployed and start collecting data, you can make any necessary adjustments to these rules and policies.
✓ Verify endpoint data collection (logs, alerts, events) is flowing from deployed agents to the XSIAM Data Lake. After deploying the agents to the pilot group, set up data collection to analyze the data.
This provides granular event data (process execution, file activity, registry changes, network connections) necessary for EDR/XDR detection and Behavioral Indicators of Compromise (BIOCs).
│- Deploy the XDR agent
✅ After testing expected agent behavior and performance, review and select default endpoint security profiles (Exploit, Malware, Restrictions, Agent Settings, Exceptions) to begin protecting your endpoints from threats immediately. Once endpoints are deployed and start collecting data, you can make any necessary adjustments to these rules and policies.
✅ Verify endpoint data collection (logs, alerts, events) is flowing from deployed agents to the XSIAM Data Lake. After deploying the agents to the pilot group, set up data collection to analyze the data.
This provides granular event data (process execution, file activity, registry changes, network connections) necessary for EDR/XDR detection and Behavioral Indicators of Compromise (BIOCs).
│- Enable Analytics and Identity Analytics
The analytics engine accesses your logs as they are streamed to Cortex XSIAM, including firewall data, and analyzes them as soon as they arrive.
Note
You need EDR or network logs from at least 30 endpoints over a minimum of 2 weeks, or Cloud audit logs over a minimum of 2 weeks.
✓ Enable Identity Analytics, which focuses on user behavior that is critical since attackers primarily target credentials. It has two main functions:
- User/Entity Behavior Analytics (UEBA): Profiles users, hosts, and groups based on identity data and flags anomalies like a user logging in from a new country (Impossible Traveler), accessing an unusual database, or transferring a massive file volume outside of their norm.
Investigation context: When an issue fires, Identity Analytics ensures that the relevant user profile details, recent activities, and group membership are automatically aggregated and displayed with a user-based Analytics type issue and Analytics BIOC rule
Note
The Cloud Identity Engine must be set up.
✓ Enable the Identity Threat Detection and Response (ITDR) add-on (optional), which enhances the analytics baseline capabilities to include the Directory Infrastructure. This enables the detection of advanced attacks targeting Domain Controllers and other identity components.
In addition, the ITDR module integrates proactive capabilities by using attack surface management to identify and expose identity-related security flaws and vulnerabilities before they can be exploited.
│- Enable Analytics and Identity Analytics
The analytics engine accesses your logs as they are streamed to Cortex XSIAM, including firewall data, and analyzes them as soon as they arrive.
You need EDR or network logs from at least 30 endpoints over a minimum of 2 weeks, or Cloud audit logs over a minimum of 2 weeks.
✅ Enable Identity Analytics, which focuses on user behavior that is critical since attackers primarily target credentials. It has two main functions:
- User/Entity Behavior Analytics (UEBA): Profiles users, hosts, and groups based on identity data and flags anomalies like a user logging in from a new country (Impossible Traveler), accessing an unusual database, or transferring a massive file volume outside of their norm.
Investigation context: When an issue fires, Identity Analytics ensures that the relevant user profile details, recent activities, and group membership are automatically aggregated and displayed with a user-based Analytics type issue and Analytics BIOC rule
The Cloud Identity Engine must be set up.
✅ Enable the Identity Threat Detection and Response (ITDR) add-on (optional), which enhances the analytics baseline capabilities to include the Directory Infrastructure. This enables the detection of advanced attacks targeting Domain Controllers and other identity components.
In addition, the ITDR module integrates proactive capabilities by using attack surface management to identify and expose identity-related security flaws and vulnerabilities before they can be exploited.
│Your Cortex XSIAM is now operational and is collecting data.Your Cortex XSIAM is now operational and is collecting data.Show markdown source
@@ -1,28 +1,28 @@ --- -description: Review the steps to deploy and onboard Cortex XSIAM. +description: >- + Cortex XSIAM onboarding checklist for activation, data source configuration, + XDR agent deployment, and analytics setup. --- # Cortex XSIAM onboarding checklist -Review the plan and prepare considerations, and then use the onboarding checklist to successfully deploy and onboard Cortex XSIAM. +Use this Cortex XSIAM onboarding checklist to plan, deploy, and configure your security operations environment. Complete activation, data source configuration, Cortex XDR agent deployment, and analytics setup. -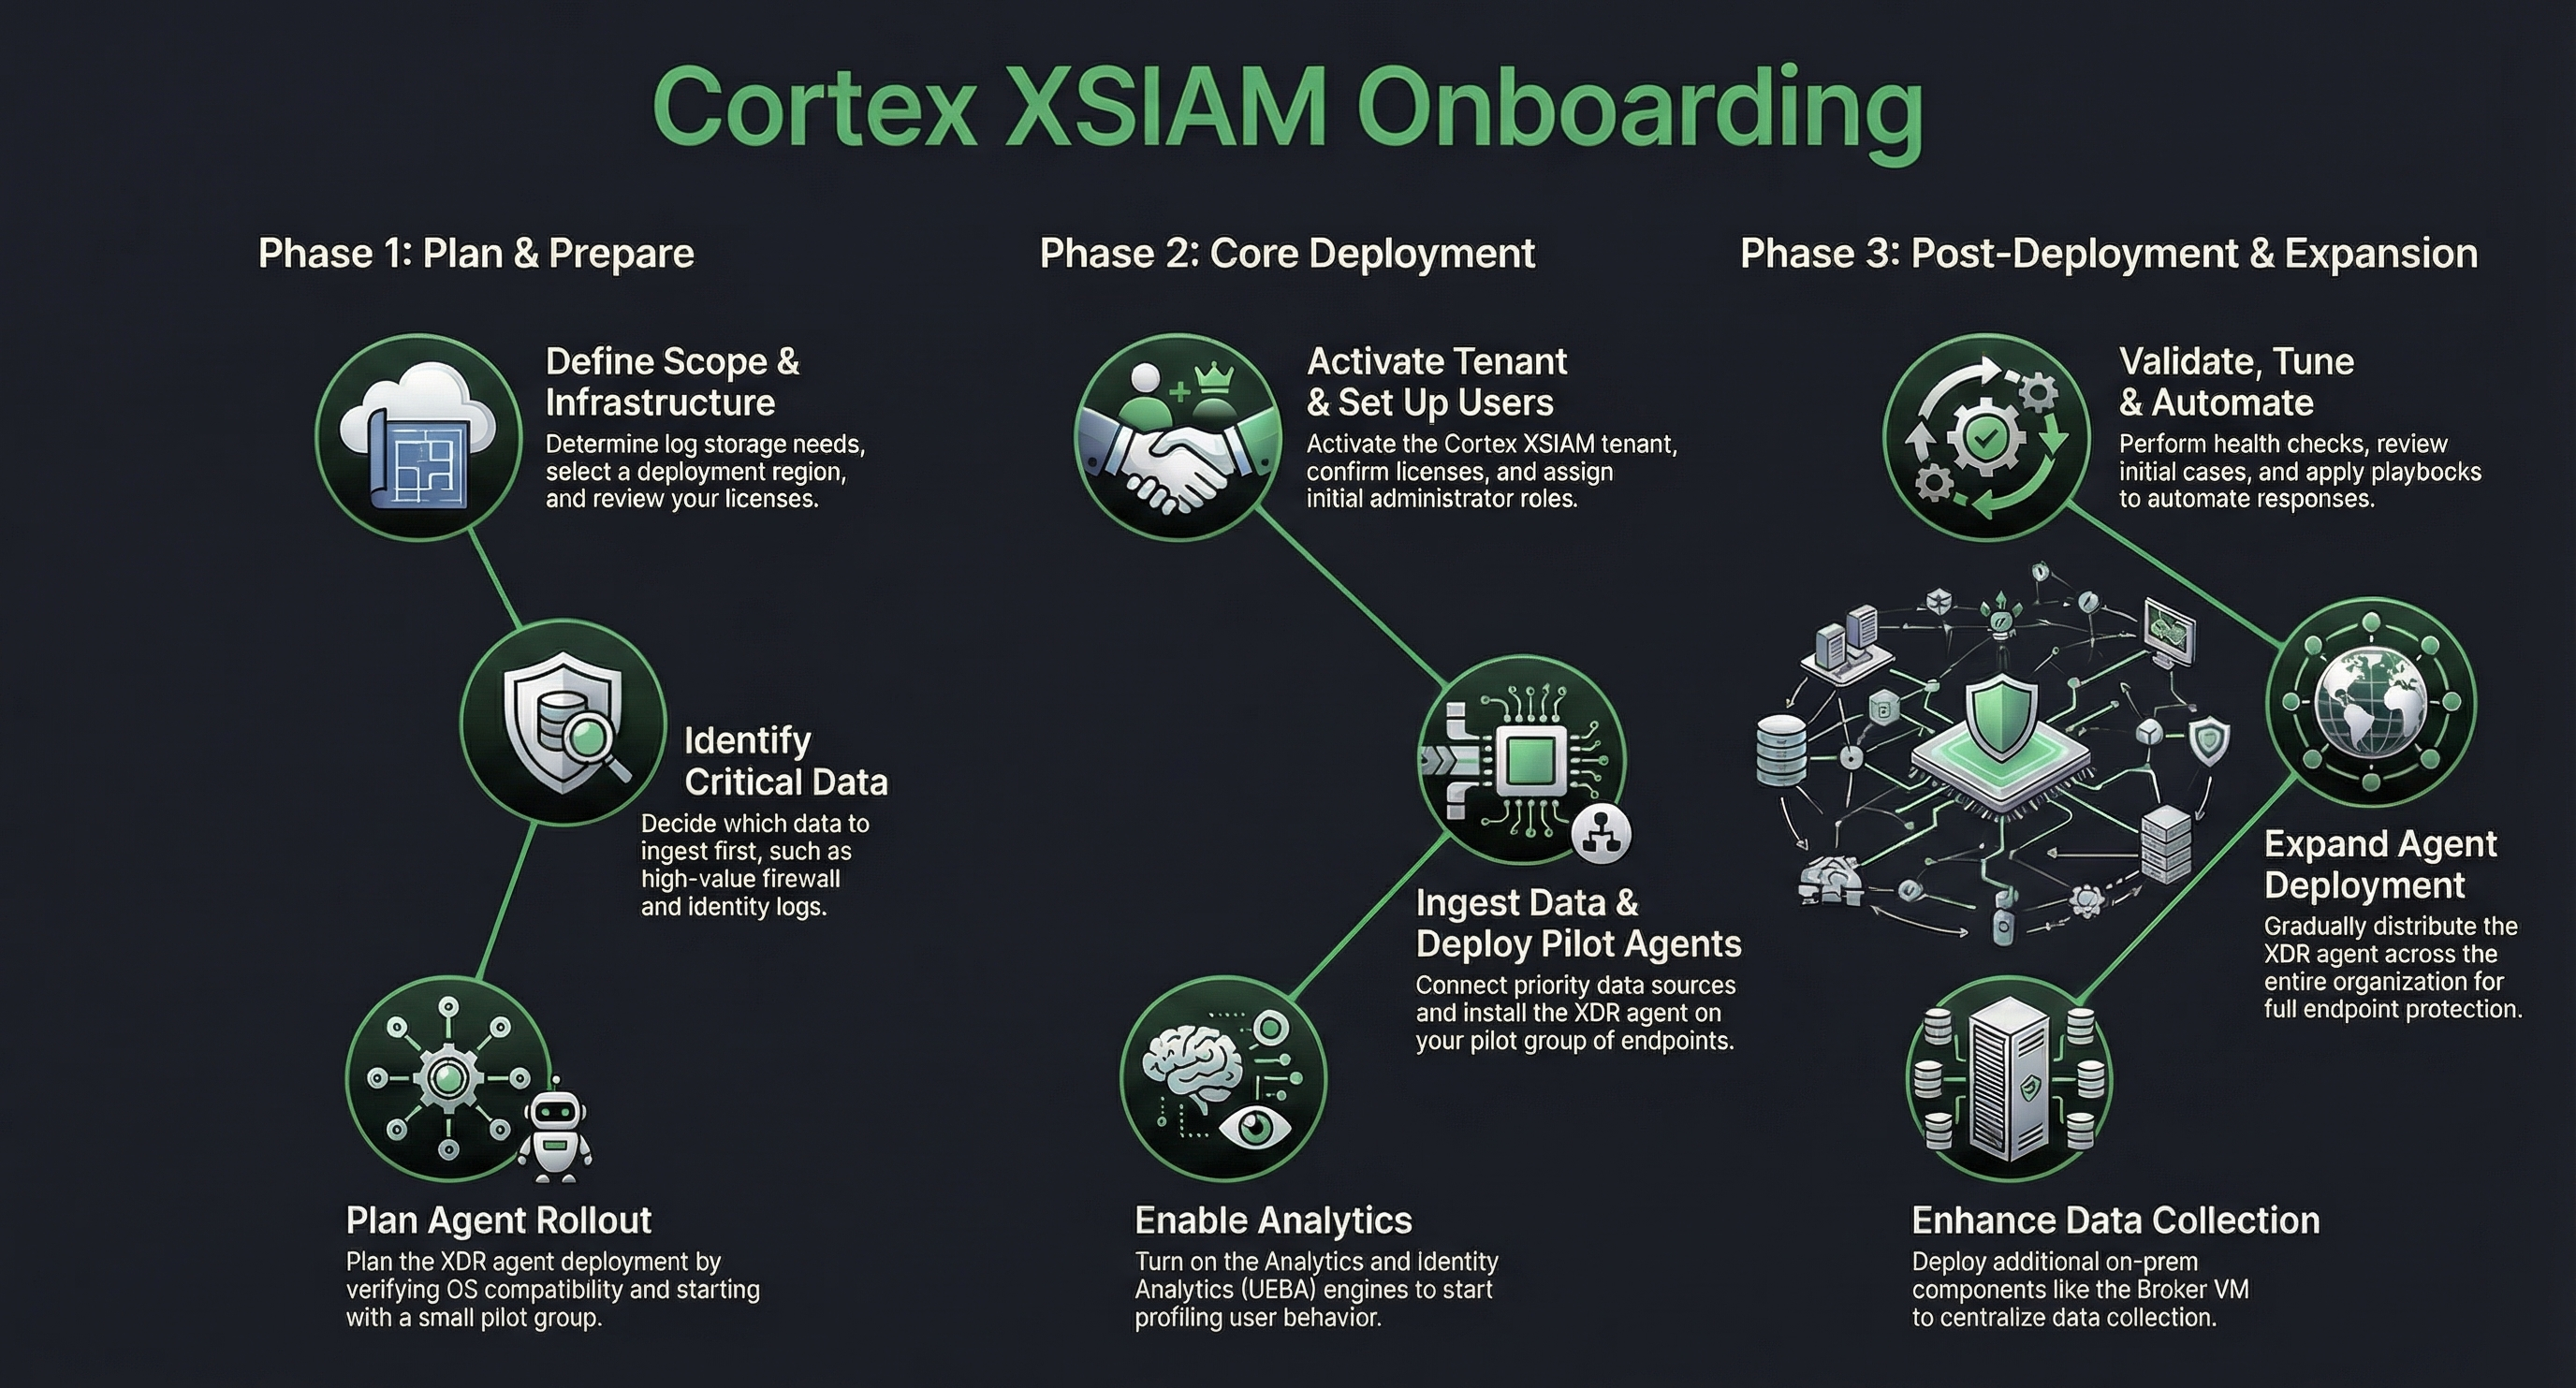 - -{% hint style="info" %} -### Note + +{% hint style="warning" %} This checklist does not include any specific Cloud Security requirements. If you have a Cortex XSIAM Premium license or another XSIAM license with Cloud Posture Security/Runtime, you should also onboard Cloud Posture Security and Runtime during or after completing this stage. For more information about Cloud Security onboarding, see [Cloud service provider (CSP) onboarding](../../configure-cortex-xsiam/cortex-xsiam-data-sources/cloud-service-provider-csp-onboarding). {% endhint %} -**Deployment checklist** +### Cortex XSIAM deployment checklist -This phase sets up the infrastructure and data pipelines. +This deployment phase sets up Cortex XSIAM infrastructure, data pipelines, endpoint protection, and security analytics. -| Step | Details | See More | -| ------------------------------------------ | -------------------------------------------------------------------------------------------------------------------------------------------------------------------------------------------------------------------------------------------------------------------------------------------------------------------------------------------------------------------------------------------------------------------------------------------------------------------------------------------------------------------------------------------------------------------------------------------------------------------------------------------------------------------------------------------------------------------------------------------------------------------------------------------------------------------------------------------------------------------------------------------------------------------------------------------------------------------------------------------------------------------------------------------------------------------------------------------------------------------------------------------------------------------------------------------------------------------------------------------------------------------------------------------------------------------------------------------------------------------------------------------------------------------------------------------------------------------------------------------------------------------------------------------------------------------------------------------------------------------------------------------------------------------------------------------------------------------------------------------------------------------------------------------------------------------------------------------------------------------------------------------------------------------------- | ------------------------------------------------------------------------------------------------------------------------------------------------------------------------------------------------------------------------------------------------------------------------------------------------------------------------------------------------------------------------------------------------------------------------------------------------------------------------------------------------------------------------------------------------------------------------------------------------------------------------------------------------------------------------------------------------------------------ | -| 1. Activation and initial setup | <p>✓ In the Cortex Gateway, activate Cortex XSIAM and confirm license status.</p><p>✓ Enable access to required PANW resources and set up encryption keys (BYOK), if required.</p><p>✓ Assign initial administrator and analyst-type user roles (Responder/Investigator), create user groups, and assign roles to those groups (recommended) to a limited number of users initially. You can update this later.</p><p>✓ Set up access through the Customer Support Portal or SAML single sign-on.</p> | <p><a href="activate-cortex-xsiam">Activate Cortex XSIAM</a><br><br><a href="activate-cortex-xsiam/enable-access-to-required-panw-resources">Enable access to required PANW resources</a><br><br><a href="set-up-users-and-roles">Set up users and roles</a><br><a href="set-up-authentication">Set up authentication</a></p> | -| 2. Configure content | <p>Use the Data Sources Onboarding wizard to configure the following:</p><p>✓ Priority content:</p><ul><li>Configure network security data, such as Palo Alto Networks Next-Generation Firewalls, and network devices.</li><li>Configure identity and user data. Install the Cloud Identity Engine (optional and highly recommended), which provides the necessary Active Directory or Microsoft Entra ID/Okta context (user names, group membership, computer names) to map a raw event (for example, an IP address) to a user or asset.</li></ul><p>✓ Highly recommended content:</p><ul><li>Connect cloud audit logs for the most critical providers, such as AWS CloudTrail, Azure Activity Logs, and Google Cloud Audit Logs, directly to Cortex XSIAM.</li><li>Configure/enable a key Threat Intelligence feed, such as the Unit 42 Intelligence feed, to enrich incoming issues. This ensures that as soon as a log/alert hits the Data Lake, it has the latest malicious context.</li></ul> | <ul><li><a href="../../configure-cortex-xsiam/cortex-xsiam-data-sources/what-are-cortex-xsiam-data-sources">What are Cortex XSIAM data sources?</a></li><li><a href="set-up-cloud-identity-engine">Set up Cloud Identity Engine</a></li></ul> | -| 3. Deploy the XDR agent | <p>✓ Install the XDR agent by creating XDR Agent installation packages for a small, diverse pilot group of endpoints and deploy the agent to a pilot group (phased rollout). Start with small, low-risk endpoints and extend, as required. Gradually expand agent distribution to larger groups that have similar attributes (hardware, software, and users). At the end of two weeks, you can have Cortex XSIAM deployed on up to 100 endpoints.</p><p>✓ After testing expected agent behavior and performance, review and select default endpoint security profiles (Exploit, Malware, Restrictions, Agent Settings, Exceptions) to begin protecting your endpoints from threats immediately. Once endpoints are deployed and start collecting data, you can make any necessary adjustments to these rules and policies.</p><p>✓ Verify endpoint data collection (logs, alerts, events) is flowing from deployed agents to the XSIAM Data Lake. After deploying the agents to the pilot group, set up data collection to analyze the data.</p><p>This provides granular event data (process execution, file activity, registry changes, network connections) necessary for EDR/XDR detection and Behavioral Indicators of Compromise (BIOCs).</p> | <ul><li><a href="install-cortex-xdr-agents/create-an-agent-installation-package">Create an agent installation package</a></li><li><a href="../../protect-your-endpoints/endpoint-security/install-and-manage-endpoints/set-up-endpoint-protection/set-up-endpoint-profiles-and-exception-rules">Set up endpoint profiles and exception rules</a></li><li><a href="../../protect-your-endpoints/endpoint-security/install-and-manage-endpoints/set-up-endpoint-protection/set-up-endpoint-profiles-and-exception-rules/set-up-agent-settings-profiles">Set up agent settings profiles</a></li><li><a href="install-cortex-xdr-agents/configure-global-agent-settings">Configure global agent settings</a></li></ul> | -| 4. Enable Analytics and Identity Analytics | <p>✓ Enable Cortex XSIAM Analytics engine (if not already enabled).</p><p>The analytics engine accesses your logs as they are streamed to Cortex XSIAM, including firewall data, and analyzes them as soon as they arrive.</p><div data-gb-custom-block data-tag="hint" data-style="info" class="hint hint-info"><p><strong>Note</strong></p><p>You need EDR or network logs from at least 30 endpoints over a minimum of 2 weeks, or Cloud audit logs over a minimum of 2 weeks.</p></div><p>✓ Enable Identity Analytics, which focuses on user behavior that is critical since attackers primarily target credentials. It has two main functions:</p><ul><li>User/Entity Behavior Analytics (UEBA): Profiles users, hosts, and groups based on identity data and flags anomalies like a user logging in from a new country (Impossible Traveler), accessing an unusual database, or transferring a massive file volume outside of their norm.</li><li><p>Investigation context: When an issue fires, Identity Analytics ensures that the relevant user profile details, recent activities, and group membership are automatically aggregated and displayed with a user-based Analytics type issue and Analytics BIOC rule</p><div data-gb-custom-block data-tag="hint" data-style="info" class="hint hint-info"><p><strong>Note</strong></p><p>The Cloud Identity Engine must be set up.</p></div></li></ul><p>✓ Enable the Identity Threat Detection and Response (ITDR) add-on (optional), which enhances the analytics baseline capabilities to include the Directory Infrastructure. This enables the detection of advanced attacks targeting Domain Controllers and other identity components.</p><p>In addition, the ITDR module integrates proactive capabilities by using attack surface management to identify and expose identity-related security flaws and vulnerabilities before they can be exploited.</p> | <ul><li><a href="cortex-xsiam-analytics/enable-the-analytics-engine-and-identity-analytics">Enable the Analytics Engine and Identity Analytics</a></li><li><a href="../../detect-investigate-and-respond-to-threats/threat-management/analytics/analytics-overview/identity-analytics">Identity Analytics</a></li><li><a href="broken-reference">Identity Threat Module (ITDR)</a></li></ul> | +| Step | Details | See More | +| ------------------------------------------ | ------------------------------------------------------------------------------------------------------------------------------------------------------------------------------------------------------------------------------------------------------------------------------------------------------------------------------------------------------------------------------------------------------------------------------------------------------------------------------------------------------------------------------------------------------------------------------------------------------------------------------------------------------------------------------------------------------------------------------------------------------------------------------------------------------------------------------------------------------------------------------------------------------------------------------------------------------------------------------------------------------------------------------------------------------------------------------------------------------------------------------------------------------------------------------------------------------------------------------------------------------------------------------------------------------------------------------------------------------------------------------------------------------------------------------------------------------------------------------------------------------------------------------------------------------------------------------------------------------------------------------------------------------------------------------------------------------------------------------------------------------------------------------------------------------------------------------------------------------------------ | ------------------------------------------------------------------------------------------------------------------------------------------------------------------------------------------------------------------------------------------------------------------------------------------------------------------------------------------------------------------------------------------------------------------------------------------------------------------------------------------------------------------------------------------------------------------------------------------------------------------------------------------------------------------------------------------------------------------ | +| 1. Activation and initial setup | <p>✅ In the Cortex Gateway, activate Cortex XSIAM and confirm license status.</p><p>✅ Enable access to required PANW resources and set up encryption keys (BYOK), if required.</p><p>✅ Assign initial administrator and analyst-type user roles (Responder/Investigator), create user groups, and assign roles to those groups (recommended) to a limited number of users initially. You can update this later.</p><p>✅ Set up access through the Customer Support Portal or SAML single sign-on.</p> | <p><a href="activate-cortex-xsiam">Activate Cortex XSIAM</a><br><br><a href="activate-cortex-xsiam/enable-access-to-required-panw-resources">Enable access to required PANW resources</a><br><br><a href="set-up-users-and-roles">Set up users and roles</a><br><a href="set-up-authentication">Set up authentication</a></p> | +| 2. Configure content | <p>Use the Data Sources Onboarding wizard to configure the following:</p><p>✅ Priority content:</p><ul><li>Configure network security data, such as Palo Alto Networks Next-Generation Firewalls, and network devices.</li><li>Configure identity and user data. Install the Cloud Identity Engine (optional and highly recommended), which provides the necessary Active Directory or Microsoft Entra ID/Okta context (user names, group membership, computer names) to map a raw event (for example, an IP address) to a user or asset.</li></ul><p>✅ Highly recommended content:</p><ul><li>Connect cloud audit logs for the most critical providers, such as AWS CloudTrail, Azure Activity Logs, and Google Cloud Audit Logs, directly to Cortex XSIAM.</li><li>Configure/enable a key Threat Intelligence feed, such as the Unit 42 Intelligence feed, to enrich incoming issues. This ensures that as soon as a log/alert hits the Data Lake, it has the latest malicious context.</li></ul> | <ul><li><a href="../../configure-cortex-xsiam/cortex-xsiam-data-sources/what-are-cortex-xsiam-data-sources">What are Cortex XSIAM data sources?</a></li><li><a href="set-up-cloud-identity-engine">Set up Cloud Identity Engine</a></li></ul> | +| 3. Deploy the XDR agent | <p>✅ Install the XDR agent by creating XDR Agent installation packages for a small, diverse pilot group of endpoints and deploy the agent to a pilot group (phased rollout). Start with small, low-risk endpoints and extend, as required. Gradually expand agent distribution to larger groups that have similar attributes (hardware, software, and users). At the end of two weeks, you can have Cortex XSIAM deployed on up to 100 endpoints.</p><p>✅ After testing expected agent behavior and performance, review and select default endpoint security profiles (Exploit, Malware, Restrictions, Agent Settings, Exceptions) to begin protecting your endpoints from threats immediately. Once endpoints are deployed and start collecting data, you can make any necessary adjustments to these rules and policies.</p><p>✅ Verify endpoint data collection (logs, alerts, events) is flowing from deployed agents to the XSIAM Data Lake. After deploying the agents to the pilot group, set up data collection to analyze the data.</p><p>This provides granular event data (process execution, file activity, registry changes, network connections) necessary for EDR/XDR detection and Behavioral Indicators of Compromise (BIOCs).</p> | <ul><li><a href="install-cortex-xdr-agents/create-an-agent-installation-package">Create an agent installation package</a></li><li><a href="../../protect-your-endpoints/endpoint-security/install-and-manage-endpoints/set-up-endpoint-protection/set-up-endpoint-profiles-and-exception-rules">Set up endpoint profiles and exception rules</a></li><li><a href="../../protect-your-endpoints/endpoint-security/install-and-manage-endpoints/set-up-endpoint-protection/set-up-endpoint-profiles-and-exception-rules/set-up-agent-settings-profiles">Set up agent settings profiles</a></li><li><a href="install-cortex-xdr-agents/configure-global-agent-settings">Configure global agent settings</a></li></ul> | +| 4. Enable Analytics and Identity Analytics | <p>✅ Enable Cortex XSIAM Analytics engine (if not already enabled).</p><p>The analytics engine accesses your logs as they are streamed to Cortex XSIAM, including firewall data, and analyzes them as soon as they arrive.</p><div data-gb-custom-block data-tag="hint" data-style="info" class="hint hint-info"><p>You need EDR or network logs from at least 30 endpoints over a minimum of 2 weeks, or Cloud audit logs over a minimum of 2 weeks.</p></div><p>✅ Enable Identity Analytics, which focuses on user behavior that is critical since attackers primarily target credentials. It has two main functions:</p><ul><li>User/Entity Behavior Analytics (UEBA): Profiles users, hosts, and groups based on identity data and flags anomalies like a user logging in from a new country (Impossible Traveler), accessing an unusual database, or transferring a massive file volume outside of their norm.</li><li><p>Investigation context: When an issue fires, Identity Analytics ensures that the relevant user profile details, recent activities, and group membership are automatically aggregated and displayed with a user-based Analytics type issue and Analytics BIOC rule</p><div data-gb-custom-block data-tag="hint" data-style="info" class="hint hint-info"><p>The Cloud Identity Engine must be set up.</p></div></li></ul><p>✅ Enable the Identity Threat Detection and Response (ITDR) add-on (optional), which enhances the analytics baseline capabilities to include the Directory Infrastructure. This enables the detection of advanced attacks targeting Domain Controllers and other identity components.</p><p>In addition, the ITDR module integrates proactive capabilities by using attack surface management to identify and expose identity-related security flaws and vulnerabilities before they can be exploited.</p> | <ul><li><a href="cortex-xsiam-analytics/enable-the-analytics-engine-and-identity-analytics">Enable the Analytics Engine and Identity Analytics</a></li><li><a href="../../detect-investigate-and-respond-to-threats/threat-management/analytics/analytics-overview/identity-analytics">Identity Analytics</a></li><li><a href="../../detect-investigate-and-respond-to-threats/identity-threat-module-itdr">Identity Threat Detection and Response (ITDR)</a></li></ul> | Your Cortex XSIAM is now operational and is collecting data. -
▸ ▾ FedRAMP overview modified +6 −0
xsiam/onboard-cortex-xsiam/deployment-steps/fedramp-overviewRead it on the Cortex docs portal ↗ Read it here → This file's diff on GitHub ↗
Before After@@ -1,3 +1,9 @@---description: >-Learn how FedRAMP standardizes cloud security assessment, authorization, andcontinuous monitoring for U.S. government agencies.---# FedRAMP overview# FedRAMP overviewThe Federal Risk and Authorization Management Program (FedRAMP) provides a standardized approach to security assessment, authorization, and continuous monitoring for cloud products and services used by the U.S. government. This program ensures that federal information remains secure while allowing agencies to adopt cloud solutions efficiently.The Federal Risk and Authorization Management Program (FedRAMP) provides a standardized approach to security assessment, authorization, and continuous monitoring for cloud products and services used by the U.S. government. This program ensures that federal information remains secure while allowing agencies to adopt cloud solutions efficiently.Show markdown source
@@ -1,3 +1,9 @@
+---
+description: >-
+  Learn how FedRAMP standardizes cloud security assessment, authorization, and
+  continuous monitoring for U.S. government agencies.
+---
+
 # FedRAMP overview

 The Federal Risk and Authorization Management Program (FedRAMP) provides a standardized approach to security assessment, authorization, and continuous monitoring for cloud products and services used by the U.S. government. This program ensures that federal information remains secure while allowing agencies to adopt cloud solutions efficiently.
-
▸ ▾ Cortex XSIAM FedRAMP compliance for federal agencies modified +11 −5
xsiam/onboard-cortex-xsiam/deployment-steps/fedramp-overview/cortex-xsiam-federal-complianceRead it on the Cortex docs portal ↗ Read it here → This file's diff on GitHub ↗
Before After@@ -1,23 +1,29 @@# Cortex XSIAM federal compliance---description: >-Learn how FedRAMP-authorized Cortex XSIAM supports U.S. federal agencies withisolated tenants, U.S. data residency, and government cloud infrastructure.---Cortex XSIAM is FedRAMP High- and Moderate-authorized, providing a secure environment specifically for U.S. Federal agencies and highly regulated industries.# Cortex XSIAM FedRAMP compliance for federal agenciesSecurity & infrastructure architectureCortex XSIAM is FedRAMP High- and Moderate-authorized for U.S. federal agencies and regulated industries. FedRAMP-authorized Cortex XSIAM tenants provide isolated government cloud environments, U.S. data residency, and secure federal network access.To ensure strict compliance, these environments utilize the following safeguards:### FedRAMP security and infrastructure architectureFedRAMP Cortex XSIAM environments use the following compliance safeguards:• Isolation: Dedicated single-tenant instances that are physically and logically isolated from the commercial user base.• Isolation: Dedicated single-tenant instances that are physically and logically isolated from the commercial user base.• Data sovereignty: All logs and ingested data remain strictly within the United States.• Data sovereignty: All logs and ingested data remain strictly within the United States.• Infrastructure: Usage of government-specific infrastructure, such as AWS GovCloud or Azure Government.• Infrastructure: Usage of government-specific infrastructure, such as AWS GovCloud or Azure Government.• Secure egress: Implementation of federal FQDNs, such asp-proxy.federal.paloaltonetworks.com, to secure all egress traffic paths.• Secure egress: Implementation of federal FQDNs, such asp-proxy.federal.paloaltonetworks.com, to secure all egress traffic paths.• Scanning rights: FedRAMP instances are authorized to scan both secure government and standard commercial cloud accounts, whereas commercial instances are strictly prohibited from accessing government-authorized environments.• Scanning rights: FedRAMP instances are authorized to scan both secure government and standard commercial cloud accounts, whereas commercial instances are strictly prohibited from accessing government-authorized environments.### Software Composition Analysis (SCA) for FedRAMP### Software Composition Analysis (SCA) in FedRAMPApplication Security Software Composition Analysis (SCA) is available in FedRAMP and Government (Gov) tenant environments. Organizations operating under FedRAMP or public-sector compliance requirements can scan open-source dependencies for known vulnerabilities (CVEs), license miscompliance, and package operational risks using the same SCA scanner available in commercial environments.Application Security Software Composition Analysis (SCA) is available in FedRAMP and Government (Gov) tenant environments. Organizations operating under FedRAMP or public-sector compliance requirements can scan open-source dependencies for known vulnerabilities (CVEs), license miscompliance, and package operational risks using the same SCA scanner available in commercial environments.SCA in FedRAMP/Gov tenants uses the same enablement and prerequisites as commercial tenants:SCA in FedRAMP/Gov tenants uses the same enablement and prerequisites as commercial tenants:• The Application Security module is active on the tenant• The Application Security module is active on the tenant• At least one VCS integration is onboarded• At least one VCS integration is onboarded• The SCA scanner is enabled for the target repositories• The SCA scanner is enabled for the target repositoriesShow markdown source
@@ -1,23 +1,29 @@
-# Cortex XSIAM federal compliance
+---
+description: >-
+  Learn how FedRAMP-authorized Cortex XSIAM supports U.S. federal agencies with
+  isolated tenants, U.S. data residency, and government cloud infrastructure.
+---

-Cortex XSIAM is FedRAMP **High**- and **Moderate-authorized**, providing a secure environment specifically for U.S. Federal agencies and highly regulated industries.
+# Cortex XSIAM FedRAMP compliance for federal agencies

-**Security & infrastructure architecture**
+Cortex XSIAM is FedRAMP **High**- and **Moderate-authorized** for U.S. federal agencies and regulated industries. FedRAMP-authorized Cortex XSIAM tenants provide isolated government cloud environments, U.S. data residency, and secure federal network access.

-To ensure strict compliance, these environments utilize the following safeguards:
+### FedRAMP security and infrastructure architecture
+
+FedRAMP Cortex XSIAM environments use the following compliance safeguards:

 * **Isolation**: Dedicated single-tenant instances that are physically and logically isolated from the commercial user base.
 * **Data sovereignty**: All logs and ingested data remain strictly within the United States.
 * **Infrastructure**: Usage of government-specific infrastructure, such as AWS GovCloud or Azure Government.
 * **Secure egress**: Implementation of federal FQDNs, such as `p-proxy.federal.paloaltonetworks.com`, to secure all egress traffic paths.
 * **Scanning rights:** FedRAMP instances are authorized to scan both secure government and standard commercial cloud accounts, whereas commercial instances are strictly prohibited from accessing government-authorized environments.

-### Software Composition Analysis (SCA) for FedRAMP
+### Software Composition Analysis (SCA) in FedRAMP

 Application Security Software Composition Analysis (SCA) is available in FedRAMP and Government (Gov) tenant environments. Organizations operating under FedRAMP or public-sector compliance requirements can scan open-source dependencies for known vulnerabilities (CVEs), license miscompliance, and package operational risks using the same SCA scanner available in commercial environments.

 SCA in FedRAMP/Gov tenants uses the same enablement and prerequisites as commercial tenants:

 * The Application Security module is active on the tenant
 * At least one VCS integration is onboarded
 * The SCA scanner is enabled for the target repositories
-
▸ ▾ FedRAMP limitations and supported government cloud regions modified +15 −7 Retitled for FedRAMP; the AWS GovCloud and Azure Government region lists are unchanged apart from correcting "Governement".
xsiam/onboard-cortex-xsiam/deployment-steps/fedramp-overview/limitations-and-supported-regionsRead it on the Cortex docs portal ↗ Read it here → This file's diff on GitHub ↗
Before After@@ -1,20 +1,28 @@# Limitations & supported regions---description: >-Review Cortex XSIAM FedRAMP feature limitations and supported AWS GovCloud andAzure Government regions for federal deployments.---Service limitations# FedRAMP limitations and supported government cloud regionsCortex XSIAM FedRAMP Government deployments support specific cloud services and regions. Review these service limitations before onboarding federal cloud environments.### FedRAMP service limitations• Unsupported features: FedRAMP Government instances do not currently support these DSPM services:• Unsupported features: FedRAMP Government instances do not currently support these DSPM services:• AWS: RDS/Aurora scanning• AWS: RDS/Aurora scanning• DBaaS: Snowflake, Databricks• DBaaS: Snowflake, Databricks• Microsoft 365• Microsoft 365• Azure: All services (this is not supported for both DSPM and AISPM services)• Azure: All services (this is not supported for both DSPM and AISPM services)• Environmental restrictions: Multi-tenant or MSSP environments are not currently supported by FedRAMP.• Environmental restrictions: Multi-tenant or MSSP environments are not currently supported by FedRAMP.• Permitted capabilities: Other capabilities, such as registry scanning, serverless scanning, and agentless disk scanning, are allowed.• Permitted capabilities: Other capabilities, such as registry scanning, serverless scanning, and agentless disk scanning, are allowed.Supported regions### Supported AWS GovCloud and Azure Government regionsSupported regions are limited to AWS GovCloud regions and Microsoft Azure government regions.Supported regions are limited to AWS GovCloud regions and Microsoft Azure government regions.Provider│Supported regionsProvider│Supported regions| ----------------- | ---------------------------------------------------------------------------------------------------------------------------------------------------------------- || ---------------- | ---------------------------------------------------------------------------------------------------------------------------------------------------------------- |AWS GovCloud│- AWS GovCloud (US-East) -
us-gov-east-1 - AWS GovCloud (US-West) -
us-gov-west-1
AWS GovCloud│- AWS GovCloud (US-East) -
us-gov-east-1 - AWS GovCloud (US-West) -
us-gov-west-1
Azure Governement│- US Gov Arizona -
usgovarizona - US Gov Texas -
usgovtexas - US Gov Virginia -
usgovvirginia
Azure Government│- US Gov Arizona -
usgovarizona - US Gov Texas -
usgovtexas - US Gov Virginia -
usgovvirginia
Show markdown source
@@ -1,20 +1,28 @@
-# Limitations & supported regions
+---
+description: >-
+  Review Cortex XSIAM FedRAMP feature limitations and supported AWS GovCloud and
+  Azure Government regions for federal deployments.
+---

-**Service limitations**
+# FedRAMP limitations and supported government cloud regions
+
+Cortex XSIAM FedRAMP Government deployments support specific cloud services and regions. Review these service limitations before onboarding federal cloud environments.
+
+### FedRAMP service limitations

 * **Unsupported features**: FedRAMP Government instances do not currently support these DSPM services:
   * AWS: RDS/Aurora scanning
   * DBaaS: Snowflake, Databricks
   * Microsoft 365
   * Azure: All services (**this is not supported for both DSPM and AISPM services**)
 * **Environmental restrictions**: Multi-tenant or MSSP environments are not currently supported by FedRAMP.
 * **Permitted capabilities**: Other capabilities, such as registry scanning, serverless scanning, and agentless disk scanning, are allowed.

-**Supported regions**
+### Supported AWS GovCloud and Azure Government regions

 Supported regions are limited to AWS GovCloud regions and Microsoft Azure government regions.

-| Provider          | Supported regions                                                                                                                                                |
-| ----------------- | ---------------------------------------------------------------------------------------------------------------------------------------------------------------- |
-| AWS GovCloud      | <ul><li>AWS GovCloud (US-East) - <code>us-gov-east-1</code></li><li>AWS GovCloud (US-West) - <code>us-gov-west-1</code></li></ul>                                |
-| Azure Governement | <ul><li>US Gov Arizona - <code>usgovarizona</code></li><li>US Gov Texas - <code>usgovtexas</code></li><li>US Gov Virginia - <code>usgovvirginia</code></li></ul> |
+| Provider         | Supported regions                                                                                                                                                |
+| ---------------- | ---------------------------------------------------------------------------------------------------------------------------------------------------------------- |
+| AWS GovCloud     | <ul><li>AWS GovCloud (US-East) - <code>us-gov-east-1</code></li><li>AWS GovCloud (US-West) - <code>us-gov-west-1</code></li></ul>                                |
+| Azure Government | <ul><li>US Gov Arizona - <code>usgovarizona</code></li><li>US Gov Texas - <code>usgovtexas</code></li><li>US Gov Virginia - <code>usgovvirginia</code></li></ul> |
- AWS GovCloud (US-East) -
-
▸ ▾ Onboard and configure government cloud environments modified +11 −3
xsiam/onboard-cortex-xsiam/deployment-steps/fedramp-overview/onboarding-and-configurationRead it on the Cortex docs portal ↗ Read it here → This file's diff on GitHub ↗
Before After@@ -1,9 +1,17 @@# Onboarding & configuration---description: >-Onboard government cloud environments to Cortex XSIAM with the CSP wizard,Government tenant settings, and compliant scan modes.---To implement a government-authorized environment, specific steps must be taken during the setup process:# Onboard and configure government cloud environmentsUse the following steps to onboard and configure a government-authorized cloud environment in Cortex XSIAM. These settings support federal security requirements for Government CSP environments.### Government cloud onboarding and configuration1. Onboarding: Use the cloud onboarding wizard to connect a Government Cloud Service Provider (CSP) environment to Cortex XSIAM.1. Onboarding: Use the cloud onboarding wizard to connect a Government Cloud Service Provider (CSP) environment to Cortex XSIAM.2. Environment selection: During configuration, select the Government option in the Environment menu to ensure the tenant adheres to federal security standards.2. Environment selection: During configuration, select the Government option in the Environment menu to ensure the tenant adheres to federal security standards.3. Scan mode: You can select Cloud Scan or Scan with Outpost.3. Scan mode: You can select Cloud Scan or Scan with Outpost.<div data-gb-custom-block data-tag="hint" data-style="info" class="hint hint-info"><h3>Note</h3><p>If you choose an outpost scan, you must select an outpost that has the environment type defined as Government to maintain compliance and connectivity.</p></div><div data-gb-custom-block data-tag="hint" data-style="info" class="hint hint-info"><p>If you choose an outpost scan, you must select an outpost that has the environment type defined as Government to maintain compliance and connectivity.</p></div>Show markdown source
@@ -1,9 +1,17 @@
-# Onboarding & configuration
+---
+description: >-
+  Onboard government cloud environments to Cortex XSIAM with the CSP wizard,
+  Government tenant settings, and compliant scan modes.
+---

-To implement a government-authorized environment, specific steps must be taken during the setup process:
+# Onboard and configure government cloud environments
+
+Use the following steps to onboard and configure a government-authorized cloud environment in Cortex XSIAM. These settings support federal security requirements for Government CSP environments.
+
+### Government cloud onboarding and configuration

 1. **Onboarding**: Use the cloud onboarding wizard to connect a Government Cloud Service Provider (CSP) environment to Cortex XSIAM.
 2. **Environment selection**: During configuration, select the **Government** option in the Environment menu to ensure the tenant adheres to federal security standards.
 3.  **Scan mode**: You can select **Cloud Scan** or **Scan with Outpost**.

-    <div data-gb-custom-block data-tag="hint" data-style="info" class="hint hint-info"><h3>Note</h3><p>If you choose an outpost scan, you must select an outpost that has the environment type defined as Government to maintain compliance and connectivity.</p></div>
+    <div data-gb-custom-block data-tag="hint" data-style="info" class="hint hint-info"><p>If you choose an outpost scan, you must select an outpost that has the environment type defined as Government to maintain compliance and connectivity.</p></div>
-
▸ ▾ Install Cortex XDR agents modified +2 −2
xsiam/onboard-cortex-xsiam/deployment-steps/install-cortex-xdr-agentsRead it on the Cortex docs portal ↗ Read it here → This file's diff on GitHub ↗
Before After@@ -1,9 +1,9 @@------description: >-description: >-Learn about the initial steps required to deploy Cortex XDR agent software toInstall Cortex XDR agents with agent installation packages to monitorendpoints.endpoints and collect Cortex XSIAM endpoint data.------# Install Cortex XDR agents# Install Cortex XDR agentsThe Cortex XDR agent monitors endpoint activity and collects endpoint data that Cortex XSIAM uses to generate issues. Before you can begin collecting endpoint data, you must create an agent installation package and then install the Cortex XDR agent.The Cortex XDR agent monitors endpoint activity and collects endpoint data that Cortex XSIAM uses to generate issues. Before you can begin collecting endpoint data, you must create an agent installation package and then install the Cortex XDR agent.Show markdown source
@@ -1,9 +1,9 @@
 ---
 description: >-
-  Learn about the initial steps required to deploy Cortex XDR agent software to
-  endpoints.
+  Install Cortex XDR agents with agent installation packages to monitor
+  endpoints and collect Cortex XSIAM endpoint data.
 ---

 # Install Cortex XDR agents

 The Cortex XDR agent monitors endpoint activity and collects endpoint data that Cortex XSIAM uses to generate issues. Before you can begin collecting endpoint data, you must create an agent installation package and then install the Cortex XDR agent.
-
▸ ▾ Configure global agent settings modified +6 −0
xsiam/onboard-cortex-xsiam/deployment-steps/install-cortex-xdr-agents/configure-global-agent-settingsRead it on the Cortex docs portal ↗ Read it here → This file's diff on GitHub ↗
Before After@@ -1,8 +1,14 @@---description: >-Configure global Cortex XDR agent settings for uninstall passwords, contentbandwidth, upgrades, advanced analysis, and endpoint cleanup.---# Configure global agent settings# Configure global agent settingsIn addition to the customizable Agent Settings Profiles for each Operating System and different endpoint targets, you can configure global Agent Configurations that apply to all the endpoints in your network.In addition to the customizable Agent Settings Profiles for each Operating System and different endpoint targets, you can configure global Agent Configurations that apply to all the endpoints in your network.1. From Cortex XSIAM, select Settings → Configurations → General → Agent Configurations.1. From Cortex XSIAM, select Settings → Configurations → General → Agent Configurations.2. Set global uninstall password.2. Set global uninstall password.The uninstall password is required to remove a Cortex XDR agent and to grant access to the agent security component on the endpoint. You can use the default uninstall **`Password1`** defined in Cortex XSIAM or set a new one and Save. This global uninstall password applies to all the endpoints (excluding mobile) in your network. If you change the password later on, the new default password applies to all new and existing profiles to which it applied before. If you want to use a different password to uninstall specific agents, you can override the default global uninstall password by setting a different password for those agents in the Agent Settings profile. The selected password must satisfy the requirements enforced by **Password Strength** indicator.The uninstall password is required to remove a Cortex XDR agent and to grant access to the agent security component on the endpoint. You can use the default uninstall **`Password1`** defined in Cortex XSIAM or set a new one and Save. This global uninstall password applies to all the endpoints (excluding mobile) in your network. If you change the password later on, the new default password applies to all new and existing profiles to which it applied before. If you want to use a different password to uninstall specific agents, you can override the default global uninstall password by setting a different password for those agents in the Agent Settings profile. The selected password must satisfy the requirements enforced by **Password Strength** indicator.Show markdown source
@@ -1,8 +1,14 @@ +--- +description: >- + Configure global Cortex XDR agent settings for uninstall passwords, content + bandwidth, upgrades, advanced analysis, and endpoint cleanup. +--- + # Configure global agent settings In addition to the customizable Agent Settings Profiles for each Operating System and different endpoint targets, you can configure global Agent Configurations that apply to all the endpoints in your network. 1. From Cortex XSIAM, select **Settings** → **Configurations** → **General** → **Agent Configurations**. 2. Set global uninstall password. The uninstall password is required to remove a Cortex XDR agent and to grant access to the agent security component on the endpoint. You can use the default uninstall **`Password1`** defined in Cortex XSIAM or set a new one and Save. This global uninstall password applies to all the endpoints (excluding mobile) in your network. If you change the password later on, the new default password applies to all new and existing profiles to which it applied before. If you want to use a different password to uninstall specific agents, you can override the default global uninstall password by setting a different password for those agents in the Agent Settings profile. The selected password must satisfy the requirements enforced by **Password Strength** indicator. -
▸ ▾ Create an agent installation package modified +6 −0
xsiam/onboard-cortex-xsiam/deployment-steps/install-cortex-xdr-agents/create-an-agent-installation-packageRead it on the Cortex docs portal ↗ Read it here → This file's diff on GitHub ↗
Before After@@ -1,8 +1,14 @@---description: >-Create Cortex XDR agent installation packages for endpoints, Kubernetes,container, and serverless workloads in Cortex XSIAM.---# Create an agent installation package# Create an agent installation packageTo install the Cortex XDR agent on the endpoint for the first time, create an agent installation package. Review Where can I install the Cortex XDR agent for supported versions and operating systems.To install the Cortex XDR agent on the endpoint for the first time, create an agent installation package. Review Where can I install the Cortex XDR agent for supported versions and operating systems.To install the Cortex XDR agent software, you must use a valid installation package that exists in your Cortex XSIAM management console. If you delete an installation package, new agents installed from this package are not able to register with Cortex XSIAM; however, existing agents may re-register using the Agent ID generated by the installation package.To install the Cortex XDR agent software, you must use a valid installation package that exists in your Cortex XSIAM management console. If you delete an installation package, new agents installed from this package are not able to register with Cortex XSIAM; however, existing agents may re-register using the Agent ID generated by the installation package.1. From Cortex XSIAM, select Inventory → Endpoints → Agent Installations.1. From Cortex XSIAM, select Inventory → Endpoints → Agent Installations.2. Click Create to create a new installer.2. Click Create to create a new installer.Show markdown source
@@ -1,8 +1,14 @@
+---
+description: >-
+  Create Cortex XDR agent installation packages for endpoints, Kubernetes,
+  container, and serverless workloads in Cortex XSIAM.
+---
+
 # Create an agent installation package

 To install the Cortex XDR agent on the endpoint for the first time, create an agent installation package. Review [Where can I install the Cortex XDR agent](https://app.gitbook.com/s/fZ8QSMnkjnXpuOeuRcam/) for supported versions and operating systems.

 To install the Cortex XDR agent software, you must use a valid installation package that exists in your Cortex XSIAM management console. If you delete an installation package, new agents installed from this package are not able to register with Cortex XSIAM; however, existing agents may re-register using the Agent ID generated by the installation package.

 1. From Cortex XSIAM, select **Inventory** → **Endpoints** → **Agent Installations**.
 2. Click **Create** to create a new installer.
-
▸ ▾ Define endpoint groups modified +6 −0
xsiam/onboard-cortex-xsiam/deployment-steps/install-cortex-xdr-agents/define-endpoint-groupsRead it on the Cortex docs portal ↗ Read it here → This file's diff on GitHub ↗
Before After@@ -1,8 +1,14 @@---description: >-Create and manage static or dynamic Cortex XDR Agent endpoint groups to targetsecurity policies and actions by endpoint attributes.---# Define endpoint groups# Define endpoint groupsYou can define an endpoint group and then apply policy rules and manage specific endpoints. If you set up Cloud Identity Engine, you can also leverage your Active Directory user, group, and computer details to define endpoint groups.You can define an endpoint group and then apply policy rules and manage specific endpoints. If you set up Cloud Identity Engine, you can also leverage your Active Directory user, group, and computer details to define endpoint groups.Do one of the following:Do one of the following:• Create a dynamic group by enabling Cortex XSIAM to populate your endpoint group dynamically using endpoint characteristics, such as an endpoint tag, partial hostname or alias, full or partial domain or workgroup name, IP address, range or subnets, installation type (VDI, temporary session or standard endpoint), agent version, endpoint type (workstation, server, mobile), user or operating system version.• Create a dynamic group by enabling Cortex XSIAM to populate your endpoint group dynamically using endpoint characteristics, such as an endpoint tag, partial hostname or alias, full or partial domain or workgroup name, IP address, range or subnets, installation type (VDI, temporary session or standard endpoint), agent version, endpoint type (workstation, server, mobile), user or operating system version.• Create a static group by selecting a list of specific endpoints.• Create a static group by selecting a list of specific endpoints.Show markdown source
@@ -1,8 +1,14 @@
+---
+description: >-
+  Create and manage static or dynamic Cortex XDR Agent endpoint groups to target
+  security policies and actions by endpoint attributes.
+---
+
 # Define endpoint groups

 You can define an endpoint group and then apply policy rules and manage specific endpoints. If you set up Cloud Identity Engine, you can also leverage your Active Directory user, group, and computer details to define endpoint groups.

 Do one of the following:

 * Create a dynamic group by enabling Cortex XSIAM to populate your endpoint group dynamically using endpoint characteristics, such as an endpoint tag, partial hostname or alias, full or partial domain or workgroup name, IP address, range or subnets, installation type (VDI, temporary session or standard endpoint), agent version, endpoint type (workstation, server, mobile), user or operating system version.
 * Create a static group by selecting a list of specific endpoints.
-
▸ ▾ Deploy installation packages modified +7 −0
xsiam/onboard-cortex-xsiam/deployment-steps/install-cortex-xdr-agents/deploy-installation-packagesRead it on the Cortex docs portal ↗ Read it here → This file's diff on GitHub ↗
Before After@@ -1,8 +1,15 @@---description: >-Deploy Cortex XDR agent installation packages to Windows, macOS, Linux,Kubernetes, and Android endpoints using manual or software distributionmethods.---# Deploy installation packages# Deploy installation packagesAfter you create and download an installation package, you can then install it directly on an endpoint or you can use a software deployment tool, such as JAMF or GPO, to distribute the software to multiple endpoints.After you create and download an installation package, you can then install it directly on an endpoint or you can use a software deployment tool, such as JAMF or GPO, to distribute the software to multiple endpoints.• For Windows endpoints, select the architecture type. You can download the installer msi file only or a distribution package that includes both the installer msi file and the latest content zip. The distribution package is recommended to reduce the network load and time typically required for the initial roll-out or major upgrades of the Cortex XDR agent. To understand the benefits, workflow, and requirements to support this type of deployment, refer to the Cortex XDR Agent Administrator Guide.• For Windows endpoints, select the architecture type. You can download the installer msi file only or a distribution package that includes both the installer msi file and the latest content zip. The distribution package is recommended to reduce the network load and time typically required for the initial roll-out or major upgrades of the Cortex XDR agent. To understand the benefits, workflow, and requirements to support this type of deployment, refer to the Cortex XDR Agent Administrator Guide.• For macOS endpoints, download the ZIP installation folder and upload it to the endpoint. To deploy the Cortex XDR agent using JAMF, upload the ZIP folder to JAMF. Alternatively, to install the agent manually on the endpoint, unzip the ZIP folder and double-click the pkg file.• For macOS endpoints, download the ZIP installation folder and upload it to the endpoint. To deploy the Cortex XDR agent using JAMF, upload the ZIP folder to JAMF. Alternatively, to install the agent manually on the endpoint, unzip the ZIP folder and double-click the pkg file.• For Linux endpoints, you can download .rpm or .deb installers (according to the endpoint Linux distribution), and deploy the installers on the endpoints using the Linux package manager. Alternatively, you can download a Shell installer and deploy it manually on the endpoint.• For Linux endpoints, you can download .rpm or .deb installers (according to the endpoint Linux distribution), and deploy the installers on the endpoints using the Linux package manager. Alternatively, you can download a Shell installer and deploy it manually on the endpoint.• For Kubernetes clusters on Linux endpoints, download the YAML file. We strongly recommend that you do not edit this file.• For Kubernetes clusters on Linux endpoints, download the YAML file. We strongly recommend that you do not edit this file.Show markdown source
@@ -1,8 +1,15 @@
+---
+description: >-
+  Deploy Cortex XDR agent installation packages to Windows, macOS, Linux,
+  Kubernetes, and Android endpoints using manual or software distribution
+  methods.
+---
+
 # Deploy installation packages

 After you create and download an installation package, you can then install it directly on an endpoint or you can use a software deployment tool, such as JAMF or GPO, to distribute the software to multiple endpoints.

 * For Windows endpoints, select the architecture type. You can download the installer msi file only or a distribution package that includes both the installer msi file and the latest content zip. The distribution package is recommended to reduce the network load and time typically required for the initial roll-out or major upgrades of the Cortex XDR agent. To understand the benefits, workflow, and requirements to support this type of deployment, refer to the Cortex XDR Agent Administrator Guide.
 * For macOS endpoints, download the ZIP installation folder and upload it to the endpoint. To deploy the Cortex XDR agent using JAMF, upload the ZIP folder to JAMF. Alternatively, to install the agent manually on the endpoint, unzip the ZIP folder and double-click the pkg file.
 * For Linux endpoints, you can download .rpm or .deb installers (according to the endpoint Linux distribution), and deploy the installers on the endpoints using the Linux package manager. Alternatively, you can download a Shell installer and deploy it manually on the endpoint.
 * For Kubernetes clusters on Linux endpoints, download the YAML file. We strongly recommend that you do not edit this file.
-
▸ ▾ Endpoint data collection modified +6 −0
xsiam/onboard-cortex-xsiam/deployment-steps/install-cortex-xdr-agents/endpoint-data-collectionRead it on the Cortex docs portal ↗ Read it here → This file's diff on GitHub ↗
Before After@@ -1,8 +1,14 @@---description: >-Review endpoint metadata, EDR events, Windows event logs, and performancemetrics collected by Cortex XDR agents.---# Endpoint data collection# Endpoint data collectionWhen the Cortex XDR agent generates an issue on endpoint activity, a minimum set of metadata about the endpoint is sent to the server.When the Cortex XDR agent generates an issue on endpoint activity, a minimum set of metadata about the endpoint is sent to the server.When you enable behavioral threat protection or EDR data collection in your endpoint security policy, the Cortex XDR agent can also continuously monitor endpoint activity for malicious event chains identified by Palo Alto Networks. The endpoint data that the Cortex XDR agent collects when you enable these capabilities varies by platform type.When you enable behavioral threat protection or EDR data collection in your endpoint security policy, the Cortex XDR agent can also continuously monitor endpoint activity for malicious event chains identified by Palo Alto Networks. The endpoint data that the Cortex XDR agent collects when you enable these capabilities varies by platform type.Show markdown source
@@ -1,8 +1,14 @@
+---
+description: >-
+  Review endpoint metadata, EDR events, Windows event logs, and performance
+  metrics collected by Cortex XDR agents.
+---
+
 # Endpoint data collection

 When the Cortex XDR agent generates an issue on endpoint activity, a minimum set of metadata about the endpoint is sent to the server.

 When you enable behavioral threat protection or EDR data collection in your endpoint security policy, the Cortex XDR agent can also continuously monitor endpoint activity for malicious event chains identified by Palo Alto Networks. The endpoint data that the Cortex XDR agent collects when you enable these capabilities varies by platform type.

 <details>
-
▸ ▾ Guidelines for keeping Cortex XDR agents and content updated modified +8 −2
xsiam/onboard-cortex-xsiam/deployment-steps/install-cortex-xdr-agents/guidelines-for-keeping-cortex-xdr-agents-and-content-updatedRead it on the Cortex docs portal ↗ Read it here → This file's diff on GitHub ↗
Before After@@ -1,33 +1,39 @@---description: >-Plan phased Cortex XDR agent upgrades and content updates with rolloutschedules, staging content, and bandwidth controls.---# Guidelines for keeping Cortex XDR agents and content updated# Guidelines for keeping Cortex XDR agents and content updatedThis topic covers a recommended strategy and best practices for managing agent and content updates to help reduce the risk of downtime in a production environment, while helping ensure timely delivery of security content and capabilities.This topic covers a recommended strategy and best practices for managing agent and content updates to help reduce the risk of downtime in a production environment, while helping ensure timely delivery of security content and capabilities.Keeping Cortex XDR agents up-to-date is essential for protecting against evolving threats and vulnerabilities. Regular updates ensure the latest security features for malware and exploit prevention, and compatibility with the latest software environments, which helps reduce the risk of attacks. This can also help organizations meet regulatory standards while maintaining strong overall protection.Keeping Cortex XDR agents up-to-date is essential for protecting against evolving threats and vulnerabilities. Regular updates ensure the latest security features for malware and exploit prevention, and compatibility with the latest software environments, which helps reduce the risk of attacks. This can also help organizations meet regulatory standards while maintaining strong overall protection.Content updates, such as new threat intelligence or detection logic, are critical for defending against newly discovered cyber threats and malware and are designed to ensure that systems remain protected against the latest attacks. Content updates, released on a weekly basis, address compatibility issues as well, helping to achieve smooth operations alongside the Cortex XDR agent. Without regular content updates, security solutions may fail to detect new or evolving threats, leaving systems vulnerable to attacks.Content updates, such as new threat intelligence or detection logic, are critical for defending against newly discovered cyber threats and malware and are designed to ensure that systems remain protected against the latest attacks. Content updates, released on a weekly basis, address compatibility issues as well, helping to achieve smooth operations alongside the Cortex XDR agent. Without regular content updates, security solutions may fail to detect new or evolving threats, leaving systems vulnerable to attacks.The Cortex XDR agent can retrieve content updates immediately as they become available, or after a pre-configured delay period of up to 30 days. In addition, to expedite testing and evaluation, the staging content provides a preview of the content update a week before its published GA.The Cortex XDR agent can retrieve content updates immediately as they become available, or after a pre-configured delay period of up to 30 days. In addition, to expedite testing and evaluation, the staging content provides a preview of the content update a week before its published GA.When planning Cortex XDR agent upgrades and content updates, consult with the appropriate stakeholders and teams and follow the change management strategy in your organization.When planning Cortex XDR agent upgrades and content updates, consult with the appropriate stakeholders and teams and follow the change management strategy in your organization.Cortex XSIAM can be configured to manage the deployment of agent and content updates by adjusting the following settings:Cortex XSIAM can be configured to manage the deployment of agent and content updates by adjusting the following settings:### AGENT UPGRADE SETTINGS### Agent upgrade settingsAgent settings per endpoint:Agent settings per endpoint:• Agent Auto-Upgrade is disabled by default. Before enabling agent auto-upgrade for Cortex XDR agents, make sure to consult with all relevant stakeholders in your organization. Enabling this option allows you to define the scope of the automatic updates, such as upgrading to the latest agent release, one release prior, only maintenance releases, or maintenance releases within a specific version.• Agent Auto-Upgrade is disabled by default. Before enabling agent auto-upgrade for Cortex XDR agents, make sure to consult with all relevant stakeholders in your organization. Enabling this option allows you to define the scope of the automatic updates, such as upgrading to the latest agent release, one release prior, only maintenance releases, or maintenance releases within a specific version.• Upgrade Rollout includes two options: Immediate, where the Cortex XDR agent automatically receives new releases, including maintenance updates and features, and Delayed, which lets you set a delay of 7 to 45 days after a version is released before upgrading endpoints.• Upgrade Rollout includes two options: Immediate, where the Cortex XDR agent automatically receives new releases, including maintenance updates and features, and Delayed, which lets you set a delay of 7 to 45 days after a version is released before upgrading endpoints.• Agent Upgrade Scheduler allows the upgrade task to be scheduled for specific days of the week and a specific time range.• Agent Upgrade Scheduler allows the upgrade task to be scheduled for specific days of the week and a specific time range.Global agent settings: Configure the number of parallel upgrades to apply to all endpoints in your organization.Global agent settings: Configure the number of parallel upgrades to apply to all endpoints in your organization.### CONTENT UPDATE SETTINGS### Content update settingsContent updates per endpoint:Content updates per endpoint:• Content Auto-Update is enabled by default and automatically retrieves the latest content before deploying it on the endpoint. If you disable content updates, the agent will stop fetching updates from the Cortex XSIAM tenant and will continue to operate with the existing content on the endpoint.• Content Auto-Update is enabled by default and automatically retrieves the latest content before deploying it on the endpoint. If you disable content updates, the agent will stop fetching updates from the Cortex XSIAM tenant and will continue to operate with the existing content on the endpoint.• Content Rollout: The Cortex XDR agent can retrieve content updates immediately as they become available, after a pre-configured delay period of up to 30 days. Utilize the staging content for early evaluation on test environments before the content is released to production.• Content Rollout: The Cortex XDR agent can retrieve content updates immediately as they become available, after a pre-configured delay period of up to 30 days. Utilize the staging content for early evaluation on test environments before the content is released to production.Global content updates: Configure the content update cadence and bandwidth allocation within your organization. To enforce immediate protection against the latest threats, enable minor content updates. Otherwise, the content updates in your network occur only on major releases.Global content updates: Configure the content update cadence and bandwidth allocation within your organization. To enforce immediate protection against the latest threats, enable minor content updates. Otherwise, the content updates in your network occur only on major releases.Show markdown source
@@ -1,33 +1,39 @@
+---
+description: >-
+  Plan phased Cortex XDR agent upgrades and content updates with rollout
+  schedules, staging content, and bandwidth controls.
+---
+
 # Guidelines for keeping Cortex XDR agents and content updated

 This topic covers a recommended strategy and best practices for managing agent and content updates to help reduce the risk of downtime in a production environment, while helping ensure timely delivery of security content and capabilities.

 Keeping Cortex XDR agents up-to-date is essential for protecting against evolving threats and vulnerabilities. Regular updates ensure the latest security features for malware and exploit prevention, and compatibility with the latest software environments, which helps reduce the risk of attacks. This can also help organizations meet regulatory standards while maintaining strong overall protection.

 Content updates, such as new threat intelligence or detection logic, are critical for defending against newly discovered cyber threats and malware and are designed to ensure that systems remain protected against the latest attacks. Content updates, released on a weekly basis, address compatibility issues as well, helping to achieve smooth operations alongside the Cortex XDR agent. Without regular content updates, security solutions may fail to detect new or evolving threats, leaving systems vulnerable to attacks.

 The Cortex XDR agent can retrieve content updates immediately as they become available, or after a pre-configured delay period of up to 30 days. In addition, to expedite testing and evaluation, the staging content provides a preview of the content update a week before its published GA.

 When planning Cortex XDR agent upgrades and content updates, consult with the appropriate stakeholders and teams and follow the change management strategy in your organization.

 Cortex XSIAM can be configured to manage the deployment of agent and content updates by adjusting the following settings:

-### AGENT UPGRADE SETTINGS
+### Agent upgrade settings

 **Agent settings per endpoint:**

 * **Agent Auto-Upgrade** is disabled by default. Before enabling agent auto-upgrade for Cortex XDR agents, make sure to consult with all relevant stakeholders in your organization. Enabling this option allows you to define the scope of the automatic updates, such as upgrading to the latest agent release, one release prior, only maintenance releases, or maintenance releases within a specific version.
 * **Upgrade Rollout** includes two options: Immediate, where the Cortex XDR agent automatically receives new releases, including maintenance updates and features, and Delayed, which lets you set a delay of 7 to 45 days after a version is released before upgrading endpoints.
 * **Agent Upgrade Scheduler** allows the upgrade task to be scheduled for specific days of the week and a specific time range.

 **Global agent settings:** Configure the number of parallel upgrades to apply to all endpoints in your organization.

-### CONTENT UPDATE SETTINGS
+### Content update settings

 **Content updates per endpoint:**

 * **Content Auto-Update** is enabled by default and automatically retrieves the latest content before deploying it on the endpoint. If you disable content updates, the agent will stop fetching updates from the Cortex XSIAM tenant and will continue to operate with the existing content on the endpoint.
 * **Content Rollout:** The Cortex XDR agent can retrieve content updates immediately as they become available, after a pre-configured delay period of up to 30 days. Utilize the staging content for early evaluation on test environments before the content is released to production.

 **Global content updates:** Configure the content update cadence and bandwidth allocation within your organization. To enforce immediate protection against the latest threats, enable minor content updates. Otherwise, the content updates in your network occur only on major releases.
-
▸ ▾ Manage endpoint profiles modified +6 −0
xsiam/onboard-cortex-xsiam/deployment-steps/install-cortex-xdr-agents/manage-endpoint-profilesRead it on the Cortex docs portal ↗ Read it here → This file's diff on GitHub ↗
Before After@@ -1,5 +1,11 @@---description: >-Manage Cortex XSIAM endpoint security profiles and policy mappings to applyreusable threat protection settings across endpoint groups.---# Manage endpoint profiles# Manage endpoint profilesCortex XSIAM provides default security profiles that you can use out of the box to immediately begin protecting your endpoints from threats. These profiles are applied to endpoints by mapping them to policies and then mapping the policies to endpoints.Cortex XSIAM provides default security profiles that you can use out of the box to immediately begin protecting your endpoints from threats. These profiles are applied to endpoints by mapping them to policies and then mapping the policies to endpoints.While security rules enable you to block or allow files to run on your endpoints, security profiles help you customize and reuse settings across different groups of endpoints. When the Cortex XDR agent detects behavior that matches a rule defined in your security policy, it applies the security profile that is attached to the rule for further inspection.While security rules enable you to block or allow files to run on your endpoints, security profiles help you customize and reuse settings across different groups of endpoints. When the Cortex XDR agent detects behavior that matches a rule defined in your security policy, it applies the security profile that is attached to the rule for further inspection.Show markdown source
@@ -1,5 +1,11 @@
+---
+description: >-
+  Manage Cortex XSIAM endpoint security profiles and policy mappings to apply
+  reusable threat protection settings across endpoint groups.
+---
+
 # Manage endpoint profiles

 Cortex XSIAM provides default security profiles that you can use out of the box to immediately begin protecting your endpoints from threats. These profiles are applied to endpoints by mapping them to policies and then mapping the policies to endpoints.

 While security rules enable you to block or allow files to run on your endpoints, security profiles help you customize and reuse settings across different groups of endpoints. When the Cortex XDR agent detects behavior that matches a rule defined in your security policy, it applies the security profile that is attached to the rule for further inspection.
-
▸ ▾ Set up authentication modified +0 −2
xsiam/onboard-cortex-xsiam/deployment-steps/set-up-authenticationRead it on the Cortex docs portal ↗ Read it here → This file's diff on GitHub ↗
Before After@@ -25,12 +25,10 @@ SSO authentication provides several administrative advantages:Customer Support Portal authentication, by contrast, is useful if you have users who need the same permissions across multiple tenants. If you use SSO for multiple tenants, you must set up the SSO configuration separately for each tenant, both in the IdP and in Cortex XSIAM.Customer Support Portal authentication, by contrast, is useful if you have users who need the same permissions across multiple tenants. If you use SSO for multiple tenants, you must set up the SSO configuration separately for each tenant, both in the IdP and in Cortex XSIAM.To restrict a user to SSO login only, ensure they are not assigned the Cortex User role in the Cortex Gateway. For more information, see Manage users in Cortex Gateway in the Cortex Gateway Administrator Guide. While the CSP login option remains available, the user will be unable to successfully authenticate and must use the SSO login method instead.To restrict a user to SSO login only, ensure they are not assigned the Cortex User role in the Cortex Gateway. For more information, see Manage users in Cortex Gateway in the Cortex Gateway Administrator Guide. While the CSP login option remains available, the user will be unable to successfully authenticate and must use the SSO login method instead.For more information, see Assign user roles and groups.For more information, see Assign user roles and groups.hint infohint info### TipYou should have at least one user in the Customer Support Portal for backup, in case of any authentication issues with your IdP provider.You should have at least one user in the Customer Support Portal for backup, in case of any authentication issues with your IdP provider.endhintendhintShow markdown source
@@ -25,12 +25,10 @@ SSO authentication provides several administrative advantages: Customer Support Portal authentication, by contrast, is useful if you have users who need the same permissions across multiple tenants. If you use SSO for multiple tenants, you must set up the SSO configuration separately for each tenant, both in the IdP and in Cortex XSIAM. To restrict a user to SSO login only, ensure they are not assigned the **Cortex User** role in the Cortex Gateway. For more information, see Manage users in Cortex Gateway in the Cortex Gateway Administrator Guide. While the CSP login option remains available, the user will be unable to successfully authenticate and must use the SSO login method instead. For more information, see [Assign user roles and groups](set-up-users-and-roles/assign-user-roles-and-groups). {% hint style="info" %} -### Tip - You should have at least one user in the Customer Support Portal for backup, in case of any authentication issues with your IdP provider. {% endhint %} -
▸ ▾ Authenticate users through the Customer Support Portal modified +33 −18
xsiam/onboard-cortex-xsiam/deployment-steps/set-up-authentication/authenticate-users-through-the-customer-support-portalRead it on the Cortex docs portal ↗ Read it here → This file's diff on GitHub ↗
Before After@@ -1,44 +1,59 @@---description: >-Authenticate Cortex XSIAM users through Customer Support Portal and assignGateway or tenant access roles.---# Authenticate users through the Customer Support Portal# Authenticate users through the Customer Support PortalWhen you add users to your Customer Support Portal account, users are sent an invitation to join. After they accept, users can access Cortex Gateway and tenants, but they cannot view any tenants in the Gateway and cannot view any data in the tenant unless they are assigned a direct role or user group role. Only Account Admins can make any changes in Cortex Gateway.When you add users to your Customer Support Portal account, users are sent an invitation to join. After they accept, users can access Cortex Gateway and tenants, but they cannot view any tenants in the Gateway and cannot view any data in the tenant unless they are assigned a direct role or user group role. Only Account Admins can make any changes in Cortex Gateway.Keep in mind the following:Keep in mind the following:• You must be assigned the Super User role in the Customer Support Portal to add users in the Customer Support Portal.• You must be assigned the Super User role in the Customer Support Portal to add users in the Customer Support Portal.• The first Super User who logs into Cortex Gateway is automatically assigned the Account Admin role and has access to the tenant. The user who activates the Cortex XSIAM tenant will also be assigned the Account Admin role (if there is no current Account Admin role) or Instance Admin (if there is an existing Account Admin role) and will have access to the tenant. Any additional users including Super Users need to be assigned access to the tenant.• The first Super User who logs into Cortex Gateway is automatically assigned the Account Admin role and has access to the tenant. The user who activates the Cortex XSIAM tenant will also be assigned the Account Admin role (if there is no current Account Admin role) or Instance Admin (if there is an existing Account Admin role) and will have access to the tenant. Any additional users including Super Users need to be assigned access to the tenant.• To log in to Cortex XSIAM through the Customer Support Portal (CSP), users must be assigned the Cortex User role in CSP. If this role is not assigned, the user will be unable to log in via the CSP and must use the Single Sign-On (SSO) login method instead.• To log in to Cortex XSIAM through the Customer Support Portal (CSP), users must be assigned the Cortex User role in CSP. If this role is not assigned, the user will be unable to log in via the CSP and must use the Single Sign-On (SSO) login method instead.When users log into Cortex Gateway or the tenant they are prompted to sign into the Customer Support Portal using their username and password. This is the default method of authentication.When users log into Cortex Gateway or the tenant they are prompted to sign into the Customer Support Portal using their username and password. This is the default method of authentication.hint infohint info### NoteAfter users are added to the Customer Support Portal and they accept the invitation, you can manage them in Cortex Gateway or the Cortex XSIAM tenant.After users are added to the Customer Support Portal and they accept the invitation, you can manage them in Cortex Gateway or the Cortex XSIAM tenant.endhintendhintHow to authenticate users through the Customer Support PortalHow to authenticate users through the Customer Support Portal1. Add users to your Customer Support Portal account, by logging into https://support.paloaltonetworks.com/ and doing one of the following:stepper• In your Customer Support User Account, create users.step1. On the left-hand side menu, select Members → Create New User .### Add the user to your Customer Support Portal.2. Add the member details and click Submit.Sign in to the Customer Support Portal and do one of the following:• Create a user1. Select Members → Create New User.2. Add the member details and click Submit.An email is sent to the user which must be accepted within seven days.The user must accept the email invitation within seven days.For more detailed information including how to reset the invitation, see [How a Super User Creates a New Customer Support Portal User Account](https://knowledgebase.paloaltonetworks.com/KCSArticleDetail?id=kA10g000000ClNPCA0).For invitation help, see [How a Super User Creates a New Customer Support Portal User Account](https://knowledgebase.paloaltonetworks.com/KCSArticleDetail?id=kA10g000000ClNPCA0).• Send an Account Registration Link.• Send an account registration link1. Select Account Management → Account Details → User Access.2. In Account Registration, click Create.3. Copy and send the link to the user.A registration link is generated by a Customer Support Portal account Super User and shared with users who need to create a login for access to the account.The user submits their registration details through the link. The Super User receives a creation notification.1. On the left-hand side menu, select Account Management → Account Details, and click User Access.For link management, see [How to Use the Account Registration Link](https://knowledgebase.paloaltonetworks.com/KCSArticleDetail?id=kA10g000000ClNXCA0).2. In the Account Registration link, click Create.endstep3. Copy and send the link to the users you want to add.When clicking the link, users are required to enter their registration details and submit them to the Customer Support Portal.step### Wait for the user to acceptAfter users have submitted their details, the Super User receives a notification that a user has been created.The user accepts the invitation. They can then sign in to Cortex Gateway.endstepFor more information about how to generate, regenerate, or disable a link, see [How to Use the Account Registration Link](https://knowledgebase.paloaltonetworks.com/KCSArticleDetail?id=kA10g000000ClNXCA0).step2. Log in to Cortex Gateway .### Assign tenant accessAfter the user accepts the invitation, you see the added users. You must assign a role to the user directly or add them to user groups in Cortex Gateway or in the Cortex XSIAM tenant.In Cortex Gateway or the Cortex XSIAM tenant, assign a role directly. Alternatively, add the user to a user group with a role.endstependstepperShow markdown source
@@ -1,44 +1,59 @@ +--- +description: >- + Authenticate Cortex XSIAM users through Customer Support Portal and assign + Gateway or tenant access roles. +--- + # Authenticate users through the Customer Support Portal When you add users to your Customer Support Portal account, users are sent an invitation to join. After they accept, users can access Cortex Gateway and tenants, but they cannot view any tenants in the Gateway and cannot view any data in the tenant unless they are assigned a direct role or user group role. Only Account Admins can make any changes in Cortex Gateway. **Keep in mind the following**: * You must be assigned the Super User role in the Customer Support Portal to add users in the Customer Support Portal. * The first Super User who logs into Cortex Gateway is automatically assigned the Account Admin role and has access to the tenant. The user who activates the Cortex XSIAM tenant will also be assigned the Account Admin role (if there is no current Account Admin role) or Instance Admin (if there is an existing Account Admin role) and will have access to the tenant. Any additional users including Super Users need to be assigned access to the tenant. * To log in to Cortex XSIAM through the Customer Support Portal (CSP), users must be assigned the Cortex User role in CSP. If this role is not assigned, the user will be unable to log in via the CSP and must use the Single Sign-On (SSO) login method instead. When users log into Cortex Gateway or the tenant they are prompted to sign into the Customer Support Portal using their username and password. This is the default method of authentication. {% hint style="info" %} -### Note - After users are added to the Customer Support Portal and they accept the invitation, you can manage them in Cortex Gateway or the Cortex XSIAM tenant. {% endhint %} How to authenticate users through the Customer Support Portal -1. Add users to your Customer Support Portal account, by logging into [https://support.paloaltonetworks.com/](https://support.paloaltonetworks.com/) and doing one of the following: - * In your Customer Support User Account, create users. - 1. On the left-hand side menu, select **Members** → **Create New User** . - 2. Add the member details and click Submit. +{% stepper %} +{% step %} +### Add the user to your Customer Support Portal. + +Sign in to the [Customer Support Portal](https://support.paloaltonetworks.com/) and do one of the following: + +* **Create a user** + 1. Select **Members** → **Create New User**. + 2. Add the member details and click **Submit**. - An email is sent to the user which must be accepted within seven days. + The user must accept the email invitation within seven days. - For more detailed information including how to reset the invitation, see [How a Super User Creates a New Customer Support Portal User Account](https://knowledgebase.paloaltonetworks.com/KCSArticleDetail?id=kA10g000000ClNPCA0). - * Send an Account Registration Link. + For invitation help, see [How a Super User Creates a New Customer Support Portal User Account](https://knowledgebase.paloaltonetworks.com/KCSArticleDetail?id=kA10g000000ClNPCA0). +* **Send an account registration link** + 1. Select **Account Management** → **Account Details** → **User Access**. + 2. In **Account Registration**, click **Create**. + 3. Copy and send the link to the user. - A registration link is generated by a Customer Support Portal account Super User and shared with users who need to create a login for access to the account. + The user submits their registration details through the link. The Super User receives a creation notification. - 1. On the left-hand side menu, select **Account Management** → **Account Details**, and click **User Access**. - 2. In the **Account Registration** link, click **Create**. - 3. Copy and send the link to the users you want to add. + For link management, see [How to Use the Account Registration Link](https://knowledgebase.paloaltonetworks.com/KCSArticleDetail?id=kA10g000000ClNXCA0). +{% endstep %} - When clicking the link, users are required to enter their registration details and submit them to the Customer Support Portal. +{% step %} +### Wait for the user to accept - After users have submitted their details, the Super User receives a notification that a user has been created. +The user accepts the invitation. They can then sign in to Cortex Gateway. +{% endstep %} - For more information about how to generate, regenerate, or disable a link, see [How to Use the Account Registration Link](https://knowledgebase.paloaltonetworks.com/KCSArticleDetail?id=kA10g000000ClNXCA0). -2. Log in to Cortex Gateway . +{% step %} +### Assign tenant access - After the user accepts the invitation, you see the added users. You must assign a role to the user directly or add them to user groups in Cortex Gateway or in the Cortex XSIAM tenant. +In Cortex Gateway or the Cortex XSIAM tenant, assign a role directly. Alternatively, add the user to a user group with a role. +{% endstep %} +{% endstepper %} -
▸ ▾ Authenticate users using SSO modified +16 −14
xsiam/onboard-cortex-xsiam/deployment-steps/set-up-authentication/authenticate-users-using-ssoRead it on the Cortex docs portal ↗ Read it here → This file's diff on GitHub ↗
Before After@@ -1,74 +1,76 @@---description: >-Configure Cortex XSIAM SAML 2.0 single sign-on with identity providers, groupmapping, and user provisioning.---# Authenticate users using SSO# Authenticate users using SSOCortex XSIAM enables you to authenticate system users securely across enterprise-wide applications and websites with one set of credentials using single sign-on (SSO) with SAML 2.0. System users can authenticate using your organization's Identity Provider (IdP), such as Okta or PingOne. You can integrate with any IdP that is supported by SAML 2.0.Cortex XSIAM enables you to authenticate system users securely across enterprise-wide applications and websites with one set of credentials using single sign-on (SSO) with SAML 2.0. System users can authenticate using your organization's Identity Provider (IdP), such as Okta or PingOne. You can integrate with any IdP that is supported by SAML 2.0.Use SAML SSO when you want your platform users to be authenticated according to your organization's precise security standards as implemented within your enterprise IdP. This is critical for enforcing corporate Multi-Factor Authentication (MFA) mandates, identity verification policies, handling automatic de-provisioning (for example, when a user leaves the company), or specific conditional network access rules before granting portal access.Use SAML SSO when you want your platform users to be authenticated according to your organization's precise security standards as implemented within your enterprise IdP. This is critical for enforcing corporate Multi-Factor Authentication (MFA) mandates, identity verification policies, handling automatic de-provisioning (for example, when a user leaves the company), or specific conditional network access rules before granting portal access.Configuring SSO with SAML 2.0 is dependent on your organization’s IdP. Some of the parameter values need to be supplied from your organization’s IdP and some need to be added to your organization’s IdP. You must have sufficient knowledge about IdPs, how to access your organization’s IdP, which values to add to Cortex XSIAM, and which values to add to your IdP fields.Configuring SSO with SAML 2.0 is dependent on your organization’s IdP. Some of the parameter values need to be supplied from your organization’s IdP and some need to be added to your organization’s IdP. You must have sufficient knowledge about IdPs, how to access your organization’s IdP, which values to add to Cortex XSIAM, and which values to add to your IdP fields.hint infohint info### Note• To set up SSO authentication in the tenant, you must be assigned an Instance Administrator or Account Admin role.• To set up SSO authentication in the tenant, you must be assigned an Instance Administrator or Account Admin role.• SAML 2.0 users must log in to Cortex XSIAM using the FQDN (full URL) of the tenant. To allow login directly from the IdP to , you must set the relay state on the IdP to the FQDN of the tenant.• SAML 2.0 users must log in to Cortex XSIAM using the FQDN (full URL) of the tenant. To allow login directly from the IdP to the tenant, you must set the relay state on the IdP to the FQDN of the tenant.• If you have multiple tenants, you must set up the SSO configuration separately for each tenant, both in the IdP and in Cortex XSIAM.• If you have multiple tenants, you must set up the SSO configuration separately for each tenant, both in the IdP and in Cortex XSIAM.• If you are using AWS SSO, theApplication ACS URLrefers to theSingle Sign-On URLand theApplication SAML Audiencerefers to theAudience URL (SP Entity ID). Both values can be copied from the Authentication Settings in Cortex XSIAM.• If you are using AWS SSO, theApplication ACS URLrefers to theSingle Sign-On URLand theApplication SAML Audiencerefers to theAudience URL (SP Entity ID). Both values can be copied from the Authentication Settings in Cortex XSIAM.• Unlike users who authenticate through the Customer Support Portal (CSP), users who log in via SSO do not require the Cortex User role to be assigned in the CSP. Their access and permissions are governed by the SAML Group Mapping configured in Cortex XSIAM.• Unlike users who authenticate through the Customer Support Portal (CSP), users who log in via SSO do not require the Cortex User role to be assigned in the CSP. Their access and permissions are governed by the SAML Group Mapping configured in Cortex XSIAM.endhintendhint### Identity provisioning and de-provisioning lifecycleIdentity provisioning and de-provisioning lifecycleJust-In-Time (JIT) account creation#### Just-In-Time (JIT) account creationWhen an enterprise user authenticates through your configured Identity Provider (IdP) for the very first time, an explicit user account entry is dynamically generated inside the platform via Just-In-Time (JIT) provisioning. Once provisioned, this newly formed user identity appears within the primary Users Table console.When an enterprise user authenticates through your configured Identity Provider (IdP) for the very first time, an explicit user account entry is dynamically generated inside the platform via Just-In-Time (JIT) provisioning. Once provisioned, this newly formed user identity appears within the primary Users Table console.Following initial JIT creation, administrators can open the account entry to assign targeted Access Management controls, defining precise Roles and granular data Scopes. You can choose to select an optional global Default Role parameter within the general SSO configuration menu to automatically apply baseline permissions to newly provisioned users.Following initial JIT creation, administrators can open the account entry to assign targeted Access Management controls, defining precise Roles and granular data Scopes. You can choose to select an optional global Default Role parameter within the general SSO configuration menu to automatically apply baseline permissions to newly provisioned users.To maintain a secure posture, it is critical that this Default Role is configured with the least-privileged permissions possible (such as read-only or a basic viewer role) to ensure users without explicit role or group assignments inherit minimal access by default. For detailed implementation steps and advice on structuring these permissions, see.To maintain a secure posture, it is critical that this Default Role is configured with the least-privileged permissions possible (such as read-only or a basic viewer role) to ensure users without explicit role or group assignments inherit minimal access by default.SECURITY MINIMIZATION BEST PRACTICE: If a Default Role is utilized for JIT automation, it is strongly recommended to restrict this role to the most minimal, low-privilege read-only permissions possible. This ensures that if a platform administrator forgets to manually apply an explicit target role or scope assignment to a newly synced user, that account remains structurally isolated from sensitive security controls or data views.#### Security minimization best practiceIf a Default Role is utilized for JIT automation, it is strongly recommended to restrict this role to the most minimal, low-privilege read-only permissions possible. This ensures that if a platform administrator forgets to manually apply an explicit target role or scope assignment to a newly synced user, that account remains structurally isolated from sensitive security controls or data views.Once account objects successfully register via JIT login, administrators can manually pair those known identities directly with local Custom Cortex User Groups within the console.Once account objects successfully register via JIT login, administrators can manually pair those known identities directly with local Custom Cortex User Groups within the console.Deprovisioning and account disabling actions#### Deprovisioning and account disabling actions• Identity Provider (IdP) account suspensions: If a user account is deleted, suspended, or disabled directly within your organization's external Identity Provider (IdP), that target user is blocked from executing any further single sign-on validation attempts into Cortex XSIAM if you set SSO as the authentication method, taking effect upon their next login sequence. For continuity tracking purposes, the historical record for that user will continue to populate inside the internal console Users table until an inactivity threshold triggers a backend purge. For more information, see the [Inactivity removal cycles] policy explained directly below.• Identity Provider (IdP) account suspensions: If a user account is deleted, suspended, or disabled directly within your organization's external Identity Provider (IdP), that target user is blocked from executing any further single sign-on validation attempts into Cortex XSIAM if you set SSO as the authentication method, taking effect upon their next login sequence. For continuity tracking purposes, the historical record for that user will continue to populate inside the internal console Users table until an inactivity threshold triggers a backend purge. For more information, see the [Inactivity removal cycles] policy explained directly below.• Inactivity removal cycles: For accounts bound to both single sign-on (SSO) pipelines and native Customer Support Portal (CSP) infrastructure, identity profiles and group mappings are automatically purged and removed from the platform console following a specified period of prolonged system inactivity. This inactivity threshold is explicitly configured by navigating to Settings → Configurations → General → Security Settings and selecting Enabled from the Deactivate Inactive User drop-down menu. Selecting this option exposes the Deactivation period field, which is set to 30 days by default, allowing administrators to specify the exact number of inactive days required to trigger user deactivation.• Inactivity removal cycles: For accounts bound to both single sign-on (SSO) pipelines and native Customer Support Portal (CSP) infrastructure, identity profiles and group mappings are automatically purged and removed from the platform console following a specified period of prolonged system inactivity. This inactivity threshold is explicitly configured by navigating to Settings → Configurations → General → Security Settings and selecting Enabled from the Deactivate Inactive User drop-down menu. Selecting this option exposes the Deactivation period field, which is set to 30 days by default, allowing administrators to specify the exact number of inactive days required to trigger user deactivation.• Cloud Identity Engine (CIE) separation boundary: Disabling, removing, or changing user records directly inside the Cloud Identity Engine interface does not disable, modify, or block corresponding user accounts inside Cortex XSIAM. User lifecycle connectivity is governed purely by active IdP authentication responses or CSP invitation status.• Cloud Identity Engine (CIE) separation boundary: Disabling, removing, or changing user records directly inside the Cloud Identity Engine interface does not disable, modify, or block corresponding user accounts inside Cortex XSIAM. User lifecycle connectivity is governed purely by active IdP authentication responses or CSP invitation status.</details>If you are configuring Okta or Microsoft Entra ID, follow the procedure in Okta or Microsoft Entra ID. You can also adapt these instructions for use with any similar SAML 2.0 IdP.If you are configuring Okta or Microsoft Entra ID, follow the procedure in Okta or Microsoft Entra ID. You can also adapt these instructions for use with any similar SAML 2.0 IdP.1. In Cortex XSIAM, go to Settings → Configurations → Access Management → Authentication Settings.1. In Cortex XSIAM, go to Settings → Configurations → Access Management → Authentication Settings.2. In the Login Options tab, toggle SSO Disabled to on.2. In the Login Options tab, toggle SSO Disabled to on.You can see the SSO settings, so you can configure them according to your organization’s IdP.You can see the SSO settings, so you can configure them according to your organization’s IdP.3. If you want to add another SSO connection to enable managing user groups with different roles and different IdPs, click Add SSO Connection.3. If you want to add another SSO connection to enable managing user groups with different roles and different IdPs, click Add SSO Connection.Different SSO parameters for an SSO are displayed to configure according to your organization’s additional IdP.Different SSO parameters for an SSO are displayed to configure according to your organization’s additional IdP.<div data-gb-custom-block data-tag="hint" data-style="info" class="hint hint-info"><h3>Note</h3><ul><li>The first SSO cannot be deleted; it can only be deactivated by toggling <strong>SSO Enabled</strong> to off.</li><li><p>The <strong>Domain</strong> parameter is predefined for the first SSO.</p><p>If you add additional SSO providers, you must provide the email Domain in the SSO Integration settings for all providers except the first. Cortex XSIAM uses this domain to determine to which identity provider to send the user for authentication.</p></li><li>When mapping IdP user groups to Cortex XSIAM user groups, you must include the group attribute for each IdP you want to use. For example, if you are using Microsoft Entra ID and Okta, your Cortex XSIAM user group SAML Group Mapping field must include the IdP groups for each provider. Each group name is separated by a comma.</li></ul></div><div data-gb-custom-block data-tag="hint" data-style="info" class="hint hint-info"><ul><li>The first SSO cannot be deleted; it can only be deactivated by toggling <strong>SSO Enabled</strong> to off.</li><li><p>The <strong>Domain</strong> parameter is predefined for the first SSO.</p><p>If you add additional SSO providers, you must provide the email Domain in the SSO Integration settings for all providers except the first. Cortex XSIAM uses this domain to determine to which identity provider to send the user for authentication.</p></li><li>When mapping IdP user groups to Cortex XSIAM user groups, you must include the group attribute for each IdP you want to use. For example, if you are using Microsoft Entra ID and Okta, your Cortex XSIAM user group SAML Group Mapping field must include the IdP groups for each provider. Each group name is separated by a comma.</li></ul></div>4. Set the following parameters using your organization’s IdP, where the field parameters are explained in the tables below.4. Set the following parameters using your organization’s IdP, where the field parameters are explained in the tables below.• General parameters• General parameters• IdP Attribute Mapping• IdP Attribute Mapping• Advanced Settings (optional)• Advanced Settings (optional)5. Save your changes.5. Save your changes.Whenever an SSO user logs in to Cortex XSIAM, the following login options are available.Whenever an SSO user logs in to Cortex XSIAM, the following login options are available.• Sign-in with SSO• Sign-in with SSOIf you have enabled more than one SSO provider, an optional email field appears. If the user does not enter an email address or if the email address does not match an existing domain, the user is automatically directed to the default IdP provider (the first in the list of SSO providers in the Authentication Settings). If the user enters an email address and it matches a domain listed in the **Domain** field in the SSO Integration settings for one of your IdPs, **Sign-In with SSO** sends the user to the IdP associated with that email domain.If you have enabled more than one SSO provider, an optional email field appears. If the user does not enter an email address or if the email address does not match an existing domain, the user is automatically directed to the default IdP provider (the first in the list of SSO providers in the Authentication Settings). If the user enters an email address and it matches a domain listed in the **Domain** field in the SSO Integration settings for one of your IdPs, **Sign-In with SSO** sends the user to the IdP associated with that email domain.<div data-gb-custom-block data-tag="hint" data-style="info" class="hint hint-info"><h3>Important</h3><p><strong>PROGRAMMATIC CONTRAINT</strong>:</p><p>There is no public API endpoint available to provision or de-provision users programmatically within Cortex XSIAM. All target accounts must be initialized or explicitly managed using the native interactive Single Sign-On (SSO) or Customer Support Portal (CSP) interface workflows defined in this guide. To review the list of supported programmatic actions and ingestion endpoints, see the Cortex XSIAM API Reference guide.</p></div><div data-gb-custom-block data-tag="hint" data-style="warning" class="hint hint-warning"><p><strong>Programmatic constraint</strong>:</p><p>There is no public API endpoint available to provision or de-provision users programmatically within Cortex XSIAM. All target accounts must be initialized or explicitly managed using the native interactive Single Sign-On (SSO) or Customer Support Portal (CSP) interface workflows defined in this guide. To review the list of supported programmatic actions and ingestion endpoints, see the Cortex XSIAM API Reference guide.</p></div>General parametersGeneral parametersParameter│DescriptionParameter│Description| --------------------------- | --------------------------------------------------------------------------------------------------------------------------------------------------------------------------------------------------------------------------------------------------------------------------------------------------------------------------------------------------------------------------------------------------------------------------------------------------------------------------------------------------------- || --------------------------- | --------------------------------------------------------------------------------------------------------------------------------------------------------------------------------------------------------------------------------------------------------------------------------------------------------------------------------------------------------------------------------------------------------------------------------------------------------------------------------------------------------- |IdP SSO or Metadata URL│Select the option that meets your organization's requirements.Indicates your SSO URL, which is a fixed, read-only value based on your tenant's URL using the format
https://<name of tenant>.crtx.paloaltonetworks.com/idp/saml. For example,https://tenant1.crtx.paloaltonetworks.com/idp/samlYou need this value when configuring your IdP.
IdP SSO or Metadata URL│Select the option that meets your organization's requirements.Indicates your SSO URL, which is a fixed, read-only value based on your tenant's URL using the format
https://<name of tenant>.crtx.paloaltonetworks.com/idp/saml. For example,https://tenant1.crtx.paloaltonetworks.com/idp/samlYou need this value when configuring your IdP.
Show markdown source
@@ -1,74 +1,76 @@ +--- +description: >- + Configure Cortex XSIAM SAML 2.0 single sign-on with identity providers, group + mapping, and user provisioning. +--- + # Authenticate users using SSO Cortex XSIAM enables you to authenticate system users securely across enterprise-wide applications and websites with one set of credentials using single sign-on (SSO) with SAML 2.0. System users can authenticate using your organization's Identity Provider (IdP), such as Okta or PingOne. You can integrate with any IdP that is supported by SAML 2.0. Use SAML SSO when you want your platform users to be authenticated according to your organization's precise security standards as implemented within your enterprise IdP. This is critical for enforcing corporate Multi-Factor Authentication (MFA) mandates, identity verification policies, handling automatic de-provisioning (for example, when a user leaves the company), or specific conditional network access rules before granting portal access. Configuring SSO with SAML 2.0 is dependent on your organization’s IdP. Some of the parameter values need to be supplied from your organization’s IdP and some need to be added to your organization’s IdP. You must have sufficient knowledge about IdPs, how to access your organization’s IdP, which values to add to Cortex XSIAM, and which values to add to your IdP fields. {% hint style="info" %} -### Note - * To set up SSO authentication in the tenant, you must be assigned an Instance Administrator or Account Admin role. -* SAML 2.0 users must log in to Cortex XSIAM using the FQDN (full URL) of the tenant. To allow login directly from the IdP to , you must set the relay state on the IdP to the FQDN of the tenant. +* SAML 2.0 users must log in to Cortex XSIAM using the FQDN (full URL) of the tenant. To allow login directly from the IdP to the tenant, you must set the relay state on the IdP to the FQDN of the tenant. * If you have multiple tenants, you must set up the SSO configuration separately for each tenant, both in the IdP and in Cortex XSIAM. * If you are using AWS SSO, the `Application ACS URL` refers to the `Single Sign-On URL` and the `Application SAML Audience` refers to the `Audience URL (SP Entity ID)`. Both values can be copied from the **Authentication Settings** in Cortex XSIAM. * Unlike users who authenticate through the Customer Support Portal (CSP), users who log in via SSO do not require the **Cortex User** role to be assigned in the CSP. Their access and permissions are governed by the SAML Group Mapping configured in Cortex XSIAM. {% endhint %} -<details> - -<summary>Identity provisioning and de-provisioning lifecycle</summary> +### Identity provisioning and de-provisioning lifecycle -**Just-In-Time (JIT) account creation** +#### **Just-In-Time (JIT) account creation** When an enterprise user authenticates through your configured Identity Provider (IdP) for the very first time, an explicit user account entry is dynamically generated inside the platform via Just-In-Time (JIT) provisioning. Once provisioned, this newly formed user identity appears within the primary Users Table console. Following initial JIT creation, administrators can open the account entry to assign targeted Access Management controls, defining precise Roles and granular data Scopes. You can choose to select an optional global **Default Role** parameter within the general SSO configuration menu to automatically apply baseline permissions to newly provisioned users. -To maintain a secure posture, it is critical that this **Default Role** is configured with the least-privileged permissions possible (such as read-only or a basic viewer role) to ensure users without explicit role or group assignments inherit minimal access by default. For detailed implementation steps and advice on structuring these permissions, see. +To maintain a secure posture, it is critical that this **Default Role** is configured with the least-privileged permissions possible (such as read-only or a basic viewer role) to ensure users without explicit role or group assignments inherit minimal access by default. -**SECURITY MINIMIZATION BEST PRACTICE**: If a Default Role is utilized for JIT automation, it is strongly recommended to restrict this role to the most minimal, low-privilege read-only permissions possible. This ensures that if a platform administrator forgets to manually apply an explicit target role or scope assignment to a newly synced user, that account remains structurally isolated from sensitive security controls or data views. +#### **Security minimization best practice** + +If a Default Role is utilized for JIT automation, it is strongly recommended to restrict this role to the most minimal, low-privilege read-only permissions possible. This ensures that if a platform administrator forgets to manually apply an explicit target role or scope assignment to a newly synced user, that account remains structurally isolated from sensitive security controls or data views. Once account objects successfully register via JIT login, administrators can manually pair those known identities directly with local Custom Cortex User Groups within the console. -**Deprovisioning and account disabling actions** +#### **Deprovisioning and account disabling actions** * **Identity Provider (IdP) account suspensions**: If a user account is deleted, suspended, or disabled directly within your organization's external Identity Provider (IdP), that target user is blocked from executing any further single sign-on validation attempts into Cortex XSIAM if you set SSO as the authentication method, taking effect upon their next login sequence. For continuity tracking purposes, the historical record for that user will continue to populate inside the internal console Users table until an inactivity threshold triggers a backend purge. For more information, see the \[Inactivity removal cycles] policy explained directly below. * **Inactivity removal cycles**: For accounts bound to both single sign-on (SSO) pipelines and native Customer Support Portal (CSP) infrastructure, identity profiles and group mappings are automatically purged and removed from the platform console following a specified period of prolonged system inactivity. This inactivity threshold is explicitly configured by navigating to **Settings** → **Configurations** → **General** → **Security Settings** and selecting **Enabled** from the **Deactivate Inactive User** drop-down menu. Selecting this option exposes the **Deactivation period** field, which is set to 30 days by default, allowing administrators to specify the exact number of inactive days required to trigger user deactivation. * **Cloud Identity Engine (CIE) separation boundary**: Disabling, removing, or changing user records directly inside the Cloud Identity Engine interface does not disable, modify, or block corresponding user accounts inside Cortex XSIAM. User lifecycle connectivity is governed purely by active IdP authentication responses or CSP invitation status. -</details> - If you are configuring Okta or Microsoft Entra ID, follow the procedure in Okta or Microsoft Entra ID. You can also adapt these instructions for use with any similar SAML 2.0 IdP. 1. In Cortex XSIAM, go to Settings → Configurations → Access Management → **Authentication Settings**. 2. In the **Login Options** tab, toggle **SSO Disabled** to on. You can see the SSO settings, so you can configure them according to your organization’s IdP. 3. If you want to add another SSO connection to enable managing user groups with different roles and different IdPs, click **Add SSO Connection**. Different SSO parameters for an SSO are displayed to configure according to your organization’s additional IdP. - <div data-gb-custom-block data-tag="hint" data-style="info" class="hint hint-info"><h3>Note</h3><ul><li>The first SSO cannot be deleted; it can only be deactivated by toggling <strong>SSO Enabled</strong> to off.</li><li><p>The <strong>Domain</strong> parameter is predefined for the first SSO.</p><p>If you add additional SSO providers, you must provide the email Domain in the SSO Integration settings for all providers except the first. Cortex XSIAM uses this domain to determine to which identity provider to send the user for authentication.</p></li><li>When mapping IdP user groups to Cortex XSIAM user groups, you must include the group attribute for each IdP you want to use. For example, if you are using Microsoft Entra ID and Okta, your Cortex XSIAM user group SAML Group Mapping field must include the IdP groups for each provider. Each group name is separated by a comma.</li></ul></div> + <div data-gb-custom-block data-tag="hint" data-style="info" class="hint hint-info"><ul><li>The first SSO cannot be deleted; it can only be deactivated by toggling <strong>SSO Enabled</strong> to off.</li><li><p>The <strong>Domain</strong> parameter is predefined for the first SSO.</p><p>If you add additional SSO providers, you must provide the email Domain in the SSO Integration settings for all providers except the first. Cortex XSIAM uses this domain to determine to which identity provider to send the user for authentication.</p></li><li>When mapping IdP user groups to Cortex XSIAM user groups, you must include the group attribute for each IdP you want to use. For example, if you are using Microsoft Entra ID and Okta, your Cortex XSIAM user group SAML Group Mapping field must include the IdP groups for each provider. Each group name is separated by a comma.</li></ul></div> 4. Set the following parameters using your organization’s IdP, where the field parameters are explained in the tables below. * **General parameters** * **IdP Attribute Mapping** * **Advanced Settings** (optional) 5. **Save** your changes. Whenever an SSO user logs in to Cortex XSIAM, the following login options are available. * **Sign-in with SSO** If you have enabled more than one SSO provider, an optional email field appears. If the user does not enter an email address or if the email address does not match an existing domain, the user is automatically directed to the default IdP provider (the first in the list of SSO providers in the Authentication Settings). If the user enters an email address and it matches a domain listed in the **Domain** field in the SSO Integration settings for one of your IdPs, **Sign-In with SSO** sends the user to the IdP associated with that email domain. - <div data-gb-custom-block data-tag="hint" data-style="info" class="hint hint-info"><h3>Important</h3><p><strong>PROGRAMMATIC CONTRAINT</strong>:</p><p>There is no public API endpoint available to provision or de-provision users programmatically within Cortex XSIAM. All target accounts must be initialized or explicitly managed using the native interactive Single Sign-On (SSO) or Customer Support Portal (CSP) interface workflows defined in this guide. To review the list of supported programmatic actions and ingestion endpoints, see the Cortex XSIAM API Reference guide.</p></div> + <div data-gb-custom-block data-tag="hint" data-style="warning" class="hint hint-warning"><p><strong>Programmatic constraint</strong>:</p><p>There is no public API endpoint available to provision or de-provision users programmatically within Cortex XSIAM. All target accounts must be initialized or explicitly managed using the native interactive Single Sign-On (SSO) or Customer Support Portal (CSP) interface workflows defined in this guide. To review the list of supported programmatic actions and ingestion endpoints, see the Cortex XSIAM API Reference guide.</p></div> <details> <summary>General parameters</summary> | Parameter | Description | | --------------------------- | --------------------------------------------------------------------------------------------------------------------------------------------------------------------------------------------------------------------------------------------------------------------------------------------------------------------------------------------------------------------------------------------------------------------------------------------------------------------------------------------------------- | | IdP SSO or Metadata URL | <p>Select the option that meets your organization's requirements.</p><p>Indicates your SSO URL, which is a fixed, read-only value based on your tenant's URL using the format <strong><code>https://</code></strong><em><strong><code><name of tenant></code></strong></em><strong><code>.crtx.paloaltonetworks.com/idp/saml</code></strong>. For example, <strong><code>https://tenant1.crtx.paloaltonetworks.com/idp/saml</code></strong></p><p>You need this value when configuring your IdP.</p> | -
▸ ▾ Set up Microsoft Entra ID as the Identity Provider Using SAML 2.0 modified +6 −0
xsiam/onboard-cortex-xsiam/deployment-steps/set-up-authentication/set-up-microsoft-entra-id-as-the-identity-provider-using-saml-2.0Read it on the Cortex docs portal ↗ Read it here → This file's diff on GitHub ↗
Before After@@ -1,8 +1,14 @@---description: >-Configure Microsoft Entra ID SAML 2.0 single sign-on, security group claims,and user group mapping for Cortex XSIAM.---# Set up Microsoft Entra ID as the Identity Provider Using SAML 2.0# Set up Microsoft Entra ID as the Identity Provider Using SAML 2.0This topic provides specific instructions for using Microsoft Entra ID (formerly Azure AD) to authenticate your Cortex XSIAM users. As Microsoft Entra ID is a third-party software, specific procedures, and screenshots may change without notice. We encourage you to also review the Microsoft Entra ID documentation.This topic provides specific instructions for using Microsoft Entra ID (formerly Azure AD) to authenticate your Cortex XSIAM users. As Microsoft Entra ID is a third-party software, specific procedures, and screenshots may change without notice. We encourage you to also review the Microsoft Entra ID documentation.To configure SAML SSO in Cortex XSIAM, you must be a user who can access the Cortex XSIAM tenant and have either the Account Admin or Instance Administrator role assigned.To configure SAML SSO in Cortex XSIAM, you must be a user who can access the Cortex XSIAM tenant and have either the Account Admin or Instance Administrator role assigned.The following video is a step-by-step guide configuring SSO for Microsoft Entra ID: Microsoft Entra ID SSO.The following video is a step-by-step guide configuring SSO for Microsoft Entra ID: Microsoft Entra ID SSO.Show markdown source
@@ -1,8 +1,14 @@
+---
+description: >-
+  Configure Microsoft Entra ID SAML 2.0 single sign-on, security group claims,
+  and user group mapping for Cortex XSIAM.
+---
+
 # Set up Microsoft Entra ID as the Identity Provider Using SAML 2.0

 This topic provides specific instructions for using Microsoft Entra ID (formerly Azure AD) to authenticate your Cortex XSIAM users. As Microsoft Entra ID is a third-party software, specific procedures, and screenshots may change without notice. We encourage you to also review the [Microsoft Entra ID documentation](https://learn.microsoft.com/en-us/azure/active-directory/manage-apps/add-application-portal-setup-sso).

 To configure SAML SSO in Cortex XSIAM, you must be a user who can access the Cortex XSIAM tenant and have either the Account Admin or Instance Administrator role assigned.

 The following video is a step-by-step guide configuring SSO for Microsoft Entra ID: [Microsoft Entra ID SSO](https://www.youtube.com/watch?v=nwF3hY3wgc0).
-
▸ ▾ Set up Okta as the Identity Provider Using SAML 2.0 modified +6 −0
xsiam/onboard-cortex-xsiam/deployment-steps/set-up-authentication/set-up-okta-as-the-identity-provider-using-saml-2.0Read it on the Cortex docs portal ↗ Read it here → This file's diff on GitHub ↗
Before After@@ -1,8 +1,14 @@---description: >-Configure Okta SAML 2.0 single sign-on and group mapping for Cortex XSIAMusers.---# Set up Okta as the Identity Provider Using SAML 2.0# Set up Okta as the Identity Provider Using SAML 2.0This topic provides specific instructions for using Okta to authenticate your Cortex XSIAM users. As Okta is a third-party software, specific procedures, and screenshots may change without notice. We encourage you to also review the Okta documentation for app integrations.This topic provides specific instructions for using Okta to authenticate your Cortex XSIAM users. As Okta is a third-party software, specific procedures, and screenshots may change without notice. We encourage you to also review the Okta documentation for app integrations.To configure SAML SSO in Cortex XSIAM, you must be a user who can access the Cortex XSIAM tenant and have either the Account Admin or Instance Administrator role assigned.To configure SAML SSO in Cortex XSIAM, you must be a user who can access the Cortex XSIAM tenant and have either the Account Admin or Instance Administrator role assigned.Show markdown source
@@ -1,8 +1,14 @@
+---
+description: >-
+  Configure Okta SAML 2.0 single sign-on and group mapping for Cortex XSIAM
+  users.
+---
+
 # Set up Okta as the Identity Provider Using SAML 2.0

 This topic provides specific instructions for using Okta to authenticate your Cortex XSIAM users. As Okta is a third-party software, specific procedures, and screenshots may change without notice. We encourage you to also review the [Okta documentation for app integrations](https://help.okta.com/oie/en-us/content/topics/apps/apps_apps.htm).

 To configure SAML SSO in Cortex XSIAM, you must be a user who can access the Cortex XSIAM tenant and have either the Account Admin or Instance Administrator role assigned.

 <details>
-
▸ ▾ Set up users, groups, and roles modified +9 −11
xsiam/onboard-cortex-xsiam/deployment-steps/set-up-users-and-rolesRead it on the Cortex docs portal ↗ Read it here → This file's diff on GitHub ↗
Before After@@ -12,44 +12,42 @@ SBAC refines the RBAC permissions by granting access only to the relevant data tCortex Gateway and the tenant have different options and requirements.Cortex Gateway and the tenant have different options and requirements.Location│DetailsLocation│Details| ------------------- | ----------------------------------------------------------------------------------------------------------------------------------------------------------------------------------------------------------------------------------------------------------------------------------------------------------------------------------------------------------------------------------------------------------------------------------------------------------------------------------------------------------------------------------------------------------------------------------------------------------------------------------------------------------------------------------------------------------------------------------------------------------------------------------------------------------------------------------------------------------------------------------------------------------- || ------------------- | ----------------------------------------------------------------------------------------------------------------------------------------------------------------------------------------------------------------------------------------------------------------------------------------------------------------------------------------------------------------------------------------------------------------------------------------------------------------------------------------------------------------------------------------------------------------------------------------------------------------------------------------------------------------------------------------------------------------------------------------------------------------------------------------------------------------------------------------------------------------------------------------------------------- |Cortex Gateway│A centralized portal for managing roles, user groups, and users for all tenants. Any roles and user groups created in Cortex Gateway are available for all tenants.In Cortex Gateway, on the Permissions page, you can manage users that have been added to your Customer Support Portal account or view users that have been created in the tenant using SSO (you cannot edit SSO users in Cortex Gateway). All users must have at least one role or belong to at least one user group to be saved in the Cortex Gateway. You can exclude different tenants or different Cortex products. For more information, see Cortex Gateway Administrator Guide.
Only users with the Account Admin role can manage roles, tenants, and user groups in Cortex Gateway.
Cortex Gateway│A centralized portal for managing roles, user groups, and users for all tenants. Any roles and user groups created in Cortex Gateway are available for all tenants.In Cortex Gateway, on the Permissions page, you can manage users that have been added to your Customer Support Portal account or view users that have been created in the tenant using SSO (you cannot edit SSO users in Cortex Gateway). All users must have at least one role or belong to at least one user group to be saved in the Cortex Gateway. You can exclude different tenants or different Cortex products. For more information, see Cortex Gateway Administrator Guide.
Only users with the Account Admin role can manage roles, tenants, and user groups in Cortex Gateway.
Cortex XSIAM tenant│(Recommended) All permissions and roles are specific to the tenant and exist only at the tenant level. Advanced settings, such as SBAC and Dataset access management, can be defined at the tenant level.Managing users, roles, scopes, user groups, and authentication settings in Cortex XSIAM requires View/Edit RBAC permissions for Access Management (under Configurations). Account Admin and Instance Administrator roles are granted this permission by default.
For more information, see Manage user roles.
Cortex XSIAM tenant│(Recommended) All permissions and roles are specific to the tenant and exist only at the tenant level. Advanced settings, such as SBAC and Dataset access management, can be defined at the tenant level.Managing users, roles, scopes, user groups, and authentication settings in Cortex XSIAM requires View/Edit RBAC permissions for Access Management (under Configurations). Account Admin and Instance Administrator roles are granted this permission by default.
For more information, see Manage user roles.
Predefined user roles### Predefined user rolesCortex XSIAM utilizes Role-Based Access Control (RBAC) to manage user permissions across all tenants and services. This framework ensures a secure separation of duties by granting users only the specific access required for their functional or regional responsibilities. Key features include:Cortex XSIAM utilizes Role-Based Access Control (RBAC) to manage user permissions across all tenants and services. This framework ensures a secure separation of duties by granting users only the specific access required for their functional or regional responsibilities. Key features include:• Predefined Roles: Cortex XSIAM provides default roles with set permissions. While these cannot be edited directly, they can be copied and customized to meet your organization's specific security requirements. To view the predefined permissions for each default role, go to Settings → Configurations → Access Management → Roles.• Predefined Roles: Cortex XSIAM provides default roles with set permissions. While these cannot be edited directly, they can be copied and customized to meet your organization's specific security requirements. To view the predefined permissions for each default role, go to Settings → Configurations → Access Management → Roles.For more information about user role-based access permissions, see [Role permissions by component](../../reference-and-developer-docs/role-based-access-control/role-permissions-by-component)For more information about user role-based access permissions, see [Role permissions by component](../../reference-and-developer-docs/role-based-access-control/role-permissions-by-component)• Centralized Management: Roles can be configured globally within the Cortex Gateway or at the individual tenant level.• Centralized Management: Roles can be configured globally within the Cortex Gateway or at the individual tenant level.• Visibility logic: Users may not see a specific feature if the feature is not supported by the license type or if they do not have access based on their assigned role or scope.• Visibility logic: Users may not see a specific feature if the feature is not supported by the license type or if they do not have access based on their assigned role or scope.hint infohint info### TipTo quickly see exactly which pages and actions a role allows, click on the role name, which opens a read-only view of all checked permissions.To quickly see exactly which pages and actions a role allows, click on the role name, which opens a read-only view of all checked permissions.endhintendhintSuper user and administrative rolesSuper user and administrative rolesRole│Description│Recommended useRole│Description│Recommended use| ---------------------- | ----------------------------------------------------------------------------------------------------------------------------------------------------------------------------------------------------------------------------------------------------------------------------------------------------------------------------------------------------------------------------------------------------------------------------------------------------------------------------------------------------------------------------------------------------------------------------------------------------------------------------------------------------------------------------------------------------------------------------------------------------------------------------------------------------------------------------------- | --------------------------------------------------------------------------------------------------------------------------------------------------------------------------------------------------------------------------------------------------------------------------------------------------------------------------------------------------------------------------------------- || ---------------------- | ------------------------------------------------------------------------------------------------------------------------------------------------------------------------------------------------------------------------------------------------------------------------------------------------------------------------------------------------------------------------------------------------------------------------------------------------------------------------------------------------------------------------------------------------------------------------------------------------------------------------------------------------------------------------------------------------------------------------------------------------------------------------------------------------------- | --------------------------------------------------------------------------------------------------------------------------------------------------------------------------------------------------------------------------------------------------------------------------------------------------------------------------------------------------------------------------------------- |Account Admin│A super user role that is assigned directly to the user in Cortex Gateway or a tenant and has full access to all Cortex products in your account, including all tenants added in the future. In Cortex Gateway, the Account Admin can assign roles to Cortex instances and activate product-specific Cortex tenants. This user has the same view/edit permissions in the tenant as the Instance Administrator.
│Assign to the primary platform administrator, typically the security operations director, or designated platform owner. This role should be limited to a very small number of trusted users.Note
The user who activated the Cortex product is assigned the Account Admin role. You cannot create additional Account Admin roles in the Cortex XSIAM tenant. If you do not want the user to have Account Admin permission, you must remove the Account Admin role in Cortex Gateway.
Account Admin│A super user role that is assigned directly to the user in Cortex Gateway or a tenant and has full access to all Cortex products in your account, including all tenants added in the future. In Cortex Gateway, the Account Admin can assign roles to Cortex instances and activate product-specific Cortex tenants. This user has the same view/edit permissions in the tenant as the Instance Administrator.
│Assign to the primary platform administrator, typically the security operations director, or designated platform owner. This role should be limited to a very small number of trusted users.The user who activated the Cortex product is assigned the Account Admin role. You cannot create additional Account Admin roles in the Cortex XSIAM tenant. If you do not want the user to have Account Admin permission, you must remove the Account Admin role in Cortex Gateway.
Instance Administrator│View and edit permissions for all components and access all pages in the Cortex XSIAM tenant. The Instance Administrator can also make other users an Instance Administrator for the tenant. If the tenant has predefined or custom roles, the Instance Administrator can assign those roles with scopes to other users.│Assign to instance-level administrators who need full control over a specific tenant, but should not automatically gain access to other instances in the account.Common scenarios include multi-tenant deployments, MSSP environments, and delegated admins (for example, a team lead gets full admin on their team's instance without access to other teams' instances).
Instance Administrator│View and edit permissions for all components and access all pages in the Cortex XSIAM tenant. The Instance Administrator can also make other users an Instance Administrator for the tenant. If the tenant has predefined or custom roles, the Instance Administrator can assign those roles with scopes to other users.│Assign to instance-level administrators who need full control over a specific tenant, but should not automatically gain access to other instances in the account.Common scenarios include multi-tenant deployments, MSSP environments, and delegated admins (for example, a team lead gets full admin on their team's instance without access to other teams' instances).
Deployment Admin│Manage and control endpoints, installations, and configure Broker VMs.The Deployment Admin is a focused infrastructure role for teams responsible for rolling out and maintaining Cortex XDR Agents. It provides full control over agent installations, endpoint groups, and broker configuration, but excludes security operations capabilities like issue triage, case response, and detection rule management.
│Assign to IT operations staff who need to deploy agents across the organization, manage agent groups and installations, configure broker VMs, and set up integrations.Deployment Admin│Manage and control endpoints, installations, and configure Broker VMs.The Deployment Admin is a focused infrastructure role for teams responsible for rolling out and maintaining Cortex XDR Agents. It provides full control over agent installations, endpoint groups, and broker configuration, but excludes security operations capabilities like issue triage, case response, and detection rule management.
│Assign to IT operations staff who need to deploy agents across the organization, manage agent groups and installations, configure broker VMs, and set up integrations.IT Admin│Manage and control endpoints and installations, configure Broker VMs, view endpoint profiles and policies, and view issues.The IT Admin extends the Deployment Admin with cases and issue visibility, host insights, and general configuration access.
│Assign to IT administrators who need security awareness but without security authority. They need to see issues and policies (troubleshooting, understanding endpoint behavior), but cannot configure or respond to cases.IT Admin│Manage and control endpoints and installations, configure Broker VMs, view endpoint profiles and policies, and view issues.The IT Admin extends the Deployment Admin with cases and issue visibility, host insights, and general configuration access.
│Assign to IT administrators who need security awareness but without security authority. They need to see issues and policies (troubleshooting, understanding endpoint behavior), but cannot configure or respond to cases.Privileged IT Admin│Manage and control endpoints and installations, configure Broker VMs, create profiles and policies, view issues, and initiate Live Terminal.This permission is significantly more extensive than the standard IT Admin. It includes response actions, script execution, detection rule editing, cloud security policies, compliance management, and Live Terminal access. This role is closer to a Security Admin than a typical IT Admin.
│Assign to senior IT administrators or IT security leads who need full endpoint management capabilities plus the ability to respond to cases, edit detection rules, manage policies/profiles, and access cloud security features.Privileged IT Admin│Manage and control endpoints and installations, configure Broker VMs, create profiles and policies, view issues, and initiate Live Terminal.This permission is significantly more extensive than the standard IT Admin. It includes response actions, script execution, detection rule editing, cloud security policies, compliance management, and Live Terminal access. This role is closer to a Security Admin than a typical IT Admin.
│Assign to senior IT administrators or IT security leads who need full endpoint management capabilities plus the ability to respond to cases, edit detection rules, manage policies/profiles, and access cloud security features.Scoped Agent Admin│Can only access product areas that support endpoint Scoped-Based Access Control (SBAC) - Agent Administration, Action Center, Response, Dashboards, and Reports.Scoped Agent Admin is designed for SBAC. All permissions are limited to the endpoint scope assigned to the user. The role focuses on response actions and agent management within that scope, with no access to investigation, detections, settings, or cloud security features.
│Assign to regional IT admins, site-specific endpoint managers, or MSSP analysts who should only manage and respond to endpoints within a specific scope (for example, a geographic region, business unit, or customer). SBAC ensures they cannot see or act on endpoints outside their assigned scope.Scoped Agent Admin│Can only access product areas that support endpoint Scoped-Based Access Control (SBAC) - Agent Administration, Action Center, Response, Dashboards, and Reports.Scoped Agent Admin is designed for SBAC. All permissions are limited to the endpoint scope assigned to the user. The role focuses on response actions and agent management within that scope, with no access to investigation, detections, settings, or cloud security features.
│Assign to regional IT admins, site-specific endpoint managers, or MSSP analysts who should only manage and respond to endpoints within a specific scope (for example, a geographic region, business unit, or customer). SBAC ensures they cannot see or act on endpoints outside their assigned scope.</details></details>Security and investigation rolesSecurity and investigation rolesRole│Description│Recommended useRole│Description│Recommended useShow markdown source
@@ -12,44 +12,42 @@ SBAC refines the RBAC permissions by granting access only to the relevant data t Cortex Gateway and the tenant have different options and requirements. | Location | Details | | ------------------- | ----------------------------------------------------------------------------------------------------------------------------------------------------------------------------------------------------------------------------------------------------------------------------------------------------------------------------------------------------------------------------------------------------------------------------------------------------------------------------------------------------------------------------------------------------------------------------------------------------------------------------------------------------------------------------------------------------------------------------------------------------------------------------------------------------------------------------------------------------------------------------------------------------------- | | Cortex Gateway | <p>A centralized portal for managing roles, user groups, and users for all tenants. Any roles and user groups created in Cortex Gateway are available for all tenants.</p><p>In <strong>Cortex Gateway</strong>, on the <strong>Permissions</strong> page, you can manage users that have been added to your Customer Support Portal account or view users that have been created in the tenant using SSO (you cannot edit SSO users in Cortex Gateway). All users must have at least one role or belong to at least one user group to be saved in the Cortex Gateway. You can exclude different tenants or different Cortex products. For more information, see <a href="https://app.gitbook.com/s/nG6FTSH3MviWTK9yhAIg/cortex-gateway-admin-guide">Cortex Gateway Administrator Guide</a>.</p><p>Only users with the Account Admin role can manage roles, tenants, and user groups in Cortex Gateway.</p> | | Cortex XSIAM tenant | <p>(Recommended) All permissions and roles are specific to the tenant and exist only at the tenant level. Advanced settings, such as SBAC and Dataset access management, can be defined at the tenant level.</p><p>Managing users, roles, scopes, user groups, and authentication settings in Cortex XSIAM requires <strong>View/Edit</strong> RBAC permissions for <strong>Access Management</strong> (under <strong>Configurations</strong>). Account Admin and Instance Administrator roles are granted this permission by default.</p><p>For more information, see <a href="../../post-deployment/manage-user-roles-and-access-management#UUID-751d26ed-9390-dddd-d4f6-bb1f20db3a1d">Manage user roles</a>.</p> | -**Predefined user roles** +### **Predefined user roles** Cortex XSIAM utilizes Role-Based Access Control (RBAC) to manage user permissions across all tenants and services. This framework ensures a secure separation of duties by granting users only the specific access required for their functional or regional responsibilities. Key features include: * Predefined Roles: Cortex XSIAM provides default roles with set permissions. While these cannot be edited directly, they can be copied and customized to meet your organization's specific security requirements. To view the predefined permissions for each default role, go to **Settings** → **Configurations** → **Access Management** → **Roles**. For more information about user role-based access permissions, see [Role permissions by component](../../reference-and-developer-docs/role-based-access-control/role-permissions-by-component) * Centralized Management: Roles can be configured globally within the Cortex Gateway or at the individual tenant level. * Visibility logic: Users may not see a specific feature if the feature is not supported by the license type or if they do not have access based on their assigned role or scope. {% hint style="info" %} -### Tip - To quickly see exactly which pages and actions a role allows, click on the role name, which opens a read-only view of all checked permissions. {% endhint %} <details> <summary>Super user and administrative roles</summary> -| Role | Description | Recommended use | -| ---------------------- | ----------------------------------------------------------------------------------------------------------------------------------------------------------------------------------------------------------------------------------------------------------------------------------------------------------------------------------------------------------------------------------------------------------------------------------------------------------------------------------------------------------------------------------------------------------------------------------------------------------------------------------------------------------------------------------------------------------------------------------------------------------------------------------------------------------------------------------- | --------------------------------------------------------------------------------------------------------------------------------------------------------------------------------------------------------------------------------------------------------------------------------------------------------------------------------------------------------------------------------------- | -| Account Admin | <p>A super user role that is assigned directly to the user in Cortex Gateway or a tenant and has full access to all Cortex products in your account, including all tenants added in the future. In Cortex Gateway, the Account Admin can assign roles to Cortex instances and activate product-specific Cortex tenants. This user has the same view/edit permissions in the tenant as the Instance Administrator.</p><div data-gb-custom-block data-tag="hint" data-style="info" class="hint hint-info"><p><strong>Note</strong></p><p>The user who activated the Cortex product is assigned the Account Admin role. You cannot create additional Account Admin roles in the Cortex XSIAM tenant. If you do not want the user to have Account Admin permission, you must remove the Account Admin role in Cortex Gateway.</p></div> | Assign to the primary platform administrator, typically the security operations director, or designated platform owner. This role should be limited to a very small number of trusted users. | -| Instance Administrator | View and edit permissions for all components and access all pages in the Cortex XSIAM tenant. The Instance Administrator can also make other users an Instance Administrator for the tenant. If the tenant has predefined or custom roles, the Instance Administrator can assign those roles with scopes to other users. | <p>Assign to instance-level administrators who need full control over a specific tenant, but should not automatically gain access to other instances in the account.</p><p>Common scenarios include multi-tenant deployments, MSSP environments, and delegated admins (for example, a team lead gets full admin on their team's instance without access to other teams' instances).</p> | -| Deployment Admin | <p>Manage and control endpoints, installations, and configure Broker VMs.</p><p>The Deployment Admin is a focused infrastructure role for teams responsible for rolling out and maintaining Cortex XDR Agents. It provides full control over agent installations, endpoint groups, and broker configuration, but excludes security operations capabilities like issue triage, case response, and detection rule management.</p> | Assign to IT operations staff who need to deploy agents across the organization, manage agent groups and installations, configure broker VMs, and set up integrations. | -| IT Admin | <p>Manage and control endpoints and installations, configure Broker VMs, view endpoint profiles and policies, and view issues.</p><p>The IT Admin extends the Deployment Admin with cases and issue visibility, host insights, and general configuration access.</p> | Assign to IT administrators who need security awareness but without security authority. They need to see issues and policies (troubleshooting, understanding endpoint behavior), but cannot configure or respond to cases. | -| Privileged IT Admin | <p>Manage and control endpoints and installations, configure Broker VMs, create profiles and policies, view issues, and initiate Live Terminal.</p><p>This permission is significantly more extensive than the standard IT Admin. It includes response actions, script execution, detection rule editing, cloud security policies, compliance management, and Live Terminal access. This role is closer to a Security Admin than a typical IT Admin.</p> | Assign to senior IT administrators or IT security leads who need full endpoint management capabilities plus the ability to respond to cases, edit detection rules, manage policies/profiles, and access cloud security features. | -| Scoped Agent Admin | <p>Can only access product areas that support endpoint Scoped-Based Access Control (SBAC) - Agent Administration, Action Center, Response, Dashboards, and Reports.</p><p>Scoped Agent Admin is designed for SBAC. All permissions are limited to the endpoint scope assigned to the user. The role focuses on response actions and agent management within that scope, with no access to investigation, detections, settings, or cloud security features.</p> | Assign to regional IT admins, site-specific endpoint managers, or MSSP analysts who should only manage and respond to endpoints within a specific scope (for example, a geographic region, business unit, or customer). SBAC ensures they cannot see or act on endpoints outside their assigned scope. | +| Role | Description | Recommended use | +| ---------------------- | ------------------------------------------------------------------------------------------------------------------------------------------------------------------------------------------------------------------------------------------------------------------------------------------------------------------------------------------------------------------------------------------------------------------------------------------------------------------------------------------------------------------------------------------------------------------------------------------------------------------------------------------------------------------------------------------------------------------------------------------------------------------------------------------------------- | --------------------------------------------------------------------------------------------------------------------------------------------------------------------------------------------------------------------------------------------------------------------------------------------------------------------------------------------------------------------------------------- | +| Account Admin | <p>A super user role that is assigned directly to the user in Cortex Gateway or a tenant and has full access to all Cortex products in your account, including all tenants added in the future. In Cortex Gateway, the Account Admin can assign roles to Cortex instances and activate product-specific Cortex tenants. This user has the same view/edit permissions in the tenant as the Instance Administrator.</p><div data-gb-custom-block data-tag="hint" data-style="info" class="hint hint-info"><p>The user who activated the Cortex product is assigned the Account Admin role. You cannot create additional Account Admin roles in the Cortex XSIAM tenant. If you do not want the user to have Account Admin permission, you must remove the Account Admin role in Cortex Gateway.</p></div> | Assign to the primary platform administrator, typically the security operations director, or designated platform owner. This role should be limited to a very small number of trusted users. | +| Instance Administrator | View and edit permissions for all components and access all pages in the Cortex XSIAM tenant. The Instance Administrator can also make other users an Instance Administrator for the tenant. If the tenant has predefined or custom roles, the Instance Administrator can assign those roles with scopes to other users. | <p>Assign to instance-level administrators who need full control over a specific tenant, but should not automatically gain access to other instances in the account.</p><p>Common scenarios include multi-tenant deployments, MSSP environments, and delegated admins (for example, a team lead gets full admin on their team's instance without access to other teams' instances).</p> | +| Deployment Admin | <p>Manage and control endpoints, installations, and configure Broker VMs.</p><p>The Deployment Admin is a focused infrastructure role for teams responsible for rolling out and maintaining Cortex XDR Agents. It provides full control over agent installations, endpoint groups, and broker configuration, but excludes security operations capabilities like issue triage, case response, and detection rule management.</p> | Assign to IT operations staff who need to deploy agents across the organization, manage agent groups and installations, configure broker VMs, and set up integrations. | +| IT Admin | <p>Manage and control endpoints and installations, configure Broker VMs, view endpoint profiles and policies, and view issues.</p><p>The IT Admin extends the Deployment Admin with cases and issue visibility, host insights, and general configuration access.</p> | Assign to IT administrators who need security awareness but without security authority. They need to see issues and policies (troubleshooting, understanding endpoint behavior), but cannot configure or respond to cases. | +| Privileged IT Admin | <p>Manage and control endpoints and installations, configure Broker VMs, create profiles and policies, view issues, and initiate Live Terminal.</p><p>This permission is significantly more extensive than the standard IT Admin. It includes response actions, script execution, detection rule editing, cloud security policies, compliance management, and Live Terminal access. This role is closer to a Security Admin than a typical IT Admin.</p> | Assign to senior IT administrators or IT security leads who need full endpoint management capabilities plus the ability to respond to cases, edit detection rules, manage policies/profiles, and access cloud security features. | +| Scoped Agent Admin | <p>Can only access product areas that support endpoint Scoped-Based Access Control (SBAC) - Agent Administration, Action Center, Response, Dashboards, and Reports.</p><p>Scoped Agent Admin is designed for SBAC. All permissions are limited to the endpoint scope assigned to the user. The role focuses on response actions and agent management within that scope, with no access to investigation, detections, settings, or cloud security features.</p> | Assign to regional IT admins, site-specific endpoint managers, or MSSP analysts who should only manage and respond to endpoints within a specific scope (for example, a geographic region, business unit, or customer). SBAC ensures they cannot see or act on endpoints outside their assigned scope. | </details> <details> <summary>Security and investigation roles</summary> | Role | Description | Recommended use | -
▸ ▾ Assign user roles and groups modified +157 −21 The SBAC scoping table, rebuilt as an HTML table only a day earlier, becomes expandable sections inside a stepper; the asset, case, endpoint and dataset-row rules are unchanged.
xsiam/onboard-cortex-xsiam/deployment-steps/set-up-users-and-roles/assign-user-roles-and-groupsRead it on the Cortex docs portal ↗ Read it here → This file's diff on GitHub ↗
Before After@@ -1,42 +1,178 @@---description: >-Assign Cortex XSIAM roles and groups, configure RBAC permissions, and applySBAC granular access.---# Assign user roles and groups# Assign user roles and groupsAssign roles directly to users or create user groups and assign roles to those groups. We recommend creating user groups (with a user role), and assigning users to those user groups rather than creating direct roles for each user.Assign roles directly to users or create user groups and assign roles to those groups. We recommend creating user groups (with a user role), and assigning users to those user groups rather than creating direct roles for each user.hint infohint info### NoteIf an existing user in the Cortex Gateway no longer has a role or a user group assigned, the user is revoked. Any roles, user groups, or egress configurations created by that user are shown as created by Revoked user instead of the user’s email address.If an existing user in the Cortex Gateway no longer has a role or a user group assigned, the user is revoked. Any roles, user groups, or egress configurations created by that user are shown as created by Revoked user instead of the user’s email address.endhintendhint## Assign a user/user group to a role## Assign a user/user group to a roleCortex XSIAM provides predefined built-in user roles that provide specific access rights that cannot be modified. You can also create custom, editable user roles. If a user does not have any Cortex XSIAM access permissions that are assigned specifically to them, the field displays No-Role.Cortex XSIAM provides predefined built-in user roles that provide specific access rights that cannot be modified. You can also create custom, editable user roles. If a user does not have any Cortex XSIAM access permissions that are assigned specifically to them, the field displays No-Role.1. Select Settings → Configurations → Access Management → Users.stepper2. Right-click the relevant user, and select Edit User Permissions.stepSelect Settings → Configurations → Access Management → Users.endstepstepRight-click the relevant user and select Edit User Permissions.hint infoTo apply the same settings to multiple users, select them, and then right-click and select Edit Users Permissions.endhintendstepstepEnsure the Role tab is selected.endstepstepUnder Role, select the default or custom role.endstepstep(Optional) Under User Groups, add the user to a group.endstepstep(Optional) Under Show Accumulated Permissions:1. Do one of the following:• Select all to view the combined permissions for every role and user group assigned to the user.• Select a specific role assigned to the user to view the available permissions for that role.2. Under Components, expand each list to view the permissions.hint warningSetting Cortex Query Language (XQL) dataset access permissions for a user role can only be performed from Cortex XSIAM Access Management. For more information, see Manage user roles.endhintendstepstep(Optional) You can configure and manage granular scoping:1. Click the Scope tab.2. Under Scope Definition, expand the scoping areas that you want to grant the user role access to in the tenant by clicking the chevron icon (>) beside the scoping area title, and make any changes required. The following sections explain the options available to configure:hint warningBefore configuring, ensure you review Understand scoping in the Manage user scope section.endhintAssetsSet the Scope by selecting one of the following:• No assets: No asset is accessible.• All assets: Defines access to all assets.• Select asset groups: Defines access to the specific assets associated with the Asset Groups selected, and to view all their related cases, issues, and findings for these specific assets and Asset Groups. Under Select asset groups, define the specific asset groups that you want to grant access. Only Asset Groups relevant for scoping are listed, which are asset groups that are using only the asset attributes listed in Manage user scope (under Understand scoping → Scoping Areas → Assets).The scoping of assets also affects the scoping of cases, issues, and findings.hint infoVisibility of Security domain Issues that refer to assets with agents is controlled by the Endpoints scoping configuration.endhint</details>Cases and Issues<div data-gb-custom-block data-tag="hint" data-style="info" class="hint hint-info"><p>To apply the same settings to multiple users, select them, and then right-click and select <strong>Edit Users Permissions</strong>.</p></div>Set the Scope by selecting one of the following:3. Ensure the Role tab is selected.4. Under Role, select the default or custom role.5. (Optional) Under User Groups, add the user to a group.6. (Optional) Under Show Accumulated Permissions:1. Do one of the following:• Select all to view the combined permissions for every role and user group assigned to the user.• Select a specific role assigned to the user to view the available permissions for that role.2. Under Components, expand each list to view the permissionsSetting Cortex Query Language (XQL) dataset access permissions for a user role can only be performed from Cortex XSIAM Access Management. For more information, see Manage user roles.7. (Optional) You can configure and manage granular scoping:1. Click the Scope tab.• No cases and issues: Defines access to no cases and issues.2. Under Scope Definition, expand the scoping areas that you want to grant the user role access to in the tenant by clicking the chevron icon (>) beside the scoping area title, and make any changes required. The following table explains the options available to configure:• All cases and issues: Defines access to all cases and issues. Users can view cases or issues referencing assets within their scope. Use the Assets section to define which assets are in scope.• Select domains: Defines access to the domains selected to view their related cases and issues. Under Select domains, define the specific domains that you want to grant access.<div data-gb-custom-block data-tag="hint" data-style="warning" class="hint hint-warning"><p>Before configuring, ensure that you review <strong>Understand scoping</strong> in the <a href="../../../post-deployment/manage-user-roles-and-access-management#UUID-071cdbb6-6c6a-6afe-3a67-1fa79991a0a8">Manage user scope</a> section.</p></div>Users can only view cases or issues referencing assets and endpoints within their scope. Use the Assets section to define which assets are in scope.<table><thead><tr><th>Scoping Area</th><th>Granular Scoping Configurations</th></tr></thead><tbody><tr><td>Assets</td><td><p>Set the <strong>Scope</strong> by selecting one of the following:</p><ul><li><strong>No assets</strong>: No asset is accessible.</li><li><strong>All assets</strong>: Defines access to all assets.</li><li><strong>Select asset groups</strong>: Defines access to the specific assets associated with the Asset Groups selected, and to view all their related cases, issues, and findings for these specific assets and Asset Groups. Under <strong>Select asset groups</strong>, define the specific asset groups that you want to grant access. Only Asset Groups relevant for scoping are listed, which are asset groups that are using only the asset attributes listed in <a href="../../../post-deployment/manage-user-roles-and-access-management/manage-user-scope#UUID-071cdbb6-6c6a-6afe-3a67-1fa79991a0a8_section-idm235041053079477">Manage user scope</a> (under <strong>Understand scoping</strong> → <strong>Scoping Areas</strong> → <strong>Assets</strong>).</li></ul><p>The scoping of assets also affects the scoping of cases, issues, and findings.</p><div data-gb-custom-block data-tag="hint" data-style="info" class="hint hint-info"><p><strong>Note</strong></p><p>Visibility of Security domain Issues that refer to assets with agents is controlled by the <strong>Endpoints</strong> scoping configuration.</p></div></td></tr><tr><td>Cases and Issues</td><td><p>Set the <strong>Scope</strong> by selecting one of the following:</p><ul><li><strong>No cases and issues</strong>: Defines access to no cases and issues.</li><li><strong>All cases and issues</strong>: Defines access to all cases and issues. Users can view cases or issues referencing assets within their scope. Use the <strong>Assets</strong> section to define which assets are in scope.</li><li><p><strong>Select domains</strong>: Defines access to the domains selected to view their related cases and issues. Under <strong>Select domains</strong>, define the specific domains that you want to grant access.</p><p>Users can only view cases or issues referencing assets and endpoints within their scope. Use the <strong>Assets</strong> section to define which assets are in scope.</p></li></ul><p>When selecting <strong>All cases and issues</strong> or <strong>Select domains</strong>, you can separately configure access to issues and cases that lack an asset reference or where the referenced asset is not in <strong>All Assets</strong> and <strong>All Endpoints</strong> inventories. To provide access, select the <strong>Allow access to cases and issues that are not referencing known assets or endpoints</strong> checkbox. Once selected, you can specifically control which users have access to issues and cases that lack <strong>Affected Assets</strong> (as seen in the issue’s panel) and <strong>Assets</strong> (as seen in the case's panel), or where the listed assets are not part of the Asset or Endpoint inventories. When the assets listed are not part of the inventories, the asset string is typically non-clickable. In some cases, such as for identity-related issues, assets may open a dedicated <strong>User Risk View</strong>, which differs from the standard inventories panels. In the <strong>Issues</strong> and <strong>Cases</strong> tables, such items can be identified by empty values in the following columns: Asset IDs, Target Agent Identifier, and Source Agent Identifier.</p></td></tr><tr><td>Endpoints</td><td><p>Set the <strong>Scope</strong> by selecting one of the following:</p><ul><li><strong>No endpoints</strong>: Defines access to no endpoints with no ability to view their related agent management and enterprise policies.</li><li><strong>All endpoints</strong>: Defines access to all endpoints with the ability to view their related agent management and enterprise policies. This configuration can impact the visibility of related <strong>Security</strong> domain <strong>Cases and Issues</strong>, but will not affect asset visibility.</li><li><strong>Select specific (at least one required)</strong>: Defines specific access to all endpoint groups by selecting <strong>Endpoint Groups</strong> or all endpoint tags by selecting <strong>Endpoint Tags</strong> to view their related agent management and enterprise policies. This configuration can impact the visibility of related <strong>Security</strong> domain <strong>Cases and Issues</strong>, but will not affect asset visibility.</li></ul></td></tr><tr><td>Datasets Rows</td><td><p>Configure a <code>filter</code> to define the specific subset of rows a user is allowed to access in each raw dataset. A raw dataset is every dataset where Palo Alto Networks data is ingested out-of-the-box or third-party data is ingested using a configured dedicated collector, also called a data source. This filter configuration does not impact the visibility of cases and issues.</p><p>Follow these steps to configure a <code>filter</code>.</p><ol><li><p>For datasets where no <code>filter</code> is defined, determine how to set the When no filter is defined option as either:</p><ul><li>No rows are accessible (default): Without a configured <code>filter</code>, no rows are accessible. Users can query the datasets in Cortex Query Language (XQL) as they have access, but the results will be empty.</li><li>All rows are accessible: Without a configured <code>filter</code>, all rows are accessible. Users can query the datasets in Cortex Query Language (XQL) as they have access, and view all results.</li></ul><p>When defining a filter for row-level scoping on raw datasets, queries based on the Cortex Data Model (XDM) are not supported. XDM queries return specific rows only when All rows are accessible is selected and no filter is defined in the Datasets Rows scoping area. Otherwise, no rows are returned.</p></li><li><p>Define any filters for the applicable datasets listed in the table:</p><ol><li>Scroll down the list of datasets to the dataset you want to apply a <code>filter</code> on, and click the Edit Scope icon.</li><li><p>In the Define what rows are accessible window, continue to write the query for the <code>filter</code> in the query box (where the syntax is a limited subset of XQL) to limit the data rows for the selected dataset according to the access permissions you want the user to have. The beginning of the query is already defined before the query box, and there is no need to include this in your query.</p><p>For optimal performance, we recommend using a single field in the <code>filter</code> definition and simple comparison operators.</p><p>Supported syntax</p><p><strong>Fields</strong></p><p>You can define the rest of the <code>filter</code> in the query box, where only the following system fields are supported: <code>_broker_device_id</code>, <code>_broker_device_ip</code>, <code>_broker_device_name</code>, <code>_collector_id</code>, <code>_collector_ip</code>, <code>_collector_name</code>, <code>_collector_type</code>, <code>_device_id</code>, <code>_final_reporting_device_ip</code>, <code>_final_reporting_device_name</code>, <code>_log_type</code>, <code>_product</code>, <code>_scope</code>, <code>_reporting_device_ip</code>, <code>_reporting_device_name</code>, and <code>_vendor</code>.</p><p>For more information on these fields, see the table that describes all the fields in the <code>metrics_source</code> dataset and <code>metrics_view</code> preset in <a href="../../../configure-cortex-xsiam/cortex-xsiam-data-sources/administration-and-troubleshooting/overview-of-data-ingestion-metrics">Overview of data ingestion metrics</a>. For more information on the <code>_scope</code> field (relevant when <code>_scope</code> is defined in the Parsing Rule), see [Scenario 3: Supported fields don't provide the necessary segmentation] in Scenarios related to Datasets Rows scoping.</p><p><strong>Comparison operators</strong></p><p>The following comparison operators are supported:</p><ul><li>Exact matches (<code>=</code>, <code>!=</code>)</li><li>Comparing numerical values (<code>></code>, <code><</code>, <code>>=</code>, <code><=</code>)</li><li>Checking membership in lists (<code>in</code>)</li><li>Querying arrays (<code>array_contains</code>)</li><li>Partial matches (<code>contains</code>, <code>starts_with</code>): Using this operator has additional performance overhead, and we recommend avoiding its use.</li></ul><p>If you only want a user to be able to access rows in the <code>pan_dds_raw</code> dataset, when the <code>_collector_name</code> is <code>bu2_collector</code> , you'd have to define the <code>filter</code> in the query box as:</p><pre><code>_collector_name = “bu2_collector”When selecting All cases and issues or Select domains, you can separately configure access to issues and cases that lack an asset reference or where the referenced asset is not in All Assets and All Endpoints inventories. To provide access, select the Allow access to cases and issues that are not referencing known assets or endpoints checkbox. Once selected, you can specifically control which users have access to issues and cases that lack Affected Assets (as seen in the issue’s panel) and Assets (as seen in the case's panel), or where the listed assets are not part of the Asset or Endpoint inventories. When the assets listed are not part of the inventories, the asset string is typically non-clickable. In some cases, such as for identity-related issues, assets may open a dedicated User Risk View, which differs from the standard inventories panels. In the Issues and Cases tables, such items can be identified by empty values in the following columns: Asset IDs, Target Agent Identifier, and Source Agent Identifier.</code></pre></li></ol></li></ol></td></tr><tr><td></td><td></td></tr><tr><td></td><td></td></tr><tr><td><p><br></p><ul><li>(Optional) Set the Time frame for the query. The default is Last 1 day.</li><li>(Optional) You can preview the query results displayed based on your defined query by clicking Preview. You can edit your query until you're satisfied with the output. By default, the query results are limited to 1000 records.</li><li><p>When you are finished, click Done.</p><p>The Scope field for the dataset that you added the filter on is updated with the query.</p><p>In the above example, the Scope field displays <code>_collector_name = “bu2_collector”</code>.</p></li></ul></td><td></td></tr></tbody></table></details>EndpointsSet the Scope by selecting one of the following:• No endpoints: Defines access to no endpoints, with no ability to view their related agent management and enterprise policies.• All endpoints: Defines access to all endpoints with the ability to view their related agent management and enterprise policies. This configuration can impact the visibility of related Security domain Cases and Issues, but will not affect asset visibility.• Select specific (at least one required): Defines specific access to all endpoint groups by selecting Endpoint Groups or all endpoint tags by selecting Endpoint Tags to view their related agent management and enterprise policies. This configuration can impact the visibility of related Security domain Cases and Issues, but will not affect asset visibility.</details>Datasets RowsConfigure afilterto define the specific subset of rows a user is allowed to access in each raw dataset. A raw dataset is every dataset where Palo Alto Networks data is ingested out-of-the-box or third-party data is ingested using a configured dedicated collector, also called a data source. This filter configuration does not impact the visibility of cases and issues.Follow these steps to configure afilter.1. For datasets where nofilteris defined, determine how to set the When no filter is defined option as either:• No rows are accessible (default): Without a configuredfilter, no rows are accessible. Users can query the datasets in Cortex Query Language (XQL) as they have access, but the results will be empty.• All rows are accessible: Without a configuredfilter, all rows are accessible. Users can query the datasets in Cortex Query Language (XQL) as they have access, and view all results.When defining a filter for row-level scoping on raw datasets, queries based on the Cortex Data Model (XDM) are not supported. XDM queries return specific rows only when All rows are accessible is selected and no filter is defined in the Datasets Rows scoping area. Otherwise, no rows are returned.2. Define any filters for the applicable datasets listed in the table:1. Scroll down the list of datasets to the dataset you want to apply afilteron, and click the Edit Scope icon.2. In the Define what rows are accessible window, continue to write the query for thefilterin the query box (where the syntax is a limited subset of XQL) to limit the data rows for the selected dataset according to the access permissions you want the user to have. The beginning of the query is already defined before the query box, and there is no need to include this in your query.For optimal performance, we recommend using a single field in the `filter` definition and simple comparison operators.Supported syntax**Fields**You can define the rest of the `filter` in the query box, where only the following system fields are supported: `_broker_device_id`, `_broker_device_ip`, `_broker_device_name`, `_collector_id`, `_collector_ip`, `_collector_name`, `_collector_type`, `_device_id`, `_final_reporting_device_ip`, `_final_reporting_device_name`, `_log_type`, `_product`, `_scope`, `_reporting_device_ip`, `_reporting_device_name`, and `_vendor`.For more information on these fields, see the table that describes all the fields in the `metrics_source` dataset and `metrics_view` preset in [Overview of data ingestion metrics](../../../configure-cortex-xsiam/cortex-xsiam-data-sources/administration-and-troubleshooting/overview-of-data-ingestion-metrics). For more information on the `_scope` field (relevant when `_scope` is defined in the Parsing Rule), see \[Scenario 3: Supported fields don't provide the necessary segmentation] in Scenarios related to Datasets Rows scoping.**Comparison operators**The following comparison operators are supported:• Exact matches (=,!=)• Comparing numerical values (>,<,>=,<=)• Checking membership in lists (in)• Querying arrays (array_contains)• Partial matches (contains,starts_with): Using this operator has additional performance overhead, and we recommend avoiding its use.If you only want a user to be able to access rows in the `pan_dds_raw` dataset, when the `_collector_name` is `bu2_collector` , you'd have to define the `filter` in the query box as:```_collector_name = “bu2_collector”```3. (Optional) Set the Time frame for the query. The default is Last 1 day.4. (Optional) You can preview the query results displayed based on your defined query by clicking Preview. You can edit your query until you're satisfied with the output. By default, the query results are limited to 1000 records.5. When you are finished, click Done.The Scope field for the dataset that you added the filter on is updated with the query.In the above example, the Scope field displays `_collector_name = “bu2_collector”`.</details>hint warningBy default, Enable Scope Based Access Control is disabled in Settings → Configurations → General → Server Settings, and granular scoping is not enforced. Before enabling SBAC, we recommend that an administrator or a user with Access Management permissions first ensures that the users, user groups, and API Keys defined in Cortex XSIAM are granted the required access by assigning the relevant scopes. For more information, see Manage user scope.endhintendstep<div data-gb-custom-block data-tag="hint" data-style="info" class="hint hint-info"><h3>Important</h3><p>By default, <strong>Enable Scope Based Access Control</strong> is disabled in Settings → Configurations → General → <strong>Server Settings</strong>, and granular scoping is not enforced. Before enabling SBAC, we recommend that an administrator or a user with <strong>Access Management</strong> permissions first ensures that the users, user groups, and API Keys defined in Cortex XSIAM are granted the required access by assigning the relevant scopes. For more information, see <a href="../../post-deployment/manage-user-roles-and-access-management/manage-user-scope">Manage user scope</a>.</p></div>step8. Click Save.Save the user group.endstependstepperPerform additional tasksPerform additional tasksFor more information about additional tasks such as creating a custom role, modifying a user's role, or removing a user's role, see Manage user access.For more information about additional tasks such as creating a custom role, modifying a user's role, or removing a user's role, see Manage user access.Show markdown source
@@ -1,42 +1,178 @@ +--- +description: >- + Assign Cortex XSIAM roles and groups, configure RBAC permissions, and apply + SBAC granular access. +--- + # Assign user roles and groups Assign roles directly to users or create user groups and assign roles to those groups. We recommend creating user groups (with a user role), and assigning users to those user groups rather than creating direct roles for each user. {% hint style="info" %} -### Note - If an existing user in the Cortex Gateway no longer has a role or a user group assigned, the user is revoked. Any roles, user groups, or egress configurations created by that user are shown as created by **Revoked user** instead of the user’s email address. {% endhint %} ## Assign a user/user group to a role Cortex XSIAM provides predefined built-in user roles that provide specific access rights that cannot be modified. You can also create custom, editable user roles. If a user does not have any Cortex XSIAM access permissions that are assigned specifically to them, the field displays **No-Role**. -1. Select **Settings** → **Configurations** → **Access Management** → **Users**. -2. Right-click the relevant user, and select **Edit User Permissions**. +{% stepper %} +{% step %} +Select **Settings** → **Configurations** → **Access Management** → **Users**. +{% endstep %} + +{% step %} +Right-click the relevant user and select **Edit User Permissions**. + +{% hint style="info" %} +To apply the same settings to multiple users, select them, and then right-click and select **Edit Users Permissions**. +{% endhint %} +{% endstep %} + +{% step %} +Ensure the **Role** tab is selected. +{% endstep %} + +{% step %} +Under **Role**, select the default or custom role. +{% endstep %} + +{% step %} +(Optional) Under **User Groups**, add the user to a group. +{% endstep %} + +{% step %} +(Optional) Under **Show Accumulated Permissions**: + +1. Do one of the following: + * Select all to view the combined permissions for every role and user group assigned to the user. + * Select a specific role assigned to the user to view the available permissions for that role. +2. Under **Components**, expand each list to view the permissions. + +{% hint style="warning" %} +Setting Cortex Query Language (XQL) dataset access permissions for a user role can only be performed from **Cortex XSIAM Access Management**. For more information, see [Manage user roles](../../../post-deployment/manage-user-roles-and-access-management#UUID-751d26ed-9390-dddd-d4f6-bb1f20db3a1d). +{% endhint %} +{% endstep %} + +{% step %} +(Optional) You can configure and manage granular scoping: + +1. Click the **Scope** tab. +2. Under **Scope Definition**, expand the scoping areas that you want to grant the user role access to in the tenant by clicking the chevron icon (**>**) beside the scoping area title, and make any changes required. The following sections explain the options available to configure: + +{% hint style="warning" %} +Before configuring, ensure you review **Understand scoping** in the [Manage user scope](../../../post-deployment/manage-user-roles-and-access-management#UUID-071cdbb6-6c6a-6afe-3a67-1fa79991a0a8) section. +{% endhint %} + +<details> + +<summary>Assets</summary> + +Set the **Scope** by selecting one of the following: + +* **No assets**: No asset is accessible. +* **All assets**: Defines access to all assets. +* **Select asset groups**: Defines access to the specific assets associated with the Asset Groups selected, and to view all their related cases, issues, and findings for these specific assets and Asset Groups. Under **Select asset groups**, define the specific asset groups that you want to grant access. Only Asset Groups relevant for scoping are listed, which are asset groups that are using only the asset attributes listed in [Manage user scope](../../../post-deployment/manage-user-roles-and-access-management/manage-user-scope#UUID-071cdbb6-6c6a-6afe-3a67-1fa79991a0a8_section-idm235041053079477) (under **Understand scoping** → **Scoping Areas** → **Assets**). + +The scoping of assets also affects the scoping of cases, issues, and findings. + +{% hint style="info" %} +Visibility of Security domain Issues that refer to assets with agents is controlled by the **Endpoints** scoping configuration. +{% endhint %} + +</details> + +<details> + +<summary>Cases and Issues</summary> - <div data-gb-custom-block data-tag="hint" data-style="info" class="hint hint-info"><p>To apply the same settings to multiple users, select them, and then right-click and select <strong>Edit Users Permissions</strong>.</p></div> -3. Ensure the **Role** tab is selected. -4. Under **Role**, select the default or custom role. -5. (Optional) Under **User Groups**, add the user to a group. -6. (Optional) Under **Show Accumulated Permissions**: - 1. Do one of the following: - * Select all to view the combined permissions for every role and user group assigned to the user. - * Select a specific role assigned to the user to view the available permissions for that role. - 2. Under **Components**, expand each list to view the permissionsSetting Cortex Query Language (XQL) dataset access permissions for a user role can only be performed from **Cortex XSIAM Access Management**. For more information, see [Manage user roles](../../../post-deployment/manage-user-roles-and-access-management#UUID-751d26ed-9390-dddd-d4f6-bb1f20db3a1d). -7. (Optional) You can configure and manage granular scoping: +Set the Scope by selecting one of the following: - 1. Click the **Scope** tab. - 2. Under **Scope Definition**, expand the scoping areas that you want to grant the user role access to in the tenant by clicking the chevron icon (**>**) beside the scoping area title, and make any changes required. The following table explains the options available to configure: +* No cases and issues: Defines access to no cases and issues. +* All cases and issues: Defines access to all cases and issues. Users can view cases or issues referencing assets within their scope. Use the Assets section to define which assets are in scope. +* Select domains: Defines access to the domains selected to view their related cases and issues. Under Select domains, define the specific domains that you want to grant access. - <div data-gb-custom-block data-tag="hint" data-style="warning" class="hint hint-warning"><p>Before configuring, ensure that you review <strong>Understand scoping</strong> in the <a href="../../../post-deployment/manage-user-roles-and-access-management#UUID-071cdbb6-6c6a-6afe-3a67-1fa79991a0a8">Manage user scope</a> section.</p></div> + Users can only view cases or issues referencing assets and endpoints within their scope. Use the Assets section to define which assets are in scope. - <table><thead><tr><th>Scoping Area</th><th>Granular Scoping Configurations</th></tr></thead><tbody><tr><td>Assets</td><td><p>Set the <strong>Scope</strong> by selecting one of the following:</p><ul><li><strong>No assets</strong>: No asset is accessible.</li><li><strong>All assets</strong>: Defines access to all assets.</li><li><strong>Select asset groups</strong>: Defines access to the specific assets associated with the Asset Groups selected, and to view all their related cases, issues, and findings for these specific assets and Asset Groups. Under <strong>Select asset groups</strong>, define the specific asset groups that you want to grant access. Only Asset Groups relevant for scoping are listed, which are asset groups that are using only the asset attributes listed in <a href="../../../post-deployment/manage-user-roles-and-access-management/manage-user-scope#UUID-071cdbb6-6c6a-6afe-3a67-1fa79991a0a8_section-idm235041053079477">Manage user scope</a> (under <strong>Understand scoping</strong> → <strong>Scoping Areas</strong> → <strong>Assets</strong>).</li></ul><p>The scoping of assets also affects the scoping of cases, issues, and findings.</p><div data-gb-custom-block data-tag="hint" data-style="info" class="hint hint-info"><p><strong>Note</strong></p><p>Visibility of Security domain Issues that refer to assets with agents is controlled by the <strong>Endpoints</strong> scoping configuration.</p></div></td></tr><tr><td>Cases and Issues</td><td><p>Set the <strong>Scope</strong> by selecting one of the following:</p><ul><li><strong>No cases and issues</strong>: Defines access to no cases and issues.</li><li><strong>All cases and issues</strong>: Defines access to all cases and issues. Users can view cases or issues referencing assets within their scope. Use the <strong>Assets</strong> section to define which assets are in scope.</li><li><p><strong>Select domains</strong>: Defines access to the domains selected to view their related cases and issues. Under <strong>Select domains</strong>, define the specific domains that you want to grant access.</p><p>Users can only view cases or issues referencing assets and endpoints within their scope. Use the <strong>Assets</strong> section to define which assets are in scope.</p></li></ul><p>When selecting <strong>All cases and issues</strong> or <strong>Select domains</strong>, you can separately configure access to issues and cases that lack an asset reference or where the referenced asset is not in <strong>All Assets</strong> and <strong>All Endpoints</strong> inventories. To provide access, select the <strong>Allow access to cases and issues that are not referencing known assets or endpoints</strong> checkbox. Once selected, you can specifically control which users have access to issues and cases that lack <strong>Affected Assets</strong> (as seen in the issue’s panel) and <strong>Assets</strong> (as seen in the case's panel), or where the listed assets are not part of the Asset or Endpoint inventories. When the assets listed are not part of the inventories, the asset string is typically non-clickable. In some cases, such as for identity-related issues, assets may open a dedicated <strong>User Risk View</strong>, which differs from the standard inventories panels. In the <strong>Issues</strong> and <strong>Cases</strong> tables, such items can be identified by empty values in the following columns: Asset IDs, Target Agent Identifier, and Source Agent Identifier.</p></td></tr><tr><td>Endpoints</td><td><p>Set the <strong>Scope</strong> by selecting one of the following:</p><ul><li><strong>No endpoints</strong>: Defines access to no endpoints with no ability to view their related agent management and enterprise policies.</li><li><strong>All endpoints</strong>: Defines access to all endpoints with the ability to view their related agent management and enterprise policies. This configuration can impact the visibility of related <strong>Security</strong> domain <strong>Cases and Issues</strong>, but will not affect asset visibility.</li><li><strong>Select specific (at least one required)</strong>: Defines specific access to all endpoint groups by selecting <strong>Endpoint Groups</strong> or all endpoint tags by selecting <strong>Endpoint Tags</strong> to view their related agent management and enterprise policies. This configuration can impact the visibility of related <strong>Security</strong> domain <strong>Cases and Issues</strong>, but will not affect asset visibility.</li></ul></td></tr><tr><td>Datasets Rows</td><td><p>Configure a <code>filter</code> to define the specific subset of rows a user is allowed to access in each raw dataset. A raw dataset is every dataset where Palo Alto Networks data is ingested out-of-the-box or third-party data is ingested using a configured dedicated collector, also called a data source. This filter configuration does not impact the visibility of cases and issues.</p><p>Follow these steps to configure a <code>filter</code>.</p><ol><li><p>For datasets where no <code>filter</code> is defined, determine how to set the When no filter is defined option as either:</p><ul><li>No rows are accessible (default): Without a configured <code>filter</code>, no rows are accessible. Users can query the datasets in Cortex Query Language (XQL) as they have access, but the results will be empty.</li><li>All rows are accessible: Without a configured <code>filter</code>, all rows are accessible. Users can query the datasets in Cortex Query Language (XQL) as they have access, and view all results.</li></ul><p>When defining a filter for row-level scoping on raw datasets, queries based on the Cortex Data Model (XDM) are not supported. XDM queries return specific rows only when All rows are accessible is selected and no filter is defined in the Datasets Rows scoping area. Otherwise, no rows are returned.</p></li><li><p>Define any filters for the applicable datasets listed in the table:</p><ol><li>Scroll down the list of datasets to the dataset you want to apply a <code>filter</code> on, and click the Edit Scope icon.</li><li><p>In the Define what rows are accessible window, continue to write the query for the <code>filter</code> in the query box (where the syntax is a limited subset of XQL) to limit the data rows for the selected dataset according to the access permissions you want the user to have. The beginning of the query is already defined before the query box, and there is no need to include this in your query.</p><p>For optimal performance, we recommend using a single field in the <code>filter</code> definition and simple comparison operators.</p><p>Supported syntax</p><p><strong>Fields</strong></p><p>You can define the rest of the <code>filter</code> in the query box, where only the following system fields are supported: <code>_broker_device_id</code>, <code>_broker_device_ip</code>, <code>_broker_device_name</code>, <code>_collector_id</code>, <code>_collector_ip</code>, <code>_collector_name</code>, <code>_collector_type</code>, <code>_device_id</code>, <code>_final_reporting_device_ip</code>, <code>_final_reporting_device_name</code>, <code>_log_type</code>, <code>_product</code>, <code>_scope</code>, <code>_reporting_device_ip</code>, <code>_reporting_device_name</code>, and <code>_vendor</code>.</p><p>For more information on these fields, see the table that describes all the fields in the <code>metrics_source</code> dataset and <code>metrics_view</code> preset in <a href="../../../configure-cortex-xsiam/cortex-xsiam-data-sources/administration-and-troubleshooting/overview-of-data-ingestion-metrics">Overview of data ingestion metrics</a>. For more information on the <code>_scope</code> field (relevant when <code>_scope</code> is defined in the Parsing Rule), see [Scenario 3: Supported fields don't provide the necessary segmentation] in Scenarios related to Datasets Rows scoping.</p><p><strong>Comparison operators</strong></p><p>The following comparison operators are supported:</p><ul><li>Exact matches (<code>=</code>, <code>!=</code>)</li><li>Comparing numerical values (<code>></code>, <code><</code>, <code>>=</code>, <code><=</code>)</li><li>Checking membership in lists (<code>in</code>)</li><li>Querying arrays (<code>array_contains</code>)</li><li>Partial matches (<code>contains</code>, <code>starts_with</code>): Using this operator has additional performance overhead, and we recommend avoiding its use.</li></ul><p>If you only want a user to be able to access rows in the <code>pan_dds_raw</code> dataset, when the <code>_collector_name</code> is <code>bu2_collector</code> , you'd have to define the <code>filter</code> in the query box as:</p><pre><code>_collector_name = “bu2_collector” - </code></pre></li></ol></li></ol></td></tr><tr><td></td><td></td></tr><tr><td></td><td></td></tr><tr><td><p><br></p><ul><li>(Optional) Set the Time frame for the query. The default is Last 1 day.</li><li>(Optional) You can preview the query results displayed based on your defined query by clicking Preview. You can edit your query until you're satisfied with the output. By default, the query results are limited to 1000 records.</li><li><p>When you are finished, click Done.</p><p>The Scope field for the dataset that you added the filter on is updated with the query.</p><p>In the above example, the Scope field displays <code>_collector_name = “bu2_collector”</code>.</p></li></ul></td><td></td></tr></tbody></table> +When selecting All cases and issues or Select domains, you can separately configure access to issues and cases that lack an asset reference or where the referenced asset is not in All Assets and All Endpoints inventories. To provide access, select the Allow access to cases and issues that are not referencing known assets or endpoints checkbox. Once selected, you can specifically control which users have access to issues and cases that lack Affected Assets (as seen in the issue’s panel) and Assets (as seen in the case's panel), or where the listed assets are not part of the Asset or Endpoint inventories. When the assets listed are not part of the inventories, the asset string is typically non-clickable. In some cases, such as for identity-related issues, assets may open a dedicated User Risk View, which differs from the standard inventories panels. In the Issues and Cases tables, such items can be identified by empty values in the following columns: Asset IDs, Target Agent Identifier, and Source Agent Identifier. + +</details> + +<details> + +<summary>Endpoints</summary> + +Set the Scope by selecting one of the following: + +* No endpoints: Defines access to no endpoints, with no ability to view their related agent management and enterprise policies. +* All endpoints: Defines access to all endpoints with the ability to view their related agent management and enterprise policies. This configuration can impact the visibility of related Security domain Cases and Issues, but will not affect asset visibility. +* Select specific (at least one required): Defines specific access to all endpoint groups by selecting Endpoint Groups or all endpoint tags by selecting Endpoint Tags to view their related agent management and enterprise policies. This configuration can impact the visibility of related Security domain Cases and Issues, but will not affect asset visibility. + +</details> + +<details> + +<summary>Datasets Rows</summary> + +Configure a `filter` to define the specific subset of rows a user is allowed to access in each raw dataset. A raw dataset is every dataset where Palo Alto Networks data is ingested out-of-the-box or third-party data is ingested using a configured dedicated collector, also called a data source. This filter configuration does not impact the visibility of cases and issues. + +Follow these steps to configure a `filter`. + +1. For datasets where no `filter` is defined, determine how to set the When no filter is defined option as either: + + * No rows are accessible (default): Without a configured `filter`, no rows are accessible. Users can query the datasets in Cortex Query Language (XQL) as they have access, but the results will be empty. + * All rows are accessible: Without a configured `filter`, all rows are accessible. Users can query the datasets in Cortex Query Language (XQL) as they have access, and view all results. + + When defining a filter for row-level scoping on raw datasets, queries based on the Cortex Data Model (XDM) are not supported. XDM queries return specific rows only when All rows are accessible is selected and no filter is defined in the Datasets Rows scoping area. Otherwise, no rows are returned. +2. Define any filters for the applicable datasets listed in the table: + 1. Scroll down the list of datasets to the dataset you want to apply a `filter` on, and click the Edit Scope icon. + 2. In the Define what rows are accessible window, continue to write the query for the `filter` in the query box (where the syntax is a limited subset of XQL) to limit the data rows for the selected dataset according to the access permissions you want the user to have. The beginning of the query is already defined before the query box, and there is no need to include this in your query. + + For optimal performance, we recommend using a single field in the `filter` definition and simple comparison operators. + + Supported syntax + + **Fields** + + You can define the rest of the `filter` in the query box, where only the following system fields are supported: `_broker_device_id`, `_broker_device_ip`, `_broker_device_name`, `_collector_id`, `_collector_ip`, `_collector_name`, `_collector_type`, `_device_id`, `_final_reporting_device_ip`, `_final_reporting_device_name`, `_log_type`, `_product`, `_scope`, `_reporting_device_ip`, `_reporting_device_name`, and `_vendor`. + + For more information on these fields, see the table that describes all the fields in the `metrics_source` dataset and `metrics_view` preset in [Overview of data ingestion metrics](../../../configure-cortex-xsiam/cortex-xsiam-data-sources/administration-and-troubleshooting/overview-of-data-ingestion-metrics). For more information on the `_scope` field (relevant when `_scope` is defined in the Parsing Rule), see \[Scenario 3: Supported fields don't provide the necessary segmentation] in Scenarios related to Datasets Rows scoping. + + **Comparison operators** + + The following comparison operators are supported: + + * Exact matches (`=`, `!=`) + * Comparing numerical values (`>`, `<`, `>=`, `<=`) + * Checking membership in lists (`in`) + * Querying arrays (`array_contains`) + * Partial matches (`contains`, `starts_with`): Using this operator has additional performance overhead, and we recommend avoiding its use. + + If you only want a user to be able to access rows in the `pan_dds_raw` dataset, when the `_collector_name` is `bu2_collector` , you'd have to define the `filter` in the query box as: + + ``` + _collector_name = “bu2_collector” + ``` + 3. (Optional) Set the Time frame for the query. The default is Last 1 day. + 4. (Optional) You can preview the query results displayed based on your defined query by clicking Preview. You can edit your query until you're satisfied with the output. By default, the query results are limited to 1000 records. + 5. When you are finished, click Done. + + The Scope field for the dataset that you added the filter on is updated with the query. + + In the above example, the Scope field displays `_collector_name = “bu2_collector”`. + +</details> + +{% hint style="warning" %} +By default, **Enable Scope Based Access Control** is disabled in Settings → Configurations → General → **Server Settings**, and granular scoping is not enforced. Before enabling SBAC, we recommend that an administrator or a user with **Access Management** permissions first ensures that the users, user groups, and API Keys defined in Cortex XSIAM are granted the required access by assigning the relevant scopes. For more information, see [Manage user scope](../../post-deployment/manage-user-roles-and-access-management/manage-user-scope). +{% endhint %} +{% endstep %} - <div data-gb-custom-block data-tag="hint" data-style="info" class="hint hint-info"><h3>Important</h3><p>By default, <strong>Enable Scope Based Access Control</strong> is disabled in Settings → Configurations → General → <strong>Server Settings</strong>, and granular scoping is not enforced. Before enabling SBAC, we recommend that an administrator or a user with <strong>Access Management</strong> permissions first ensures that the users, user groups, and API Keys defined in Cortex XSIAM are granted the required access by assigning the relevant scopes. For more information, see <a href="../../post-deployment/manage-user-roles-and-access-management/manage-user-scope">Manage user scope</a>.</p></div> -8. Click Save. +{% step %} +Save the user group. +{% endstep %} +{% endstepper %} **Perform additional tasks** For more information about additional tasks such as creating a custom role, modifying a user's role, or removing a user's role, see [Manage user access](../../../post-deployment/manage-user-roles-and-access-management#UUID-a112c99e-112f-ab8a-e5ed-e31445dee8fe). -
▸ ▾ Manage Cortex XSIAM user groups modified +20 −18
xsiam/onboard-cortex-xsiam/deployment-steps/set-up-users-and-roles/user-group-managementRead it on the Cortex docs portal ↗ Read it here → This file's diff on GitHub ↗
Before After@@ -1,46 +1,50 @@# User group management---description: >-Manage Cortex XSIAM user groups for RBAC, SBAC scoping, SAML mapping, andActive Directory synchronization.---Users are assigned roles and permissions either by being assigned a role directly or by being assigned membership in one or more user groups.# Manage Cortex XSIAM user groupsManage Cortex XSIAM user groups to assign roles, permissions, and access controls. Users receive access through direct role assignments or membership in one or more user groups.A user group can only be assigned to a single role, but users can be added to multiple groups if they require multiple roles. You can also nest groups to achieve the same effect.A user group can only be assigned to a single role, but users can be added to multiple groups if they require multiple roles. You can also nest groups to achieve the same effect.Users who have multiple roles through either method will receive the highest level of access based on the combination of their roles. The same principle for users with multiple roles is followed for both the Role-Based Access Control (RBAC) access permissions and the Scope-Based Access Control (SBAC) granular scoping, so that users receive the highest level of access by combining their roles.Users who have multiple roles through either method will receive the highest level of access based on the combination of their roles. The same principle for users with multiple roles is followed for both the Role-Based Access Control (RBAC) access permissions and the Scope-Based Access Control (SBAC) granular scoping, so that users receive the highest level of access by combining their roles.### ExampleExampleJoe has an Analyst role and is a member of the Tier-1 Analyst user group, which is assigned the Triage role. Joe has the permissions of the Analyst role and the Triage role. Joe is assigned 2 roles, and has the highest permission based on the combination of both roles.Joe has an Analyst role and is a member of the Tier-1 Analyst user group, which is assigned the Triage role. Joe has the permissions of the Analyst role and the Triage role. Joe is assigned 2 roles and has the highest permission based on the combination of both roles.• John is a member of two user groups - Tier-1 Analyst and Tier-2 Analyst. One group is configured to use the Triage role and the other group is configured to use the Incident Response role. John is assigned both roles and has the highest permissions based on the combination of all roles.• John is a member of two user groups - Tier-1 Analyst and Tier-2 Analyst. One group is configured to use the Triage role and the other group is configured to use the Incident Response role. John is assigned both roles and has the highest permissions based on the combination of all roles.• Jack is a member of the Tier-2 user group, which has an Incident response role. This user group is included in a Tier-3 user group (Threat Hunter role), added as a nested group. Jack is assigned both roles and has the highest permissions based on the combination of all roles.• Jack is a member of the Tier-2 user group, which has an Incident response role. This user group is included in a Tier-3 user group (Threat Hunter role), added as a nested group. Jack is assigned both roles and has the highest permissions based on the combination of all roles.On the User Groups page, you can create a new user group for several different system users or groups.On the User Groups page, you can create a new user group for several different system users or groups.You can see information including the details of all user groups, the roles, nested groups, IdP groups (SAML), and when the group was created/updated.You can see information including the details of all user groups, the roles, nested groups, IdP groups (SAML), and when the group was created/updated.You can also right-click in the table to edit, save as a new group, remove (delete) a group, and copy text to the clipboard.You can also right-click in the table to edit, save as a new group, remove (delete) a group, and copy text to the clipboard.hint infohint infoNoteNon-administrator users with Access Management permissions cannot create or modify user groups to include the Instance Administrator role. Additionally, the Edit and Delete options are hidden for any user group that holds the Instance Administrator role, whether assigned directly or indirectly (through parent group assignments).Non-administrator users with Access Management permissions cannot create or modify user groups to include the Instance Administrator role. Additionally, the Edit and Delete options are hidden for any user group that holds the Instance Administrator role, whether assigned directly or indirectly (through parent group assignments).endhintendhintYou can create user groups in the tenant or Cortex Gateway.You can create user groups in the tenant or Cortex Gateway.User groups created in Cortex Gateway do not support SAML group mapping and are shared across all your tenants. We recommend managing user groups directly in the Cortex tenant, because only tenant-based groups support scoping and SAML group mapping.User groups created in Cortex Gateway do not support SAML group mapping and are shared across all your tenants. We recommend managing user groups directly in the Cortex tenant, because only tenant-based groups support scoping and SAML group mapping.Managing groups directly in the tenant allows you to maintain different user groups for different environments, such as dev/prod. It also allows you to apply granular scoping to a user group by granting access only to the relevant data that the group members require.Managing groups directly in the tenant allows you to maintain different user groups for different environments, such as dev/prod. It also allows you to apply granular scoping to a user group by granting access only to the relevant data that the group members require.To use scope-based access control (SBAC), you must enable it in the Server Settings page. For more information, see Manage user scope. Before configuring SBAC, ensure that you review Understand scoping in the Manage user scope section.To use scope-based access control (SBAC), you must enable it in the Server Settings page. For more information, see Manage user scope. Before configuring SBAC, ensure that you review Understand scoping in the Manage user scope section.Core identity and group provisioning strategiesCortex XSIAM identity and group provisioning strategiesTo govern user-to-group lifecycle relationships within individual tenant workloads, administrators must utilize one of three core provisioning strategies to ingest or evaluate directory identities:To govern user-to-group lifecycle relationships within individual tenant workloads, administrators must utilize one of three core provisioning strategies to ingest or evaluate directory identities:Strategy A: Native local custom groups (default method)Strategy A: Native local custom groups (default method)This default method allows you to associate users with groups created and managed within Cortex XDR.This default method allows you to associate users with groups created and managed within Cortex XDR.• Methodology: System administrators manually build structural custom groups directly in the tenant console or the Cortex Gateway, explicitly assigning individual accounts into the member list.• Methodology: System administrators manually build structural custom groups directly in the tenant console or the Cortex Gateway, explicitly assigning individual accounts into the member list.@@ -76,17 +80,17 @@ This process utilizes the CIE directory to manage and arrange organizational groThe Cloud Identity Engine (CIE) is used exclusively for directory group management; it is not utilized for individual user account management, provisioning, or authentication workflows. Consequently, disabling, suspending, or removing user objects directly within CIE does not automatically disable, restrict, or delete those corresponding users inside Cortex XDR. If you use Single Sign-On (SSO) for Cortex XDR authentication, see the User De-provisioning and Restrictions section in Authenticate users using SSO for complete instructions on handling directory lifecycle cleanups and managing stale accounts.The Cloud Identity Engine (CIE) is used exclusively for directory group management; it is not utilized for individual user account management, provisioning, or authentication workflows. Consequently, disabling, suspending, or removing user objects directly within CIE does not automatically disable, restrict, or delete those corresponding users inside Cortex XDR. If you use Single Sign-On (SSO) for Cortex XDR authentication, see the User De-provisioning and Restrictions section in Authenticate users using SSO for complete instructions on handling directory lifecycle cleanups and managing stale accounts.endhintendhint</details></details>How to create a user groupCreate a Cortex XSIAM user group1. Go to Settings → Configurations → Access Management → User Groups.1. Go to Settings → Configurations → Access Management → User Groups.2. To create a new user group for several different system users or groups, click New Group, and add the following parameters:
2. To create a new user group for several different system users or groups, click New Group, and add the following parameters:
Parameter│DescriptionParameter│Description| ------------------ | ----------------------------------------------------------------------------------------------------------------------------------------------------------------------------------------------------------------------------------------------------------------------------------------------------------------------------------------------------------------------------------------------------------------------------------------------------------------------------------------------------------------------------------------------------------------------------------------------------------------------------------------------------------------------------------------------------------------------------------------------------------------------------------------------------------------------------------------------------------------------------------------------------------------------------------------------------------------------------------------------------------------------------------------------------------------------------------------------------------------------------------------------------------------------------------------------------------------------------------------------------------------------------------------------------------------- || ------------------ | ----------------------------------------------------------------------------------------------------------------------------------------------------------------------------------------------------------------------------------------------------------------------------------------------------------------------------------------------------------------------------------------------------------------------------------------------------------------------------------------------------------------------------------------------------------------------------------------------------------------------------------------------------------------------------------------------------------------------------------------------------------------------------------------------------------------------------------------------------------------------------------------------------------------------------------------------------------------------------------------------------------------------------------------------------------------------------------------------------------------------------------------------------------------------------------------------------------------------------------------------------------------------------------------------------------------- |Name│Name of the user group.Name│Name of the user group.Description│Description of the user group.Description│Description of the user group.@@ -115,35 +119,33 @@ By default, **Enable Scope-Based Access Control** is disabled in Settings → Coendhintendhint4. Click Create to create the user group.4. Click Create to create the user group.</details></details>How to create a user group by importing an active directory groupImport an Active Directory group into Cortex XSIAMhint infohint info### NoteTo automatically synchronize group membership with your organization's Active Directory, you can import an AD group. When someone joins or leaves a team in AD, their Cortex permissions update automatically.To automatically synchronize group membership with your organization's Active Directory, you can import an AD group. When someone joins or leaves a team in AD, their Cortex permissions update automatically.The Import AD Group feature is only enabled when the Cloud Identity Engine (CIE) is connected and configured.The Import AD Group feature is only enabled when the Cloud Identity Engine (CIE) is connected and configured.endhintendhint1. Select Settings → Configurations → Access Management → User Groups.1. Select Settings → Configurations → Access Management → User Groups.2. Click Import AD Group.2. Click Import AD Group.3. In the Role tab, define the following parameters:
3. In the Role tab, define the following parameters:
Parameter│DescriptionParameter│Description| ------------------ | ----------------------------------------------------------------------------------------------------------------------------------------------------------------------------------------------------------------------------------------------------------------------------------------------------------------------------------------------------------------------------------------------------------------------------------------------------------------------------------------------------------------------------------------------------------------------------------------------------------------------------------------------------------------------------------------------------------- || ------------------ | ---------------------------------------------------------------------------------------------------------------------------------------------------------------------------------------------------------------------------------------------------------------------------------------------------------------------------------------------------------------------------------------------------------------------------------------------------------------------------------------------------------------------------------------------------------------------------------------------------------------------------------------------------------------------------------------------------------- |Import AD Group│Type to search the CIE in real time, and choose a group or Organizational Unit (OU) to import from Active Directory.
Note
Only CSP and SSO users already existing in Cortex will be imported.
Import AD Group│Type to search the CIE in real time, and choose a group or Organizational Unit (OU) to import from Active Directory.
Only CSP and SSO users already existing in Cortex will be imported.
Description│Description of the imported user group.Description│Description of the imported user group.Role│Select the group role associated with this user group. You can only have a single role designated per group.Role│Select the group role associated with this user group. You can only have a single role designated per group.SAML Group Mapping│Maps the SAML group membership to this user group. For example, you have defined aCortex Adminsgroup. You need to name this group exactly how it appears in Okta.You can add multiple groups by pressing enter after each name to build a list.
Note
When using Microsoft Entra ID for SSO, the SAML group mapping needs to be provided using the group object ID (GUID) and not the group name.
If you have not set up SSO in your tenant, skip this field and add it later. After you have added it, follow the procedure relevant to your IdP.
SAML Group Mapping│Maps the SAML group membership to this user group. For example, you have defined aCortex Adminsgroup. You need to name this group exactly how it appears in Okta.You can add multiple groups by pressing enter after each name to build a list.
Note
When using Microsoft Entra ID for SSO, the SAML group mapping needs to be provided using the group object ID (GUID) and not the group name.
If you have not set up SSO in your tenant, skip this field and add it later. After you have added it, follow the procedure relevant to your IdP.
4. Click the Scope tab to configure granular scoping for the imported group. You can limit the data and content that users can access by configuring the Assets, Cases and Issues, Endpoints, and Datasets Rows options the same as detailed in the custom user group instructions.4. Click the Scope tab to configure granular scoping for the imported group. You can limit the data and content that users can access by configuring the Assets, Cases and Issues, Endpoints, and Datasets Rows options the same as detailed in the custom user group instructions.5. Click Import.5. Click Import.6. Cortex creates a new User Group of type AD Group and immediately fetches the current members in the background. An update appears in Notifications when the import is complete. Following the import, Cortex XSIAM automatically runs periodic background syncs with the CIE to ensure the group's membership stays up to date.6. Cortex creates a new User Group of type AD Group and immediately fetches the current members in the background. An update appears in Notifications when the import is complete. Following the import, Cortex XSIAM automatically runs periodic background syncs with the CIE to ensure the group's membership stays up to date.<div data-gb-custom-block data-tag="hint" data-style="info" class="hint hint-info"><h3>Note</h3><p>If an imported group is later deleted from your Active Directory, Cortex XSIAM automatically deletes the corresponding user group at the next sync cycle.</p></div><div data-gb-custom-block data-tag="hint" data-style="info" class="hint hint-info"><p>If an imported group is later deleted from your Active Directory, Cortex XSIAM automatically deletes the corresponding user group at the next sync cycle.</p></div></details></details>Show markdown source
@@ -1,46 +1,50 @@ -# User group management +--- +description: >- + Manage Cortex XSIAM user groups for RBAC, SBAC scoping, SAML mapping, and + Active Directory synchronization. +--- -Users are assigned roles and permissions either by being assigned a role directly or by being assigned membership in one or more user groups. +# Manage Cortex XSIAM user groups + +Manage Cortex XSIAM user groups to assign roles, permissions, and access controls. Users receive access through direct role assignments or membership in one or more user groups. A user group can only be assigned to a single role, but users can be added to multiple groups if they require multiple roles. You can also nest groups to achieve the same effect. Users who have multiple roles through either method will receive the highest level of access based on the combination of their roles. The same principle for users with multiple roles is followed for both the Role-Based Access Control (RBAC) access permissions and the Scope-Based Access Control (SBAC) granular scoping, so that users receive the highest level of access by combining their roles. -### Example +**Example** -Joe has an Analyst role and is a member of the Tier-1 Analyst user group, which is assigned the Triage role. Joe has the permissions of the Analyst role and the Triage role. Joe is assigned 2 roles, and has the highest permission based on the combination of both roles. +Joe has an Analyst role and is a member of the Tier-1 Analyst user group, which is assigned the Triage role. Joe has the permissions of the Analyst role and the Triage role. Joe is assigned 2 roles and has the highest permission based on the combination of both roles. * John is a member of two user groups - Tier-1 Analyst and Tier-2 Analyst. One group is configured to use the Triage role and the other group is configured to use the Incident Response role. John is assigned both roles and has the highest permissions based on the combination of all roles. * Jack is a member of the Tier-2 user group, which has an Incident response role. This user group is included in a Tier-3 user group (Threat Hunter role), added as a nested group. Jack is assigned both roles and has the highest permissions based on the combination of all roles. On the **User Groups** page, you can create a new user group for several different system users or groups. You can see information including the details of all user groups, the roles, nested groups, IdP groups (SAML), and when the group was created/updated. You can also right-click in the table to edit, save as a new group, remove (delete) a group, and copy text to the clipboard. {% hint style="info" %} -**Note** - Non-administrator users with **Access Management** permissions cannot create or modify user groups to include the **Instance Administrator** role. Additionally, the **Edit** and **Delete** options are hidden for any user group that holds the **Instance Administrator** role, whether assigned directly or indirectly (through parent group assignments). {% endhint %} You can create user groups in the tenant or Cortex Gateway. User groups created in Cortex Gateway do not support SAML group mapping and are shared across all your tenants. We recommend managing user groups directly in the Cortex tenant, because only tenant-based groups support scoping and SAML group mapping. Managing groups directly in the tenant allows you to maintain different user groups for different environments, such as dev/prod. It also allows you to apply granular scoping to a user group by granting access only to the relevant data that the group members require. To use scope-based access control (SBAC), you must enable it in the **Server Settings** page. For more information, see [Manage user scope](../../../post-deployment/manage-user-roles-and-access-management/manage-user-scope#understand-scoping). Before configuring SBAC, ensure that you review **Understand scoping** in the [Manage user scope](../../../post-deployment/manage-user-roles-and-access-management/manage-user-scope#understand-scoping) section. <details> -<summary>Core identity and group provisioning strategies</summary> +<summary>Cortex XSIAM identity and group provisioning strategies</summary> To govern user-to-group lifecycle relationships within individual tenant workloads, administrators must utilize one of three core provisioning strategies to ingest or evaluate directory identities: **Strategy A: Native local custom groups (default method)** This default method allows you to associate users with groups created and managed within Cortex XDR. * **Methodology**: System administrators manually build structural custom groups directly in the tenant console or the Cortex Gateway, explicitly assigning individual accounts into the member list. @@ -76,17 +80,17 @@ This process utilizes the CIE directory to manage and arrange organizational gro The Cloud Identity Engine (CIE) is used exclusively for directory group management; it is not utilized for individual user account management, provisioning, or authentication workflows. Consequently, disabling, suspending, or removing user objects directly within CIE does not automatically disable, restrict, or delete those corresponding users inside Cortex XDR. If you use Single Sign-On (SSO) for Cortex XDR authentication, see the User De-provisioning and Restrictions section in [Authenticate users using SSO](broken-reference) for complete instructions on handling directory lifecycle cleanups and managing stale accounts. {% endhint %} </details> <details> -<summary>How to create a user group</summary> +<summary>Create a Cortex XSIAM user group</summary> 1. Go to **Settings** → **Configurations** → **Access Management** → **User Groups**. 2. To create a new user group for several different system users or groups, click **New Group**, and add the following parameters:<br> | Parameter | Description | | ------------------ | ----------------------------------------------------------------------------------------------------------------------------------------------------------------------------------------------------------------------------------------------------------------------------------------------------------------------------------------------------------------------------------------------------------------------------------------------------------------------------------------------------------------------------------------------------------------------------------------------------------------------------------------------------------------------------------------------------------------------------------------------------------------------------------------------------------------------------------------------------------------------------------------------------------------------------------------------------------------------------------------------------------------------------------------------------------------------------------------------------------------------------------------------------------------------------------------------------------------------------------------------------------------------------------------------------------------- | | Name | Name of the user group. | | Description | Description of the user group. | @@ -115,35 +119,33 @@ By default, **Enable Scope-Based Access Control** is disabled in Settings → Co {% endhint %} 4. Click **Create** to create the user group. </details> <details> -<summary>How to create a user group by importing an active directory group</summary> +<summary>Import an Active Directory group into Cortex XSIAM</summary> {% hint style="info" %} -### Note - To automatically synchronize group membership with your organization's Active Directory, you can import an AD group. When someone joins or leaves a team in AD, their Cortex permissions update automatically. The Import AD Group feature is only enabled when the Cloud Identity Engine (CIE) is connected and configured. {% endhint %} 1. Select Settings → Configurations → Access Management → **User Groups**. 2. Click **Import AD Group**. 3. In the **Role** tab, define the following parameters:<br> - | Parameter | Description | - | ------------------ | ----------------------------------------------------------------------------------------------------------------------------------------------------------------------------------------------------------------------------------------------------------------------------------------------------------------------------------------------------------------------------------------------------------------------------------------------------------------------------------------------------------------------------------------------------------------------------------------------------------------------------------------------------------------------------------------------------------- | - | Import AD Group | <p>Type to search the CIE in real time, and choose a group or Organizational Unit (OU) to import from Active Directory.</p><div data-gb-custom-block data-tag="hint" data-style="info" class="hint hint-info"><p><strong>Note</strong></p><p>Only CSP and SSO users already existing in Cortex will be imported.</p></div> | - | Description | Description of the imported user group. | - | Role | Select the group role associated with this user group. You can only have a single role designated per group. | - | SAML Group Mapping | <p>Maps the SAML group membership to this user group. For example, you have defined a <code>Cortex Admins</code> group. You need to name this group exactly how it appears in Okta.</p><p>You can add multiple groups by pressing enter after each name to build a list.</p><div data-gb-custom-block data-tag="hint" data-style="info" class="hint hint-info"><p><strong>Note</strong></p><p>When using Microsoft Entra ID for SSO, the SAML group mapping needs to be provided using the group object ID (GUID) and not the group name.</p></div><p>If you have not set up SSO in your tenant, skip this field and add it later. After you have added it, follow the procedure relevant to your IdP. </p> | + | Parameter | Description | + | ------------------ | ---------------------------------------------------------------------------------------------------------------------------------------------------------------------------------------------------------------------------------------------------------------------------------------------------------------------------------------------------------------------------------------------------------------------------------------------------------------------------------------------------------------------------------------------------------------------------------------------------------------------------------------------------------------------------------------------------------- | + | Import AD Group | <p>Type to search the CIE in real time, and choose a group or Organizational Unit (OU) to import from Active Directory.</p><div data-gb-custom-block data-tag="hint" data-style="info" class="hint hint-info"><p>Only CSP and SSO users already existing in Cortex will be imported.</p></div> | + | Description | Description of the imported user group. | + | Role | Select the group role associated with this user group. You can only have a single role designated per group. | + | SAML Group Mapping | <p>Maps the SAML group membership to this user group. For example, you have defined a <code>Cortex Admins</code> group. You need to name this group exactly how it appears in Okta.</p><p>You can add multiple groups by pressing enter after each name to build a list.</p><div data-gb-custom-block data-tag="hint" data-style="info" class="hint hint-info"><p><strong>Note</strong></p><p>When using Microsoft Entra ID for SSO, the SAML group mapping needs to be provided using the group object ID (GUID) and not the group name.</p></div><p>If you have not set up SSO in your tenant, skip this field and add it later. After you have added it, follow the procedure relevant to your IdP.</p> | 4. Click the **Scope** tab to configure granular scoping for the imported group. You can limit the data and content that users can access by configuring the **Assets**, **Cases and Issues**, **Endpoints**, and **Datasets Rows** options the same as detailed in the custom user group instructions. 5. Click **Import**. 6. Cortex creates a new User Group of type **AD Group** and immediately fetches the current members in the background. An update appears in **Notifications** when the import is complete. Following the import, Cortex XSIAM automatically runs periodic background syncs with the CIE to ensure the group's membership stays up to date. - <div data-gb-custom-block data-tag="hint" data-style="info" class="hint hint-info"><h3>Note</h3><p>If an imported group is later deleted from your Active Directory, Cortex XSIAM automatically deletes the corresponding user group at the next sync cycle.</p></div> + <div data-gb-custom-block data-tag="hint" data-style="info" class="hint hint-info"><p>If an imported group is later deleted from your Active Directory, Cortex XSIAM automatically deletes the corresponding user group at the next sync cycle.</p></div> </details> -
▸ ▾ Plan and prepare modified +12 −10
xsiam/onboard-cortex-xsiam/plan-and-prepareRead it on the Cortex docs portal ↗ Read it here → This file's diff on GitHub ↗
Before After@@ -1,26 +1,28 @@------description: Learn more about deployment considerations and onboarding steps.description: >-Plan your Cortex XSIAM deployment, including storage, region, licensing, XDRagents, data sources, and user roles.------# Plan and prepare# Plan and prepareThis stage includes how to plan and prepare the Cortex XSIAM environment.This stage includes how to plan and prepare the Cortex XSIAM environment.hint infohint info### Note### NoteThis topic does not include any specific Cloud Security requirements. If you have a Cortex XSIAM Premium license or another XSIAM license with Cloud Posture Security/Runtime addons, you should also plan and prepare Cloud Posture Security and Runtime during or after completing this stage. For more information about Cloud Security onboarding, see Cloud service provider onboarding.This topic does not include any specific Cloud Security requirements. If you have a Cortex XSIAM Premium license or another XSIAM license with Cloud Posture Security/Runtime addons, you should also plan and prepare Cloud Posture Security and Runtime during or after completing this stage. For more information about Cloud Security onboarding, see Cloud service provider onboarding.endhintendhintBefore you get started with Cortex XSIAM, consider the following:Before you get started with Cortex XSIAM, consider the following:🖼 plan-prepare.png🖼 imageAction│Details│See MoreAction│Details│See More| ---------------------------------- | ----------------------------------------------------------------------------------------------------------------------------------------------------------------------------------------------------------------------------------------------------------------------------------------------------------------------------------------------------------------------------------------------------------------------------------------------------------------------------------------------------------------------------------------------------------------------------------------------------------------------------------------------------------------------------------------------------------------------------------------------------------------------------------------------------------------------------------------------------------------------------------------------------------------------------------------------------------------------------------------------------------------------------------------------------------------------------------------------------------------------------------------------------------------------------------------------------------------------------------------------- | --------------------------------------------------------------------------------------------------------------------------------------------------------------------------------------------------------------------------------------------------------------------------------------------------------------------------------------------------------------------------------------------------------- || ---------------------------------- | ------------------------------------------------------------------------------------------------------------------------------------------------------------------------------------------------------------------------------------------------------------------------------------------------------------------------------------------------------------------------------------------------------------------------------------------------------------------------------------------------------------------------------------------------------------------------------------------------------------------------------------------------------------------------------------------------------------------------------------------------------------------------------------------------------------------------------------------------------------------------------------------------------------------------------------------------------------------------------------------------------------------------------------------------------------------------------------------------------------------------------------------------------------------------------------------------------------------- | --------------------------------------------------------------------------------------------------------------------------------------------------------------------------------------------------------------------------------------------------------------------------------------------------------------------------------------------------------------------------------------------------------- |Determine the required Log storage│✓ Determine the amount of log storage you need for your Cortex XSIAM deployment. Discuss with your partner or sales representative to determine whether to purchase additional storage within the Cortex XSIAM tenant.│Data storage lifecycleDetermine the required Log storage│✅ Determine the amount of log storage you need for your Cortex XSIAM deployment. Discuss with your partner or sales representative to determine whether to purchase additional storage within the Cortex XSIAM tenant.│Data storage lifecycleDetermine the deployment region│✓ Determine the region you want to host Cortex XSIAM and any associated services, such as the Directory Sync Service. If you plan to stream data from a Strata Logging Service instance, it must be in the same region as Cortex XSIAM.│Cortex XSIAM supported regionsDetermine the deployment region│✅ Determine the region you want to host Cortex XSIAM and any associated services, such as the Directory Sync Service. If you plan to stream data from a Strata Logging Service instance, it must be in the same region as Cortex XSIAM.│Cortex XSIAM supported regionsReview your license and add-ons│✓ Review your Cortex XSIAM license and consider the addons for your use case, such as Advanced Email Security and Exposure management for complete security protection.│Cortex XSIAM product licensesReview your license and add-ons│✅ Review your Cortex XSIAM license and consider the addons for your use case, such as Advanced Email Security and Exposure management for complete security protection.│Cortex XSIAM product licensesPlan the XDR Agent deployment│✓ The XDR Agent is installed on endpoints for protection and extended detection and response (XDR). The data is collected into the Cortex XSIAM tenant.Note
The XDR agent is included with the Cortex XSIAM Premium and Enterprise licenses and any other XSIAM license with the Enterprise Runtime Security (XDR) add-on.
For Cortex XSIAM Premium or XSIAM licences with the Cloud Runtime Security add-on, the agent is also used to stop attacks running on workloads, including VMs, containers, Kubernetes, and serverless functions.
Consider the following:
✓ Determine the necessary bandwidth required to support the number of agents you plan to deploy.
✓ Verify endpoint operating systems and identify third-party security products to ensure they are compatible with Cortex XSIAM.
✓ Create a proof of concept (POC) that simulates your corporate production environment. After the successful completion of the initial POC, we recommend a phased rollout, which enables you to test the agent and its policies on a small scale before deploying them widely.
│Plan the XDR Agent deployment│✅ The XDR Agent is installed on endpoints for protection and extended detection and response (XDR). The data is collected into the Cortex XSIAM tenant.The XDR agent is included with the Cortex XSIAM Premium and Enterprise licenses and any other XSIAM license with the Enterprise Runtime Security (XDR) add-on.
For Cortex XSIAM Premium or XSIAM licences with the Cloud Runtime Security add-on, the agent is also used to stop attacks running on workloads, including VMs, containers, Kubernetes, and serverless functions.
Consider the following:
✅ Determine the necessary bandwidth required to support the number of agents you plan to deploy.
✅ Verify endpoint operating systems and identify third-party security products to ensure they are compatible with Cortex XSIAM.
✅ Create a proof of concept (POC) that simulates your corporate production environment. After the successful completion of the initial POC, we recommend a phased rollout, which enables you to test the agent and its policies on a small scale before deploying them widely.
│Consider the data sources to use│✓ Consider the data sources you want to initially ingest, such as Palo Alto Networks firewall/cloud logs, as they provide the most immediate security context and data for Cortex XSIAM's analytics.In Cortex XSIAM, content is organized into content packs, which are either downloaded from the Data Sources catalog or from Marketplace. Start planning what content you require.
✓ Review the steps you need to take in your day-to-day SOC operations, and the required third-party tools/applications.
│What are Cortex XSIAM data sources?Consider the data sources to use│✅ Consider the data sources you want to initially ingest, such as Palo Alto Networks firewall/cloud logs, as they provide the most immediate security context and data for Cortex XSIAM's analytics.In Cortex XSIAM, content is organized into content packs, which are either downloaded from the Data Sources catalog or from Marketplace. Start planning what content you require.
✅ Review the steps you need to take in your day-to-day SOC operations, and the required third-party tools/applications.
│What are Cortex XSIAM data sources?Consider roles and permissions│✓ Review and plan roles using Role-Based Access Control (RBAC) for your security operations team. Consider user groups and start with the default roles.│Set up users and rolesConsider roles and permissions│✅ Review and plan roles using Role-Based Access Control (RBAC) for your security operations team. Consider user groups and start with the default roles.│Set up users and rolesShow markdown source
@@ -1,26 +1,28 @@ --- -description: Learn more about deployment considerations and onboarding steps. +description: >- + Plan your Cortex XSIAM deployment, including storage, region, licensing, XDR + agents, data sources, and user roles. --- # Plan and prepare This stage includes how to plan and prepare the Cortex XSIAM environment. {% hint style="info" %} ### Note This topic does not include any specific Cloud Security requirements. If you have a Cortex XSIAM Premium license or another XSIAM license with Cloud Posture Security/Runtime addons, you should also plan and prepare Cloud Posture Security and Runtime during or after completing this stage. For more information about Cloud Security onboarding, see [Cloud service provider onboarding](../configure-cortex-xsiam/cortex-xsiam-data-sources/cloud-service-provider-csp-onboarding). {% endhint %} Before you get started with Cortex XSIAM, consider the following: -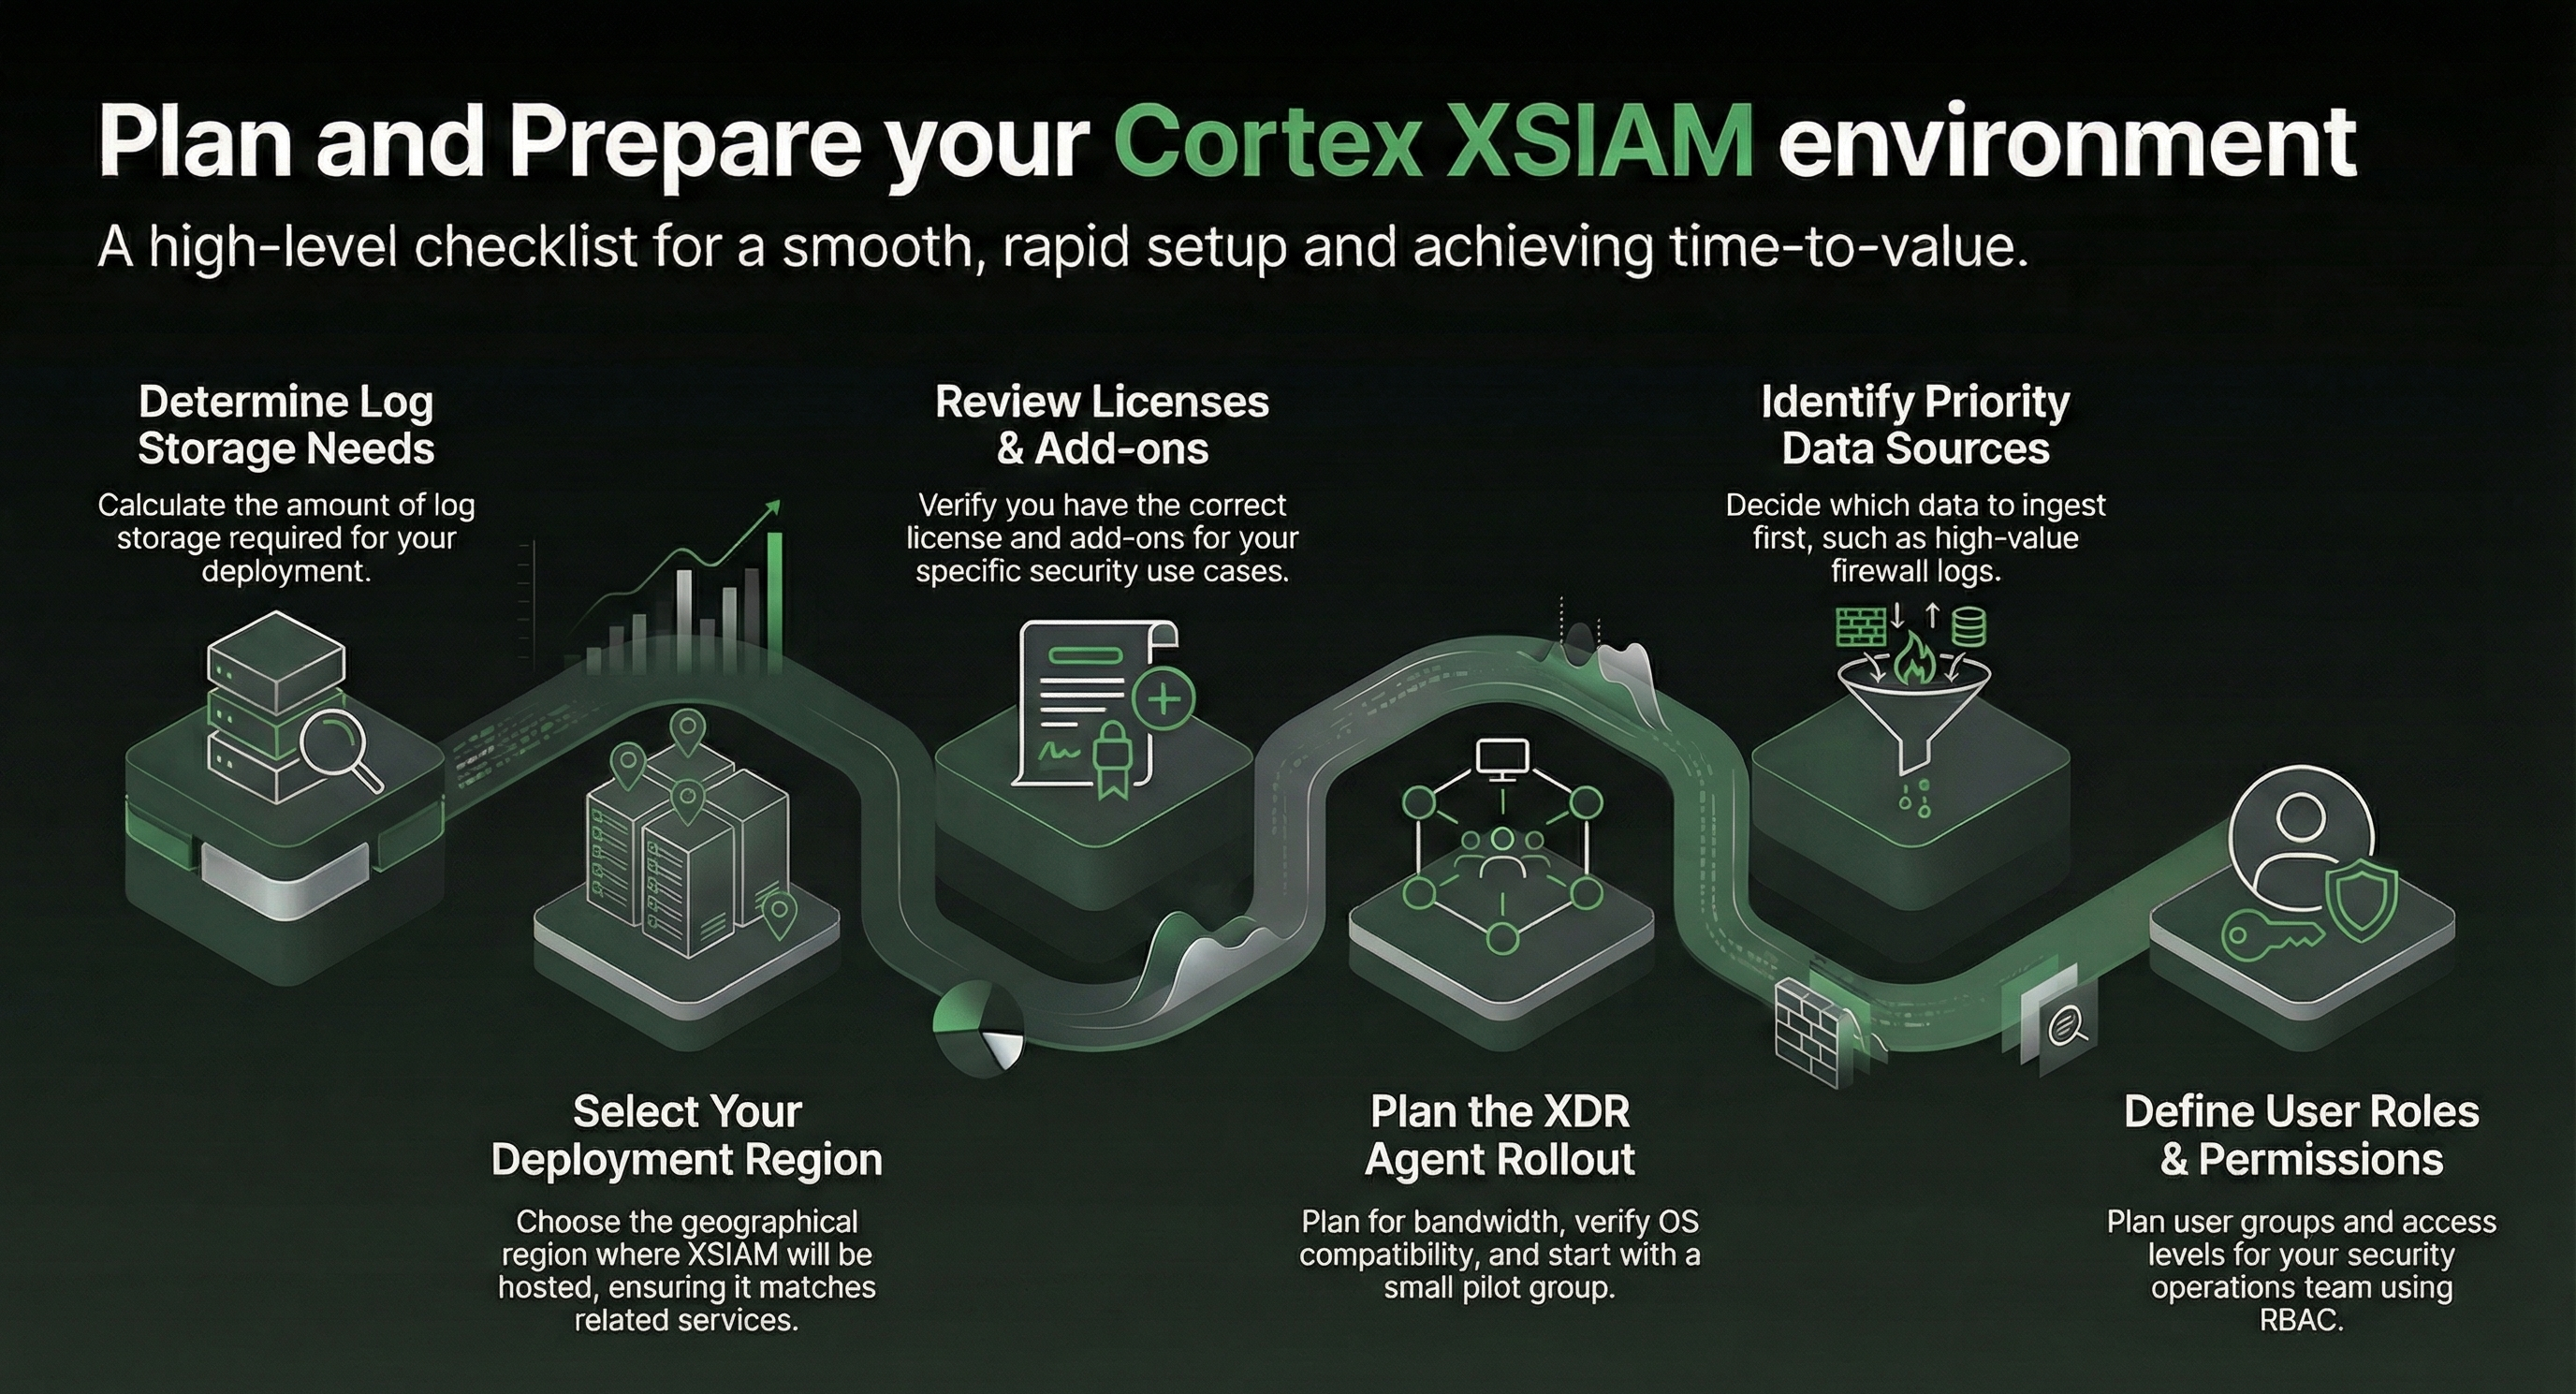 + -| Action | Details | See More | -| ---------------------------------- | ----------------------------------------------------------------------------------------------------------------------------------------------------------------------------------------------------------------------------------------------------------------------------------------------------------------------------------------------------------------------------------------------------------------------------------------------------------------------------------------------------------------------------------------------------------------------------------------------------------------------------------------------------------------------------------------------------------------------------------------------------------------------------------------------------------------------------------------------------------------------------------------------------------------------------------------------------------------------------------------------------------------------------------------------------------------------------------------------------------------------------------------------------------------------------------------------------------------------------------------------- | --------------------------------------------------------------------------------------------------------------------------------------------------------------------------------------------------------------------------------------------------------------------------------------------------------------------------------------------------------------------------------------------------------- | -| Determine the required Log storage | ✓ Determine the amount of log storage you need for your Cortex XSIAM deployment. Discuss with your partner or sales representative to determine whether to purchase additional storage within the Cortex XSIAM tenant. | [Data storage lifecycle](../learn-about-cortex-xsiam/cortex-xsiam-product-licenses/data-storage-lifecycle) | -| Determine the deployment region | ✓ Determine the region you want to host Cortex XSIAM and any associated services, such as the Directory Sync Service. If you plan to stream data from a Strata Logging Service instance, it must be in the same region as Cortex XSIAM. | [Cortex XSIAM supported regions](../deployment-steps/activate-cortex-xsiam#UUID-61479dc6-978f-bf5d-da88-4f934ff79ef1) | -| Review your license and add-ons | ✓ Review your Cortex XSIAM license and consider the addons for your use case, such as Advanced Email Security and Exposure management for complete security protection. | [Cortex XSIAM product licenses](../learn-about-cortex-xsiam/cortex-xsiam-product-licenses) | -| Plan the XDR Agent deployment | <p>✓ The XDR Agent is installed on endpoints for protection and extended detection and response (XDR). The data is collected into the Cortex XSIAM tenant.</p><div data-gb-custom-block data-tag="hint" data-style="info" class="hint hint-info"><p><strong>Note</strong></p><p>The XDR agent is included with the Cortex XSIAM Premium and Enterprise licenses and any other XSIAM license with the Enterprise Runtime Security (XDR) add-on.</p></div><p>For Cortex XSIAM Premium or XSIAM licences with the Cloud Runtime Security add-on, the agent is also used to stop attacks running on workloads, including VMs, containers, Kubernetes, and serverless functions.</p><p>Consider the following:</p><p>✓ Determine the necessary bandwidth required to support the number of agents you plan to deploy.</p><p>✓ Verify endpoint operating systems and identify third-party security products to ensure they are compatible with Cortex XSIAM.</p><p>✓ Create a proof of concept (POC) that simulates your corporate production environment. After the successful completion of the initial POC, we recommend a phased rollout, which enables you to test the agent and its policies on a small scale before deploying them widely.</p> | <ul><li><a href="../protect-your-endpoints/endpoint-security/endpoint-protection">Endpoint protection</a></li><li><a href="https://app.gitbook.com/s/fZ8QSMnkjnXpuOeuRcam/where-can-i-install-the-cortex-xdr-agent/endpoint-operating-systems-supported">Supported XDR Agent operating systems</a></li><li><a href="plan-and-prepare/plan-your-agent-deployment">Plan your agent deployment</a></li></ul> | -| Consider the data sources to use | <p>✓ Consider the data sources you want to initially ingest, such as Palo Alto Networks firewall/cloud logs, as they provide the most immediate security context and data for Cortex XSIAM's analytics.</p><p>In Cortex XSIAM, content is organized into content packs, which are either downloaded from the Data Sources catalog or from Marketplace. Start planning what content you require.</p><p>✓ Review the steps you need to take in your day-to-day SOC operations, and the required third-party tools/applications.</p> | [What are Cortex XSIAM data sources?](../configure-cortex-xsiam/cortex-xsiam-data-sources/what-are-cortex-xsiam-data-sources) | -| Consider roles and permissions | ✓ Review and plan roles using Role-Based Access Control (RBAC) for your security operations team. Consider user groups and start with the default roles. | [Set up users and roles](deployment-steps/set-up-users-and-roles) | +| Action | Details | See More | +| ---------------------------------- | ------------------------------------------------------------------------------------------------------------------------------------------------------------------------------------------------------------------------------------------------------------------------------------------------------------------------------------------------------------------------------------------------------------------------------------------------------------------------------------------------------------------------------------------------------------------------------------------------------------------------------------------------------------------------------------------------------------------------------------------------------------------------------------------------------------------------------------------------------------------------------------------------------------------------------------------------------------------------------------------------------------------------------------------------------------------------------------------------------------------------------------------------------------------------------------------------------------------- | --------------------------------------------------------------------------------------------------------------------------------------------------------------------------------------------------------------------------------------------------------------------------------------------------------------------------------------------------------------------------------------------------------- | +| Determine the required Log storage | ✅ Determine the amount of log storage you need for your Cortex XSIAM deployment. Discuss with your partner or sales representative to determine whether to purchase additional storage within the Cortex XSIAM tenant. | [Data storage lifecycle](../learn-about-cortex-xsiam/cortex-xsiam-product-licenses/data-storage-lifecycle) | +| Determine the deployment region | ✅ Determine the region you want to host Cortex XSIAM and any associated services, such as the Directory Sync Service. If you plan to stream data from a Strata Logging Service instance, it must be in the same region as Cortex XSIAM. | [Cortex XSIAM supported regions](../deployment-steps/activate-cortex-xsiam#UUID-61479dc6-978f-bf5d-da88-4f934ff79ef1) | +| Review your license and add-ons | ✅ Review your Cortex XSIAM license and consider the addons for your use case, such as Advanced Email Security and Exposure management for complete security protection. | [Cortex XSIAM product licenses](../learn-about-cortex-xsiam/cortex-xsiam-product-licenses) | +| Plan the XDR Agent deployment | <p>✅ The XDR Agent is installed on endpoints for protection and extended detection and response (XDR). The data is collected into the Cortex XSIAM tenant.</p><div data-gb-custom-block data-tag="hint" data-style="info" class="hint hint-info"><p>The XDR agent is included with the Cortex XSIAM Premium and Enterprise licenses and any other XSIAM license with the Enterprise Runtime Security (XDR) add-on.</p></div><p>For Cortex XSIAM Premium or XSIAM licences with the Cloud Runtime Security add-on, the agent is also used to stop attacks running on workloads, including VMs, containers, Kubernetes, and serverless functions.</p><p>Consider the following:</p><p>✅ Determine the necessary bandwidth required to support the number of agents you plan to deploy.</p><p>✅ Verify endpoint operating systems and identify third-party security products to ensure they are compatible with Cortex XSIAM.</p><p>✅ Create a proof of concept (POC) that simulates your corporate production environment. After the successful completion of the initial POC, we recommend a phased rollout, which enables you to test the agent and its policies on a small scale before deploying them widely.</p> | <ul><li><a href="../protect-your-endpoints/endpoint-security/endpoint-protection">Endpoint protection</a></li><li><a href="https://app.gitbook.com/s/fZ8QSMnkjnXpuOeuRcam/where-can-i-install-the-cortex-xdr-agent/endpoint-operating-systems-supported">Supported XDR Agent operating systems</a></li><li><a href="plan-and-prepare/plan-your-agent-deployment">Plan your agent deployment</a></li></ul> | +| Consider the data sources to use | <p>✅ Consider the data sources you want to initially ingest, such as Palo Alto Networks firewall/cloud logs, as they provide the most immediate security context and data for Cortex XSIAM's analytics.</p><p>In Cortex XSIAM, content is organized into content packs, which are either downloaded from the Data Sources catalog or from Marketplace. Start planning what content you require.</p><p>✅ Review the steps you need to take in your day-to-day SOC operations, and the required third-party tools/applications.</p> | [What are Cortex XSIAM data sources?](../configure-cortex-xsiam/cortex-xsiam-data-sources/what-are-cortex-xsiam-data-sources) | +| Consider roles and permissions | ✅ Review and plan roles using Role-Based Access Control (RBAC) for your security operations team. Consider user groups and start with the default roles. | [Set up users and roles](deployment-steps/set-up-users-and-roles) | -
▸ ▾ Plan your agent deployment modified +3 −1
xsiam/onboard-cortex-xsiam/plan-and-prepare/plan-your-agent-deploymentRead it on the Cortex docs portal ↗ Read it here → This file's diff on GitHub ↗
Before After@@ -1,10 +1,12 @@------description: Plan how you are going to deploy your Cortex XDR agent.description: >-Plan phased Cortex XDR agent deployment, from pilot testing toorganization-wide Cortex XSIAM rollout.------# Plan your agent deployment# Plan your agent deploymentYou typically deploy Cortex XDR agent software to endpoints across a network after an initial proof of concept (POC), which simulates your corporate production environment. During the POC or deployment stage, you analyze security events to determine which are triggered by malicious activity and which are due to legitimate processes behaving in a risky or incorrect manner. You also simulate the number and types of endpoints, the user profiles, and the types of applications that run on the endpoints in your organization, and, according to these factors, you define, test, and adjust the security policy for your organization.You typically deploy Cortex XDR agent software to endpoints across a network after an initial proof of concept (POC), which simulates your corporate production environment. During the POC or deployment stage, you analyze security events to determine which are triggered by malicious activity and which are due to legitimate processes behaving in a risky or incorrect manner. You also simulate the number and types of endpoints, the user profiles, and the types of applications that run on the endpoints in your organization, and, according to these factors, you define, test, and adjust the security policy for your organization.The goal of this multi-step process is to provide maximum protection to the organization without interfering with legitimate workflows.The goal of this multi-step process is to provide maximum protection to the organization without interfering with legitimate workflows.Show markdown source
@@ -1,10 +1,12 @@
 ---
-description: Plan how you are going to deploy your Cortex XDR agent.
+description: >-
+  Plan phased Cortex XDR agent deployment, from pilot testing to
+  organization-wide Cortex XSIAM rollout.
 ---

 # Plan your agent deployment

 You typically deploy Cortex XDR agent software to endpoints across a network after an initial proof of concept (POC), which simulates your corporate production environment. During the POC or deployment stage, you analyze security events to determine which are triggered by malicious activity and which are due to legitimate processes behaving in a risky or incorrect manner. You also simulate the number and types of endpoints, the user profiles, and the types of applications that run on the endpoints in your organization, and, according to these factors, you define, test, and adjust the security policy for your organization.

 The goal of this multi-step process is to provide maximum protection to the organization without interfering with legitimate workflows.
-
▸ ▾ Post-deployment modified +13 −2
xsiam/onboard-cortex-xsiam/post-deploymentRead it on the Cortex docs portal ↗ Read it here → This file's diff on GitHub ↗
Before After@@ -1,9 +1,20 @@------description: >-description: >-Perform post-deployment tasks such as configuring automations and creatingComplete Cortex XSIAM post-deployment tasks, including health checks,automation rules, and performing health checks. management.automations, and reviews of security cases and issues.------# Post-deployment# Post-deploymentOnce your Cortex XSIAM is operational, start post-deployment, such as performing health checks, configuring automations, and reviewing cases and issues.Once your Cortex XSIAM is operational, start post-deployment, such as performing health checks, configuring automations, and reviewing cases and issues.Key post-deployment topics include:• post-deployment-checklist• perform-health-checks• cortex-marketplace• manage-user-roles-and-access-management• dashboards-and-reports• configure-server-settings• configure-security-settings• data-and-log-forwardingShow markdown source
@@ -1,9 +1,20 @@
 ---
 description: >-
-  Perform post-deployment tasks such as configuring automations and creating
-  automation rules, and performing health checks. management.
+  Complete Cortex XSIAM post-deployment tasks, including health checks,
+  automations, and reviews of security cases and issues.
 ---

 # Post-deployment

 Once your Cortex XSIAM is operational, start post-deployment, such as performing health checks, configuring automations, and reviewing cases and issues.
+
+Key post-deployment topics include:
+
+* [post-deployment-checklist](post-deployment/post-deployment-checklist "mention")
+* [perform-health-checks](post-deployment/perform-health-checks "mention")
+* [cortex-marketplace](post-deployment/cortex-marketplace "mention")
+* [manage-user-roles-and-access-management](post-deployment/manage-user-roles-and-access-management "mention")
+* [dashboards-and-reports](post-deployment/dashboards-and-reports "mention")
+* [configure-server-settings](post-deployment/configure-server-settings "mention")
+* [configure-security-settings](post-deployment/configure-security-settings "mention")
+* [data-and-log-forwarding](post-deployment/data-and-log-forwarding "mention")
-
▸ ▾ Configure security settings modified +2 −2
xsiam/onboard-cortex-xsiam/post-deployment/configure-security-settingsRead it on the Cortex docs portal ↗ Read it here → This file's diff on GitHub ↗
Before After@@ -1,12 +1,12 @@------description: >-description: >-Configure security settings such as session expiration, user login expiration,Configure Cortex XSIAM security settings for session expiration, loginand dashboard expiration.domains, approved IP ranges, inactive users, cookies, and report emails.------# Configure security settings# Configure security settingsYou can configure security settings such as how long users can be logged in Cortex XSIAM, and from which domains and IP ranges users can log in.You can configure security settings such as how long users can be logged in Cortex XSIAM, and from which domains and IP ranges users can log in.Go to Settings → Configurations → General → Security Settings.Go to Settings → Configurations → General → Security Settings.Show markdown source
@@ -1,12 +1,12 @@
 ---
 description: >-
-  Configure security settings such as session expiration, user login expiration,
-  and dashboard expiration.
+  Configure Cortex XSIAM security settings for session expiration, login
+  domains, approved IP ranges, inactive users, cookies, and report emails.
 ---

 # Configure security settings

 You can configure security settings such as how long users can be logged in Cortex XSIAM, and from which domains and IP ranges users can log in.

 Go to **Settings** → **Configurations** → **General** → **Security Settings**.
-
▸ ▾ Configure server settings modified +2 −2
xsiam/onboard-cortex-xsiam/post-deployment/configure-server-settingsRead it on the Cortex docs portal ↗ Read it here → This file's diff on GitHub ↗
Before After@@ -1,12 +1,12 @@------description: >-description: >-Configure server settings such as keyboard shortcuts, timezone, and timestampConfigure Cortex XSIAM server settings for localization, branding, AI, accessformat.control, data ingestion, security, and support access.------# Configure server settings# Configure server settingsYou can configure server settings such as keyboard shortcuts, timezone, timestamp format, and custom logos for communications task emails to create a more personalized user experience in Cortex XSIAM. Go to Settings → Configurations → General → Server Settings.You can configure server settings such as keyboard shortcuts, timezone, timestamp format, and custom logos for communications task emails to create a more personalized user experience in Cortex XSIAM. Go to Settings → Configurations → General → Server Settings.hint infohint info### Note### NoteShow markdown source
@@ -1,12 +1,12 @@ --- description: >- - Configure server settings such as keyboard shortcuts, timezone, and timestamp - format. + Configure Cortex XSIAM server settings for localization, branding, AI, access + control, data ingestion, security, and support access. --- # Configure server settings You can configure server settings such as keyboard shortcuts, timezone, timestamp format, and custom logos for communications task emails to create a more personalized user experience in Cortex XSIAM. Go to **Settings** → **Configurations** → **General** → **Server Settings**. {% hint style="info" %} ### Note -
▸ ▾ Cortex Marketplace modified +2 −2
xsiam/onboard-cortex-xsiam/post-deployment/cortex-marketplaceRead it on the Cortex docs portal ↗ Read it here → This file's diff on GitHub ↗
Before After@@ -1,12 +1,12 @@------description: >-description: >-Search the Cortex Marketplace and find content. Search by use cases,Discover Cortex Marketplace content packs for integrations, playbooks,integrations, and categories.automations, correlation rules, dashboards, and security use cases.------# Cortex Marketplace# Cortex MarketplaceContent in Marketplace is organized into content packs to support specific security orchestration use cases. Content packs are created by Palo Alto Networks, technology partners, contributors, and customers.Content in Marketplace is organized into content packs to support specific security orchestration use cases. Content packs are created by Palo Alto Networks, technology partners, contributors, and customers.In Marketplace, content includes the following:In Marketplace, content includes the following:Show markdown source
@@ -1,12 +1,12 @@
 ---
 description: >-
-  Search the Cortex Marketplace and find content. Search by use cases,
-  integrations, and categories.
+  Discover Cortex Marketplace content packs for integrations, playbooks,
+  automations, correlation rules, dashboards, and security use cases.
 ---

 # Cortex Marketplace

 Content in Marketplace is organized into content packs to support specific security orchestration use cases. Content packs are created by Palo Alto Networks, technology partners, contributors, and customers.

 In Marketplace, content includes the following:
-
▸ ▾ Content packs modified +15 −11
xsiam/onboard-cortex-xsiam/post-deployment/cortex-marketplace/content-packsRead it on the Cortex docs portal ↗ Read it here → This file's diff on GitHub ↗
Before After@@ -1,45 +1,49 @@---description: >-Explore pre-installed and recommended Cortex Marketplace content packs forintegrations, playbooks, scripts, widgets, and security workflows.---# Content packs# Content packsContent packs are created by Palo Alto Networks, technology partners, consulting companies, MSSPs, customers, and individual contributors. Content packs may include a variety of different components, such as integrations, scripts, playbooks, and widgets, grouped together to address a specific use case. Content packs are free and can be used by all customers.Cortex Marketplace content packs bundle integrations, scripts, playbooks, widgets, and other components for security automation workflows. Palo Alto Networks, technology partners, consulting companies, MSSPs, customers, and contributors create content packs. Content packs are free for all customers.You can view Marketplace content packs from within Cortex XSIAM (go to Settings → Configurations → Marketplace) or at Cortex Developer Docs Marketplace.You can view Marketplace content packs from within Cortex XSIAM (go to Settings → Configurations → Marketplace) or at Cortex Developer Docs Marketplace.Pre-installed content packs### Pre-installed Cortex Marketplace content packsCortex XSIAM comes with a number of pre-installed content packs that cover many common uses cases. Pre-installed content packs include, but are not limited to:Cortex XSIAM includes pre-installed content packs for common security use cases. These content packs include, but are not limited to:These content packs provide important tools and building blocks you can use to customize your playbooks and workflows in Cortex XSIAM. The Common Scripts content pack, for example, includes scripts that convert file formats, fetch indicators from a file, export context data, send emails, and more.These content packs provide important tools and building blocks you can use to customize your playbooks and workflows in Cortex XSIAM. The Common Scripts content pack, for example, includes scripts that convert file formats, fetch indicators from a file, export context data, send emails, and more.Provides integration with the popular Virus Total service to analyze suspicious files, domains, IPs and URLs to detect malware and other security breaches.Provides integration with the popular VirusTotal service to analyze suspicious files, domains, IPs, and URLs to detect malware and other security breaches.Recommended content packs### Recommended Cortex Marketplace content packsIn addition, we recommend reviewing if you require the following popular content packs:In addition, we recommend reviewing if you require the following popular content packs:🖼 marketplace-usecases.png🖼 imageCreate and respond to phishing issues based on user reports.Create and respond to phishing issues based on user reports.Automate Cortex XDR incident response. Includes custom Cortex XDR incident views and layouts to aid analyst investigations.Automate Cortex XDR incident response. Includes custom Cortex XDR incident views and layouts to aid analyst investigations.Manage Jira tickets directly from Cortex XSIAM, enrich them with Cortex XSIAM data, and mirror information between Jira tickets and Cortex issues.Manage Jira tickets directly from Cortex XSIAM, enrich them with Cortex XSIAM data, and mirror information between Jira tickets and Cortex issues.Manage ServiceNow tickets directly from the Cortex XSIAM and enrich them with Cortex XSIAM data, and mirror information between ServiceNow tickets and Cortex issues.Manage ServiceNow tickets directly from Cortex XSIAM, enrich them with Cortex XSIAM data, and mirror information between ServiceNow tickets and Cortex issues.Manage Palo Alto Networks Firewall and Panorama, from Cortex XSIAM.Manage Palo Alto Networks Firewall and Panorama from Cortex XSIAM.• A collaboration integration, such as Microsoft Teams or Slack to send messages and notifications to your team.• A collaboration integration, such as Microsoft Teams or Slack, to send messages and notifications to your team.hint infohint info### NoteCortex XSIAM includes a built-in default mail sender. You also have the option of installing a different mail sender content pack, such as Microsoft Exchange Online.Cortex XSIAM includes a built-in default mail sender. You also have the option of installing a different mail sender content pack, such as Microsoft Exchange Online.endhintendhintShow markdown source
@@ -1,45 +1,49 @@ +--- +description: >- + Explore pre-installed and recommended Cortex Marketplace content packs for + integrations, playbooks, scripts, widgets, and security workflows. +--- + # Content packs -Content packs are created by Palo Alto Networks, technology partners, consulting companies, MSSPs, customers, and individual contributors. Content packs may include a variety of different components, such as integrations, scripts, playbooks, and widgets, grouped together to address a specific use case. Content packs are free and can be used by all customers. +Cortex Marketplace content packs bundle integrations, scripts, playbooks, widgets, and other components for security automation workflows. Palo Alto Networks, technology partners, consulting companies, MSSPs, customers, and contributors create content packs. Content packs are free for all customers. You can view Marketplace content packs from within Cortex XSIAM (go to Settings → **Configurations** → **Marketplace**) or at [Cortex Developer Docs Marketplace](https://cortex.marketplace.pan.dev/marketplace/). -**Pre-installed content packs** +### Pre-installed Cortex Marketplace content packs -Cortex XSIAM comes with a number of pre-installed content packs that cover many common uses cases. Pre-installed content packs include, but are not limited to: +Cortex XSIAM includes pre-installed content packs for common security use cases. These content packs include, but are not limited to: * [Common Scripts](https://cortex.marketplace.pan.dev/marketplace/details/CommonScripts/), [Common Widgets](https://cortex.marketplace.pan.dev/marketplace/details/CommonWidgets/), [Common Playbooks](https://cortex.marketplace.pan.dev/marketplace/details/CommonPlaybooks/), [Common Types](https://cortex.marketplace.pan.dev/marketplace/details/CommonTypes/), [Common Reports](https://cortex.marketplace.pan.dev/marketplace/details/CommonReports/), [Common Dashboards](https://cortex.marketplace.pan.dev/marketplace/details/CommonDashboards/) These content packs provide important tools and building blocks you can use to customize your playbooks and workflows in Cortex XSIAM. The Common Scripts content pack, for example, includes scripts that convert file formats, fetch indicators from a file, export context data, send emails, and more. * [VirusTotal](https://cortex.marketplace.pan.dev/marketplace/details/VirusTotal/) - Provides integration with the popular Virus Total service to analyze suspicious files, domains, IPs and URLs to detect malware and other security breaches. + Provides integration with the popular VirusTotal service to analyze suspicious files, domains, IPs, and URLs to detect malware and other security breaches. -**Recommended content packs** +### Recommended Cortex Marketplace content packs In addition, we recommend reviewing if you require the following popular content packs: - + * [Phishing](https://cortex.marketplace.pan.dev/marketplace/details/Phishing/) Create and respond to phishing issues based on user reports. * [Cortex XDR by Palo Alto Networks](https://cortex.marketplace.pan.dev/marketplace/details/CortexXDR/) Automate Cortex XDR incident response. Includes custom Cortex XDR incident views and layouts to aid analyst investigations. * [Atlassian Jira](https://cortex.marketplace.pan.dev/marketplace/details/Jira/) Manage Jira tickets directly from Cortex XSIAM, enrich them with Cortex XSIAM data, and mirror information between Jira tickets and Cortex issues. * [ServiceNow](https://cortex.marketplace.pan.dev/marketplace/details/ServiceNow/) - Manage ServiceNow tickets directly from the Cortex XSIAM and enrich them with Cortex XSIAM data, and mirror information between ServiceNow tickets and Cortex issues. + Manage ServiceNow tickets directly from Cortex XSIAM, enrich them with Cortex XSIAM data, and mirror information between ServiceNow tickets and Cortex issues. * [PAN-OS by Palo Alto Networks](https://cortex.marketplace.pan.dev/marketplace/details/PANOS/) - Manage Palo Alto Networks Firewall and Panorama, from Cortex XSIAM. -* A collaboration integration, such as [Microsoft Teams](https://cortex.marketplace.pan.dev/marketplace/details/MicrosoftTeams/) or [Slack](https://cortex.marketplace.pan.dev/marketplace/details/Slack/) to send messages and notifications to your team. + Manage Palo Alto Networks Firewall and Panorama from Cortex XSIAM. +* A collaboration integration, such as [Microsoft Teams](https://cortex.marketplace.pan.dev/marketplace/details/MicrosoftTeams/) or [Slack](https://cortex.marketplace.pan.dev/marketplace/details/Slack/), to send messages and notifications to your team. {% hint style="info" %} -### Note - Cortex XSIAM includes a built-in default mail sender. You also have the option of installing a different mail sender content pack, such as [Microsoft Exchange Online](https://cortex.marketplace.pan.dev/marketplace/details/MicrosoftExchangeOnline/). {% endhint %} -
▸ ▾ Install content packs modified +9 −7
xsiam/onboard-cortex-xsiam/post-deployment/cortex-marketplace/install-content-packsRead it on the Cortex docs portal ↗ Read it here → This file's diff on GitHub ↗
Before After@@ -1,29 +1,33 @@---description: >-Install Cortex Marketplace content packs, review dependencies, and configureintegrations and data sources in Cortex XSIAM.---# Install content packs# Install content packsYou can only install one content pack at a time. Cortex XSIAM automatically adds any content that is required to install the content pack. You can also add any optional content packs that use the content pack you want to install.You can only install one content pack at a time. Cortex XSIAM automatically adds any content that is required to install the content pack. You can also add any optional content packs that use the content pack you want to install.If you receive an error message when you try to install a content pack, you need to fix the error before installing. If a warning message is issued, you can still download the content pack, but you should fix the problem; otherwise, the content may not work correctly.If you receive an error message when you try to install a content pack, you need to fix the error before installing. If a warning message is issued, you can still download the content pack, but you should fix the problem; otherwise, the content may not work correctly.Before you install a content pack you should review the content pack to see what it includes and what are the various dependencies. Following is the information you can view:Before you install a content pack, you should review the content pack to see what it includes and what the various dependencies are. The following is the information you can view:• Details: General information about the content pack such as installation, content, version, author, and status.• Details: General information about the content pack such as installation, content, version, author, and status.• Content: The content to be installed, such as scripts or integrations.• Content: The content to be installed, such as scripts or integrations.• Dependencies: Details of any required content packs and optional content packs that may need to be installed with your content pack.• Dependencies: Details of any required content packs and optional content packs that may need to be installed with your content pack.• Version History: View the currently installed version, earlier versions, available updates, and revert if required.• Version History: View the currently installed version, earlier versions, available updates, and revert if required.If you want to install data sources you can do one the following:If you want to install data sources, you can do one of the following:• Go to the Data Sources & Integrations page and add a data source. Once configured, it automatically installs the required content packs, and recommends additional beneficial content such as playbooks and dashboards that are relevant for this specific data source.• Go to the Data Sources & Integrations page and add a data source. Once configured, it automatically installs the required content packs and recommends additional beneficial content such as playbooks and dashboards that are relevant for this specific data source.• In Marketplace, select either Data Onboarder (which takes you to the integration configuration in the Data Sources & Integrations page) or install the content pack directly from Marketplace. If installing the content pack from Marketplace, you will then have to configure the integration in the Data Source & Integrations page.• In Marketplace, select either Data Onboarder (which takes you to the integration configuration in the Data Sources & Integrations page) or install the content pack directly from Marketplace. If installing the content pack from Marketplace, you will then have to configure the integration in the Data Source & Integrations page.hint infohint info### NoteCurrently, not all content packs are supported in the Data Sources & Integrations page. For example, content packs with several integrations are not yet supported.Currently, not all content packs are supported in the Data Sources & Integrations page. For example, content packs with several integrations are not yet supported.endhintendhintHow to install a content pack in MarketplaceHow to install a content pack in Marketplace1. Go to Settings → Configurations → Marketplace → Browse and locate the content pack you want to install.1. Go to Settings → Configurations → Marketplace → Browse and locate the content pack you want to install.2. Click the required content pack and review the contents.2. Click the required content pack and review the contents.3. Click Install to add the content pack to the Cart.3. Click Install to add the content pack to the Cart.@@ -31,12 +35,10 @@ How to install a content pack in MarketplaceThe **Cart** displays the number of items you are installing, including any required content packs. You can log in and out, but the content packs remain in the **Cart** until you click either **Empty cart** or **Install**.The **Cart** displays the number of items you are installing, including any required content packs. You can log in and out, but the content packs remain in the **Cart** until you click either **Empty cart** or **Install**.5. Click Install.5. Click Install.6. After installation, click Refresh content.6. After installation, click Refresh content.You can now start configuring your content. If you have installed an integration, configure the integration, including setting up an integration instance.You can now start configuring your content. If you have installed an integration, configure the integration, including setting up an integration instance.hint infohint info### NoteContent packs are also automatically installed when you adopt playbooks and configure tasks.Content packs are also automatically installed when you adopt playbooks and configure tasks.endhintendhintShow markdown source
@@ -1,29 +1,33 @@ +--- +description: >- + Install Cortex Marketplace content packs, review dependencies, and configure + integrations and data sources in Cortex XSIAM. +--- + # Install content packs You can only install one content pack at a time. Cortex XSIAM automatically adds any content that is required to install the content pack. You can also add any optional content packs that use the content pack you want to install. If you receive an error message when you try to install a content pack, you need to fix the error before installing. If a warning message is issued, you can still download the content pack, but you should fix the problem; otherwise, the content may not work correctly. -Before you install a content pack you should review the content pack to see what it includes and what are the various dependencies. Following is the information you can view: +Before you install a content pack, you should review the content pack to see what it includes and what the various dependencies are. The following is the information you can view: * **Details:** General information about the content pack such as installation, content, version, author, and status. * **Content:** The content to be installed, such as scripts or integrations. * **Dependencies:** Details of any required content packs and optional content packs that may need to be installed with your content pack. * **Version History:** View the currently installed version, earlier versions, available updates, and revert if required. -If you want to install data sources you can do one the following: +If you want to install data sources, you can do one of the following: -* Go to the **Data Sources & Integrations** page and add a data source. Once configured, it automatically installs the required content packs, and recommends additional beneficial content such as playbooks and dashboards that are relevant for this specific data source. +* Go to the **Data Sources & Integrations** page and add a data source. Once configured, it automatically installs the required content packs and recommends additional beneficial content such as playbooks and dashboards that are relevant for this specific data source. * In Marketplace, select either Data Onboarder (which takes you to the integration configuration in the **Data Sources & Integrations** page) or install the content pack directly from Marketplace. If installing the content pack from Marketplace, you will then have to configure the integration in the **Data Source & Integrations** page. {% hint style="info" %} -### Note - Currently, not all content packs are supported in the **Data Sources & Integrations** page. For example, content packs with several integrations are not yet supported. {% endhint %} How to install a content pack in Marketplace 1. Go to Settings → **Configurations** → **Marketplace** → **Browse** and locate the content pack you want to install. 2. Click the required content pack and review the contents. 3. Click **Install** to add the content pack to the **Cart**. @@ -31,12 +35,10 @@ How to install a content pack in Marketplace The **Cart** displays the number of items you are installing, including any required content packs. You can log in and out, but the content packs remain in the **Cart** until you click either **Empty cart** or **Install**. 5. Click **Install**. 6. After installation, click **Refresh content**. You can now start configuring your content. If you have installed an integration, configure the integration, including setting up an integration instance. {% hint style="info" %} -### Note - Content packs are also automatically installed when you adopt playbooks and configure tasks. {% endhint %} -
▸ ▾ Dashboards and reports modified +6 −0
xsiam/onboard-cortex-xsiam/post-deployment/dashboards-and-reportsRead it on the Cortex docs portal ↗ Read it here → This file's diff on GitHub ↗
Before After@@ -1,8 +1,14 @@---description: >-Use Cortex XSIAM dashboards, widgets, reports, and report templates tovisualize security data and monitor system activity.---# Dashboards and reports# Dashboards and reportsDashboards consist of visualized data powered by fully customizable widgets, which enable you to analyze data from inside or outside Cortex XSIAM, in different formats such as graphs, pie charts, or text. Cortex XSIAM displays the predefined dashboards when you log in. You can also create custom dashboards that are based on the predefined dashboards, or built to your specifications, and you can save any of your dashboards as reports.Dashboards consist of visualized data powered by fully customizable widgets, which enable you to analyze data from inside or outside Cortex XSIAM, in different formats such as graphs, pie charts, or text. Cortex XSIAM displays the predefined dashboards when you log in. You can also create custom dashboards that are based on the predefined dashboards, or built to your specifications, and you can save any of your dashboards as reports.Cortex XSIAM also provides Command Center dashboards that display interactive overviews of your system activity, with drilldowns to additional dashboards and associated pages.Cortex XSIAM also provides Command Center dashboards that display interactive overviews of your system activity, with drilldowns to additional dashboards and associated pages.From the Dashboard & Reports menu, you can view and manage your dashboards and reports from the dashboard and incidents table, and view alert exclusions.From the Dashboard & Reports menu, you can view and manage your dashboards and reports from the dashboard and incidents table, and view alert exclusions.Show markdown source
@@ -1,8 +1,14 @@
+---
+description: >-
+  Use Cortex XSIAM dashboards, widgets, reports, and report templates to
+  visualize security data and monitor system activity.
+---
+
 # Dashboards and reports

 Dashboards consist of visualized data powered by fully customizable widgets, which enable you to analyze data from inside or outside Cortex XSIAM, in different formats such as graphs, pie charts, or text. Cortex XSIAM displays the predefined dashboards when you log in. You can also create custom dashboards that are based on the predefined dashboards, or built to your specifications, and you can save any of your dashboards as reports.

 Cortex XSIAM also provides Command Center dashboards that display interactive overviews of your system activity, with drilldowns to additional dashboards and associated pages.

 From the **Dashboard & Reports** menu, you can view and manage your dashboards and reports from the dashboard and incidents table, and view alert exclusions.
-
▸ ▾ Data and log forwarding modified +2 −3
xsiam/onboard-cortex-xsiam/post-deployment/data-and-log-forwardingRead it on the Cortex docs portal ↗ Read it here → This file's diff on GitHub ↗
Before After@@ -1,10 +1,9 @@------description: >-description: >-Stay informed and updated about events in your system by forwarding logs andConfigure Cortex XSIAM notifications and forward logs, alerts, cases, anddata to an external service, such as a syslog receiver, a Slack channel, or anissues to email, Slack, syslog, and third-party services.email account.------# Data and log forwarding# Data and log forwardingTo stay informed about important alerts and events, you can configure your notifications and specify the type of data and logs you want to forward. You can forward logs and data to an email account, a Slack channel, or a syslog receiver. In addition, cases and issues can be forwarded to third-party systems including Splunk, Amazon SQS, Amazon S3, and Webhook.To stay informed about important alerts and events, you can configure your notifications and specify the type of data and logs you want to forward. You can forward logs and data to an email account, a Slack channel, or a syslog receiver. In addition, cases and issues can be forwarded to third-party systems including Splunk, Amazon SQS, Amazon S3, and Webhook.Show markdown source
@@ -1,10 +1,9 @@
 ---
 description: >-
-  Stay informed and updated about events in your system by forwarding logs and
-  data to an external service, such as a syslog receiver, a Slack channel, or an
-  email account.
+  Configure Cortex XSIAM notifications and forward logs, alerts, cases, and
+  issues to email, Slack, syslog, and third-party services.
 ---

 # Data and log forwarding

 To stay informed about important alerts and events, you can configure your notifications and specify the type of data and logs you want to forward. You can forward logs and data to an email account, a Slack channel, or a syslog receiver. In addition, cases and issues can be forwarded to third-party systems including Splunk, Amazon SQS, Amazon S3, and Webhook.
-
▸ ▾ Data and log notification formats modified +6 −0
xsiam/onboard-cortex-xsiam/post-deployment/data-and-log-forwarding/data-and-log-notification-formatsRead it on the Cortex docs portal ↗ Read it here → This file's diff on GitHub ↗
Before After@@ -1,7 +1,13 @@---description: >-Understand Cortex XSIAM notification formats for forwarded cases, issues, andlogs, including optional alert formatting for email, syslog, and Slack.---# Data and log notification formats# Data and log notification formatsWhen Cortex XSIAM cases, issues, and logs are forwarded to email or a third-party system, notifications are sent in a specific format.When Cortex XSIAM cases, issues, and logs are forwarded to email or a third-party system, notifications are sent in a specific format.hint infohint infoIssues can be forwarded to email, syslog servers, and Slack in the alert format, if you prefer. The alert format can be selected when you configure your forwarding notification.Issues can be forwarded to email, syslog servers, and Slack in the alert format, if you prefer. The alert format can be selected when you configure your forwarding notification.endhintendhintShow markdown source
@@ -1,7 +1,13 @@ +--- +description: >- + Understand Cortex XSIAM notification formats for forwarded cases, issues, and + logs, including optional alert formatting for email, syslog, and Slack. +--- + # Data and log notification formats When Cortex XSIAM cases, issues, and logs are forwarded to email or a third-party system, notifications are sent in a specific format. {% hint style="info" %} Issues can be forwarded to email, syslog servers, and Slack in the alert format, if you prefer. The alert format can be selected when you configure your forwarding notification. {% endhint %} -
▸ ▾ Agent Audit log notification format modified +6 −0
xsiam/onboard-cortex-xsiam/post-deployment/data-and-log-forwarding/data-and-log-notification-formats/agent-audit-log-notification-formatRead it on the Cortex docs portal ↗ Read it here → This file's diff on GitHub ↗
Before After@@ -1,8 +1,14 @@---description: >-Reference Cortex XDR Agent Audit Log notification formats for email andsyslog, including CEF field mappings and payload examples.---# Agent Audit log notification format# Agent Audit log notification formatCortex XSIAM forwards the Agent Audit log to these external data resources:Cortex XSIAM forwards the Agent Audit log to these external data resources:• Email account: Sent according to the settings you configured• Email account: Sent according to the settings you configured• Syslog receiver: Sent in a CEF format RFC 5425 according to the following mapping:• Syslog receiver: Sent in a CEF format RFC 5425 according to the following mapping:Section│DescriptionSection│DescriptionShow markdown source
@@ -1,8 +1,14 @@ +--- +description: >- + Reference Cortex XDR Agent Audit Log notification formats for email and + syslog, including CEF field mappings and payload examples. +--- + # Agent Audit log notification format Cortex XSIAM forwards the Agent Audit log to these external data resources: * **Email account:** Sent according to the settings you configured * **Syslog receiver:** Sent in a [CEF format RFC 5425](https://tools.ietf.org/html/rfc5425) according to the following mapping: | Section | Description | -
▸ ▾ Analytics log format modified +6 −0
xsiam/onboard-cortex-xsiam/post-deployment/data-and-log-forwarding/data-and-log-notification-formats/analytics-log-formatRead it on the Cortex docs portal ↗ Read it here → This file's diff on GitHub ↗
Before After@@ -1,8 +1,14 @@---description: >-Reference legacy Cortex XSIAM Analytics issue log formats for email andsyslog, including detection, network activity, user, device, and file fields.---# Analytics log format# Analytics log formatCortex XSIAM Analytics logs issues as analytics issue logs. If you configure Cortex XSIAM to forward logs in the legacy format, each log record has the following format:Cortex XSIAM Analytics logs issues as analytics issue logs. If you configure Cortex XSIAM to forward logs in the legacy format, each log record has the following format:• Syslog format:• Syslog format:``````sub_type,time_generated,id,version_info/document_version,version_info/magnifier_version,version_info/detection_version,alert/url,alert/category,alert/type,alert/name,alert/description/html,alert/description/text,alert/severity,alert/state,alert/is_whitelisted,alert/ports,alert/internal_destinations/single_destinations,alert/internal_destinations/ip_ranges,alert/external_destinations,alert/app_id,alert/schedule/activity_first_seen_at,alert/schedule/activity_last_seen_at,alert/schedule/first_detected_at,alert/schedule/last_detected_at,user/user_name,user/url,user/display_name,user/org_unit,device/id,device/url,device/mac,device/hostname,device/ip,device/ip_ranges,device/owner,device/org_unit,filessub_type,time_generated,id,version_info/document_version,version_info/magnifier_version,version_info/detection_version,alert/url,alert/category,alert/type,alert/name,alert/description/html,alert/description/text,alert/severity,alert/state,alert/is_whitelisted,alert/ports,alert/internal_destinations/single_destinations,alert/internal_destinations/ip_ranges,alert/external_destinations,alert/app_id,alert/schedule/activity_first_seen_at,alert/schedule/activity_last_seen_at,alert/schedule/first_detected_at,alert/schedule/last_detected_at,user/user_name,user/url,user/display_name,user/org_unit,device/id,device/url,device/mac,device/hostname,device/ip,device/ip_ranges,device/owner,device/org_unit,filesShow markdown source
@@ -1,8 +1,14 @@ +--- +description: >- + Reference legacy Cortex XSIAM Analytics issue log formats for email and + syslog, including detection, network activity, user, device, and file fields. +--- + # Analytics log format Cortex XSIAM Analytics logs issues as analytics issue logs. If you configure Cortex XSIAM to forward logs in the legacy format, each log record has the following format: * **Syslog format:** ``` sub_type,time_generated,id,version_info/document_version,version_info/magnifier_version,version_info/detection_version,alert/url,alert/category,alert/type,alert/name,alert/description/html,alert/description/text,alert/severity,alert/state,alert/is_whitelisted,alert/ports,alert/internal_destinations/single_destinations,alert/internal_destinations/ip_ranges,alert/external_destinations,alert/app_id,alert/schedule/activity_first_seen_at,alert/schedule/activity_last_seen_at,alert/schedule/first_detected_at,alert/schedule/last_detected_at,user/user_name,user/url,user/display_name,user/org_unit,device/id,device/url,device/mac,device/hostname,device/ip,device/ip_ranges,device/owner,device/org_unit,files -
▸ ▾ Cortex XSIAM issue notification format modified +19 −23
xsiam/onboard-cortex-xsiam/post-deployment/data-and-log-forwarding/data-and-log-notification-formats/issue-notification-formatRead it on the Cortex docs portal ↗ Read it here → This file's diff on GitHub ↗
Before After@@ -1,33 +1,41 @@# Issue notification format---description: >-Reference Cortex XSIAM issue notification formats and payloads for email,Slack, syslog, Splunk, Amazon S3, Amazon SQS, and webhooks.---# Cortex XSIAM issue notification formatUnderstand Cortex XSIAM issue notification formats and payloads for each supported forwarding destination.### Issue notification destinationsIssues can be forwarded to the following:Issues can be forwarded to the following:• Email distribution list• Email distribution list• Syslog server• Syslog server• Slack• Slack• Splunk, Amazon SQS, Amazon S3, or Webhook• Splunk, Amazon SQS, Amazon S3, or Webhookhint infohint infoFor issues with relevant assets, issue notifications sent to Amazon S3, Amazon SQS, Webhook, Splunk, and email provide asset and remediation information including the asset name, cloud resource name, asset tags, account name, region, and evidence.For issues with relevant assets, issue notifications sent to Amazon S3, Amazon SQS, Webhook, Splunk, and email provide asset and remediation information including the asset name, cloud resource name, asset tags, account name, region, and evidence.endhintendhintEmail account### Email accountCortex XSIAM sends issues to email accounts based on the settings you configure. Email messages also include an issue code snippet of the fields according to the columns in the Issue table.Cortex XSIAM sends issues to email accounts based on the settings you configure. Email messages also include an issue code snippet of the fields according to the columns in the Issue table.The notification format is as follows:The notification format is as follows:• If only one issue exists in the queue, a single-issue email format is sent.• If only one issue exists in the queue, a single-issue email format is sent.• If more than one issue was grouped in the time frame, all the issues in the queue are forwarded together in a grouped email format.• If more than one issue was grouped in the time frame, all the issues in the queue are forwarded together in a grouped email format.Example#### Example: Single-issue email messageSingle-issue email message``````Email Subject: Issue: <issue_name>Email Subject: Issue: <issue_name>Email Body:Email Body:Issue Name: Suspicious Process CreationIssue Name: Suspicious Process CreationSeverity: HighSeverity: HighSource: CorrelationSource: CorrelationCategory: MalwareCategory: Malware@@ -35,20 +43,17 @@ Email Subject: Issue: <issue_name>Host: <host name>Host: <host name>Username:<user name>Username:<user name>Excluded: NoExcluded: NoStarred: YesStarred: YesIssue: <link to the tenant issue view>Issue: <link to the tenant issue view>Case: <link to the tenant case view>Case: <link to the tenant case view>``````\#### Example: Single-issue email message with assetExampleSingle-issue email message with asset``````Email Subject: Issue: <issue_name>Email Subject: Issue: <issue_name>Email Body:Email Body:Issue Name: Suspicious Process CreationIssue Name: Suspicious Process CreationSeverity: HighSeverity: HighRemediation: N/ARemediation: N/AInitial Evidence: N/AInitial Evidence: N/A@@ -64,20 +69,17 @@ Email Subject: Issue: <issue_name>Host: <host name>Host: <host name>Username:<user name>Username:<user name>Excluded: NoExcluded: NoStarred: YesStarred: YesIssue: <link to the tenant issue view>Issue: <link to the tenant issue view>Case: <link to the tenant case view>Case: <link to the tenant case view>``````\#### Example: Grouped issue email messageExampleGrouped issue email message``````Email Subject: Issues: <first_highest_severity_issue> + x othersEmail Subject: Issues: <first_highest_severity_issue> + x othersEmail Body:Email Body:Issue Name: Suspicious Process CreationIssue Name: Suspicious Process CreationSeverity: HighSeverity: HighSource: CorrelationSource: CorrelationCategory: MalwareAction: DetectedCategory: MalwareAction: Detected@@ -97,20 +99,17 @@ Email Subject: Issues: <first_highest_severity_issue> + x othersHost: <host name>Host: <host name>Starred: YesStarred: YesCase: <link to the tenant issue view>Case: <link to the tenant issue view>Issue: <link to the tenant case view>Issue: <link to the tenant case view>Notification Name: “My notification policy 2 ”Notification Name: “My notification policy 2 ”Notification Description: “Starred issues with medium severity”Notification Description: “Starred issues with medium severity”``````\#### Example: Email attachmentExampleEmail attachment``````{{"original_issue_json":{"original_issue_json":{"uuid":"<UUID Value>","uuid":"<UUID Value>","recordType":"threat","recordType":"threat","customerId":"<Customer ID>","customerId":"<Customer ID>","severity":4,"severity":4,@@ -127,20 +126,17 @@ Email attachment"YES""YES"],],"events_length":1,"events_length":1,"is_excluded":false"is_excluded":false}}``````\#### Example: Email attachment with assetExampleEmail attachment with asset``````{{"agent_id": null,"agent_id": null,"category": "POSTURE","category": "POSTURE","observation_time": 1776826363623,"observation_time": 1776826363623,"is_excluded": false,"is_excluded": false,"mitre_tactics": null,"mitre_tactics": null,@@ -244,21 +240,21 @@ Email attachment with asset"asset_external_provider_id": "arn:aws:bedrock:us-east-2::foundation-model/amazon.nova-2-lite-v1:0""asset_external_provider_id": "arn:aws:bedrock:us-east-2::foundation-model/amazon.nova-2-lite-v1:0"}}]]}}``````
Slack channel, Splunk, Amazon S3, Amazon SQS, Webhook### Slack channel, Splunk, Amazon S3, Amazon SQS, WebhookYou can send issue notifications to a single Slack contact or a Slack channel, or to Splunk, Amazon S3, Amazon SQS, or Webhook. Notifications are similar to the email format.You can send issue notifications to a single Slack contact or a Slack channel, or to Splunk, Amazon S3, Amazon SQS, or Webhook. Notifications are similar to the email format.Syslog receiver#### Syslog receiverIssue notifications forwarded to a syslog receiver are sent in a CEF format RF 5425.Issue notifications forwarded to a syslog receiver are sent in a CEF format RF 5425.Section│DescriptionSection│Description| ------------- | --------------------------------------------------------------------------------------------------------------------------------------------------------------------------------------------------------------------------------------------------------------------------------------------------------------------------------------------------------------------------------------------------------------------------------------------------------------------------------------------------------------------------------------------------------------------------------------------------------------------------------------------------------------------------------------------------------------------------------------------------------------------------------------------------------------------------------------------------------------------------------------------------------------------------------------------------------------------------------- || ------------- | --------------------------------------------------------------------------------------------------------------------------------------------------------------------------------------------------------------------------------------------------------------------------------------------------------------------------------------------------------------------------------------------------------------------------------------------------------------------------------------------------------------------------------------------------------------------------------------------------------------------------------------------------------------------------------------------------------------------------------------------------------------------------------------------------------------------------------------------------------------------------------------------------------------------------------------------------------------------------------- |Syslog header│<9>: PRI (considered a priority field)1: version number2020-03-22T07:55:07.964311Z: timestamp of when alert/log was sentcortexxdr: host nameSyslog header│<9>: PRI (considered a priority field)1: version number2020-03-22T07:55:07.964311Z: timestamp of when alert/log was sentcortexxdr: host nameCEF header│HEADER/Vendor="Palo Alto Networks" (as a constant string)HEADER/Device Product="Cortex XDR" (as a constant string)HEADER/Product Version= Cortex XDR version (2.0/2.1....)HEADER/Severity=(integer/0 - Unknown, 6 - Low, 8 - Medium, 9 - High)HEADER/Device Event Class ID=alert sourceHEADER/name =alert nameCEF header│HEADER/Vendor="Palo Alto Networks" (as a constant string)HEADER/Device Product="Cortex XDR" (as a constant string)HEADER/Product Version= Cortex XDR version (2.0/2.1....)HEADER/Severity=(integer/0 - Unknown, 6 - Low, 8 - Medium, 9 - High)HEADER/Device Event Class ID=alert sourceHEADER/name =alert nameCEF body│end=timestamp shost=endpoint_name deviceFacility=facility cat=category externalId=external_id request=request cs1=initiated_by_process cs1Label=Initiated by (constant string) cs2=initiator_commande cs2Label=Initiator CMD (constant string) cs3=signature cs3Label=Signature (constant string) cs4=cgo_name cs4Label=CGO name (constant string) cs5=cgo_command cs5Label=CGO CMD (constant string) cs6=cgo_signature cs6Label=CGO Signature (constant string) dst=destination_ip dpt=destination_port src=source_ip spt=source_port fileHash=file_hash filePath=file_path targetprocesssignature=target_process_signature tenantname=tenant_name tenantCDLid=tenant_id CSPaccountname=account_name initiatorSha256=initiator_hash initiatorPath=initiator_path osParentName=parent_name osParentCmd=parent_command osParentSha256=parent_hash osParentSignature=parent_signature osParentSigner=parent_signer incident=incident_id act=action suser=actor_effective_usernameCEF body│end=timestamp shost=endpoint_name deviceFacility=facility cat=category externalId=external_id request=request cs1=initiated_by_process cs1Label=Initiated by (constant string) cs2=initiator_commande cs2Label=Initiator CMD (constant string) cs3=signature cs3Label=Signature (constant string) cs4=cgo_name cs4Label=CGO name (constant string) cs5=cgo_command cs5Label=CGO CMD (constant string) cs6=cgo_signature cs6Label=CGO Signature (constant string) dst=destination_ip dpt=destination_port src=source_ip spt=source_port fileHash=file_hash filePath=file_path targetprocesssignature=target_process_signature tenantname=tenant_name tenantCDLid=tenant_id CSPaccountname=account_name initiatorSha256=initiator_hash initiatorPath=initiator_path osParentName=parent_name osParentCmd=parent_command osParentSha256=parent_hash osParentSignature=parent_signature osParentSigner=parent_signer incident=incident_id act=action suser=actor_effective_usernameShow markdown source
@@ -1,33 +1,41 @@ -# Issue notification format +--- +description: >- + Reference Cortex XSIAM issue notification formats and payloads for email, + Slack, syslog, Splunk, Amazon S3, Amazon SQS, and webhooks. +--- + +# Cortex XSIAM issue notification format + +Understand Cortex XSIAM issue notification formats and payloads for each supported forwarding destination. + +### Issue notification destinations Issues can be forwarded to the following: * Email distribution list * Syslog server * Slack * Splunk, Amazon SQS, Amazon S3, or Webhook {% hint style="info" %} For issues with relevant assets, issue notifications sent to Amazon S3, Amazon SQS, Webhook, Splunk, and email provide asset and remediation information including the asset name, cloud resource name, asset tags, account name, region, and evidence. {% endhint %} -**Email account** +### **Email account** Cortex XSIAM sends issues to email accounts based on the settings you configure. Email messages also include an issue code snippet of the fields according to the columns in the Issue table. The notification format is as follows: * If only one issue exists in the queue, a single-issue email format is sent. * If more than one issue was grouped in the time frame, all the issues in the queue are forwarded together in a grouped email format. -**Example** - -Single-issue email message +#### **Example:** Single-issue email message ``` Email Subject: Issue: <issue_name> Email Body: Issue Name: Suspicious Process Creation Severity: High Source: Correlation Category: Malware @@ -35,20 +43,17 @@ Email Subject: Issue: <issue_name> Host: <host name> Username:<user name> Excluded: No Starred: Yes Issue: <link to the tenant issue view> Case: <link to the tenant case view> ``` -\ -**Example** - -Single-issue email message with asset +#### **Example:** Single-issue email message with asset ``` Email Subject: Issue: <issue_name> Email Body: Issue Name: Suspicious Process Creation Severity: High Remediation: N/A Initial Evidence: N/A @@ -64,20 +69,17 @@ Email Subject: Issue: <issue_name> Host: <host name> Username:<user name> Excluded: No Starred: Yes Issue: <link to the tenant issue view> Case: <link to the tenant case view> ``` -\ -**Example** - -Grouped issue email message +#### **Example:** Grouped issue email message ``` Email Subject: Issues: <first_highest_severity_issue> + x others Email Body: Issue Name: Suspicious Process Creation Severity: High Source: Correlation Category: MalwareAction: Detected @@ -97,20 +99,17 @@ Email Subject: Issues: <first_highest_severity_issue> + x others Host: <host name> Starred: Yes Case: <link to the tenant issue view> Issue: <link to the tenant case view> Notification Name: “My notification policy 2 ” Notification Description: “Starred issues with medium severity” ``` -\ -**Example** - -Email attachment +#### **Example:** Email attachment ``` { "original_issue_json":{ "uuid":"<UUID Value>", "recordType":"threat", "customerId":"<Customer ID>", "severity":4, @@ -127,20 +126,17 @@ Email attachment "YES" ], "events_length":1, "is_excluded":false } ``` -\ -**Example** - -Email attachment with asset +#### **Example:** Email attachment with asset ``` { "agent_id": null, "category": "POSTURE", "observation_time": 1776826363623, "is_excluded": false, "mitre_tactics": null, @@ -244,21 +240,21 @@ Email attachment with asset "asset_external_provider_id": "arn:aws:bedrock:us-east-2::foundation-model/amazon.nova-2-lite-v1:0" } ] } ``` <br> -**Slack channel, Splunk, Amazon S3, Amazon SQS, Webhook** +### **Slack channel, Splunk, Amazon S3, Amazon SQS, Webhook** You can send issue notifications to a single Slack contact or a Slack channel, or to Splunk, Amazon S3, Amazon SQS, or Webhook. Notifications are similar to the email format. -**Syslog receiver** +#### **Syslog receiver** Issue notifications forwarded to a syslog receiver are sent in a CEF format RF 5425. | Section | Description | | ------------- | --------------------------------------------------------------------------------------------------------------------------------------------------------------------------------------------------------------------------------------------------------------------------------------------------------------------------------------------------------------------------------------------------------------------------------------------------------------------------------------------------------------------------------------------------------------------------------------------------------------------------------------------------------------------------------------------------------------------------------------------------------------------------------------------------------------------------------------------------------------------------------------------------------------------------------------------------------------------------------- | | Syslog header | `<9>: PRI (considered a priority field)1: version number2020-03-22T07:55:07.964311Z: timestamp of when alert/log was sentcortexxdr: host name` | | CEF header | `HEADER/Vendor="Palo Alto Networks" (as a constant string)HEADER/Device Product="Cortex XDR" (as a constant string)HEADER/Product Version= Cortex XDR version (2.0/2.1....)HEADER/Severity=(integer/0 - Unknown, 6 - Low, 8 - Medium, 9 - High)HEADER/Device Event Class ID=alert sourceHEADER/name =alert name` | | CEF body | `end=timestamp shost=endpoint_name deviceFacility=facility cat=category externalId=external_id request=request cs1=initiated_by_process cs1Label=Initiated by (constant string) cs2=initiator_commande cs2Label=Initiator CMD (constant string) cs3=signature cs3Label=Signature (constant string) cs4=cgo_name cs4Label=CGO name (constant string) cs5=cgo_command cs5Label=CGO CMD (constant string) cs6=cgo_signature cs6Label=CGO Signature (constant string) dst=destination_ip dpt=destination_port src=source_ip spt=source_port fileHash=file_hash filePath=file_path targetprocesssignature=target_process_signature tenantname=tenant_name tenantCDLid=tenant_id CSPaccountname=account_name initiatorSha256=initiator_hash initiatorPath=initiator_path osParentName=parent_name osParentCmd=parent_command osParentSha256=parent_hash osParentSignature=parent_signature osParentSigner=parent_signer incident=incident_id act=action suser=actor_effective_username` | -
▸ ▾ Log format for IOC and BIOC issues modified +6 −0
xsiam/onboard-cortex-xsiam/post-deployment/data-and-log-forwarding/data-and-log-notification-formats/log-format-for-ioc-and-bioc-issuesRead it on the Cortex docs portal ↗ Read it here → This file's diff on GitHub ↗
Before After@@ -1,8 +1,14 @@---description: >-Reference legacy Cortex XSIAM IOC and BIOC issue log formats for email andsyslog, including fields, prefixes, and categories.---# Log format for IOC and BIOC issues# Log format for IOC and BIOC issuesCortex XSIAM logs IOC and BIOC issues. If you configure Cortex XSIAM to forward logs in the legacy format, when issue logs are forwarded from Cortex XSIAM, each log record has the following format:Cortex XSIAM logs IOC and BIOC issues. If you configure Cortex XSIAM to forward logs in the legacy format, when issue logs are forwarded from Cortex XSIAM, each log record has the following format:• Email account: Each field is labeled, one line per field.• Email account: Each field is labeled, one line per field.``````edrData/action_country:edrData/action_country:Show markdown source
@@ -1,8 +1,14 @@
+---
+description: >-
+  Reference legacy Cortex XSIAM IOC and BIOC issue log formats for email and
+  syslog, including fields, prefixes, and categories.
+---
+
 # Log format for IOC and BIOC issues

 Cortex XSIAM logs IOC and BIOC issues. If you configure Cortex XSIAM to forward logs in the legacy format, when issue logs are forwarded from Cortex XSIAM, each log record has the following format:

 *   **Email account:** Each field is labeled, one line per field.

     ```
     edrData/action_country: