Activate Windows Event Collector ↗
Set up your Windows Event Collector to connect with the Cortex XSIAM Broker VM and collect events.
After you have configured and registered your Broker VM, activate your Windows Event Collector application.
The Windows Event Collector (WEC) runs on the Broker VM collecting event logs from Windows Servers, including Domain Controllers (DCs). The Windows Event Collector can be deployed in multiple setups, and can be connected directly to multiple event generators (DCs or Windows Servers) or routed using one or more Windows Event Collectors. Behind each Windows event collector there may be multiple generating sources.
To enable the collection of the event logs, you need to configure and establish trust between the Windows Event Forwarding (WEF) collectors and the WEC. Establishing trust between the WEFs and the WEC is achieved by mutual authentication over TLS using server and client certificates. The WEF, a WinRM plugin, runs under the Network Service account. Therefore, you need to provide the WEFs with the relevant certificates and grant the account access permissions to the private key used for client authentication, for example, authenticate with WEC.
Note
You can also activate the Windows Event Collector on Windows Core. For more information, see Activate Windows Event Collector on Windows Core.
Prerequisite
Set up and configure Broker VM
Broker VM version 8.0 and later
You have knowledge of Windows Active Directory and Domain Controllers.
You must configure different settings related to the FQDN where the instructions differ depending on whether you are configuring a standalone Broker VM or High Availability (HA) cluster.
Windows Server 2012 r2 or later.
After ingestion, Cortex XSIAM normalizes and saves the Windows event logs in the dataset xdr_data. The normalized logs are also saved in a unified format in microsoft_windows_raw. This enables you to search the data using Cortex Query Language (XQL) queries, build correlation rules, and generate dashboards based on the data.
Perform the following procedures in the order listed below.
In the APPS column, left-click the WEC connection to display the Windows Event Collector settings, and select Configure.
In the Windows Event Forwarder Configuration window, perform the following tasks:
In the Subscription Manager URL field, click
 (copy) . This will be used when you configure the subscription manager in the GPO (Global Policy Object) on your domain controller.
Enter a password in the Define Client Certificate Export Password field to be used to secure the downloaded WEF certificate that establishes the connection between your DC/WEF and the WEC. You will need this password when the certificate is imported to the events forwarder.
Download the WEF certificate in a PFX format to your local machine.
To view your Windows Event Forwarding configuration details at any time, select your Broker VM, right-click and navigate to → .
Cortex XSIAM monitors the certificate and triggers a Certificate Expiration notification 30 days prior to the expiration date. The notification is sent daily specifying the number of days left on the certificate, or if the certificate has already expired.
Note
You must install the WEF certificate on every Windows Server, whether DC or not, for the WEFs that are supposed to forward logs to the Windows Event Collector applet on the Broker VM.
Locate the PFX file you downloaded from the Cortex XSIAM console and double-click to open the Certificate Import Wizard.
In the Certificate Import Wizard:
Select Local Machine, and then click Next.
Verify the File name field displays the PFX certificate file you downloaded and click Next.
In the Passwords field, specify the Client Certificate Export Password you defined in the Cortex XSIAM console followed by Next.
Select Automatically select the certificate store based on the type of certificate, and then click Next and Finish.
From a command prompt, run
certlm.msc.In the file explorer, navigate to Certificates and verify the following for each of the folders:
In the → folder, ensure the certificate
forwarder.wec.paloaltonetworks.comis displayed.In the → folder, ensure the CA
ca.wec.paloaltonetworks.comis displayed.
Navigate to → → .
Right-click the certificate and navigate to → .
In the Permissions window, select Add and in the Enter the object name section, enter
NETWORK SERVICE, and then click Check Names to verify the object name. The object name is displayed with an underline when valid. and then click OK.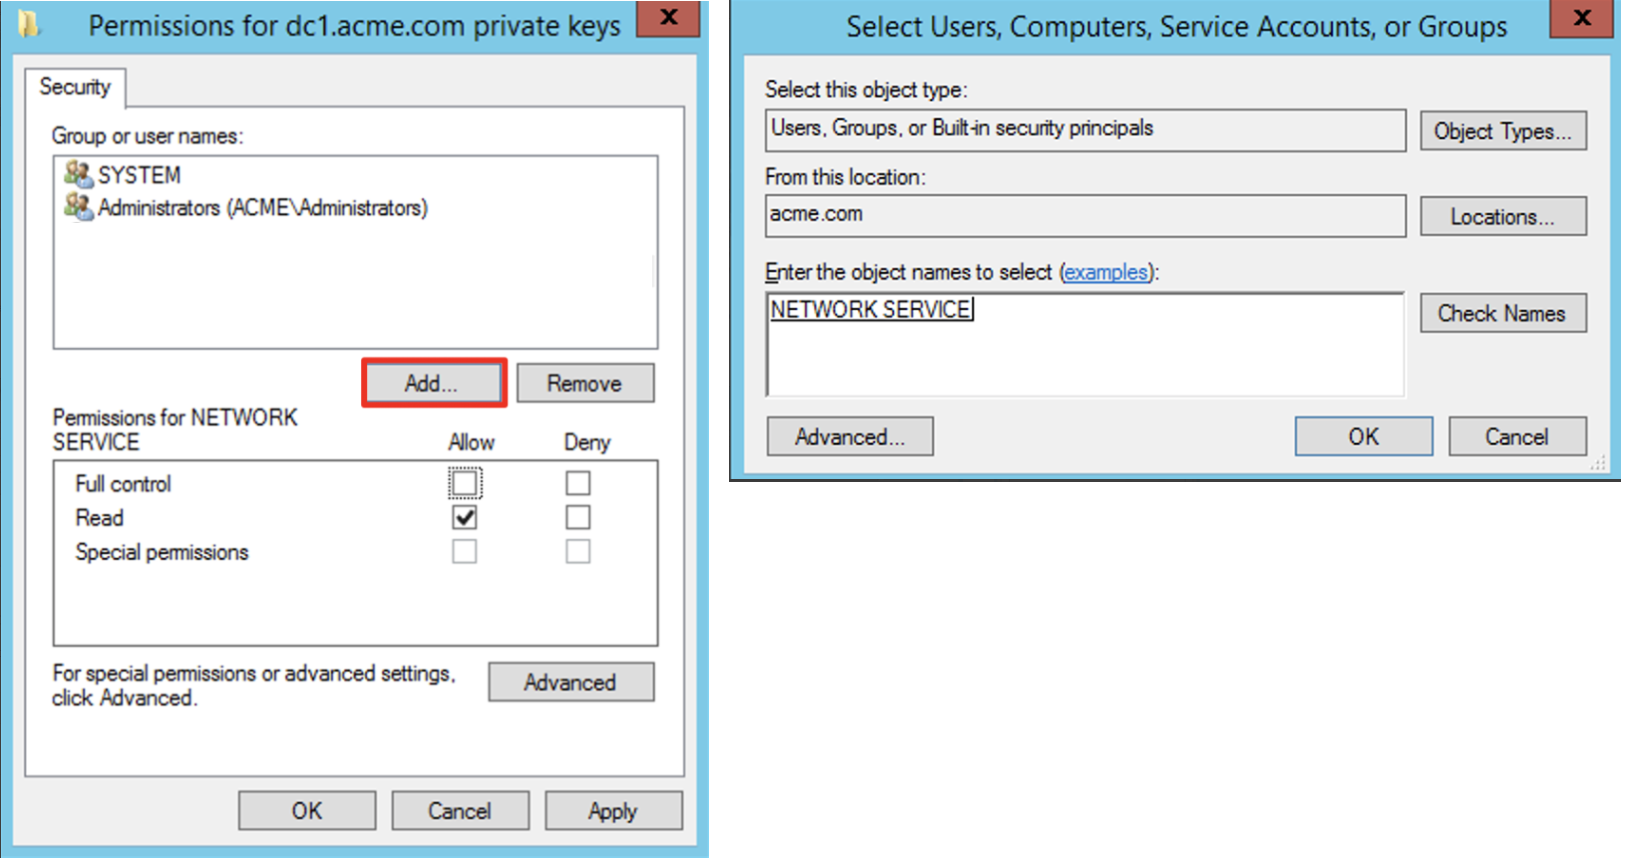
Click OK, verify the Group or user names that are displayed, and then click Apply Permissions for private keys.
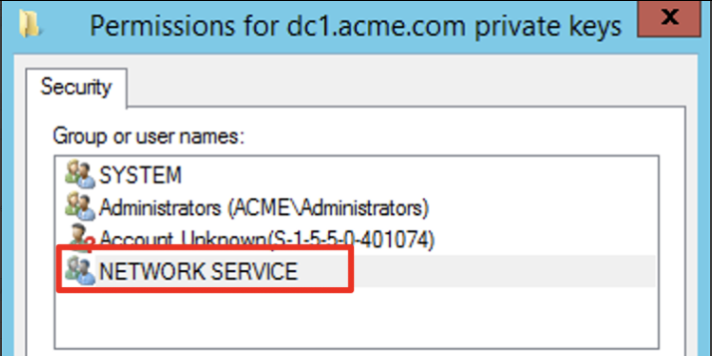
In a command prompt, open
gpmc.msc.In the Group Policy Management window, navigate to → → , right-click and select New.
In the New GPO window, enter your group policy Name: as Windows Event Forwarding, and click OK.
Navigate to → → → , right-click and select Edit.
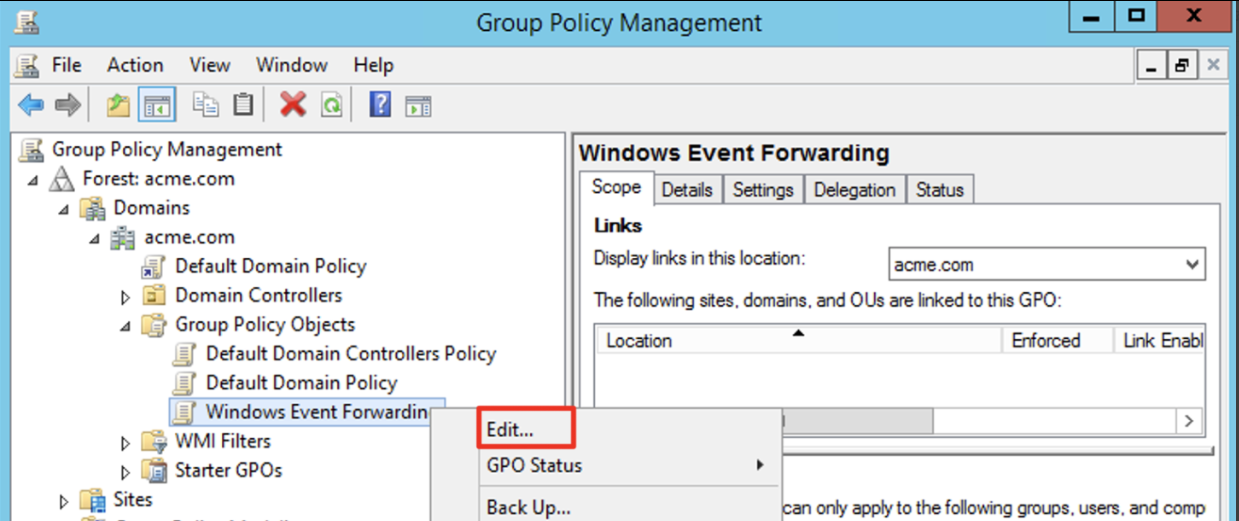
In the Group Policy Management Editor:
Set the Windows Remote Management Service for automatic startup.
Select → → → → , and in the view panel locate and double-click Windows Remote Management (WS-Management).
Mark the Define this policy setting checkbox, select Automatic, and then click Apply and OK.
At a minimum for your WEC configuration, you must enable logging of the same events that you have configured to be collected in your WEC configuration on your domain controller. Otherwise, you will not be able to view these events as the WEC only controls querying not logging. For example, if you have configured authentication events to be collected by your WEC using an authentication protocol, such as Kerberos, you should ensure all relevant audit events for authentication are configured on your domain controller. In addition, you should ensure that all relevant audit events that you want collected, such as the success and failure of account logins for Windows Event ID 4625, are properly configured, particularly for those that you want Cortex XSIAM to apply grouping and analytics inspection.
Note
This step overrides any local policy settings.
Example 71.Here is an example of how to configure the WEC to collect authentication events using Kerberos as the authentication protocol to enable the collection of Broker VM supported Kerberos events, Kerberos pre-authentication, authentication, request, and renewal tickets.
Select → → → → → → .
In the view pane, right-click Audit Kerberos Authentication Service and select Properties. In the Audit Kerberos Authentication Service window, mark Configure the following audit events:, and click Success and Failure followed by Apply and OK.
Repeat for Audit Kerberos Service Ticket Operations.
Configure the subscription manager.
Navigate to → → → → , right-click Configure target Subscription Manager and select Edit.
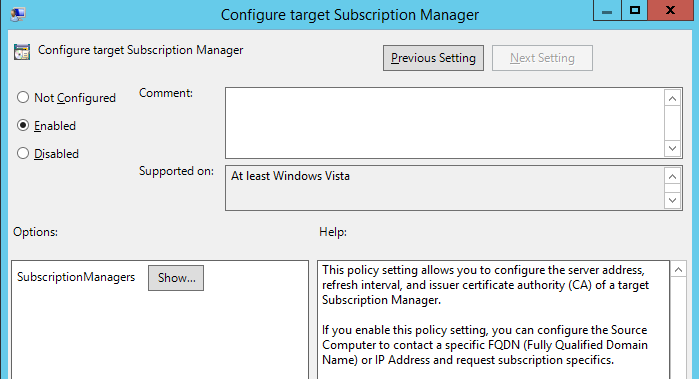
In the Configure target Subscription Manager window, perform the following:
Mark Configure target Subscription Manager as Enabled.
In the Options section, select Show and in the Show Contents window, paste the Subscription Manage URL you copied from the Cortex XSIAM console, and then click OK.
Click Apply and OK to save your changes.
Add Network Service to Event Log Readers group.
Select → → → , right-click and select → .
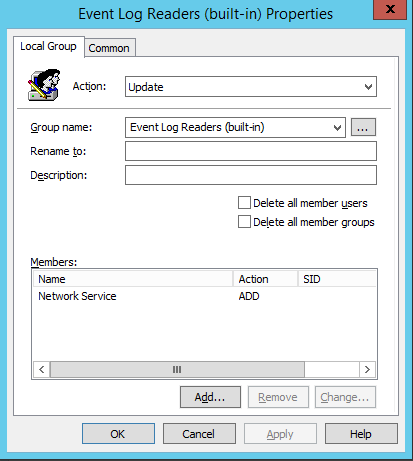
In the New Local Group Properties window:
In the Group name field, select Event Log Readers (built-in).
In the Members section, click Add and enter in the Name filed
Network Servicefollowed by OK.Note
You must type out the name, do not select the name from the browse button.
Click Apply and OK to save your changes, and close the Group Policy Management Editor window.
Configure the Windows Firewall.
Note
If Windows Firewall is enabled on your event forwarders, you will have to define an outbound rule to enable the WEF to reach port 5986 on the WEC.
In the Group Policy Management window, select → → → → → , right-click and select New Rule.
In the New Outbound Rule Wizard define the following Steps:
Rule Type: Select Port followed by Next.
Protocols and Ports: Select TCP and in the Specific Remote Ports field enter
5986followed by Next.Action: Select Allow the connection followed by Next.
Profile: Select Domain and disable Private and Public followed by Next.
Name: Specify
Windows Event Forwarding.To save your changes, click Finish.