Set up a GitHub Codespace environment ↗
This topic provides step-by-step instructions for setting up a personal Codespace for developing Cortex XSIAM content.
What are GitHub Codespaces?
GitHub Codespaces are cloud-based development environments provided by GitHub that allow you to set up remote environments with preinstalled and preconfigured tools and dependencies using a dev container.
Your Codespace environment is hosted on GitHub's servers (attached to your GitHub account), and allows you to access your Codespace from any computer.
Cost and limitations
GitHub offers a free quota for Codespaces (which is higher for GitHub Pro users) that you can utilize for developing Cortex XSIAM content.
The quota is calculated based on the number of hours your Codespace is actively running. You can see the free quota plan and options for additional paid usage after you reach your quot, in the GitHub documentation.
You will receive an automated email notification when you have used 75%, 90%, and 100% of your free quota. You can find information about your Codespaces quota usage in the GitHub settings under Billing and plans. For more information, see the GitHub article Viewing your GitHub Codespaces usage.
Note
Codespaces generated from the content repository (or a fork of it) are configured to have four cores by default.
Create a new Codespace
- Log in to your GitHub account. If you do not have a GitHub account, you must create one before you can create a Codespace.
- Enter the content repository.
- Fork the repository to your account.
- Click Fork at the top right.
- Select your account as the owner, and leave the repository name as is.
- Keep the Copy the master branch only option selected.
-
Create fork.
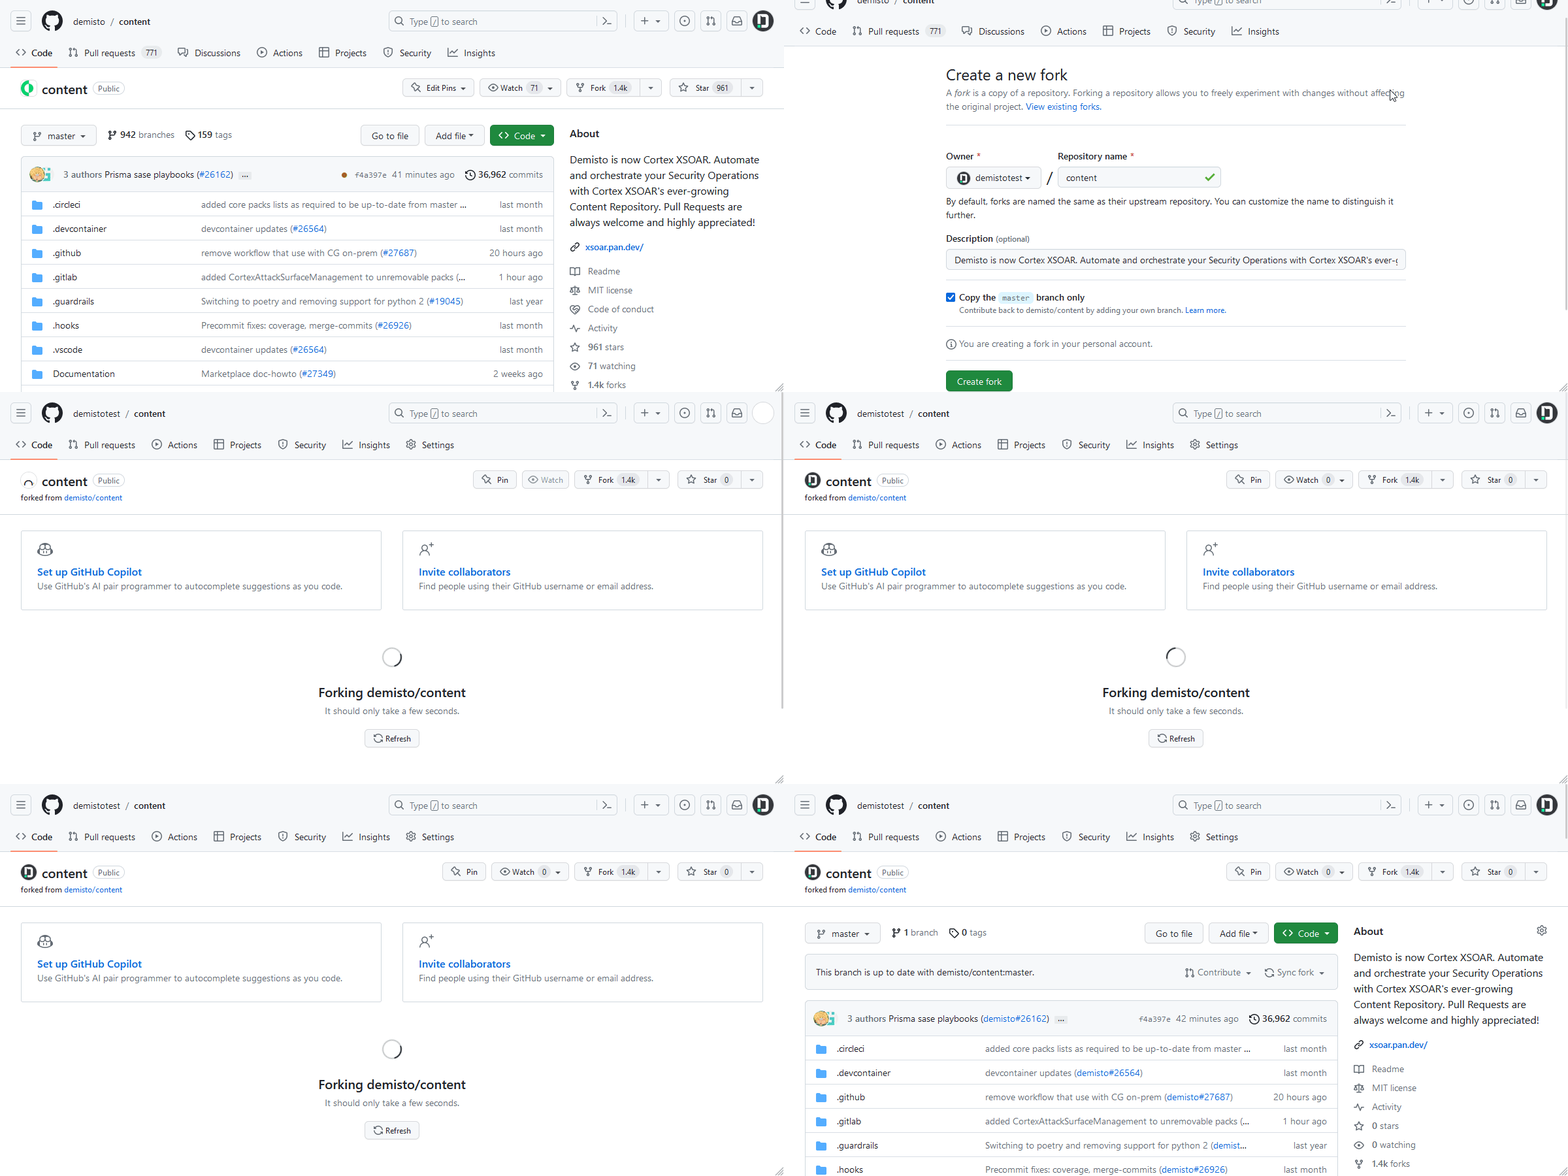
- After a few seconds, you are redirected to your forked repository page.
- Create a new branch on your fork, and give it a meaningful name.
-
Click Code, go to the Codespaces tab, and Create Codespace on \branch name>.
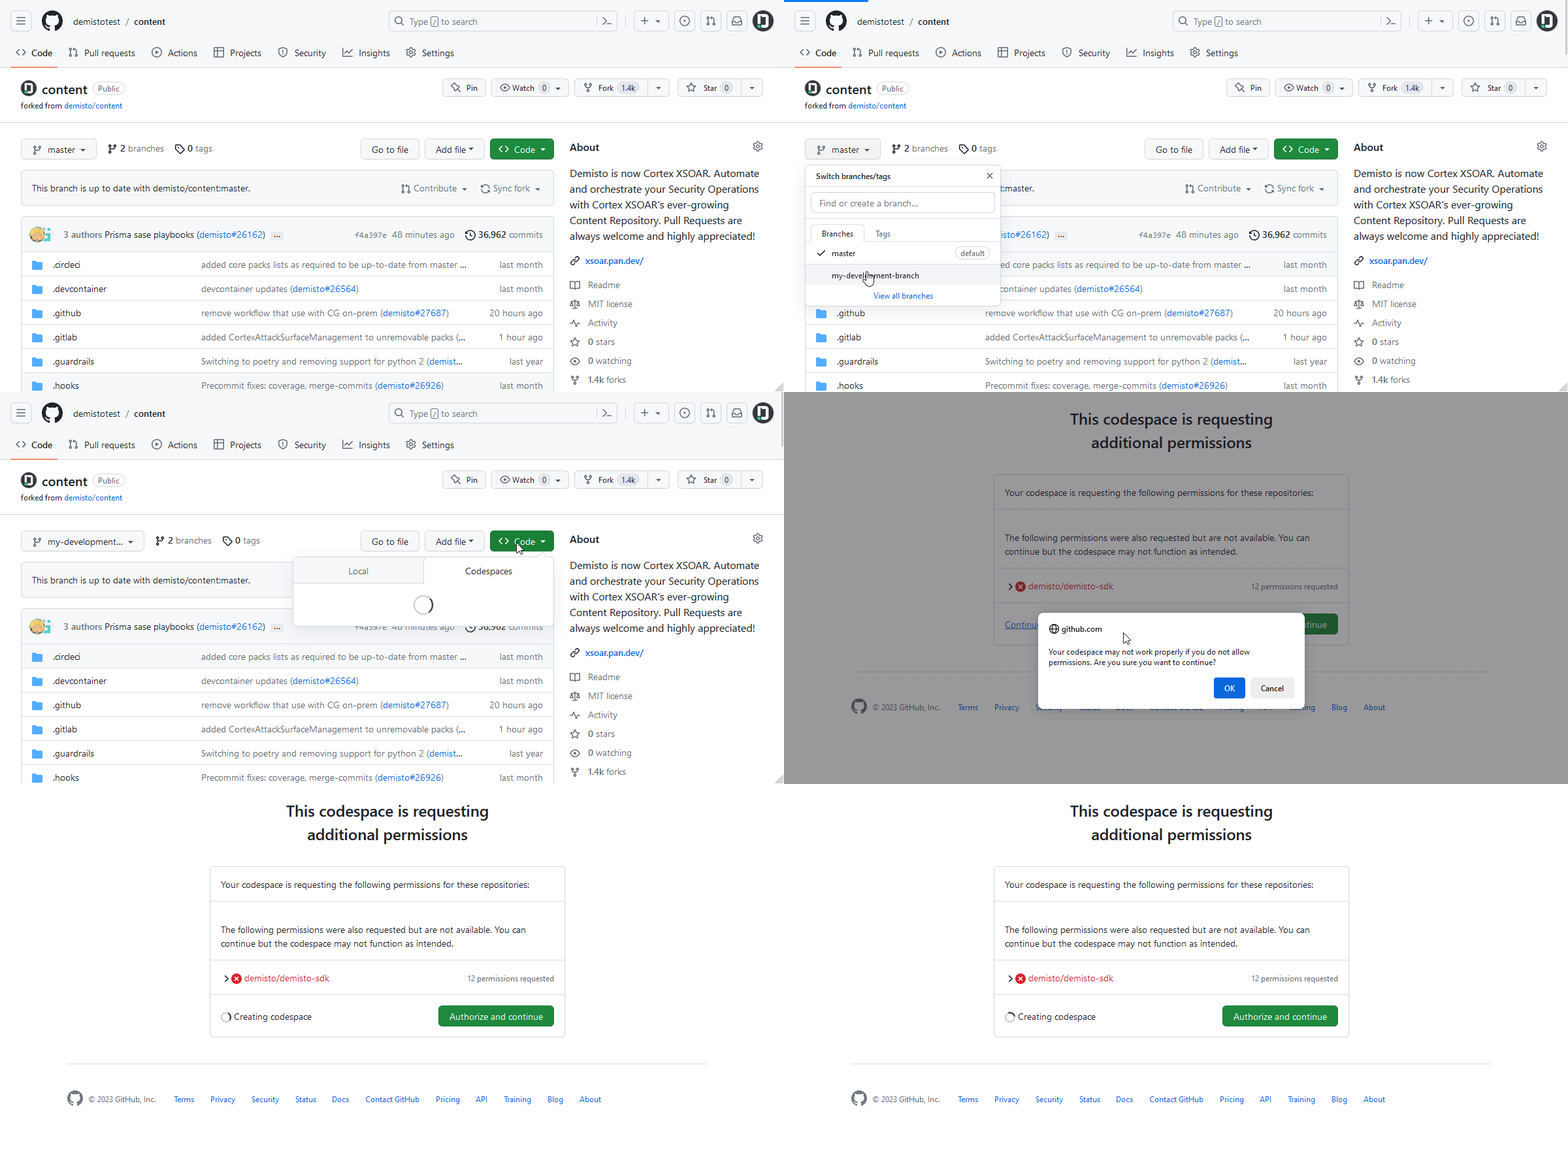
If the message This Codespace is requesting additional permissions appears, Continue without authorizing.
-
Click New Codespace.
This may take a few minutes to complete.
Configure an IDE
Browser-based Visual Studio Code
By default, GitHub provides a browser-based Visual Studio Code editor that's automatically configured, authenticated, and connected to your Codespace, using your GitHub account.
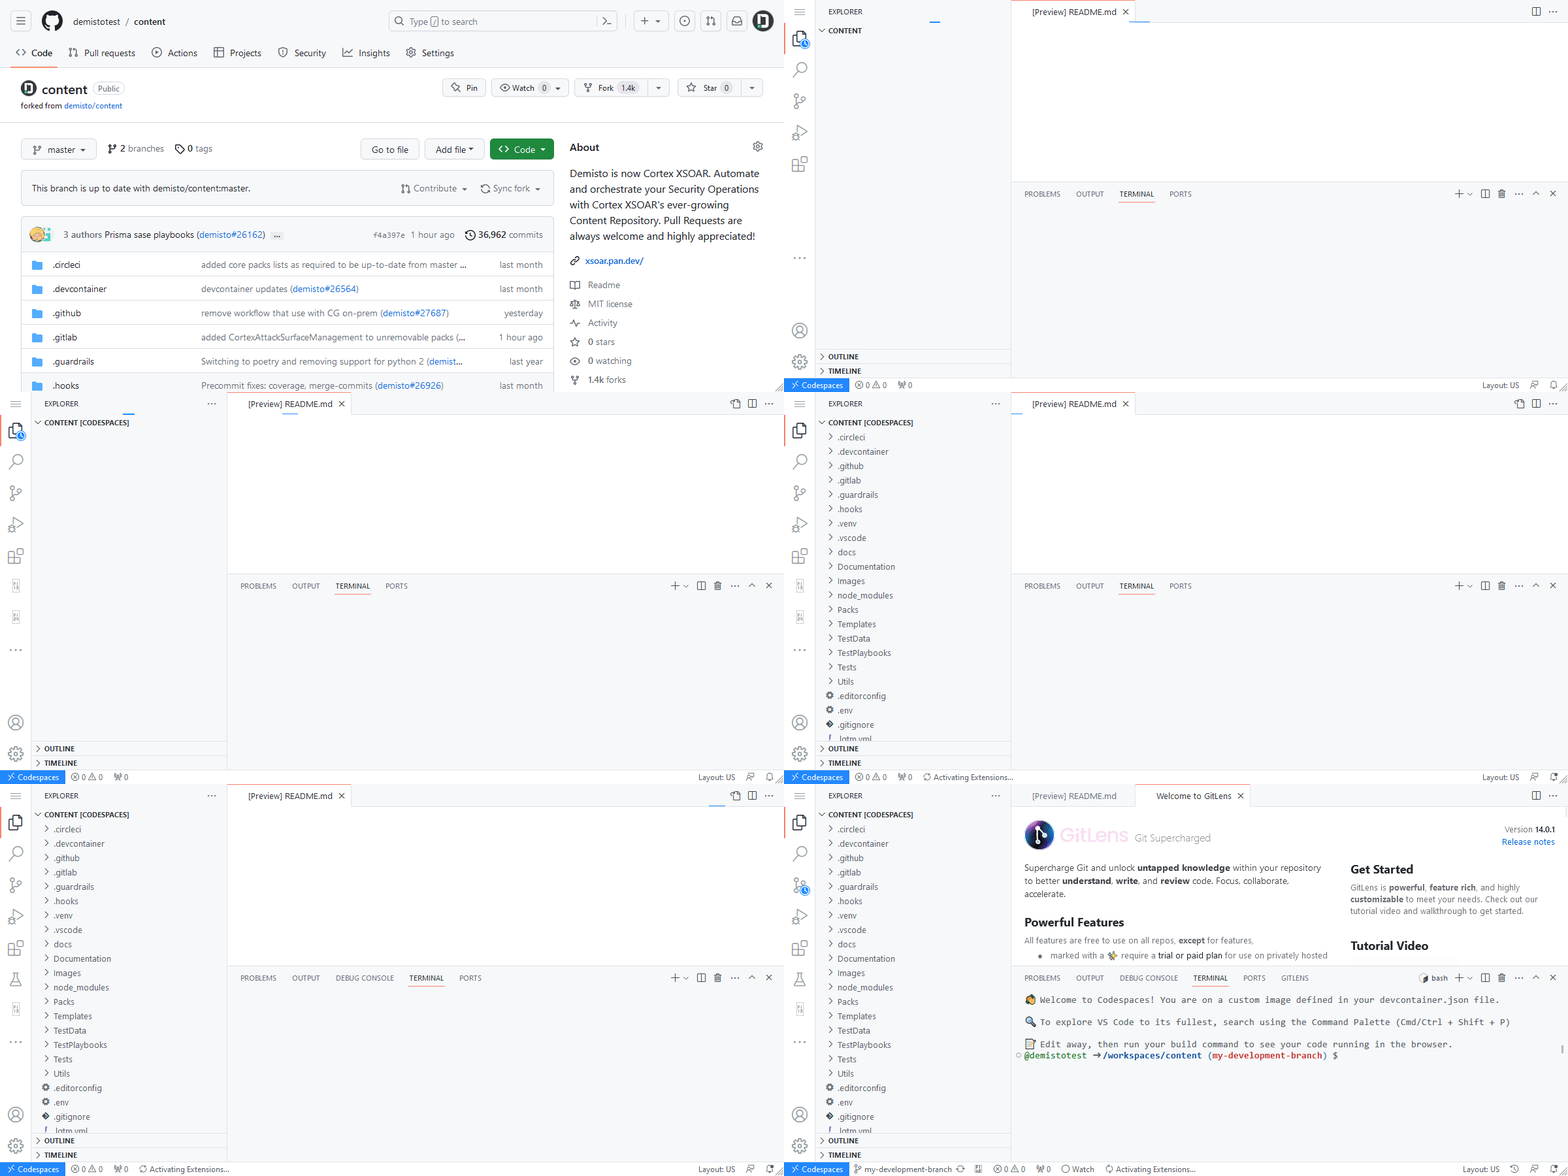
To open the editor, enter the main forked repository page, click Code, go to the Codespaces tab, and click the newly created Codespace (should have a random name).
It can take a few minutes for the Codespace to be fully initialized. This delay only occurs the first time you open a Codespace.
Once the initialization is completed and your Codespace is ready, you are redirected to the IDE, where you can start your development.
Visual Studio Code (local)
To connect to your Codespace from a local Visual Studio Code editor and use the Visual Studio Extension, you need to install the official GitHub Codespaces extension.
For a complete installation and configuration tutorial, refer to the Using GitHub Codespaces in your local development environment article by GitHub. You can skip the Creating a Codespace in VS Code section, as we've already created a Codespace.
JetBrains IDEs (PyCharm, IntelliJ IDEA, etc.) (local)
To connect to your Codespace from a JetBrains IDE, you will need to install and configure JetBrains Gateway.
For a complete installation and configuration tutorial, refer to the official Using GitHub Codespaces in your JetBrains IDE article by GitHub.
Development
After your IDE is connected to your Codespace, you can start developing your content. The environment comes pre-installed with all the required tools and dependencies for developing Cortex XSIAM content. Configuring SSH keys or any other credentials is not required, as the Codespace is already authenticated using your GitHub account.
Additional Resources
For additional documentation about GitHub Codespaces, see the official GitHub Codespaces documentation.