Security controls ↗
Security controls allow you to reduce visibility gaps by providing a clear, granular picture of the security mechanisms deployed in your cloud environment. This helps you go from managing inherent risk (theoretical danger in a vacuum) to quantifying residual risk, meaning the actual danger remaining after your defenses do their job. With Security Controls you can move beyond counting defects and alert fatigue to a more accurate view of your risk landscape that takes into account the defenses you already have in place.
Before you proceed with implementation and rollout, it is important to understand the following key concepts:
- Security control: This is the security measure or technology you have deployed, for instance, a Palo Alto Networks Next Generation Firewall (NGFW). You can inform Cortex XSIAM about the existence of risk mitigation devices or custom security controls.
- Compensating control: This is the effectiveness of a technology against a specific finding, for instance, NGFW's effectiveness in mitigating against Log4Shell. You can specify how effective a control is to mitigate risk for specific findings and issues, using states like Effective, Partially Effective or Not Effective.
Control changes do not occur in real time. Updates are triggered only when a Findings update takes place.
Automatically detect security controls
The Cortex platform can automatically detect current security controls you may already have in place. The effectiveness of these controls is calculated without any additional effort on your part. Based on your environment's current topology and configuration, Cortex can asses the effectiveness of security controls such as Cortex XDR Agent and VM-Series NGFW (Next-Generation Firewall).
Using XDR Agent as an example, Cortex provides visibility into the efficacy of agent coverage and offers actionable steps to enhance this coverage. This is achieved by running the following checks for each vulnerability:
- Is a Cortex XDR agent associated with the vulnerable asset?
- Is the vulnerability associated with the asset exploitable?
- Does the Cortex XDR agent have coverage for that particular exploitable vulnerability?
- Is the vulnerable asset internet-exposed?
- Is the vulnerable asset confirmed to be reachable from the internet by the Attack Surface Management scanner?
- Is the vulnerable asset confirmed to be exploitable from the internet by the Attack Surface Testing scanner?
- Is the Cortex XDR agent running the minimally required version and content release to be effective as a compensating control?
- Does the agent's Exploit Protection Profile have the following settings set to Block, Report, or Disabled?
- Known Vulnerable Processes Protection
- Operating System Exploit Protection
Note
Auto-detection of controls is supported when certain constraints regarding topology and configuration are met. Learn more about Network Exposure Detection.
Third-party or custom security controls can also be added by manual attestation as described in the next topic.
Manually attested security control taxonomy
Before you proceed with creating security controls, it is important to review the taxonomy outlined below. to help you map your existing controls to this official schema.
This taxonomy requires four mandatory attributes for every control:
- Name (unique): The human-readable name (e.g., "Palo_Alto_NGFW_Datacenter").
- Category: The high-level security domain that the Security Control belongs to. See table below for possible values.
- Type: The specific security control capability, which is dependent on the Category.
- Vendor: The vendor that provides the security control as shown in the table below.
Available values for control Category and Type
| Control Category | Control Type |
|---|---|
| Network Security | Network Firewall, Next Generation Firewall, Web Application Firewall, Intrusion Prevention System, Virtual Private Network |
| Endpoint Security | Endpoint Detection and Response, Extended Detection and Response, Anti-Virus, Host Based FW |
| Data Security | Virtual Private Network, Disk Encryption, Data Loss Prevention, Database Activity Monitor |
| Identity Security | Multi-factor Authentication, Single Sign-On, Privilege Access Management |
| Other | Text String (4 chars min, 256 chars max) |
Tip
Take an inventory of your top 10-15 security controls, check which ones need to be manually added into the Cortex Platform, and use the taxonomy to map them into the system.
Establish security control roles
Before you get started with security controls, you must define who can manage it. The Exposure Management Administrator role, along with the Tenant Administrator role, possesses full Create, Read, Update, and Delete (CRUD) permissions to manually add Controls and Effectiveness Rules.
Crucially, they can also manage ownership and change a security control from public to private. Other roles (e.g., Vulnerability Management, Data Security Administrator, Identity Security Administrator) are permitted to create effectiveness rules in their respective domains.
Role-Based Access Control Roles
| Role | Permissions | Recommended Governance Model |
|---|---|---|
| Exposure Management Administrator | Can CRUD all controls and rules and change ownership/privacy | Centralized Model. Assign this role to 2-3 Senior Analysts. This small group learns the feature, defines the initial controls, and establishes best practices. |
| Tenant Administrator | Same as above | Used for initial setup and assignment of the Exposure Management Administrator role. |
| Vulnerability Management (and other domain-specific admins) | Can update effectiveness in their domains | Federated Model. After best practices are set, "deputize" these domain admins. This scales the feature, allowing endpoint teams to manage controls, while implementing strong central guidance on naming conventions and taxonomy. |
| Read Only All | Can view all Security and Compensating Controls objects, rules, etc. | Assign to general SOC analysts, auditors, and stakeholders (like Asset Owners) who need visibility but not edit rights. |
Tip
Start with a centralized model. This helps a core team master the new object models, states, and taxonomies to prevent confusion and ensure high-quality control creation.
Note
Ensure that you have clear visibility into the controls that are created and implemented by periodically reviewing the Audit Logs as part of your change management process. Audit logs track the following actions:
- Create/Update/Delete Security Controls
- Create/Update/Delete Effectiveness Rules
- Update an Effectiveness Value in a finding or issue
Create a security control
Focus your initial security control creation on high-impact assets and undetected technologies to achieve an optimal level of visibility into your internet-facing environments. Instead of modeling every implemented security measure focus instead on the top ten list of controls that fit the following criteria:
- High-Impact: Controls protecting your most critical, internet-facing applications (for example, the Network Gateway Firewall for your primary e-commerce site, the Security Agent solution for your production workloads).
- High-Noise: Controls that suppress the largest volume of low-to-medium-priority findings (for example, a host-based firewall that blocks certain ports).
Once you have identified the top ten measures you would like to classify as Security Controls, follow the steps below to manually classify them:
- Navigate to Vulnerability & Exposure Management → Exposure Management → Security Controls and select Create Security Control.
-
Enter the required details in the New Security Control panel. Learn more about all the available options for the Control Category and Control Type fields.
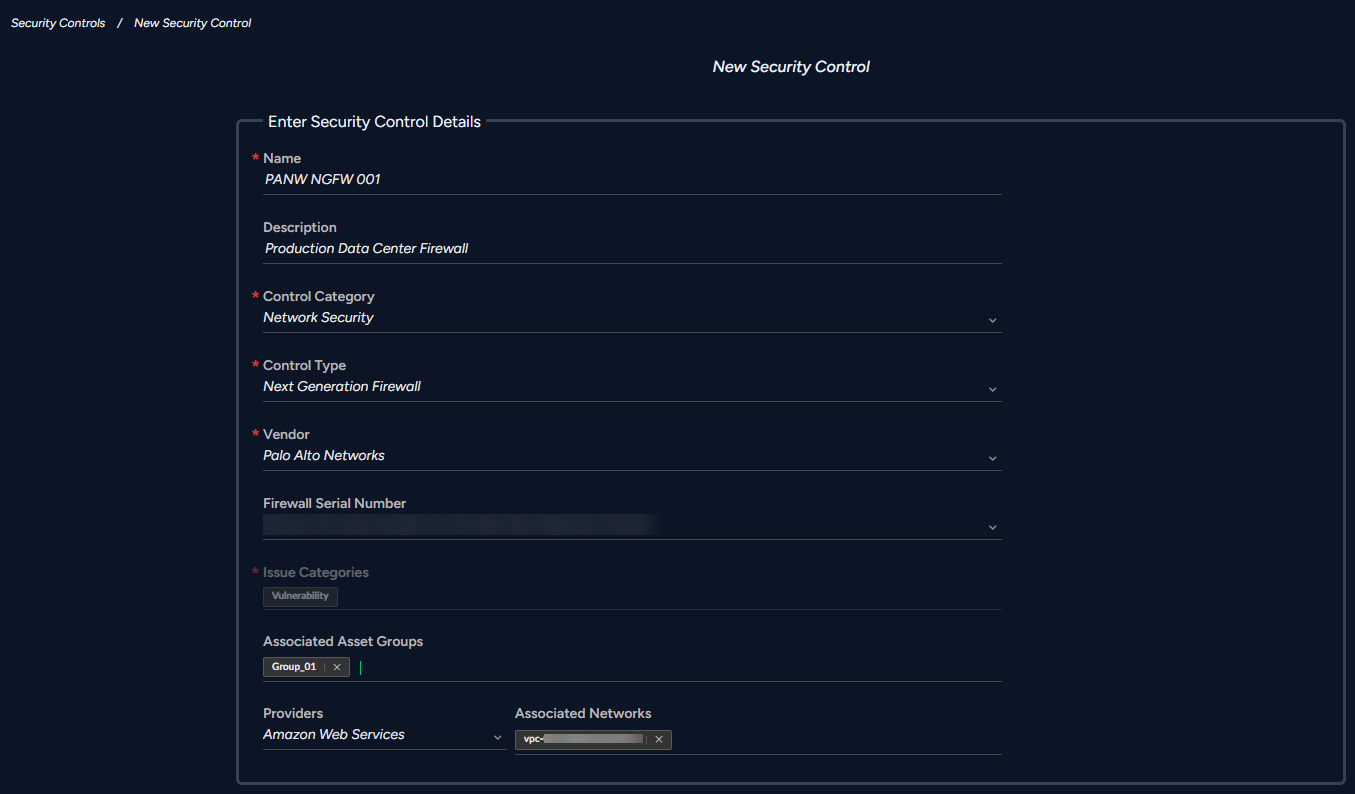
- Click on the applicable technology Vendor from the drop-down list.
-
Select an Associated Asset from the drop-down for all agent-based workloads. As a best practice, associate each control with one or more Asset Groups. New assets added to a group will have the Security Control automatically applied to it after the initial Discovery period.
Note
Discovery and Security Control application for new and updated assets may experience some latency.
- Select a Provider from the drop-down list of cloud service providers.
- Choose Associated Networks when asset-level identification is not possible. Use this option to map controls to on-prem data center subnets or entire cloud VPCs/VNets that you know are protected by a single perimeter control. The network objects are drawn from cloud V-Nets (Azure, EC2, Google).
- Click Save to complete the Security Control creation process.
Manage security controls
After a security control is created, it does not immediately enter an Active state. You cannot create a control and immediately see it on a finding. All security controls go through the lifecycle outlined below before they are fully active:
Table 8. Security control lifecycle and monitoring
| State | Definition | Take Action |
|---|---|---|
| Disabled | The security control is not associated with at least one Asset or Network. | This is an initial state that must be updated as soon as possible. You must edit the control and add an association (Assets or Networks). |
| Discovery | The control is newly created and associated with Asset Groups and Networks. | This state lasts for 24 hours. The platform is mapping assets. The control is not yet active. |
| Active | The control has successfully matched at least one asset in the inventory. | The control is now live. The platform will re-verify this association at least every 24 hours. |
| Inactive | The control was found to have no matching assets during its last check. | This health metric indicates that your Asset Group is outdated, the assets were decommissioned, or the control is stale. The platform checks for new Assets every 4 hours. |
View and edit security controls
Follow the steps below to view, edit, delete or copy security controls:
- Navigate to Vulnerability & Exposure Management Exposure Management Security Controls to view a list of all previously created controls. Select the filter icon to narrow your search by the categories provided in the drop-down.
-
Right-click on a control to view all available actions. Select Edit Control to update control details and click Save.
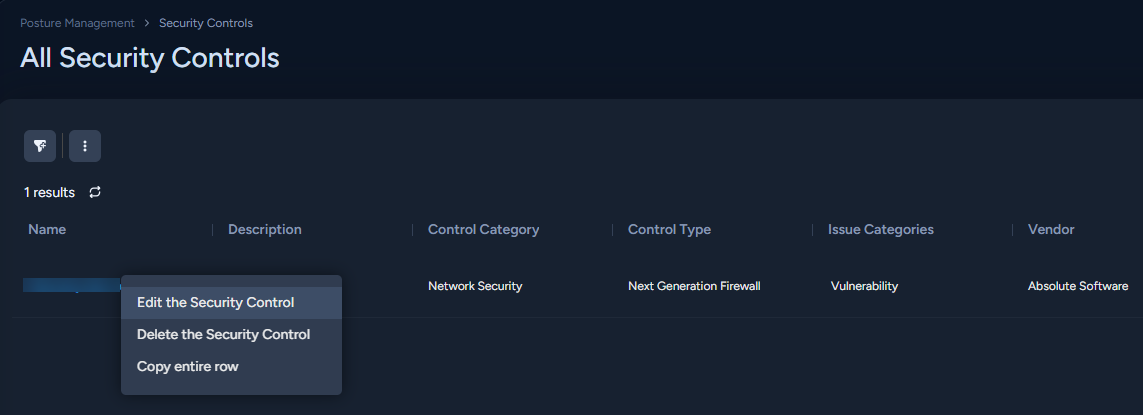
- Alternatively, you can also find Detected Controls and Detected Controls Coverage on the Vulnerability Issue (Posture Management → Vulnerability Management → Vulnerability Issues page.
Set compensating controls
Leverage the full potential of your security control by manually attesting its effectiveness.
Use the workflow below to manually set compensating control effectiveness:
- Navigate to Vulnerability & Exposure Management → Vulnerability Issues and sort the vulnerabilities listed by their CVRS score or Compensating Control Effectiveness. Select a a high-priority issue (e.g., a critical and exploitable vulnerability on a production and internet facing web server) to inspect further.
- Click on an issue to open the detailed issue side-panel view. In the Security Controls section, you will find active security controls that are in effect mitigating the issue. You can also sort issues by Control Effectiveness and select all issues that are Effective for instance. From this list, right click on any issue to update the effectiveness level.
-
Examine the Compensating Control Effectiveness column. If the security control was automatically detected and the platform has access to its configuration, the effectiveness will be also automatically defined.
If the effectiveness is listed as Unknown, you will have to manually define the security control's effectiveness. The Cortex platform does not presume effectiveness. It urges you to use your expertise to make a determination.
- Based on your knowledge of the Security Control configuration, manually change the Unknown value to one of the following effectiveness states:
- Effective: The control can fully mitigate the risk. (e.g., "I know this SC is in 'Block' mode for this vulnerability").
- Partially Effective: The control mitigates the risk under certain conditions. (e.g., The Security is in 'Log Only' mode or it only blocks some of the available exploits, but not all variants. This is a partial mitigation.).
- Not Effective: The control is not adequate. (e.g., This is an SSH 'root' login vulnerability; the Security Control in place does not mitigate the issue).
After you complete the workflow above, the Compensating Control state will be set as manually defined. The platform will re-prioritize the finding, potentially moving it out of the Critical remediation bucket, since an expert has reviewed this issue and their assessment is considered the source of truth.
Improve controls coverage
The Vulnerability Issues page provides you with control information, to help you evaluate the efficacy of your risk mitigation efforts. The Vulnerability Issues table includes fields for Detected Controls and Detected Control Coverage for each vulnerability issue, so you can filter and sort on these fields. The issue details panel also provides additional information on detected controls and coverage.
- Navigate to Vulnerability & Exposure Management → Vulnerability Issues.
-
On the Vulnerability Issues page, controls information can be found in the following columns:
Detected Controls: Lists the Security controls detected for this issue.
Detected Control Coverage: Summarizes the effectiveness of the control.
You can filter and sort on these fields as needed.
- Click on an issue to display the issue details panel. Details about Security controls appear on the Risk Details tab. Specifics include which control, if any, was detected, details about the control coverage, and information about recommended steps to improve the coverage.
-
Select the Actions tab and review the list of Recommended Actions.
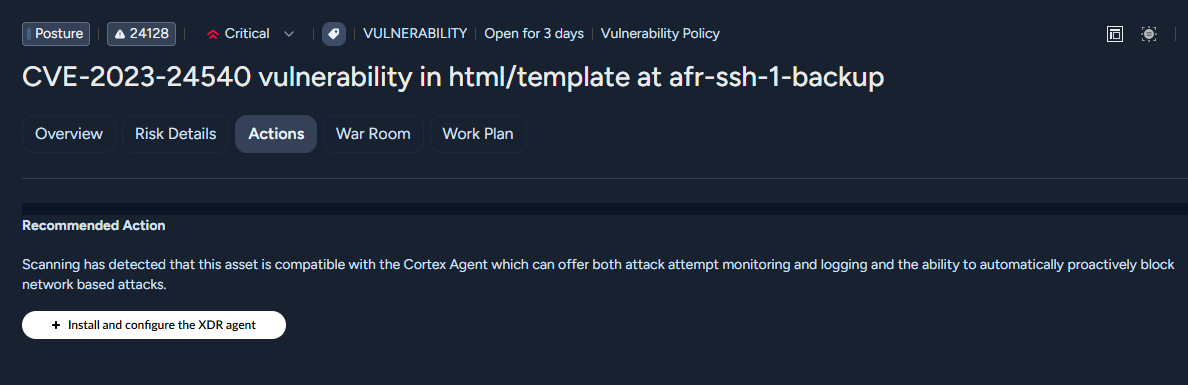
The Actions tab in a vulnerability issue lists the recommended actions as a set of links. Those links take you to Cortex XSIAM page where you can perform the recommended action. For example, if you click + Install the Cortex Security Agent, the system will not automatically install the agent; instead it will open the page where you can install agents. Current available actions are limited to installing the Cortex Security Agent.
- Click on an action to open the Cortex XSIAM page where you can complete that action.
Create effectiveness rules
Utilize compensating control effectiveness rules to automate effectiveness mapping for common, often repeated, high-confidence risk mitigation scenarios. Effectiveness Rules help you reduce the time spent triaging issues manually.
Note
Only users with the role Exposure Management Administrator can create effectiveness rules.
Follow the steps below to create an effectiveness rule:
- Navigate to Vulnerability & Exposure Management → Exposure Management → Compensating Control → Effectiveness Rules and select Create New Effectiveness Rules.
- Enter the required rule details in the fields as shown below:
- Name: e.g., NGFW-Effective-Rule
- Description: Automatically marks all NGFW-protected vulnerabilities findings as Effective.
- Issue Category: Vulnerability (A rule is restricted to a single Issue Category).
-
Source Risk: This is the "IF" condition. You can select CVE-ID, PRISMA-ID, GHSA-ID, or All.
Tip
Use All, rather than selecting individual CVEs, unless you explicitly only want to mark specific CVEs as Effectively Mitigated.
- Security Controls: Select one or more Security Controls this rule applies to (e.g., Prod-Datacenter-NGFW, Staging-NGFW).
- Compensating Control Effectiveness: This is the "THEN" action. Set to Effective.
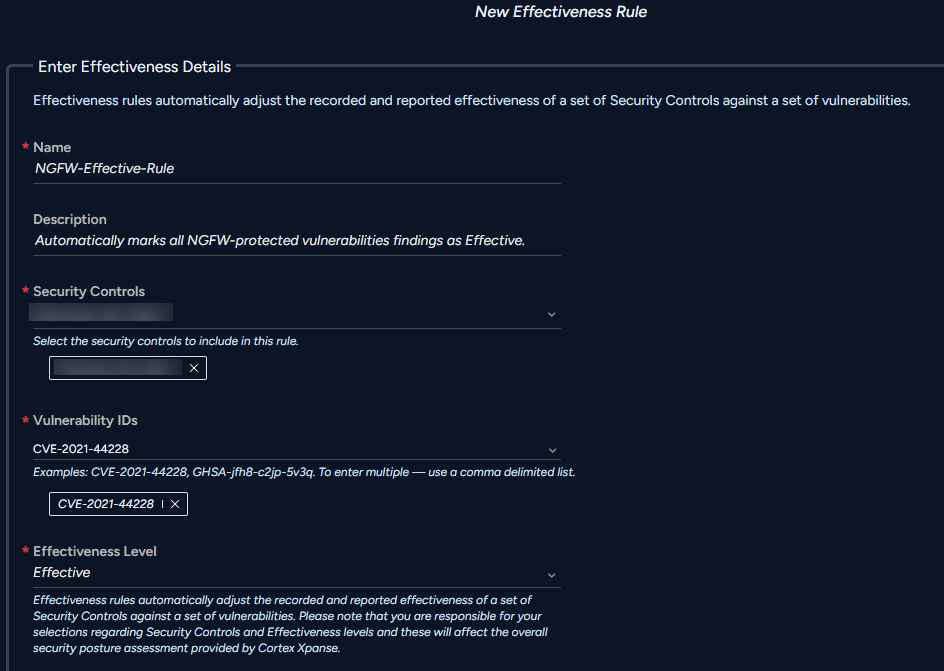
Save the rule. After it is in effect, any new finding that matches these criteria will automatically have its effectiveness set to Effective.
Manage effectiveness rules
Effectiveness rules allow you to automate 80% of your control decisions, with senior analysts having the option to override automations on a case-by-case basis as needed. In order to implement them correctly, it is important to understand the underlying logic. The precedence hierarchy logic outlined below, uses clear, strict guidelines to perfectly balance automation and human expertise,
Table 9. Effectiveness value precedence
| Precedence | Source | Logic |
|---|---|---|
| Highest | Manual Per Finding | A value set manually by an analyst on a specific finding will never be-overwritten by a rule. |
| Middle | Effectiveness Rule | Only applies if the current value is the default Unknown. It cannot override a Manually Defined value. |
| Lowest | Default Value | Unknown is applied if no manual setting or automated rule matches the finding. |